Owners Manual
Page 7
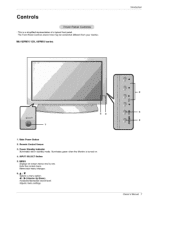
The Front Panel Controls shown here may be _mewhat different from your monitor. -This is turned on, 4, INPUT SELECT Button 5= MENU Displays on screen menus one by one, Exits the current menu_ Memorizes menu changes_ 6, AfV Selects a menu option, / _ (Volume Up/Down) Increases/decreases sound Adjusts menu settjngs, JeveL Owner's Manual 7 Remote Control Sensor 3, Power Standby Ind_cator I_lumina_es red in standby mode, Illuminates green when the Monitor is a simprified representa_on of a typical front panel. MU-42PM11/12X, 50PM10 series Introduction 32 1, Main Power Button 2.
The Front Panel Controls shown here may be _mewhat different from your monitor. -This is turned on, 4, INPUT SELECT Button 5= MENU Displays on screen menus one by one, Exits the current menu_ Memorizes menu changes_ 6, AfV Selects a menu option, / _ (Volume Up/Down) Increases/decreases sound Adjusts menu settjngs, JeveL Owner's Manual 7 Remote Control Sensor 3, Power Standby Ind_cator I_lumina_es red in standby mode, Illuminates green when the Monitor is a simprified representa_on of a typical front panel. MU-42PM11/12X, 50PM10 series Introduction 32 1, Main Power Button 2.
Owners Manual
Page 8
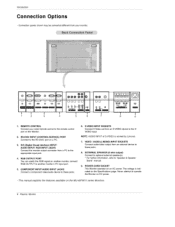
Connection pane_s shown may be somewhat different from your wired remote control to the remote control port on the Men_or, 2, RS-232C INPUT (CONTROL/SERVICE) PORT Connect to the RS-232C port on a PC. 3_ DVI (Digital Visual Interf_e) |NPUTt ..., connect RG8 OUTPUT to another monitor's PC input port 5_ COMPONENT INPUT/AUDIO INPUT JACKS Connect a component vi_oiaudio device to these jacks. 6, S-VIDEO _NP_ SC_I REMOTE CONTROL Conne_ your monitor. _O O _ _ O _ OO e@@ @@ O @e O 1 2 3 4 5 6 7 O0 O0 m i 8 1. introduction...
Connection pane_s shown may be somewhat different from your wired remote control to the remote control port on the Men_or, 2, RS-232C INPUT (CONTROL/SERVICE) PORT Connect to the RS-232C port on a PC. 3_ DVI (Digital Visual Interf_e) |NPUTt ..., connect RG8 OUTPUT to another monitor's PC input port 5_ COMPONENT INPUT/AUDIO INPUT JACKS Connect a component vi_oiaudio device to these jacks. 6, S-VIDEO _NP_ SC_I REMOTE CONTROL Conne_ your monitor. _O O _ _ O _ OO e@@ @@ O @e O 1 2 3 4 5 6 7 O0 O0 m i 8 1. introduction...
Owners Manual
Page 34
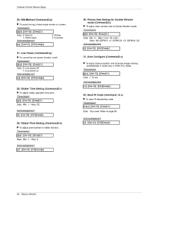
... orbiter function. Send IR Code (Command: m c) • To send IR remote key code Transmission [[m][c][ ][Set ID][ ][Data][Cr] J Data Key code: ...][Data][x] 29. Transmission I[j][t][ ][Set ID][ ][Data][Cr] I 32. Ackno wledqemen t [[c][ ][Set ID][ ][OK][Data][x] 34 Plasma Monitor Transmission [[j][q][ ][Set ID][ ][Data][Cr] J Data 0: Low power off 1: Low power on /off. Transmission l[J][s][ ][Set... • To adjust main window size in Double Window mode. ExternCaol ntrDoel vicSeetup 26. MU-42PM11: 14, 42PM12X: Acknowledgement 1E, 50PM10: 20) I[t][ ][Set ID][ ][OK][Data][x]...
... orbiter function. Send IR Code (Command: m c) • To send IR remote key code Transmission [[m][c][ ][Set ID][ ][Data][Cr] J Data Key code: ...][Data][x] 29. Transmission I[j][t][ ][Set ID][ ][Data][Cr] I 32. Ackno wledqemen t [[c][ ][Set ID][ ][OK][Data][x] 34 Plasma Monitor Transmission [[j][q][ ][Set ID][ ][Data][Cr] J Data 0: Low power off 1: Low power on /off. Transmission l[J][s][ ][Set... • To adjust main window size in Double Window mode. ExternCaol ntrDoel vicSeetup 26. MU-42PM11: 14, 42PM12X: Acknowledgement 1E, 50PM10: 20) I[t][ ][Set ID][ ][OK][Data][x]...


