

Owner's Manual (English)
Page 1
... STAR. 1-800-243-0000 USA, Consumer User 1-888-865-3026 USA, Commercial User 1-888-542-2623 CANADA LG Customer Information Center P/NO : SAC33601906 (0905-REV01) www.lgusa.com / www.lg.ca LCD TV OWNER'S MANUAL 42LH90 47LH90 55LH90 Please read this manual carefully before operating your set and retain it below should you ever need service.
... STAR. 1-800-243-0000 USA, Consumer User 1-888-865-3026 USA, Commercial User 1-888-542-2623 CANADA LG Customer Information Center P/NO : SAC33601906 (0905-REV01) www.lgusa.com / www.lg.ca LCD TV OWNER'S MANUAL 42LH90 47LH90 55LH90 Please read this manual carefully before operating your set and retain it below should you ever need service.
Owner's Manual (English)
Page 6
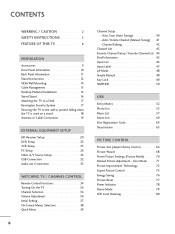
... 26 Other A/V Source Setup 32 USB Connection 32 Audio out Connection 33 WATCHING TV / CHANNEL CONTROL Remote Control Functions 34 Turning On the TV 36 Channel Selection 36 Volume Adjustment 36 Initial Setting 37 On-Screen Menus Selection 38 Quick Menu 39 6 Channel Setup - Auto ...Scan (Auto Tuning 40 - Channel Editing 42 Channel List 43 Favorite Channel Setup / Favorite Channel List . ...
... 26 Other A/V Source Setup 32 USB Connection 32 Audio out Connection 33 WATCHING TV / CHANNEL CONTROL Remote Control Functions 34 Turning On the TV 36 Channel Selection 36 Volume Adjustment 36 Initial Setting 37 On-Screen Menus Selection 38 Quick Menu 39 6 Channel Setup - Auto ...Scan (Auto Tuning 40 - Channel Editing 42 Channel List 43 Favorite Channel Setup / Favorite Channel List . ...
Owner's Manual (English)
Page 7
... Digital Broadcasting System Captions 92 - Auto Clock Setup 94 Manual Clock Setup 95 Auto On/Off Time Setting 96 Sleep Timer Setting 97 PARENTAL CONTROL / RATINGS Set Password & Lock System 98 Channel Blocking 101 Movie & TV Rating 102 Downloadable Rating 107 External Input Blocking 108 APPENDIX Troubleshooting 109 Maintenance 111 Product Specifications 112 IR...
... Digital Broadcasting System Captions 92 - Auto Clock Setup 94 Manual Clock Setup 95 Auto On/Off Time Setting 96 Sleep Timer Setting 97 PARENTAL CONTROL / RATINGS Set Password & Lock System 98 Channel Blocking 101 Movie & TV Rating 102 Downloadable Rating 107 External Input Blocking 108 APPENDIX Troubleshooting 109 Maintenance 111 Product Specifications 112 IR...
Owner's Manual (English)
Page 8
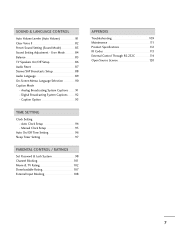
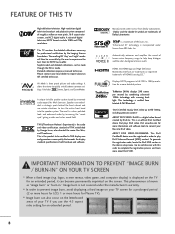
...menus, video game, and computer display) is three preset picture and audio settings. AV Mode is displayed on the TV for an extended period, it can also occur on the screen. Speakers ... who directed the movie Star Wars, and Thomlinson. Visit www.divx.com for more hours for LCD, 1 or more information and software tools to prevent image burn, avoid displaying a fixed image on... resolutions. TruMotion 240Hz displays 240 scenes per second by the user to experience the best their LG HDTV has to inquire about DivX VOD. Detailed calibration requires a licensed technician. The result s...
...menus, video game, and computer display) is three preset picture and audio settings. AV Mode is displayed on the TV for an extended period, it can also occur on the screen. Speakers ... who directed the movie Star Wars, and Thomlinson. Visit www.divx.com for more hours for LCD, 1 or more information and software tools to prevent image burn, avoid displaying a fixed image on... resolutions. TruMotion 240Hz displays 240 scenes per second by the user to experience the best their LG HDTV has to inquire about DivX VOD. Detailed calibration requires a licensed technician. The result s...
Owner's Manual (English)
Page 16
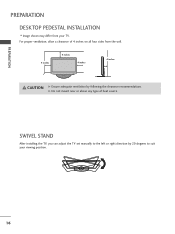
For proper ventilation, allow a clearance of heat source. SWIVEL STAND After installing the TV, you can adjust the TV set manually to suit your TV. G Do not mount near or above any type of 4 inches on all four sides from your viewing position. 16 PREPARATION PREPARATION DESKTOP PEDESTAL INSTALLATION I Image shown may differ from the wall. 4 inches 4 inches 4 inches 4 inches CAUTION G Ensure adequate ventilation by 20 degrees to the left or right direction by following the clearance recommendations.
For proper ventilation, allow a clearance of heat source. SWIVEL STAND After installing the TV, you can adjust the TV set manually to suit your TV. G Do not mount near or above any type of 4 inches on all four sides from your viewing position. 16 PREPARATION PREPARATION DESKTOP PEDESTAL INSTALLATION I Image shown may differ from the wall. 4 inches 4 inches 4 inches 4 inches CAUTION G Ensure adequate ventilation by 20 degrees to the left or right direction by following the clearance recommendations.
Owner's Manual (English)
Page 18
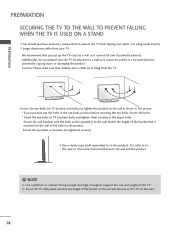
...TV...TV safely make sure that the height of the bracket...TV are tightened securely. PREPARATION PREPARATION SECURING THE TV TO THE WALL TO PREVENT FALLING WHEN THE TV... IS USED ON A STAND I You should purchase necessary components to the wall as shown in the picture. * If your TV. I Insert the eye-bolts (or TV brackets and bolts) to tighten the product to prevent the TV... from tipping over if pushed backwards. I Image shown may differ from the TV...of the TV. It is...-bolts or TV brackets/bolts and...
...TV...TV safely make sure that the height of the bracket...TV are tightened securely. PREPARATION PREPARATION SECURING THE TV TO THE WALL TO PREVENT FALLING WHEN THE TV... IS USED ON A STAND I You should purchase necessary components to the wall as shown in the picture. * If your TV. I Insert the eye-bolts (or TV brackets and bolts) to tighten the product to prevent the TV... from tipping over if pushed backwards. I Image shown may differ from the TV...of the TV. It is...-bolts or TV brackets/bolts and...
Owner's Manual (English)
Page 20
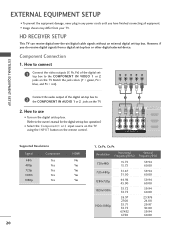
... I Turn on the digital set-top box. (Refer to the owner's manual for the digital set-top box operation.) I Select the Component1 or 2 input source on the TV using the INPUT button on the TV. Component Connection 1. I Image shown may differ from a digital set-top box or other digital ...to 2 the COMPONENT IN AUDIO 1 or 2 jacks on the TV. 2. However, if you have finished connecting all equipment. HD RECEIVER SETUP This TV can receive digital over-the-air/digital cable signals without an external digital set-top box. EXTERNAL EQUIPMENT SETUP EXTERNAL EQUIPMENT SETUP I To prevent...
... I Turn on the digital set-top box. (Refer to the owner's manual for the digital set-top box operation.) I Select the Component1 or 2 input source on the TV using the INPUT button on the TV. Component Connection 1. I Image shown may differ from a digital set-top box or other digital ...to 2 the COMPONENT IN AUDIO 1 or 2 jacks on the TV. 2. However, if you have finished connecting all equipment. HD RECEIVER SETUP This TV can receive digital over-the-air/digital cable signals without an external digital set-top box. EXTERNAL EQUIPMENT SETUP EXTERNAL EQUIPMENT SETUP I To prevent...
Owner's Manual (English)
Page 21
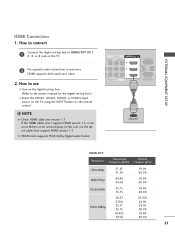
...) EXTERNAL EQUIPMENT SETUP HDMI Connection 1. NOTE G Check HDMI cable over version 1.3. How to connect 1 Connect the digital set -top box.) I Turn on the digital set-top box. (Refer to the owner's manual for the digital set -top box to use the latest cables that support HDMI version 1.3. How to HDMI/DVI IN 1, 2, 3, or...30.00 59.94 60.00 21 In this case use I Select the HDMI1, HDMI2, HDMI3, or HDMI4 input source on the TV using the INPUT button on the TV. 2 No separate audio connection is necessary. If the HDMI cables don't support HDMI version 1.3, it can cause flickers or no ...
...) EXTERNAL EQUIPMENT SETUP HDMI Connection 1. NOTE G Check HDMI cable over version 1.3. How to connect 1 Connect the digital set -top box.) I Turn on the digital set-top box. (Refer to the owner's manual for the digital set -top box to use the latest cables that support HDMI version 1.3. How to HDMI/DVI IN 1, 2, 3, or...30.00 59.94 60.00 21 In this case use I Select the HDMI1, HDMI2, HDMI3, or HDMI4 input source on the TV using the INPUT button on the TV. 2 No separate audio connection is necessary. If the HDMI cables don't support HDMI version 1.3, it can cause flickers or no ...
Owner's Manual (English)
Page 22
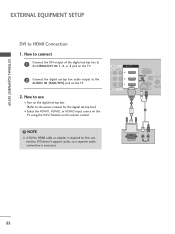
.... NOTE G A DVI to HDMI Connection 1. How to connect 1 Connect the DVI output of the digital set-top box to the HDMI/DVI IN 1, 2, or 3 jack on the TV. 2 Connect the digital set-top box audio output to the owner's manual for this connection. DVI OUTPUT L R AUDIO 22 How to... use I Select the HDMI1, HDMI2, or HDMI3 input source on the TV using the INPUT button on the TV. 2. AV IN 1 L(MONO) AUDIO R 3 2 L...
.... NOTE G A DVI to HDMI Connection 1. How to connect 1 Connect the DVI output of the digital set-top box to the HDMI/DVI IN 1, 2, or 3 jack on the TV. 2 Connect the digital set-top box audio output to the owner's manual for this connection. DVI OUTPUT L R AUDIO 22 How to... use I Select the HDMI1, HDMI2, or HDMI3 input source on the TV using the INPUT button on the TV. 2. AV IN 1 L(MONO) AUDIO R 3 2 L...
Owner's Manual (English)
Page 25
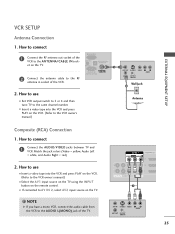
...the VCR to use I Insert a video tape into the VCR and press PLAY on the remote control. How to use I Set VCR output switch to 3 or 4 and then tune TV to the VCR owner's manual.) ANT OUT S-VIDEO VIDEO L R AUDIO ANT IN OUTPUT SWITCH Wall Jack 2 Antenna Composite (...RCA) Connection 1. I Select the A V 1 input source on the TV using the INPUT button on the VCR. (Refer to the same channel number. AV IN 1 /DVI VIDEO L(MONO) AUDIO R 3 2 2 L R 1 1 VIDEO AUDIO ...
...the VCR to use I Insert a video tape into the VCR and press PLAY on the remote control. How to use I Set VCR output switch to 3 or 4 and then tune TV to the VCR owner's manual.) ANT OUT S-VIDEO VIDEO L R AUDIO ANT IN OUTPUT SWITCH Wall Jack 2 Antenna Composite (...RCA) Connection 1. I Select the A V 1 input source on the TV using the INPUT button on the VCR. (Refer to the same channel number. AV IN 1 /DVI VIDEO L(MONO) AUDIO R 3 2 2 L R 1 1 VIDEO AUDIO ...
Owner's Manual (English)
Page 26
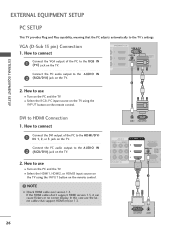
... Connect the DVI output of the PC to the RGB IN (P C) jack on the TV. 1 Connect the PC audio output to the TV's settings. Connect the PC audio output to the HDMI/DVI IN 1, 2, or 3 jack on the TV. ( ) /DVI IN RGB IN (PC) AUDIO IN (RGB/DVI) OPTICAL DIGITAL ...the HDMI cables don't support HDMI version 1.3, it can cause flickers or no screen display. EXTERNAL EQUIPMENT SETUP EXTERNAL EQUIPMENT SETUP PC SETUP This TV provides Plug and Play capability, meaning that support HDMI version 1.3. In this case use the latest cables that the PC adjusts automatically to the AUDIO...
... Connect the DVI output of the PC to the RGB IN (P C) jack on the TV. 1 Connect the PC audio output to the TV's settings. Connect the PC audio output to the HDMI/DVI IN 1, 2, or 3 jack on the TV. ( ) /DVI IN RGB IN (PC) AUDIO IN (RGB/DVI) OPTICAL DIGITAL ...the HDMI cables don't support HDMI version 1.3, it can cause flickers or no screen display. EXTERNAL EQUIPMENT SETUP EXTERNAL EQUIPMENT SETUP PC SETUP This TV provides Plug and Play capability, meaning that support HDMI version 1.3. In this case use the latest cables that the PC adjusts automatically to the AUDIO...
Owner's Manual (English)
Page 27
G In PC mode, there may become permanently imprinted on the screen. The fixed image may be positioned on the graphics card, some resolution settings may not work if an HDMI to DVI Cable is present, change the PC output to another resolution, change the refresh rate to be noise ... contrast on the screen for a long period of time. If noise is in the OPTION menu. G Depending on the screen properly. G When selecting HDMI-PC, set the "Input Label PC" in use. G If the screen is clear. G Avoid keeping a fixed image on the PICTURE menu until the picture is truncated using...
G In PC mode, there may become permanently imprinted on the screen. The fixed image may be positioned on the graphics card, some resolution settings may not work if an HDMI to DVI Cable is present, change the PC output to another resolution, change the refresh rate to be noise ... contrast on the screen for a long period of time. If noise is in the OPTION menu. G Depending on the screen properly. G When selecting HDMI-PC, set the "Input Label PC" in use. G If the screen is clear. G Avoid keeping a fixed image on the PICTURE menu until the picture is truncated using...
Owner's Manual (English)
Page 29
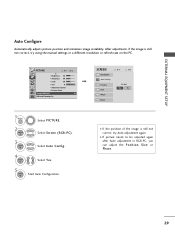
... can adjust the Position, S i z e or P h a s e. 29 Select Screen (RGB-PC). I If the position of the image is still not correct, try Auto adjustment again. To Set Yes No 1 MENU 2 ENTER 3 ENTER Select PICTURE. PICTURE Move Enter E • Brightness 50 • Sharpness 50 • Color 50 • Tint 0R G • Advanced Control... Reset Screen (RGB-PC) LED Local Dimming :On SCREEN Resolution Auto Config. After adjustment, if the image is still not correct, try using the manual settings or a different resolution or refresh rate on the PC.
... can adjust the Position, S i z e or P h a s e. 29 Select Screen (RGB-PC). I If the position of the image is still not correct, try Auto adjustment again. To Set Yes No 1 MENU 2 ENTER 3 ENTER Select PICTURE. PICTURE Move Enter E • Brightness 50 • Sharpness 50 • Color 50 • Tint 0R G • Advanced Control... Reset Screen (RGB-PC) LED Local Dimming :On SCREEN Resolution Auto Config. After adjustment, if the image is still not correct, try using the manual settings or a different resolution or refresh rate on the PC.

Owner's Manual (English)
Page 31
To Set Yes No 1 MENU 2 ENTER 3 ENTER 4 ENTER 5 ENTER Select PICTURE. This feature operates only in RGB-PC mode. Position Size Phase Reset Move Prev. EXTERNAL EQUIPMENT SETUP Screen Reset (Reset to original factory values) Returns Position, S i z e, and Phase to the default factory settings. Select Y e s. 31 PICTURE Move Enter E • Brightness 50 • Sharpness 50 • Color 50 • Tint 0R G • Advanced Control • Picture Reset Screen (RGB-PC) LED Local Dimming :On SCREEN Resolution Auto config. Select Screen (RGB-PC). Select Reset.
To Set Yes No 1 MENU 2 ENTER 3 ENTER 4 ENTER 5 ENTER Select PICTURE. This feature operates only in RGB-PC mode. Position Size Phase Reset Move Prev. EXTERNAL EQUIPMENT SETUP Screen Reset (Reset to original factory values) Returns Position, S i z e, and Phase to the default factory settings. Select Y e s. 31 PICTURE Move Enter E • Brightness 50 • Sharpness 50 • Color 50 • Tint 0R G • Advanced Control • Picture Reset Screen (RGB-PC) LED Local Dimming :On SCREEN Resolution Auto config. Select Screen (RGB-PC). Select Reset.
Owner's Manual (English)
Page 32
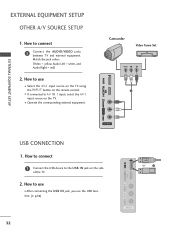
... the side of the TV. 2. USB IN IN 4 Camcorder Video Game Set VIDEO L R 1 EXTERNAL EQUIPMENT SETUP VIDEO L/MONO AUDIO R AV IN 2 USB CONNECTION 1. Match the jack colors. (Video = yellow, Audio Left = white, and Audio Right = red) 2. I Select the A V 2 input source on the TV using the INPUT button on the TV. How to AV IN... IN IN 4 or 1 Memory Key AV IN 2 How to the USB I Operate the corresponding external equipment. How to connect 1 Connect the AUDIO/VIDEO jacks between TV and external equipment.
... the side of the TV. 2. USB IN IN 4 Camcorder Video Game Set VIDEO L R 1 EXTERNAL EQUIPMENT SETUP VIDEO L/MONO AUDIO R AV IN 2 USB CONNECTION 1. Match the jack colors. (Video = yellow, Audio Left = white, and Audio Right = red) 2. I Select the A V 2 input source on the TV using the INPUT button on the TV. How to AV IN... IN IN 4 or 1 Memory Key AV IN 2 How to the USB I Operate the corresponding external equipment. How to connect 1 Connect the AUDIO/VIDEO jacks between TV and external equipment.
Owner's Manual (English)
Page 33
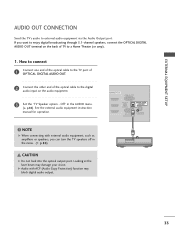
... of OPTICAL DIGITAL AUDIO OUT. 2 Connect the other end of the optical cable to the digital audio input on the back of TV to external audio equipment via the Audio Output port. NOTE G When connecting with ACP (Audio Copy Protection) function may damage your vision. Looking at the ..., such as amplifiers or speakers, you want to enjoy digital broadcasting through 5.1-channel speakers, connect the OPTICAL DIGITAL AUDIO OUT terminal on the audio equipment. ( ) 3 Set the "TV Speaker option - Off " in the menu. (G p.86) CAUTION G Do not look into the optical output port.
... of OPTICAL DIGITAL AUDIO OUT. 2 Connect the other end of the optical cable to the digital audio input on the back of TV to external audio equipment via the Audio Output port. NOTE G When connecting with ACP (Audio Copy Protection) function may damage your vision. Looking at the ..., such as amplifiers or speakers, you want to enjoy digital broadcasting through 5.1-channel speakers, connect the OPTICAL DIGITAL AUDIO OUT terminal on the audio equipment. ( ) 3 Set the "TV Speaker option - Off " in the menu. (G p.86) CAUTION G Do not look into the optical output port.
Owner's Manual (English)
Page 34
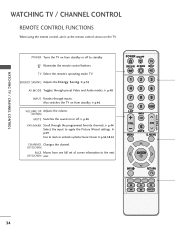
...MUTE Switches the sound on the TV. MENU ENTER INFO RETURN 34 UP/DOWN PAGE Moves from standby or off . Illuminates the remote control buttons. G p.44 Select the input to the next UP/DOWN one. Also switches the TV on from one full set of screen information to apply ...the Picture Wizard settings. G p.54,58,61 CHANNEL Changes the channel. G p.36 FAV/MARK Scroll through the programmed Favorite channels.
...MUTE Switches the sound on the TV. MENU ENTER INFO RETURN 34 UP/DOWN PAGE Moves from standby or off . Illuminates the remote control buttons. G p.44 Select the input to the next UP/DOWN one. Also switches the TV on from one full set of screen information to apply ...the Picture Wizard settings. G p.54,58,61 CHANNEL Changes the channel. G p.36 FAV/MARK Scroll through the programmed Favorite channels.
Owner's Manual (English)
Page 35
... Batteries I Open the battery compartment cover on -screen menus and adjusts the system settings to your preference. (Up/Down/Left Right/ENTER) INFO Displays channel information at the screen. WATCHING TV / CHANNEL CONTROL NUMBER button - (DASH) Used to TV viewing. When you toggle this button, the SIMPLINK menu appears at the top of...
... Batteries I Open the battery compartment cover on -screen menus and adjusts the system settings to your preference. (Up/Down/Left Right/ENTER) INFO Displays channel information at the screen. WATCHING TV / CHANNEL CONTROL NUMBER button - (DASH) Used to TV viewing. When you toggle this button, the SIMPLINK menu appears at the top of...
Owner's Manual (English)
Page 36
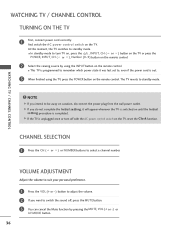
...number. I In standby mode to turn off , press the MUTE button. 3 You can cancel the Mute function by using the TV, press the POWER button on until the Initial setting procedure is completed. VOLUME ADJUSTMENT Adjust the volume to suit your personal preference. 1 Press the VOL (+ or -) button to .... NOTE G If you do not complete the Initial setting, it was last set to standby mode. ! G If the TV is switched on the remote control. I This TV is programmed to remember which power state it will appear whenever the TV is unplugged once or turn TV on, press the , INPUT, CH ( or )...
...number. I In standby mode to turn off , press the MUTE button. 3 You can cancel the Mute function by using the TV, press the POWER button on until the Initial setting procedure is completed. VOLUME ADJUSTMENT Adjust the volume to suit your personal preference. 1 Press the VOL (+ or -) button to .... NOTE G If you do not complete the Initial setting, it was last set to standby mode. ! G If the TV is switched on the remote control. I This TV is programmed to remember which power state it will appear whenever the TV is unplugged once or turn TV on, press the , INPUT, CH ( or )...
Owner's Manual (English)
Page 37
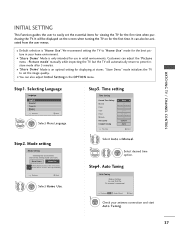
... starting, be activated from the user menus. "Store Demo" mode initializes the TV to easily set the image quality. Previous Next 1 ENTER Select H o m e U s e. It can also be sure that the TV antenna is only intended for the first time. To use in the OPTION menu... the "Picture menu - Step4. WATCHING TV / CHANNEL CONTROL INITIAL SETTING This Function guides the user to set the essential items for viewing the TV for the first time when purchasing the TV. Picture mode" manually while inspecting the TV, but the TV will be displayed on the screen when turning...
... starting, be activated from the user menus. "Store Demo" mode initializes the TV to easily set the image quality. Previous Next 1 ENTER Select H o m e U s e. It can also be sure that the TV antenna is only intended for the first time. To use in the OPTION menu... the "Picture menu - Step4. WATCHING TV / CHANNEL CONTROL INITIAL SETTING This Function guides the user to set the essential items for viewing the TV for the first time when purchasing the TV. Picture mode" manually while inspecting the TV, but the TV will be displayed on the screen when turning...


