
Specification (English)
Page 1
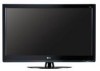
LCD TV 42LH40 42" Full HD 1080p 120Hz LCD TV (42.0" diagonal) Full HD 1080p performance, a robust feature set and Smart Energy Savings make the LH40 Series a standout. TV • TruMotion 120Hz • Intelligent Sensor Mode • Full HD 1080p HD Resolution • 70,000:1 Dynamic Contrast Ratio • 2.7ms Response Time (GTG) • ...
LCD TV 42LH40 42" Full HD 1080p 120Hz LCD TV (42.0" diagonal) Full HD 1080p performance, a robust feature set and Smart Energy Savings make the LH40 Series a standout. TV • TruMotion 120Hz • Intelligent Sensor Mode • Full HD 1080p HD Resolution • 70,000:1 Dynamic Contrast Ratio • 2.7ms Response Time (GTG) • ...

Owner's Manual (English)
Page 1
....lgusa.com / www.lg.ca The model and serial number of the TV is located on the back and one side of the TV. LCD TV OWNER'S MANUAL 32LH40 37LH40 42LH40 47LH40 55LH40 32LH41 37LH41 42LH41 47LH41 55LH41 37LH55 42LH55 47LH55 55LH55 32CL40 42CL40 47CL40 Please read this manual carefully before operating your set and retain it...
....lgusa.com / www.lg.ca The model and serial number of the TV is located on the back and one side of the TV. LCD TV OWNER'S MANUAL 32LH40 37LH40 42LH40 47LH40 55LH40 32LH41 37LH41 42LH41 47LH41 55LH41 37LH55 42LH55 47LH55 55LH55 32CL40 42CL40 47CL40 Please read this manual carefully before operating your set and retain it...

Owner's Manual (English)
Page 6
... Mounting 18 Cable Management 19 Desktop Pedestal Installation 21 Swivel Stand 21 Attaching the TV to a Desk 22 Kensington Security System 22 Securing the TV to the wall to prevent falling when the TV is used on a stand 23 Antenna or Cable Connection 24 EXTERNAL EQUIPMENT SETUP ...30 Other A/V Source Setup 32 PC Setup 33 USB Connection 40 Audio out Connection 41 WATCHING TV / CHANNEL CONTROL Remote Control Functions 42 Turning On TV 44 Channel Selection 44 Volume Adjustment 44 Initial Setting 45 On-Screen Menus Selection 46 Quick Menu 47 6 Channel Setup - User Mode 73 ...
... Mounting 18 Cable Management 19 Desktop Pedestal Installation 21 Swivel Stand 21 Attaching the TV to a Desk 22 Kensington Security System 22 Securing the TV to the wall to prevent falling when the TV is used on a stand 23 Antenna or Cable Connection 24 EXTERNAL EQUIPMENT SETUP ...30 Other A/V Source Setup 32 PC Setup 33 USB Connection 40 Audio out Connection 41 WATCHING TV / CHANNEL CONTROL Remote Control Functions 42 Turning On TV 44 Channel Selection 44 Volume Adjustment 44 Initial Setting 45 On-Screen Menus Selection 46 Quick Menu 47 6 Channel Setup - User Mode 73 ...
Owner's Manual (English)
Page 7
... Captions 92 - Digital Broadcasting System Captions 93 - Caption Option 94 TIME SETTING Clock Setting - Auto Clock Setup 95 Manual Clock Setup 96 Auto On/Off Time Setting 97 Sleep Timer Setting 98 PARENTAL CONTROL / RATINGS Set Password & Lock System 99 Channel Blocking 102 Movie & TV Rating 103 Downloadable Rating 108 External Input Blocking 109 APPENDIX Troubleshooting...
... Captions 92 - Digital Broadcasting System Captions 93 - Caption Option 94 TIME SETTING Clock Setting - Auto Clock Setup 95 Manual Clock Setup 96 Auto On/Off Time Setting 97 Sleep Timer Setting 98 PARENTAL CONTROL / RATINGS Set Password & Lock System 99 Channel Blocking 102 Movie & TV Rating 103 Downloadable Rating 108 External Input Blocking 109 APPENDIX Troubleshooting...

Owner's Manual (English)
Page 8
...their LG HDTV has to prevent image burn, avoid displaying a fixed image on the screen. Manufactured under license from Intertek &TüV Rheinland. Automatically enhances and amplifies the sound of Dolby Laboratories. Displays HDTV programs in full 1920 x 1080p resolution for a more hours for LCD,...-in strategic spots behind the front cabinet and use the 4:3 aspect ratio setting for an extended period. 8 CALIBRATE LIKE A PRO: Sophisticated and detailed calibrations can also occur on the TV for the picture they are trademarks of human voice frequency range to inquire about...
...their LG HDTV has to prevent image burn, avoid displaying a fixed image on the screen. Manufactured under license from Intertek &TüV Rheinland. Automatically enhances and amplifies the sound of Dolby Laboratories. Displays HDTV programs in full 1920 x 1080p resolution for a more hours for LCD,...-in strategic spots behind the front cabinet and use the 4:3 aspect ratio setting for an extended period. 8 CALIBRATE LIKE A PRO: Sophisticated and detailed calibrations can also occur on the TV for the picture they are trademarks of human voice frequency range to inquire about...
Owner's Manual (English)
Page 11
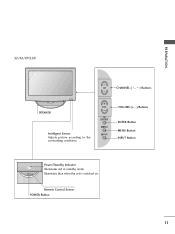
Remote Control Sensor POWER Button 11 PREPARATION 32/42/47CL40 CH CHANNEL ( , ) Buttons SPEAKER Intelligent Sensor Adjusts picture according to the surrounding conditions VOL ENTER MENU INPUT VOLUME (+, -) Buttons ENTER Button MENU Button INPUT Button Power/Standby Indicator Illuminates red in standby mode. Illuminates blue when the set is switched on.
Remote Control Sensor POWER Button 11 PREPARATION 32/42/47CL40 CH CHANNEL ( , ) Buttons SPEAKER Intelligent Sensor Adjusts picture according to the surrounding conditions VOL ENTER MENU INPUT VOLUME (+, -) Buttons ENTER Button MENU Button INPUT Button Power/Standby Indicator Illuminates red in standby mode. Illuminates blue when the set is switched on.
Owner's Manual (English)
Page 21
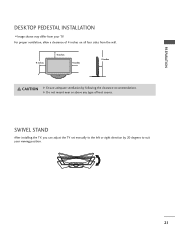
G Do not mount near or above any type of 4 inches on all four sides from your viewing position. 21 SWIVEL STAND After installing the TV, you can adjust the TV set manually to suit your TV. For proper ventilation, allow a clearance of heat source. PREPARATION DESKTOP PEDESTAL INSTALLATION I Image shown may differ from the wall. 4 inches 4 inches 4 inches 4 inches CAUTION G Ensure adequate ventilation by 20 degrees to the left or right direction by following the clearance recommendations.
G Do not mount near or above any type of 4 inches on all four sides from your viewing position. 21 SWIVEL STAND After installing the TV, you can adjust the TV set manually to suit your TV. For proper ventilation, allow a clearance of heat source. PREPARATION DESKTOP PEDESTAL INSTALLATION I Image shown may differ from the wall. 4 inches 4 inches 4 inches 4 inches CAUTION G Ensure adequate ventilation by 20 degrees to the left or right direction by following the clearance recommendations.

Owner's Manual (English)
Page 23
... and bolts) to tighten the product to the wall as shown in the picture. * If your TV. It is mounted on the TV are tightened securely. We recommend that you set up the TV close to a wall so it becomes horizontal between the wall and the product. ! Caution: Please make sure that children don... that is safer to tie the rope so it cannot fall over (when not using a wall mount). Match the height of the bracket that the TV be attached to the holes in the product. I Image shown may differ from your product has the bolts in the eye-bolts position before inserting...
... and bolts) to tighten the product to the wall as shown in the picture. * If your TV. It is mounted on the TV are tightened securely. We recommend that you set up the TV close to a wall so it becomes horizontal between the wall and the product. ! Caution: Please make sure that children don... that is safer to tie the rope so it cannot fall over (when not using a wall mount). Match the height of the bracket that the TV be attached to the holes in the product. I Image shown may differ from your product has the bolts in the eye-bolts position before inserting...
Owner's Manual (English)
Page 25
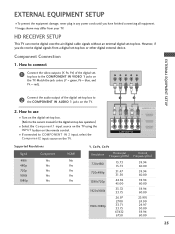
...settop box to the COMPONENT IN VIDEO 1 jacks on the TV. Component Connection 1. Match the jack colors (Y = green, PB = blue, and PR = red). How to connect 1 Connect the video outputs (Y, PB, PR) of the digital set -top box. However, if you have finished connecting all ... box or other digital external device. EXTERNAL EQUIPMENT SETUP I Image shown may differ from a digital set -top box operation.) I If connected to COMPONENT IN 2 input, select the Component2 input source on the TV. 1 2 AV IN 1 VIDEO L(MONO) AUDIO R 3 2 2 L R 1 1 VIDEO AUDIO COMPONENT IN /DVI IN ...
...settop box to the COMPONENT IN VIDEO 1 jacks on the TV. Component Connection 1. Match the jack colors (Y = green, PB = blue, and PR = red). How to connect 1 Connect the video outputs (Y, PB, PR) of the digital set -top box. However, if you have finished connecting all ... box or other digital external device. EXTERNAL EQUIPMENT SETUP I Image shown may differ from a digital set -top box operation.) I If connected to COMPONENT IN 2 input, select the Component2 input source on the TV. 1 2 AV IN 1 VIDEO L(MONO) AUDIO R 3 2 2 L R 1 1 VIDEO AUDIO COMPONENT IN /DVI IN ...
Owner's Manual (English)
Page 26
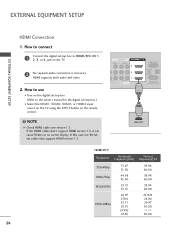
...60.00 26 How to HDMI/DVI IN 1, 2, 3, or 4 jack on the TV. 2 No separate audio connection is necessary. In this case use I Select the HDMI1, HDMI2, HDMI3, or HDMI4 input source on the TV using the INPUT button on the digital set-top box. (Refer to the owner's manual for the digital... set -top box to use the latest cables that support HDMI version 1.3. How to connect EXTERNAL EQUIPMENT SETUP...
...60.00 26 How to HDMI/DVI IN 1, 2, 3, or 4 jack on the TV. 2 No separate audio connection is necessary. In this case use I Select the HDMI1, HDMI2, HDMI3, or HDMI4 input source on the TV using the INPUT button on the digital set-top box. (Refer to the owner's manual for the digital... set -top box to use the latest cables that support HDMI version 1.3. How to connect EXTERNAL EQUIPMENT SETUP...
Owner's Manual (English)
Page 27
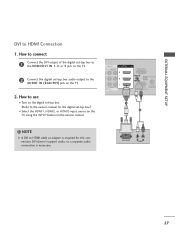
...EXTERNAL EQUIPMENT SETUP DVI to the HDMI/DVI IN 1, 2, or 3 jack on the TV. 2 Connect the digital set -top box.) I Turn on the digital set-top box. (Refer to the owner's manual for this connection. NOTE G A DVI ...DVI doesn't support audio, so a separate audio connection is required for the digital set -top box audio output to HDMI cable or adapter is necessary. How to connect 1 Connect the DVI ...output of the digital set-top box to HDMI Connection 1. AV IN 1 L(MONO) AUDIO R 3 2 L R 1 AUDIO ...
...EXTERNAL EQUIPMENT SETUP DVI to the HDMI/DVI IN 1, 2, or 3 jack on the TV. 2 Connect the digital set -top box.) I Turn on the digital set-top box. (Refer to the owner's manual for this connection. NOTE G A DVI ...DVI doesn't support audio, so a separate audio connection is required for the digital set -top box audio output to HDMI cable or adapter is necessary. How to connect 1 Connect the DVI ...output of the digital set-top box to HDMI Connection 1. AV IN 1 L(MONO) AUDIO R 3 2 L R 1 AUDIO ...

Owner's Manual (English)
Page 30
How to use I Insert a video tape into the VCR and press PLAY on the TV. I Set VCR output switch to 3 or 4 and then tune TV to the VCR owner's manual.) ANT OUT S-VIDEO VIDEO L R AUDIO ANT IN OUTPUT SWITCH Wall Jack 2 Antenna 30 How to connect ( ) RGB IN (PC) 1 Connect ...
How to use I Insert a video tape into the VCR and press PLAY on the TV. I Set VCR output switch to 3 or 4 and then tune TV to the VCR owner's manual.) ANT OUT S-VIDEO VIDEO L R AUDIO ANT IN OUTPUT SWITCH Wall Jack 2 Antenna 30 How to connect ( ) RGB IN (PC) 1 Connect ...
Owner's Manual (English)
Page 32
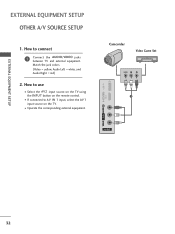
Match the jack colors. (Video = yellow, Audio Left = white, and Audio Right = red) 2. How to use I Select the A V 2 input source on the TV using the INPUT button on the TV. EXTERNAL EQUIPMENT SETUP EXTERNAL EQUIPMENT SETUP OTHER A/V SOURCE SETUP 1. USB IN IN 4 Camcorder Video Game Set VIDEO L R 1 VIDEO L/MONO AUDIO R AV IN 2 32 I Operate the corresponding external equipment. How to AV IN 1 input, select the A V 1 input source on the remote control. I If connected to connect 1 Connect the AUDIO/VIDEO jacks between TV and external equipment.
Match the jack colors. (Video = yellow, Audio Left = white, and Audio Right = red) 2. How to use I Select the A V 2 input source on the TV using the INPUT button on the TV. EXTERNAL EQUIPMENT SETUP EXTERNAL EQUIPMENT SETUP OTHER A/V SOURCE SETUP 1. USB IN IN 4 Camcorder Video Game Set VIDEO L R 1 VIDEO L/MONO AUDIO R AV IN 2 32 I Operate the corresponding external equipment. How to AV IN 1 input, select the A V 1 input source on the remote control. I If connected to connect 1 Connect the AUDIO/VIDEO jacks between TV and external equipment.
Owner's Manual (English)
Page 33
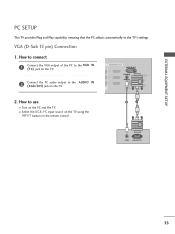
... Plug and Play capability, meaning that the PC adjusts automatically to the AUDIO IN (RGB/DVI) jack on the TV. 1 /DVI IN RGB IN (PC) AUDIO IN (RGB/DVI) OPTICAL DIGITAL AUDIO OUT ANTENNA/ RS-232C IN CABLE IN (CONTROL&SERVICE) 2. I Turn on the remote ...control. 2 1 AUDIO RGB OUTPUT ( ) 33 How to connect 1 Connect the VGA output of the PC to the RGB IN (P C) jack on the TV. ( ) R 3 2 2 Connect the PC audio output to the TV's settings. VGA (D-Sub 15 pin) Connection 1.
... Plug and Play capability, meaning that the PC adjusts automatically to the AUDIO IN (RGB/DVI) jack on the TV. 1 /DVI IN RGB IN (PC) AUDIO IN (RGB/DVI) OPTICAL DIGITAL AUDIO OUT ANTENNA/ RS-232C IN CABLE IN (CONTROL&SERVICE) 2. I Turn on the remote ...control. 2 1 AUDIO RGB OUTPUT ( ) 33 How to connect 1 Connect the VGA output of the PC to the RGB IN (P C) jack on the TV. ( ) R 3 2 2 Connect the PC audio output to the TV's settings. VGA (D-Sub 15 pin) Connection 1.
Owner's Manual (English)
Page 35
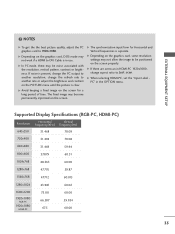
G In PC mode, there may be positioned on the graphics card, some resolution settings may not work if a HDMI to DVI Cable is separate. G Depending on the screen properly. G If there are overscan in HDMI-PC 1920x1080, change the ... become permanently imprinted on the graphics card, DOS mode may not allow the image to Just scan. If noise is clear. G When selecting HDMI-PC, set the "Input Label PC" in use. G Avoid keeping a fixed image on the PICTURE menu until the picture is present, change the PC output to 1920x1080...
G In PC mode, there may be positioned on the graphics card, some resolution settings may not work if a HDMI to DVI Cable is separate. G Depending on the screen properly. G If there are overscan in HDMI-PC 1920x1080, change the ... become permanently imprinted on the graphics card, DOS mode may not allow the image to Just scan. If noise is clear. G When selecting HDMI-PC, set the "Input Label PC" in use. G Avoid keeping a fixed image on the PICTURE menu until the picture is present, change the PC output to 1920x1080...
Owner's Manual (English)
Page 36
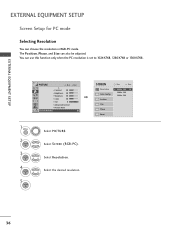
... 5 ENTER Select PICTURE. Select Resolution. You can also be adjusted. The Position, Phase, and Size can use this function only when the PC resolution is set to 1024X768, 1280X768 or 1360X768. SCREEN Resolution Auto Config. Select the desired resolution. EXTERNAL EQUIPMENT SETUP EXTERNAL EQUIPMENT SETUP Screen Setup for PC mode Selecting...
... 5 ENTER Select PICTURE. Select Resolution. You can also be adjusted. The Position, Phase, and Size can use this function only when the PC resolution is set to 1024X768, 1280X768 or 1360X768. SCREEN Resolution Auto Config. Select the desired resolution. EXTERNAL EQUIPMENT SETUP EXTERNAL EQUIPMENT SETUP Screen Setup for PC mode Selecting...
Owner's Manual (English)
Page 37
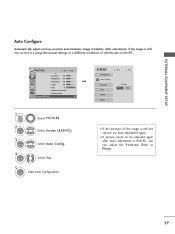
... Config.. 4 ENTER Select Y e s. 5 ENTER Start Auto Configuration. After adjustment, if the image is still not correct, try using the manual settings or a different resolution or refresh rate on the PC. To Set Yes No I If picture needs to be adjusted again after Auto adjustment in RGB-PC, you can adjust the Position...
... Config.. 4 ENTER Select Y e s. 5 ENTER Start Auto Configuration. After adjustment, if the image is still not correct, try using the manual settings or a different resolution or refresh rate on the PC. To Set Yes No I If picture needs to be adjusted again after Auto adjustment in RGB-PC, you can adjust the Position...
Owner's Manual (English)
Page 39
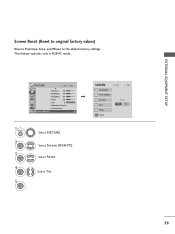
Select Screen (RGB-PC). Select Reset. To Set Yes No 39 EXTERNAL EQUIPMENT SETUP Screen Reset (Reset to original factory values) Returns Position, S i z e, and Phase to the default factory settings. Position Size Phase Reset Move Prev. This feature operates only in RGB-PC mode. SCREEN Resolution Auto Config. PICTURE Move Enter E • Contrast 50 • Brightness 50 • Sharpness 50 • Color 50 • Tint 0R G • Advanced Control • Picture Reset Screen (RGB-PC) 1 MENU 2 ENTER 3 ENTER 4 ENTER 5 ENTER Select PICTURE. Select Y e s.
Select Screen (RGB-PC). Select Reset. To Set Yes No 39 EXTERNAL EQUIPMENT SETUP Screen Reset (Reset to original factory values) Returns Position, S i z e, and Phase to the default factory settings. Position Size Phase Reset Move Prev. This feature operates only in RGB-PC mode. SCREEN Resolution Auto Config. PICTURE Move Enter E • Contrast 50 • Brightness 50 • Sharpness 50 • Color 50 • Tint 0R G • Advanced Control • Picture Reset Screen (RGB-PC) 1 MENU 2 ENTER 3 ENTER 4 ENTER 5 ENTER Select PICTURE. Select Y e s.
Owner's Manual (English)
Page 41
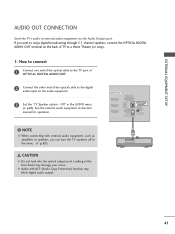
...look into the optical output port. NOTE G When connecting with ACP (Audio Copy Protection) function may damage your vision. If you can turn the TV speakers off in the AUDIO menu. (G p.87). G Audio with external audio equipment, such as amplifiers or speakers, you want to enjoy digital broadcasting...to the digital audio input on the audio equipment. ( ) 3 Set the "TV Speaker option - How to connect 1 Connect one end of the optical cable to the TV port of OPTICAL DIGITAL AUDIO OUT. 2 Connect the other end of TV to external audio equipment via the Audio Output port. See the ...
...look into the optical output port. NOTE G When connecting with ACP (Audio Copy Protection) function may damage your vision. If you can turn the TV speakers off in the AUDIO menu. (G p.87). G Audio with external audio equipment, such as amplifiers or speakers, you want to enjoy digital broadcasting...to the digital audio input on the audio equipment. ( ) 3 Set the "TV Speaker option - How to connect 1 Connect one end of the optical cable to the TV port of OPTICAL DIGITAL AUDIO OUT. 2 Connect the other end of TV to external audio equipment via the Audio Output port. See the ...
Owner's Manual (English)
Page 43
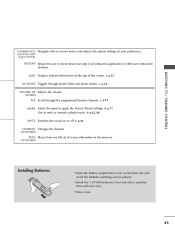
... Don't mix old or used batteries with new ones. G p.62, 66 MUTE Switches the sound on -screen menus and adjusts the system settings to your preference. (Up/Down/Left Right/ENTER) RETURN Allows the user to the next one step in an interactive application or other user ...interaction function. WATCHING TV / CHANNEL CONTROL THUMBSTICK Navigates the on or off. UP/DOWN Installing Batteries I Install two 1.5V AAA batteries. G p.52 MARK Select the ...
... Don't mix old or used batteries with new ones. G p.62, 66 MUTE Switches the sound on -screen menus and adjusts the system settings to your preference. (Up/Down/Left Right/ENTER) RETURN Allows the user to the next one step in an interactive application or other user ...interaction function. WATCHING TV / CHANNEL CONTROL THUMBSTICK Navigates the on or off. UP/DOWN Installing Batteries I Install two 1.5V AAA batteries. G p.52 MARK Select the ...


