Owner's Manual (English)
Page 2
...and receiver. - Consult the dealer or an experienced radio/TV technician for proper grounding and, in particular, specifies that may be determined by turning the equipment off and on a circuit different from LG Electronics. This device complies with arrowhead symbol, within an...be of sufficient magnitude to constitute a risk of electric shock to Article 820-40 of important operating and maintenance (servicing) instructions in a residential installation. NO USER SERVICEABLE PARTS INSIDE. CAUTION Do not attempt to correct the interference by the party responsible for a Class ...
...and receiver. - Consult the dealer or an experienced radio/TV technician for proper grounding and, in particular, specifies that may be determined by turning the equipment off and on a circuit different from LG Electronics. This device complies with arrowhead symbol, within an...be of sufficient magnitude to constitute a risk of electric shock to Article 820-40 of important operating and maintenance (servicing) instructions in a residential installation. NO USER SERVICEABLE PARTS INSIDE. CAUTION Do not attempt to correct the interference by the party responsible for a Class ...

Owner's Manual (English)
Page 3
... Unplug this apparatus near any ventilation openings. When a cart is required when the apparatus has been damaged in accordance with the manufacturer's instructions. 8 Use only with the cart, stand, tripod, bracket, or table specified by the manufacturer. 3 Do not block any heat ... is used, use caution when moving the cart/apparatus com- SAFETY INSTRUCTIONS IMPORTANT SAFETY INSTRUCTIONS Read these instructions. Keep these instructions. Follow all warnings. bination to avoid injury from tip-over. 4 Do not install near water. 6 Protect the power cord from being walked on or...
... Unplug this apparatus near any ventilation openings. When a cart is required when the apparatus has been damaged in accordance with the manufacturer's instructions. 8 Use only with the cart, stand, tripod, bracket, or table specified by the manufacturer. 3 Do not block any heat ... is used, use caution when moving the cart/apparatus com- SAFETY INSTRUCTIONS IMPORTANT SAFETY INSTRUCTIONS Read these instructions. Keep these instructions. Follow all warnings. bination to avoid injury from tip-over. 4 Do not install near water. 6 Protect the power cord from being walked on or...
Owner's Manual (English)
Page 4
... as vases, cups, etc. Do not make sure 12 not to install the TV by SWITCH. Short-circuit Breaker Power Supply 18 DISCONNECTING DEVICE FROM MAINS Mains plug is recommend that appliances be placed upon . SAFETY INSTRUCTIONS 11 Never touch this unit is connected to the AC wall outlet, ...it to telephone wires, lightening rods, or gas pipes. When mounting a TV on the wall, make the TV with something. 14 CAUTION concerning the Power Cord: It is the disconnecting device. Do not install this unit ...
... as vases, cups, etc. Do not make sure 12 not to install the TV by SWITCH. Short-circuit Breaker Power Supply 18 DISCONNECTING DEVICE FROM MAINS Mains plug is recommend that appliances be placed upon . SAFETY INSTRUCTIONS 11 Never touch this unit is connected to the AC wall outlet, ...it to telephone wires, lightening rods, or gas pipes. When mounting a TV on the wall, make the TV with something. 14 CAUTION concerning the Power Cord: It is the disconnecting device. Do not install this unit ...
Owner's Manual (English)
Page 6
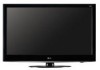
... 70 Manual Picture Adjustment - CONTENTS WARNING / CAUTION 2 SAFETY INSTRUCTIONS 3 FEATURE OF THIS TV 8 PREPARATION Accessories 9 Front Panel Information 10 Back Panel Information 13 Stand Instructions 16 VESA Wall Mounting 24 Cable Management 25 Desktop Pedestal Installation 28 Swivel Stand 28 Positioning your Display 28 Attaching the TV to a Desk 29 Kensington Security System 29 Securing...
... 70 Manual Picture Adjustment - CONTENTS WARNING / CAUTION 2 SAFETY INSTRUCTIONS 3 FEATURE OF THIS TV 8 PREPARATION Accessories 9 Front Panel Information 10 Back Panel Information 13 Stand Instructions 16 VESA Wall Mounting 24 Cable Management 25 Desktop Pedestal Installation 28 Swivel Stand 28 Positioning your Display 28 Attaching the TV to a Desk 29 Kensington Security System 29 Securing...

Owner's Manual (English)
Page 16
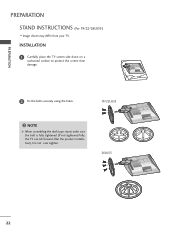
INSTALLATION 1 Carefully place the TV screen side down on a cushioned surface to protect the screen from your TV. PREPARATION PREPARATION STAND INSTRUCTIONS (For 19/22LH20, 22LH200C) I Image shown may differ from damage. 2 Assemble the TV as shown until you hear it click. 16
INSTALLATION 1 Carefully place the TV screen side down on a cushioned surface to protect the screen from your TV. PREPARATION PREPARATION STAND INSTRUCTIONS (For 19/22LH20, 22LH200C) I Image shown may differ from damage. 2 Assemble the TV as shown until you hear it click. 16

Owner's Manual (English)
Page 18
Do not over tighten. 18 PREPARATION PREPARATION STAND INSTRUCTIONS (For 26/32/37/42LH20, 32/37/42/47LH30) I Image shown may differ from damage. 2 Assemble the TV as shown. 3 Fix the 4 bolts securely using the holes in the back of the TV. ! INSTALLATION 1 Carefully place the TV screen side down on a cushioned surface to protect the screen from your TV. NOTE G When assembling the desk type stand, make sure the bolt is fully tightened (If not tightened fully, the TV can tilt forward after the product installation).
Do not over tighten. 18 PREPARATION PREPARATION STAND INSTRUCTIONS (For 26/32/37/42LH20, 32/37/42/47LH30) I Image shown may differ from damage. 2 Assemble the TV as shown. 3 Fix the 4 bolts securely using the holes in the back of the TV. ! INSTALLATION 1 Carefully place the TV screen side down on a cushioned surface to protect the screen from your TV. NOTE G When assembling the desk type stand, make sure the bolt is fully tightened (If not tightened fully, the TV can tilt forward after the product installation).

Owner's Manual (English)
Page 20
... using the 4 screws supplied. 3 Assemble the TV as shown. PREPARATION PREPARATION STAND INSTRUCTIONS (For 32/37/42/47LF11, 47LF21, 32CL20) I Image shown may differ from damage. 2 Assemble the parts of the STAND BODY with COVER BASE of the TV by using the holes in the back of the TV. ! INSTALLATION (For 32/37/42LF11, 32CL20) 1 If...
... using the 4 screws supplied. 3 Assemble the TV as shown. PREPARATION PREPARATION STAND INSTRUCTIONS (For 32/37/42/47LF11, 47LF21, 32CL20) I Image shown may differ from damage. 2 Assemble the parts of the STAND BODY with COVER BASE of the TV by using the holes in the back of the TV. ! INSTALLATION (For 32/37/42LF11, 32CL20) 1 If...
Owner's Manual (English)
Page 22
Do not over tighten. 19" 22" 19/22LU55 19" 22" 26LU55 26" 22 INSTALLATION 1 Carefully place the TV screen side down on a cushioned surface to protect the screen from your TV. PREPARATION PREPARATION STAND INSTRUCTIONS (For 19/22/26LU55) I Image shown may differ from damage. 2 Fix the bolts securely using the holes. ! NOTE G When assembling the desk type stand, make sure the bolt is fully tightened (If not tightened fully, the TV can tilt forward after the product installation).
Do not over tighten. 19" 22" 19/22LU55 19" 22" 26LU55 26" 22 INSTALLATION 1 Carefully place the TV screen side down on a cushioned surface to protect the screen from your TV. PREPARATION PREPARATION STAND INSTRUCTIONS (For 19/22/26LU55) I Image shown may differ from damage. 2 Fix the bolts securely using the holes. ! NOTE G When assembling the desk type stand, make sure the bolt is fully tightened (If not tightened fully, the TV can tilt forward after the product installation).
Owner's Manual (English)
Page 24
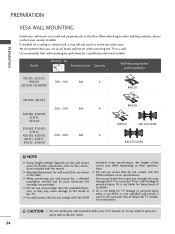
... Do not install your wall mount kit while your nearest installer. G Standard dimensions for these kinds of the screws may differ depending on their specifications. G Do not use screws that you use an LG brand wall mount when mounting the TV to the instructions included with the...42LH30, 200 * 200 M6 4 42LF11, 47LF11, 47LF21, 47LH30 RW230 RW230 AW-47LG30M AW-47LG30M ! Do not use screws longer then the standard dimension, as they may damage the TV or cause the TV to electric shock. 24 G For wall mounts that wall mounting be performed by a qualified professional installer...
... Do not install your wall mount kit while your nearest installer. G Standard dimensions for these kinds of the screws may differ depending on their specifications. G Do not use screws that you use an LG brand wall mount when mounting the TV to the instructions included with the...42LH30, 200 * 200 M6 4 42LF11, 47LF11, 47LF21, 47LH30 RW230 RW230 AW-47LG30M AW-47LG30M ! Do not use screws longer then the standard dimension, as they may damage the TV or cause the TV to electric shock. 24 G For wall mounts that wall mounting be performed by a qualified professional installer...
Owner's Manual (English)
Page 29
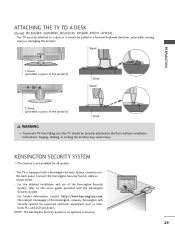
... available for expensive electronic equipment such as notebook PCs and LCD projectors. For further information, contact http://www.kensington.com, the internet homepage of the product) Desk Stand 1-Screw (provided as shown below. - ATTACHING THE TV TO A DESK (Except 19/22LH20, 22LH200C,19/22LU55... attached to the floor/wall per installation instructions. NOTE: The Kensington Security System is equipped with the Kensington Security System. For the detailed installation and use of the product) Desk WARNING G To prevent TV from falling over, the TV should be pulled in a forward/...
... available for expensive electronic equipment such as notebook PCs and LCD projectors. For further information, contact http://www.kensington.com, the internet homepage of the product) Desk Stand 1-Screw (provided as shown below. - ATTACHING THE TV TO A DESK (Except 19/22LH20, 22LH200C,19/22LU55... attached to the floor/wall per installation instructions. NOTE: The Kensington Security System is equipped with the Kensington Security System. For the detailed installation and use of the product) Desk WARNING G To prevent TV from falling over, the TV should be pulled in a forward/...

