
Specification (English)
Page 1
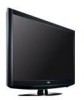
LCD TV 42LH20 42" High Definition LCD TV (42.0" diagonal) The LH20 Series is a feature rich HDTV available in a size for every room. TV • 720p HD Resolution • 30,000:1 Dynamic Contrast Ratio • 5ms Response Time (GTG) • 450 cd/m2 Brightness • Wide Color Gamut • ...
LCD TV 42LH20 42" High Definition LCD TV (42.0" diagonal) The LH20 Series is a feature rich HDTV available in a size for every room. TV • 720p HD Resolution • 30,000:1 Dynamic Contrast Ratio • 5ms Response Time (GTG) • 450 cd/m2 Brightness • Wide Color Gamut • ...

Specification (English)
Page 2
... Setup Guide • e-Manual • Parental Control w/V-Chip • Key Lock • Closed Caption • LG SIMPLINK (HDMI CEC) • CONVENIENCE FEATURES Language English/Spanish/French/Korean Auto Tuning/Programming • Channel Add/Delete ...24p - All other trademarks are approximate. © 2009 LG Electronics U.S.A., Inc., Englewood Cliffs, NJ. LCD TV 42LH20 42" High Definition LCD TV (42.0" diagonal) LGusa.com LCD SPECIFICATION Screen Size (Class) 42" Class (42.0" diagonal) Native Display Resolution 1366 x 768p Brightness (cd...
... Setup Guide • e-Manual • Parental Control w/V-Chip • Key Lock • Closed Caption • LG SIMPLINK (HDMI CEC) • CONVENIENCE FEATURES Language English/Spanish/French/Korean Auto Tuning/Programming • Channel Add/Delete ...24p - All other trademarks are approximate. © 2009 LG Electronics U.S.A., Inc., Englewood Cliffs, NJ. LCD TV 42LH20 42" High Definition LCD TV (42.0" diagonal) LGusa.com LCD SPECIFICATION Screen Size (Class) 42" Class (42.0" diagonal) Native Display Resolution 1366 x 768p Brightness (cd...
Owner's Manual (English)
Page 1
... quality for ENERGY STAR in the "factory default (Home Use)" setting. The model and serial number of the TV is located on the back and one side of the TV. Record it for future reference. Model: Serial: This product qualifies for ENERGY STAR. 1-800-243-0000 USA,...User 1-888-865-3026 USA, Commercial User 1-888-542-2623 CANADA LG Customer Information Center P/NO : SAC33601901 (0905-REV04) www.lgusa.com / www.lg.ca / www.lgcommercial.com LCD TV OWNER'S MANUAL 19LH20 22LH20 26LH20 32LH20 37LH20 42LH20 22LH200C 32LH30 37LH30 42LH30 47LH30 32LF11 37LF11 42LF11 47LF11 19LU55 22LU55 26LU55 ...
... quality for ENERGY STAR in the "factory default (Home Use)" setting. The model and serial number of the TV is located on the back and one side of the TV. Record it for future reference. Model: Serial: This product qualifies for ENERGY STAR. 1-800-243-0000 USA,...User 1-888-865-3026 USA, Commercial User 1-888-542-2623 CANADA LG Customer Information Center P/NO : SAC33601901 (0905-REV04) www.lgusa.com / www.lg.ca / www.lgcommercial.com LCD TV OWNER'S MANUAL 19LH20 22LH20 26LH20 32LH20 37LH20 42LH20 22LH200C 32LH30 37LH30 42LH30 47LH30 32LF11 37LF11 42LF11 47LF11 19LU55 22LU55 26LU55 ...
Owner's Manual (English)
Page 2
... more of the device). Connect the equipment to an outlet on , the user is subject to operate the equipment. NOTE TO CABLE/TV INSTALLER This reminder is no guarantee that may not cause (harmful) interference, and (2) this equipment does cause harmful interference to radio or...ground shall be determined by turning the equipment off and on a circuit different from LG Electronics. Increase the separation between the equipment and receiver. - Consult the dealer or an experienced radio/TV technician for compliance could void the user's authority to operate this product to the...
... more of the device). Connect the equipment to an outlet on , the user is subject to operate the equipment. NOTE TO CABLE/TV INSTALLER This reminder is no guarantee that may not cause (harmful) interference, and (2) this equipment does cause harmful interference to radio or...ground shall be determined by turning the equipment off and on a circuit different from LG Electronics. Increase the separation between the equipment and receiver. - Consult the dealer or an experienced radio/TV technician for compliance could void the user's authority to operate this product to the...
Owner's Manual (English)
Page 4
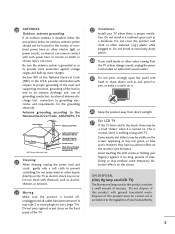
..., it is the disconnecting device. SAFETY INSTRUCTIONS 11 Never touch this product near flammable objects such as gasoline or candles or expose the TV to direct air conditioning. 16 Do not expose to dripping or splashing and do not place objects filled with liquids, such as being twisted..., kinked, pinched, closed in electric shock or fire. Do not overload wall outlets. Do not make sure 12 not to install the TV by SWITCH. a TV with something. 14 CAUTION concerning the Power Cord: It is , a single outlet circuit which powers only that appliances be certain. Short-circuit...
..., it is the disconnecting device. SAFETY INSTRUCTIONS 11 Never touch this product near flammable objects such as gasoline or candles or expose the TV to direct air conditioning. 16 Do not expose to dripping or splashing and do not place objects filled with liquids, such as being twisted..., kinked, pinched, closed in electric shock or fire. Do not overload wall outlets. Do not make sure 12 not to install the TV by SWITCH. a TV with something. 14 CAUTION concerning the Power Cord: It is , a single outlet circuit which powers only that appliances be certain. Short-circuit...
Owner's Manual (English)
Page 5
... of antenna discharge unit, connection to the regulations of your finger(s) against it for the grounding electrode. ON DISPOSAL (Only Hg lamp used LCD TV) The fluorescent lamp used in this product must be visible on the screen, appearing as alcohol, thinners or benzene. 22 Moving Make sure ...National Electrical Code (NEC) in excessively dusty places. 24 If you smell smoke or other odors coming from direct sunlight. 27 For LCD TV If the TV feels cold to prevent scratching. Antenna grounding according to provide some temporary dis- Do not cover the product with hand or sharp ...
... of antenna discharge unit, connection to the regulations of your finger(s) against it for the grounding electrode. ON DISPOSAL (Only Hg lamp used LCD TV) The fluorescent lamp used in this product must be visible on the screen, appearing as alcohol, thinners or benzene. 22 Moving Make sure ...National Electrical Code (NEC) in excessively dusty places. 24 If you smell smoke or other odors coming from direct sunlight. 27 For LCD TV If the TV feels cold to prevent scratching. Antenna grounding according to provide some temporary dis- Do not cover the product with hand or sharp ...
Owner's Manual (English)
Page 6
... Wizard 68 Preset Picture Settings (Picture Mode 70 Manual Picture Adjustment - CONTENTS WARNING / CAUTION 2 SAFETY INSTRUCTIONS 3 FEATURE OF THIS TV 8 PREPARATION Accessories 9 Front Panel Information 10 Back Panel Information 13 Stand Instructions 16 VESA Wall Mounting 24 Cable Management 25 Desktop Pedestal... 35 VCR Setup 37 Other A/V Source Setup 39 Audio out Connection 40 PC Setup 41 WATCHING TV / CHANNEL CONTROL Remote Control Functions 48 Turning On TV 50 Channel Selection 50 Volume Adjustment 50 Initial Setting 51 On-Screen Menus Selection 52 Quick Menu ...
... Wizard 68 Preset Picture Settings (Picture Mode 70 Manual Picture Adjustment - CONTENTS WARNING / CAUTION 2 SAFETY INSTRUCTIONS 3 FEATURE OF THIS TV 8 PREPARATION Accessories 9 Front Panel Information 10 Back Panel Information 13 Stand Instructions 16 VESA Wall Mounting 24 Cable Management 25 Desktop Pedestal... 35 VCR Setup 37 Other A/V Source Setup 39 Audio out Connection 40 PC Setup 41 WATCHING TV / CHANNEL CONTROL Remote Control Functions 48 Turning On TV 50 Channel Selection 50 Volume Adjustment 50 Initial Setting 51 On-Screen Menus Selection 52 Quick Menu ...
Owner's Manual (English)
Page 7
...On/Off Time Setting 95 Sleep Timer Setting 96 PARENTAL CONTROL / RATINGS Set Password & Lock System 97 Channel Blocking 100 Movie & TV Rating 101 Downloadable Rating 106 External Input Blocking 107 APPENDIX Troubleshooting 108 Maintenance 110 Product Specifications 111 IR Codes 115 External Control Through RS...Leveler (Auto Volume 80 Clear Voice II 81 Preset Sound Setting (Sound Mode 82 Sound Setting Adjustment - User Mode 83 Balance 84 TV Speakers On/Off Setup 85 Audio Reset 86 Stereo/SAP Broadcasts Setup 87 Audio Language 88 On-Screen Menus Language Selection 89 Caption ...
...On/Off Time Setting 95 Sleep Timer Setting 96 PARENTAL CONTROL / RATINGS Set Password & Lock System 97 Channel Blocking 100 Movie & TV Rating 101 Downloadable Rating 106 External Input Blocking 107 APPENDIX Troubleshooting 108 Maintenance 110 Product Specifications 111 IR Codes 115 External Control Through RS...Leveler (Auto Volume 80 Clear Voice II 81 Preset Sound Setting (Sound Mode 82 Sound Setting Adjustment - User Mode 83 Balance 84 TV Speakers On/Off Setup 85 Audio Reset 86 Stereo/SAP Broadcasts Setup 87 Audio Language 88 On-Screen Menus Language Selection 89 Caption ...
Owner's Manual (English)
Page 8
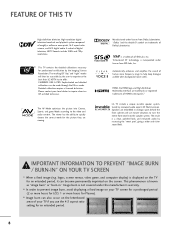
... include 1080i and 720p resolutions. The AV Mode optimizes the picture into the speaker system. Automatically enhances and amplifies the sound of SRS Labs, Inc. LG TV include a unique invisible speaker system, tuned by increasing the "sweet spot", giving a wider and richer sound field. IMPORTANT INFORMATION TO PREVENT "IMAGE BURN ... has to turn the entire front bezel into Cinema, Sports, and game Mode according to quickly choose the correct mode for LCD, 1 or more pixels, 16:9 aspect-ratio screens, and AC3 digital audio. The resulting ISF "day" and "night" modes will then be made ...
... include 1080i and 720p resolutions. The AV Mode optimizes the picture into the speaker system. Automatically enhances and amplifies the sound of SRS Labs, Inc. LG TV include a unique invisible speaker system, tuned by increasing the "sweet spot", giving a wider and richer sound field. IMPORTANT INFORMATION TO PREVENT "IMAGE BURN ... has to turn the entire front bezel into Cinema, Sports, and game Mode according to quickly choose the correct mode for LCD, 1 or more pixels, 16:9 aspect-ratio screens, and AC3 digital audio. The resulting ISF "day" and "night" modes will then be made ...

Owner's Manual (English)
Page 9
...stand fixing Protection Cover (Refer to P.26) (Refer to P.17) (Refer to P.20) (Refer to P.29) (Refer to P.21) Only 26/32/37/42LH20, 32/37/42/47LH30 (Except 47LH30) x 4 Bolts for stand assembly Screw for stand fixing (Refer to P.18) (Refer to P.29) Protection Cover (Refer to maintain standards ...Owner's Manual CD Manual Remote Control, Batteries Power Cord Not included with all models Polishing Cloth * Wipe spots on the exterior only with your TV. Excessive pressure may differ from the images be7 l8o5 w6 3. The accessories included may cause scratch or discoloration.
...stand fixing Protection Cover (Refer to P.26) (Refer to P.17) (Refer to P.20) (Refer to P.29) (Refer to P.21) Only 26/32/37/42LH20, 32/37/42/47LH30 (Except 47LH30) x 4 Bolts for stand assembly Screw for stand fixing (Refer to P.18) (Refer to P.29) Protection Cover (Refer to maintain standards ...Owner's Manual CD Manual Remote Control, Batteries Power Cord Not included with all models Polishing Cloth * Wipe spots on the exterior only with your TV. Excessive pressure may differ from the images be7 l8o5 w6 3. The accessories included may cause scratch or discoloration.

Owner's Manual (English)
Page 10
... mode. PREPARATION PREPARATION FRONT PANEL INFORMATION I Image shown may differ from your TV. 19/22/26LH20, 22LH200C INPUT Button POWER Button MENU Button ENTER Button VOLUME CHANNEL (-, +) Buttons (E,D) Buttons INPUT MENU ENTER VOL CH 32/37/42LH20, 32/37/42/47LH30 SPEAKER Remote Control Sensor, Power/Standby Indicator Illuminates red in the OPTION...
... mode. PREPARATION PREPARATION FRONT PANEL INFORMATION I Image shown may differ from your TV. 19/22/26LH20, 22LH200C INPUT Button POWER Button MENU Button ENTER Button VOLUME CHANNEL (-, +) Buttons (E,D) Buttons INPUT MENU ENTER VOL CH 32/37/42LH20, 32/37/42/47LH30 SPEAKER Remote Control Sensor, Power/Standby Indicator Illuminates red in the OPTION...

Owner's Manual (English)
Page 12
Illuminates white when the TV is switched on. 12 ❖x AC power control ❖❋❋ switch PREPARATION PREPARATION I Image shown may differ from your TV. 19/22LU55 INPUT Button POWER Button MENU Button ENTER Button VOLUME CHANNEL (-, +) Buttons ( , ) Buttons INPUT MENU ENTER VOL CH SPEAKER 26LU55 CH VOL ENTER MENU INPUT CHANNEL ( , ) Buttons VOLUME (+, -) Buttons ENTER Button MENU Button INPUT Button POWER Button Remote Control Sensor Power/Standby Indicator Illuminates red in standby mode.
Illuminates white when the TV is switched on. 12 ❖x AC power control ❖❋❋ switch PREPARATION PREPARATION I Image shown may differ from your TV. 19/22LU55 INPUT Button POWER Button MENU Button ENTER Button VOLUME CHANNEL (-, +) Buttons ( , ) Buttons INPUT MENU ENTER VOL CH SPEAKER 26LU55 CH VOL ENTER MENU INPUT CHANNEL ( , ) Buttons VOLUME (+, -) Buttons ENTER Button MENU Button INPUT Button POWER Button Remote Control Sensor Power/Standby Indicator Illuminates red in standby mode.

Owner's Manual (English)
Page 15
... to this jack. 7 RS-232C IN (CONTROL & SERVICE) PORT Used by third party devices. Accepts DVI video using an adapter or HDMI to operate the TV on DC power. 15 Supports standard definition video only (480i). 3 HDMI/DVI IN, HDMI IN Digital Connection. Uses a D-sub 15 pin cable (VGA cable). AUDIO...
... to this jack. 7 RS-232C IN (CONTROL & SERVICE) PORT Used by third party devices. Accepts DVI video using an adapter or HDMI to operate the TV on DC power. 15 Supports standard definition video only (480i). 3 HDMI/DVI IN, HDMI IN Digital Connection. Uses a D-sub 15 pin cable (VGA cable). AUDIO...

Owner's Manual (English)
Page 16
INSTALLATION 1 Carefully place the TV screen side down on a cushioned surface to protect the screen from your TV. PREPARATION PREPARATION STAND INSTRUCTIONS (For 19/22LH20, 22LH200C) I Image shown may differ from damage. 2 Assemble the TV as shown until you hear it click. 16
INSTALLATION 1 Carefully place the TV screen side down on a cushioned surface to protect the screen from your TV. PREPARATION PREPARATION STAND INSTRUCTIONS (For 19/22LH20, 22LH200C) I Image shown may differ from damage. 2 Assemble the TV as shown until you hear it click. 16

Owner's Manual (English)
Page 17
PROTECTION COVER 17 PREPARATION DETACHMENT 1 Carefully place the TV screen side down on a cushioned surface to protect the screen from damage. 2 Loose the bolts from TV. 3 Detach the stand from TV. PROTECTION COVER 4 Insert the PROTECTION COVER into the TV. 5 Fix the 4 bolts securely using the holes in the back of the TV.
PROTECTION COVER 17 PREPARATION DETACHMENT 1 Carefully place the TV screen side down on a cushioned surface to protect the screen from damage. 2 Loose the bolts from TV. 3 Detach the stand from TV. PROTECTION COVER 4 Insert the PROTECTION COVER into the TV. 5 Fix the 4 bolts securely using the holes in the back of the TV.

Owner's Manual (English)
Page 18
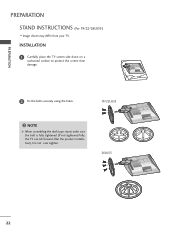
Do not over tighten. 18 NOTE G When assembling the desk type stand, make sure the bolt is fully tightened (If not tightened fully, the TV can tilt forward after the product installation). PREPARATION PREPARATION STAND INSTRUCTIONS (For 26/32/37/42LH20, 32/37/42/47LH30) I Image shown may differ from damage. 2 Assemble the TV as shown. 3 Fix the 4 bolts securely using the holes in the back of the TV. ! INSTALLATION 1 Carefully place the TV screen side down on a cushioned surface to protect the screen from your TV.
Do not over tighten. 18 NOTE G When assembling the desk type stand, make sure the bolt is fully tightened (If not tightened fully, the TV can tilt forward after the product installation). PREPARATION PREPARATION STAND INSTRUCTIONS (For 26/32/37/42LH20, 32/37/42/47LH30) I Image shown may differ from damage. 2 Assemble the TV as shown. 3 Fix the 4 bolts securely using the holes in the back of the TV. ! INSTALLATION 1 Carefully place the TV screen side down on a cushioned surface to protect the screen from your TV.

Owner's Manual (English)
Page 19
PREPARATION DETACHMENT 1 Carefully place the TV screen side down on a cushioned surface to protect the screen from damage. 2 Loose the bolts from TV. 3 Detach the stand from TV. Press the PROTECTION COVER into the TV until you hear it click. 19 PROTECTION COVER After removing the stand, install the included protection cover over the hole for the stand.
PREPARATION DETACHMENT 1 Carefully place the TV screen side down on a cushioned surface to protect the screen from damage. 2 Loose the bolts from TV. 3 Detach the stand from TV. Press the PROTECTION COVER into the TV until you hear it click. 19 PROTECTION COVER After removing the stand, install the included protection cover over the hole for the stand.

Owner's Manual (English)
Page 20
... tighten. 20 STAND BODY COVER BASE 4 Fix the 4 bolts securely using the 4 screws supplied. 3 Assemble the TV as shown. INSTALLATION (For 32/37/42LF11, 32CL20) 1 If your TV. PREPARATION PREPARATION STAND INSTRUCTIONS (For 32/37/42/47LF11, 47LF21, 32CL20) I Image shown may differ from damage. 2 Assemble the parts of the STAND BODY with...
... tighten. 20 STAND BODY COVER BASE 4 Fix the 4 bolts securely using the 4 screws supplied. 3 Assemble the TV as shown. INSTALLATION (For 32/37/42LF11, 32CL20) 1 If your TV. PREPARATION PREPARATION STAND INSTRUCTIONS (For 32/37/42/47LF11, 47LF21, 32CL20) I Image shown may differ from damage. 2 Assemble the parts of the STAND BODY with...

Owner's Manual (English)
Page 21
PROTECTION COVER After removing the stand, install the included protection cover over the hole for the stand. Press the PROTECTION COVER into the TV until you hear it click. 21 PREPARATION DETACHMENT 1 Carefully place the TV screen side down on a cushioned surface to protect the screen from damage. 2 Loose the bolts from TV. 3 Detach the stand from TV.
PROTECTION COVER After removing the stand, install the included protection cover over the hole for the stand. Press the PROTECTION COVER into the TV until you hear it click. 21 PREPARATION DETACHMENT 1 Carefully place the TV screen side down on a cushioned surface to protect the screen from damage. 2 Loose the bolts from TV. 3 Detach the stand from TV.
Owner's Manual (English)
Page 22
NOTE G When assembling the desk type stand, make sure the bolt is fully tightened (If not tightened fully, the TV can tilt forward after the product installation). Do not over tighten. 19" 22" 19/22LU55 19" 22" 26LU55 26" 22 INSTALLATION 1 Carefully place the TV screen side down on a cushioned surface to protect the screen from your TV. PREPARATION PREPARATION STAND INSTRUCTIONS (For 19/22/26LU55) I Image shown may differ from damage. 2 Fix the bolts securely using the holes. !
NOTE G When assembling the desk type stand, make sure the bolt is fully tightened (If not tightened fully, the TV can tilt forward after the product installation). Do not over tighten. 19" 22" 19/22LU55 19" 22" 26LU55 26" 22 INSTALLATION 1 Carefully place the TV screen side down on a cushioned surface to protect the screen from your TV. PREPARATION PREPARATION STAND INSTRUCTIONS (For 19/22/26LU55) I Image shown may differ from damage. 2 Fix the bolts securely using the holes. !


