

Owner's Manual
Page 1
...the label attached on the back cover and quote this product meets the ENERGY STAR guidelines for future reference. Please read this manual carefully before operating your dealer when you require service. As an ENERGY STAR Partner LGE U. has determined that this information to...by the U.S. S. A.,Inc. Environmental Protection Agency(EPA). LCD TV MODELS: 32LC2D 32LC2DU 37LC2D 42LC2D PLASMA TV MODELS: 42PC3D 42PC3DC 42PC3DV 50PC3D 60PC1D OWNER'S MANUAL Internet Home Page : http://www.lge.com http://www.lg.ca ENERGYSTAR is a set of the set . P/NO : 38289U0527F g Printed in Korea ...
...the label attached on the back cover and quote this product meets the ENERGY STAR guidelines for future reference. Please read this manual carefully before operating your dealer when you require service. As an ENERGY STAR Partner LGE U. has determined that this information to...by the U.S. S. A.,Inc. Environmental Protection Agency(EPA). LCD TV MODELS: 32LC2D 32LC2DU 37LC2D 42LC2D PLASMA TV MODELS: 42PC3D 42PC3DC 42PC3DV 50PC3D 60PC1D OWNER'S MANUAL Internet Home Page : http://www.lge.com http://www.lg.ca ENERGYSTAR is a set of the set . P/NO : 38289U0527F g Printed in Korea ...

Owner's Manual
Page 3
... exit from being walked on the apparatus. Clean only with the manufacturer's instructions. 11. Do not defeat the safety purpose of the ventilation openings. Owner's Manual 2. When the provided plug does not fit into your safety. Protect the power cord from the apparatus. 7. Heed all instructions. 5. Safety Instructions Safety Instructions WARNING...
... exit from being walked on the apparatus. Clean only with the manufacturer's instructions. 11. Do not defeat the safety purpose of the ventilation openings. Owner's Manual 2. When the provided plug does not fit into your safety. Protect the power cord from the apparatus. 7. Heed all instructions. 5. Safety Instructions Safety Instructions WARNING...

Owner's Manual
Page 4
... overload wall outlets. Pay particular attention to qualified service personnel. Doing so may produce some temporary distortion effects on the monitor's performance. - Unplug this owner's manual to be visible on . Safety Instructions 12. DISCONNECTING DEVICE FROM MAINS Main plug is , a single outlet circuit which powers only that appliance and has no...
... overload wall outlets. Pay particular attention to qualified service personnel. Doing so may produce some temporary distortion effects on the monitor's performance. - Unplug this owner's manual to be visible on . Safety Instructions 12. DISCONNECTING DEVICE FROM MAINS Main plug is , a single outlet circuit which powers only that appliance and has no...
Owner's Manual
Page 5
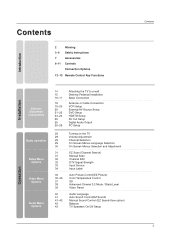
... 43 43 Turning on the TV Volume Adjustment Channel Selection On Screen Menus Language Selection On Screen Menus Selection and Adjustment EZ Scan (Channel Search) Manual Scan Channel Edit DTV Signal Strength Input Source Input Label Auto Picture Control(EZ Picture) Color Temperature Control XD Advanced-Cinema 3:2 Mode / Black Level Video...
... 43 43 Turning on the TV Volume Adjustment Channel Selection On Screen Menus Language Selection On Screen Menus Selection and Adjustment EZ Scan (Channel Search) Manual Scan Channel Edit DTV Signal Strength Input Source Input Label Auto Picture Control(EZ Picture) Color Temperature Control XD Advanced-Cinema 3:2 Mode / Black Level Video...

Owner's Manual
Page 6
Contents Operation Time Menu Options Option Menu Features Lock Menu Options 44 44 45 45 46 47 48 49 49 50 51~52 Manual Clock Setup Auto Clock Setup On/Off Timer Setup Sleep Timer Auto Off Aspect Ratio Control Caption/Text Caption Option Low Power (42PC3D/3DC/3DV, 50PC3D, 60PC1D Only) ISM (Image Sticking Minimization) Method (42PC3D/3DC/3DV, 50PC3D, 60PC1D Only) Parental Lock Setup 53~58 59~60 61 62~63 64~65 65 66~67 External Control Device Setup IR Codes Programming the Remote Programming Codes Troubleshooting Checklist Maintenance Product Specifications Reference 6
Contents Operation Time Menu Options Option Menu Features Lock Menu Options 44 44 45 45 46 47 48 49 49 50 51~52 Manual Clock Setup Auto Clock Setup On/Off Timer Setup Sleep Timer Auto Off Aspect Ratio Control Caption/Text Caption Option Low Power (42PC3D/3DC/3DV, 50PC3D, 60PC1D Only) ISM (Image Sticking Minimization) Method (42PC3D/3DC/3DV, 50PC3D, 60PC1D Only) Parental Lock Setup 53~58 59~60 61 62~63 64~65 65 66~67 External Control Device Setup IR Codes Programming the Remote Programming Codes Troubleshooting Checklist Maintenance Product Specifications Reference 6
Owner's Manual
Page 7
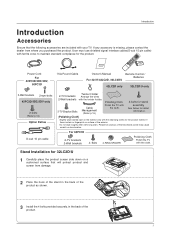
Power Cord 75Ω Round Cable Owner's Manual TV INPUT TV AUDIO POWER DAY - Do not wipe roughly when removing stain. Stand Installation for 32LC2D/U 1 Carefully place the product screen side down on ... PAGE INFO 1 FAV 4 7 2 PAGE CH 5 EZ ADJUST PIC EZ APM SOUND 0 SAP 8 9 FLASHBK 6 3 FREEZE Remote Control / For 42PC3D/3DC/3DV, For 32/37/42LC2D, 32LC2DU Batteries 50PC3D 42LC2D only 32LC2D/U only 2-Wall brackets 2-eye-bolts 42PC3D/3DC/3DV only 2-bolts (Refer p.14) Option Extras D-sub 15 pin cable Twister Holder 2-TV brackets...
Power Cord 75Ω Round Cable Owner's Manual TV INPUT TV AUDIO POWER DAY - Do not wipe roughly when removing stain. Stand Installation for 32LC2D/U 1 Carefully place the product screen side down on ... PAGE INFO 1 FAV 4 7 2 PAGE CH 5 EZ ADJUST PIC EZ APM SOUND 0 SAP 8 9 FLASHBK 6 3 FREEZE Remote Control / For 42PC3D/3DC/3DV, For 32/37/42LC2D, 32LC2DU Batteries 50PC3D 42LC2D only 32LC2D/U only 2-Wall brackets 2-eye-bolts 42PC3D/3DC/3DV only 2-bolts (Refer p.14) Option Extras D-sub 15 pin cable Twister Holder 2-TV brackets...
Owner's Manual
Page 13
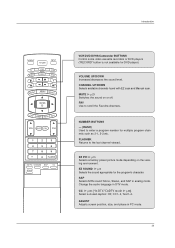
... environment. Introduction TV INPUT POWER TV AUDIO DVD MODE CABLE INPUT VCR STB BRIGHT - CHANNEL UP/DOWN Selects available channels found with EZ scan and Manual scan. MENU BRIGHT + ENTER EXIT TIMER RATIO INFO VOL MUTE FAV CH 1 2 3 4 5 6 7 8 9 0 FLASHBK EZ PIC EZ SOUND SAP CC ADJUST VCR/DVD/DVHS/Camcorder BUTTONS...
... environment. Introduction TV INPUT POWER TV AUDIO DVD MODE CABLE INPUT VCR STB BRIGHT - CHANNEL UP/DOWN Selects available channels found with EZ scan and Manual scan. MENU BRIGHT + ENTER EXIT TIMER RATIO INFO VOL MUTE FAV CH 1 2 3 4 5 6 7 8 9 0 FLASHBK EZ PIC EZ SOUND SAP CC ADJUST VCR/DVD/DVHS/Camcorder BUTTONS...
Owner's Manual
Page 19
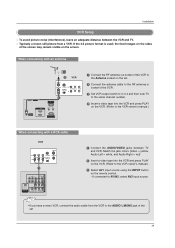
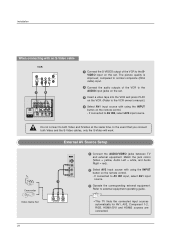
... IN RS-232C IN When connecting with a (CONTROL&SERVICE) RCA cable 1 Connect the RF antenna out socket of the VCR to the VCR owner's manual.) 3 Select AV1 input source using the INPUT button on the remote control. - COMPONENT IN AV OUT AV IN 1 COMPONENT IN AV OUT AV IN... the Antenna socket on the set . To avoid picture noise (interference), leave an adequate distance between TV and VCR. If connected to the VCR owner's manual.) VCR ANT IN OUT S-VIDEO (R) AUDIO (L) VIDEO OUTPUT SWITCH IN 34 VIDEO AUDIO ANT OUT 1 OPTICAL DIGITAL AUDIO ( ) VIDEOS-VIDEO VIDEOAUDIO AUDIO ...
... IN RS-232C IN When connecting with a (CONTROL&SERVICE) RCA cable 1 Connect the RF antenna out socket of the VCR to the VCR owner's manual.) 3 Select AV1 input source using the INPUT button on the remote control. - COMPONENT IN AV OUT AV IN 1 COMPONENT IN AV OUT AV IN... the Antenna socket on the set . To avoid picture noise (interference), leave an adequate distance between TV and VCR. If connected to the VCR owner's manual.) VCR ANT IN OUT S-VIDEO (R) AUDIO (L) VIDEO OUTPUT SWITCH IN 34 VIDEO AUDIO ANT OUT 1 OPTICAL DIGITAL AUDIO ( ) VIDEOS-VIDEO VIDEOAUDIO AUDIO ...
Owner's Manual
Page 20
... cables, only the S-Video will work. In the event that you connect both Video and S-Video at the same time. Refer to the VCR owner's manual.) 4 Select AV1 input source with using the INPUT button on the remote control. - The picture quality is improved;
... cables, only the S-Video will work. In the event that you connect both Video and S-Video at the same time. Refer to the VCR owner's manual.) 4 Select AV1 input source with using the INPUT button on the remote control. - The picture quality is improved;
Owner's Manual
Page 21
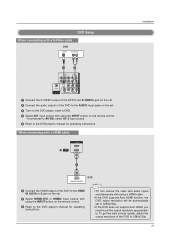
... TV can receive the video and audio signal simultaneously with using the INPUT button on the remote control. 3 Refer to the DVD player's manual for operating instructions. If connected to AV IN2, select AV 2 input source. 5 Refer to set the output resolution appropriately. When connecting with...output resolution will be automatically set to 1280x720p. • If the DVD does not support Auto HDMI, you need to the DVD player's manual for operating instructions. VIDEO AUDIO DVD Setup When connecting with a S-Video cable DVD S-VIDEO (R) AUDIO (L) COMPONENT IN ANTENNA/ CABLE IN ...
... TV can receive the video and audio signal simultaneously with using the INPUT button on the remote control. 3 Refer to the DVD player's manual for operating instructions. If connected to AV IN2, select AV 2 input source. 5 Refer to set the output resolution appropriately. When connecting with...output resolution will be automatically set to 1280x720p. • If the DVD does not support Auto HDMI, you need to the DVD player's manual for operating instructions. VIDEO AUDIO DVD Setup When connecting with a S-Video cable DVD S-VIDEO (R) AUDIO (L) COMPONENT IN ANTENNA/ CABLE IN ...
Owner's Manual
Page 22
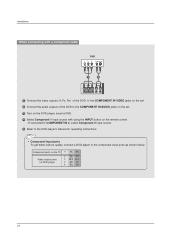
COMPONENT IN AV OUT AV IN 1 • Component Input ports VIDEO AUDIO To get better picture quality, connect a DVD player to the DVD player's manual for operating instructions. If connected to COMPONENT IN 2, select Component 2 input source. 5 Refer to the component input ports as shown below. Installation When connecting with a ...
COMPONENT IN AV OUT AV IN 1 • Component Input ports VIDEO AUDIO To get better picture quality, connect a DVD player to the DVD player's manual for operating instructions. If connected to COMPONENT IN 2, select Component 2 input source. 5 Refer to the component input ports as shown below. Installation When connecting with a ...
Owner's Manual
Page 23
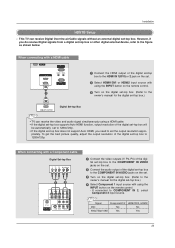
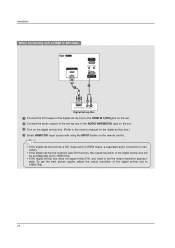
...; TV can receive Digital Over-the-air/Cable signals without an external digital set -top box or other digital external device, refer to the owner's manual for the digita(ClONTsROLe&StER-VtICoE) p box.) 4 Select Component 1 input source with using a HDMI cable. • If the digital set-top box ... output resolution of the digital set the output resolution appro- However, if you need to set -top box to the RS-232C IN owner's manual for the digital set . Installation HDSTB Setup - To get the best picture quality, adjust the output resolution of the digital set-top box will...
...; TV can receive Digital Over-the-air/Cable signals without an external digital set -top box or other digital external device, refer to the owner's manual for the digita(ClONTsROLe&StER-VtICoE) p box.) 4 Select Component 1 input source with using a HDMI cable. • If the digital set-top box ... output resolution of the digital set the output resolution appro- However, if you need to set -top box to the RS-232C IN owner's manual for the digital set . Installation HDSTB Setup - To get the best picture quality, adjust the output resolution of the digital set-top box will...
Owner's Manual
Page 24
...-top box will be automatically set to 1280x720p. • If the digital set-top box does not support Auto DVI, you need to the owner's manual for the d(PCi)gital set-top box.) REMORTEGBAIUNDIO IN CONTROL IN (RGB/DVI) 4 Select HDMI1/DVI input source with a HDMI to DVI cable SERVICE HDMI...
...-top box will be automatically set to 1280x720p. • If the digital set-top box does not support Auto DVI, you need to the owner's manual for the d(PCi)gital set-top box.) REMORTEGBAIUNDIO IN CONTROL IN (RGB/DVI) 4 Select HDMI1/DVI input source with a HDMI to DVI cable SERVICE HDMI...
Owner's Manual
Page 25
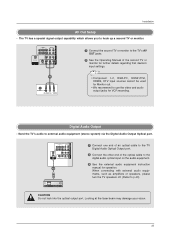
...DIGITAL AUDIO OUT S-VIDEO VIDEO (MONO) AUDIO 1 Connect the second TV or monitor to the TV's AV OUT jacks. 2 See the Operating Manual of the optical cable to hook up a second TV or monitor. The TV has a special signal output capability which allows you to the ...digital audio optical input on the audio equipment. 3 See the external audio equipment instruction manual for VCR recording. Digital Audio Output - COMPONENT IN AV OUT AV IN 1 VIDEO AUDIO OPTICAL DIGITAL AUDIO OUT S-VIDEO VIDEO (MONO) AUDIO 1/2...
...DIGITAL AUDIO OUT S-VIDEO VIDEO (MONO) AUDIO 1 Connect the second TV or monitor to the TV's AV OUT jacks. 2 See the Operating Manual of the optical cable to hook up a second TV or monitor. The TV has a special signal output capability which allows you to the ...digital audio optical input on the audio equipment. 3 See the external audio equipment instruction manual for VCR recording. Digital Audio Output - COMPONENT IN AV OUT AV IN 1 VIDEO AUDIO OPTICAL DIGITAL AUDIO OUT S-VIDEO VIDEO (MONO) AUDIO 1/2...
Owner's Manual
Page 27
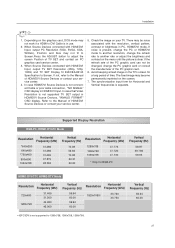
In case that Video Resolution is not connected Cable or poor cable connection, "NO SIGNAL" OSD display in use. 2. Refer to the Manual of HDMI/DVI Source Devices or contact your TV. Installation 1. When Source Devices connected with HDMI/DVI Input, output TV SET Resolution (480p, 720p, ...CEA-861-B Specification to another rate or adjust the brightness and contrast on the menu until the picture is clear. If not, refer to the Manual of HDMI/DVI Source Devices or contact your service center. 4. Check the image on the TV's screen for Horizontal and Vertical frequencies is in...
In case that Video Resolution is not connected Cable or poor cable connection, "NO SIGNAL" OSD display in use. 2. Refer to the Manual of HDMI/DVI Source Devices or contact your TV. Installation 1. When Source Devices connected with HDMI/DVI Input, output TV SET Resolution (480p, 720p, ...CEA-861-B Specification to another rate or adjust the brightness and contrast on the menu until the picture is clear. If not, refer to the Manual of HDMI/DVI Source Devices or contact your service center. 4. Check the image on the TV's screen for Horizontal and Vertical frequencies is in...
Owner's Manual
Page 30
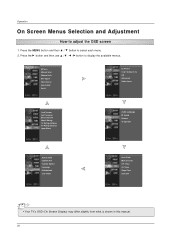
... TV Rating-General Input Block Audio Language EZ Sound Balance TV Speaker Aspect Ratio Caption/Text Caption Option Language ISM Method Low Power Auto Clock Manual Clock Off Timer On Timer Sleep Timer Auto Off • Your TV's OSD (On Screen Display) may differ slightly from what is shown in ...this manual. 30 Press the G button and then use D / E / F / G button to adjust the OSD screen 1. Operation On Screen Menus Selection and Adjustment How to display the ...
... TV Rating-General Input Block Audio Language EZ Sound Balance TV Speaker Aspect Ratio Caption/Text Caption Option Language ISM Method Low Power Auto Clock Manual Clock Off Timer On Timer Sleep Timer Auto Off • Your TV's OSD (On Screen Display) may differ slightly from what is shown in ...this manual. 30 Press the G button and then use D / E / F / G button to adjust the OSD screen 1. Operation On Screen Menus Selection and Adjustment How to display the ...
Owner's Manual
Page 31
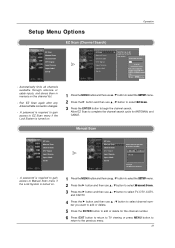
... is turned on. 1 Press the MENU button and then use D / E button to select the SETUP menu. 2 Press the G button and then use D / E button to select Manual Scan. 3 Press the G button and then use D / E button to select TV, DTV, CATV, and CADTV. 4 Press the G button and then use D / E button to ... Channel Edit DTV Signal Input Source Input Label Set ID Select channel type and RF-channel number. A password is required to gain access to Manual Scan menu if the Lock System is turned on the channel list. - Processing EZ scan... Next MENU Previous - Setup Menu Options Operation EZ Scan ...
... is turned on. 1 Press the MENU button and then use D / E button to select the SETUP menu. 2 Press the G button and then use D / E button to select Manual Scan. 3 Press the G button and then use D / E button to select TV, DTV, CATV, and CADTV. 4 Press the G button and then use D / E button to ... Channel Edit DTV Signal Input Source Input Label Set ID Select channel type and RF-channel number. A password is required to gain access to Manual Scan menu if the Lock System is turned on the channel list. - Processing EZ scan... Next MENU Previous - Setup Menu Options Operation EZ Scan ...

Owner's Manual
Page 32
... Channel Edit DTV Signal Input Source Input Label Set ID Channel Edit EZ Scan Manual Scan Channel Edit DTV Signal Input Source Input Label Set ID G Selection ( G or ) leads you can be created by referring to the small window at ...
... Channel Edit DTV Signal Input Source Input Label Set ID Channel Edit EZ Scan Manual Scan Channel Edit DTV Signal Input Source Input Label Set ID G Selection ( G or ) leads you can be created by referring to the small window at ...
Owner's Manual
Page 33
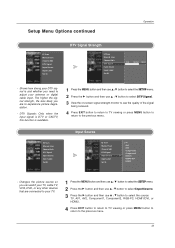
...return to TV viewing or press MENU button to return to experience picture degradation. - EZ Scan Manual Scan Channel Edit DTV Signal Input Source Input Label Set ID Input Source EZ Scan Manual Scan Channel Edit DTV Signal Input Source Input Label Set ID TV AV1 AV2 Component1 Component2 G ... to return to adjust your antenna or digital cable input. Setup Menu Options continued Operation EZ Scan Manual Scan Channel Edit DTV Signal Input Source Input Label Set ID DTV Signal Strength EZ Scan Manual Scan Channel Edit DTV Signal Input Source Input Label Set ID Bad Normal Good -
...return to TV viewing or press MENU button to return to experience picture degradation. - EZ Scan Manual Scan Channel Edit DTV Signal Input Source Input Label Set ID Input Source EZ Scan Manual Scan Channel Edit DTV Signal Input Source Input Label Set ID TV AV1 AV2 Component1 Component2 G ... to return to adjust your antenna or digital cable input. Setup Menu Options continued Operation EZ Scan Manual Scan Channel Edit DTV Signal Input Source Input Label Set ID DTV Signal Strength EZ Scan Manual Scan Channel Edit DTV Signal Input Source Input Label Set ID Bad Normal Good -
Owner's Manual
Page 34
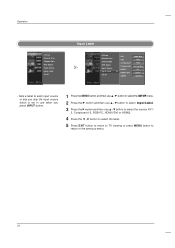
... Channel Edit DTV Signal Input Source Input Label Set ID Input Label EZ Scan Manual Scan Channel Edit DTV Signal Input Source Input Label Set ID AV1 Cable Box AV2 VCR Component1 DVD Component2 Set Top Box RGB-PC G HDMI1/...
... Channel Edit DTV Signal Input Source Input Label Set ID Input Label EZ Scan Manual Scan Channel Edit DTV Signal Input Source Input Label Set ID AV1 Cable Box AV2 VCR Component1 DVD Component2 Set Top Box RGB-PC G HDMI1/...


