
Owners Manual
Page 1
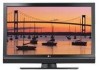
www.lgcommercial.com Record model number and serial number of the set . Retain it for future reference. LCD TV PLASMA TV OWNER'S MANUAL LCD TV MODELS PLASMA TV MODEL 32LC5DC 32LC50C 42PX8DC 32LC5DCS 32LC50CS 32LC5DCB 32LC50CB 37LC5DC 32LX50C 37LC5DCB 32LX50CS 37LC5DC1 37LC50C 42LC5DC 37LC50CB 32LX5DC 42LB50C 32LX5DCS 42LC50C 42LB5DC Please read this manual carefully before operating your dealer when you require service. See the label attached on the back cover and quote t tion to your set .
www.lgcommercial.com Record model number and serial number of the set . Retain it for future reference. LCD TV PLASMA TV OWNER'S MANUAL LCD TV MODELS PLASMA TV MODEL 32LC5DC 32LC50C 42PX8DC 32LC5DCS 32LC50CS 32LC5DCB 32LC50CB 37LC5DC 32LX50C 37LC5DCB 32LX50CS 37LC5DC1 37LC50C 42LC5DC 37LC50CB 32LX5DC 42LB50C 32LX5DCS 42LC50C 42LB5DC Please read this manual carefully before operating your dealer when you require service. See the label attached on the back cover and quote t tion to your set .
Owners Manual
Page 5
... 16 GROUNDING Ensure that appliance and has no objects filled with liquids, such as vases, shall be placed on or over . Any of this owner's manual to qualified service personnel. Power Supply Short-circuit Breaker 17 DISCONNECTING DEVICE FROM MAINS Mains plug is used, use marking : WARNING - that is, a single outlet...
... 16 GROUNDING Ensure that appliance and has no objects filled with liquids, such as vases, shall be placed on or over . Any of this owner's manual to qualified service personnel. Power Supply Short-circuit Breaker 17 DISCONNECTING DEVICE FROM MAINS Mains plug is used, use marking : WARNING - that is, a single outlet...
Owners Manual
Page 6
... 63 Caption Options 64 Auto Scan (EZ Scan 36 - EZ Picture - User Mode 47 Color Tone - User Mode 56 Balance Adjustment 57 TV Speakers On/Off Setup 58 Stereo/SAP Broadcasts Setup 59 Audio Language 60 On-Screen Menus Language Selection 61 Caption/Text 62 - Preset 46... Manual Picture Adjustment - Black (Darkness) Level 51 Picture Reset 52 Low-Power Picture Mode 52 Image Sticking Minimization( ISM) Method 53 SOUND & LANGUAGE CONTROL...
... 63 Caption Options 64 Auto Scan (EZ Scan 36 - EZ Picture - User Mode 47 Color Tone - User Mode 56 Balance Adjustment 57 TV Speakers On/Off Setup 58 Stereo/SAP Broadcasts Setup 59 Audio Language 60 On-Screen Menus Language Selection 61 Caption/Text 62 - Preset 46... Manual Picture Adjustment - Black (Darkness) Level 51 Picture Reset 52 Low-Power Picture Mode 52 Image Sticking Minimization( ISM) Method 53 SOUND & LANGUAGE CONTROL...
Owners Manual
Page 7
TIME SETTING Clock Setting 65 Auto Clock Setup 65 Manual Clock Setup 66 Auto On/Off Timer Setting 67 Auto Shut-off Setting 68 Sleep Timer Setting 69 SCREEN ADJUSTMENT Auto Configure (RGB(PC) Mode only 70 Manual Configure 71 Selecting XGA Mode 72 Initializing (Reset ...to Original Factory Settings) . 73 PARENTAL CONTROL / RATINGS Set Password & Lock System 74 - TV Rating Children & General 78 TV Rating English & French 79 APPENDIX Troubleshooting 80 Maintenance 82...
TIME SETTING Clock Setting 65 Auto Clock Setup 65 Manual Clock Setup 66 Auto On/Off Timer Setting 67 Auto Shut-off Setting 68 Sleep Timer Setting 69 SCREEN ADJUSTMENT Auto Configure (RGB(PC) Mode only 70 Manual Configure 71 Selecting XGA Mode 72 Initializing (Reset ...to Original Factory Settings) . 73 PARENTAL CONTROL / RATINGS Set Password & Lock System 74 - TV Rating Children & General 78 TV Rating English & French 79 APPENDIX Troubleshooting 80 Maintenance 82...
Owners Manual
Page 9
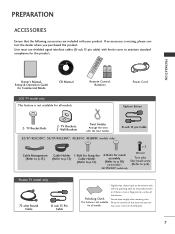
... for Commercial Mode CD Manual Remote Control, Batteries Power Cord LCD TV model only This feature is missing, please contact the dealer where you purchased the product. TV Bracket Bolts 2- This feature is stain or fingerprint on the exterior only with the twist holder. 32/37/42LC5DC*, 32/37/42LC50C*, 42LB5DC, 42LB50C models only D-sub...
... for Commercial Mode CD Manual Remote Control, Batteries Power Cord LCD TV model only This feature is missing, please contact the dealer where you purchased the product. TV Bracket Bolts 2- This feature is stain or fingerprint on the exterior only with the twist holder. 32/37/42LC5DC*, 32/37/42LC50C*, 42LB5DC, 42LB50C models only D-sub...
Owners Manual
Page 23
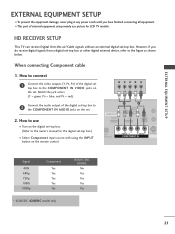
... connecting Component cable 1. RJP RFACE VIDEO AUDIO S-VIDEO ( ) COMPONENT IN Signal 480i 480p 720p 1080i 1080p Component Yes Yes Yes Yes Yes * 42LB5DC, 42LB50C model only HDMI1/DVI, HDMI2 No Yes Yes Yes Yes 21 Y PB PR L R Connect the audio output of the digital set top...picture for the digital set -top box. HD RECEIVER SETUP This TV can receive Digital Over-the-air/Cable signals without an external digital set -top box.) ■ Select Component input source with using the INPUT button on the digital set-top box. (Refer to the owner's manual for LCD TV models.
... connecting Component cable 1. RJP RFACE VIDEO AUDIO S-VIDEO ( ) COMPONENT IN Signal 480i 480p 720p 1080i 1080p Component Yes Yes Yes Yes Yes * 42LB5DC, 42LB50C model only HDMI1/DVI, HDMI2 No Yes Yes Yes Yes 21 Y PB PR L R Connect the audio output of the digital set top...picture for the digital set -top box. HD RECEIVER SETUP This TV can receive Digital Over-the-air/Cable signals without an external digital set -top box.) ■ Select Component input source with using the INPUT button on the digital set-top box. (Refer to the owner's manual for LCD TV models.
Owners Manual
Page 24
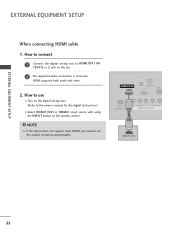
How to use ■ Turn on the digital set-top box. ( ) (Refer to the owner's manual for the digital set the output resolution appropriately. HDMI/DVI IN 1(DVI) DIGITAL AUDIO OUT (OPTICAL) 2 M.P.I RJP INTERFACE 1 VIDEO AUDIO COMPONENT IN HDMI-DTV OUTPUT ( ) ...
How to use ■ Turn on the digital set-top box. ( ) (Refer to the owner's manual for the digital set the output resolution appropriately. HDMI/DVI IN 1(DVI) DIGITAL AUDIO OUT (OPTICAL) 2 M.P.I RJP INTERFACE 1 VIDEO AUDIO COMPONENT IN HDMI-DTV OUTPUT ( ) ...
Owners Manual
Page 25
How to use ■ Turn on the digital set-top box. (Refer to the owner's manual for the digital set-top box.) ■ Select HDMI1/DVI or HDMI2 input source with using the INPUT button on the set -top box to ...
How to use ■ Turn on the digital set-top box. (Refer to the owner's manual for the digital set-top box.) ■ Select HDMI1/DVI or HDMI2 input source with using the INPUT button on the set -top box to ...
Owners Manual
Page 26
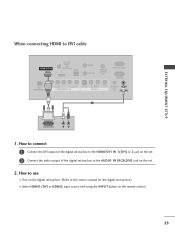
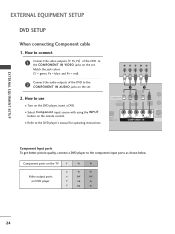
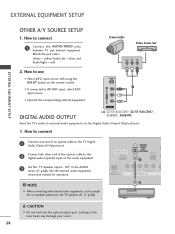
How to the DVD player's manual for operating instructions. HDMI/DVI IN 1(DVI) 1 2 DIGITAL AUDIO OUT (OPTICAL) 2 M.P.I. ■ Select Component input source with using the INPUT button on the remote control. &#... DVD player, insert a DVD. Y PB PR L R Connect the audio outputs of the DVD to the component input ports as shown below. Component ports on the TV Y Y Video output ports Y on the set . Match the jack colors (Y = green, PB = blue, and PR = red). EXTERNAL EQUIPMENT SETUP EXTERNAL EQUIPMENT SETUP DVD SETUP When...
How to the DVD player's manual for operating instructions. HDMI/DVI IN 1(DVI) 1 2 DIGITAL AUDIO OUT (OPTICAL) 2 M.P.I. ■ Select Component input source with using the INPUT button on the remote control. &#... DVD player, insert a DVD. Y PB PR L R Connect the audio outputs of the DVD to the component input ports as shown below. Component ports on the TV Y Y Video output ports Y on the set . Match the jack colors (Y = green, PB = blue, and PR = red). EXTERNAL EQUIPMENT SETUP EXTERNAL EQUIPMENT SETUP DVD SETUP When...
Owners Manual
Page 27
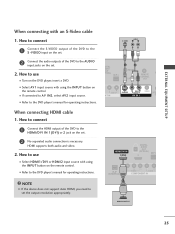
When connecting with using the INPUT button on the remote control. ( ) ( ■ Refer to the DVD player's manual for operating instructions. 1 2 GITAL UDIO OUT RESET TICAL) M.P.I ■ Select HDMI1/DVI or HDMI2 input source with an S-Video cable 1. How to connect... device does not support Auto HDMI, you need to the AUDIO input jacks on the set the output resolution appropriately. How to the DVD player's manual for operating instructions. HDMI-DVD OUTPUT 25 S-VIDEO AUDIO L R EXTERNAL EQUIPMENT SETUP 2 Connect the audio outputs of the DVD to the S -...
When connecting with using the INPUT button on the remote control. ( ) ( ■ Refer to the DVD player's manual for operating instructions. 1 2 GITAL UDIO OUT RESET TICAL) M.P.I ■ Select HDMI1/DVI or HDMI2 input source with an S-Video cable 1. How to connect... device does not support Auto HDMI, you need to the AUDIO input jacks on the set the output resolution appropriately. How to the DVD player's manual for operating instructions. HDMI-DVD OUTPUT 25 S-VIDEO AUDIO L R EXTERNAL EQUIPMENT SETUP 2 Connect the audio outputs of the DVD to the S -...
Owners Manual
Page 28
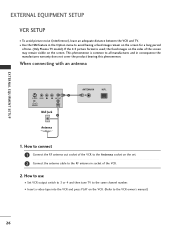
...socket of the VCR to the Antenna socket on the set. 2 Connect the antenna cable to all manufactures and in socket of time. (Only Plasma TV model). If the 4:3 picture format is common to the RF antenna in consequence the manufactures warranty does not cover the product bearing this phenomenon. How... to use ■ Set VCR output switch to 3 or 4 and then tune TV to the VCR owner's manual.) 26 the fixed images on the sides of the screen may remain visible on the VCR. (Refer to the same channel number. ■...
...socket of the VCR to the Antenna socket on the set. 2 Connect the antenna cable to all manufactures and in socket of time. (Only Plasma TV model). If the 4:3 picture format is common to the RF antenna in consequence the manufactures warranty does not cover the product bearing this phenomenon. How... to use ■ Set VCR output switch to 3 or 4 and then tune TV to the VCR owner's manual.) 26 the fixed images on the sides of the screen may remain visible on the VCR. (Refer to the same channel number. ■...
Owners Manual
Page 29
... set. 2. SER REMOTE CONTROL UPDATE OUT ■ Insert a video tape into the VCR and press PLAY on the VCR. (Refer to the VCR owner's manual.) ■ Select A V 1 input source with using the INPUT button on the remote control. ■ If connected to the AUDIO input jacks on the ...red) M.P.I . ANT IN S-VIDEO L R VIDEO ANT OUT OUTPUT SWITCH 2 Connect the audio outputs of the VCR to connect 1 Connect the AUDIO/VIDEO jacks between TV and VCR. How to use ■ Insert a video tape into the VCR and press PLAY on the set . 1. NOTE G The picture quality is improved: ...
... set. 2. SER REMOTE CONTROL UPDATE OUT ■ Insert a video tape into the VCR and press PLAY on the VCR. (Refer to the VCR owner's manual.) ■ Select A V 1 input source with using the INPUT button on the remote control. ■ If connected to the AUDIO input jacks on the ...red) M.P.I . ANT IN S-VIDEO L R VIDEO ANT OUT OUTPUT SWITCH 2 Connect the audio outputs of the VCR to connect 1 Connect the AUDIO/VIDEO jacks between TV and VCR. How to use ■ Insert a video tape into the VCR and press PLAY on the set . 1. NOTE G The picture quality is improved: ...
Owners Manual
Page 30
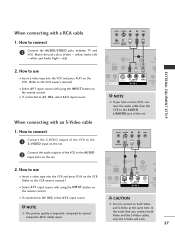
S-VIDEO 1 VIDEO L/MONO AUDIO R AV IN 2 DIGITAL AUDIO OUTPUT i.e) 32/37/42LC5DC*, 32/37/42LC50C*, 42LB5DC, 42LB50C Send the TV's audio to connect 1 Connect the AUDIO/VIDEO jacks between TV and external equipment. HDMI/DVI IN 1(DVI) DIGITAL AUDIO OUT (OPTICAL) 2 M.P.I. 1 ( RJP VIDEO AUDIO S-V ... to AV IN1 input, select A V 1 input source. ■ Operate the corresponding external equipment. See the external audio equipment instruction manual for operation. Looking at the laser beam may damage your vision. 28 Match the jack colors. (Video = yellow, Audio Left = white...
S-VIDEO 1 VIDEO L/MONO AUDIO R AV IN 2 DIGITAL AUDIO OUTPUT i.e) 32/37/42LC5DC*, 32/37/42LC50C*, 42LB5DC, 42LB50C Send the TV's audio to connect 1 Connect the AUDIO/VIDEO jacks between TV and external equipment. HDMI/DVI IN 1(DVI) DIGITAL AUDIO OUT (OPTICAL) 2 M.P.I. 1 ( RJP VIDEO AUDIO S-V ... to AV IN1 input, select A V 1 input source. ■ Operate the corresponding external equipment. See the external audio equipment instruction manual for operation. Looking at the laser beam may damage your vision. 28 Match the jack colors. (Video = yellow, Audio Left = white...
Owners Manual
Page 37
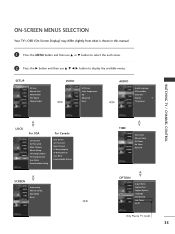
Block Downloadable Rating For Canada Lock System Set Password Block Channel TV Rating-English TV Rating-French Aux. ON-SCREEN MENUS SELECTION Your TV's OSD (On Screen Display) may differ slightly from what is shown in this manual. 1 Press the MENU button and then use D or E button to select the each menu....VIDEO AUDIO TIME OPTION SCREEN LOCK Lock System Set Password Block Channel Movie Rating TV Rating-Children TV Rating-General Aux. XGA Mode Reset TIME SETUP VIDEO AUDIO TIME OPTION SCREEN LOCK Auto Clock Manual Clock Off Timer On Timer Auto Off OPTION SETUP VIDEO AUDIO TIME OPTION ...
Block Downloadable Rating For Canada Lock System Set Password Block Channel TV Rating-English TV Rating-French Aux. ON-SCREEN MENUS SELECTION Your TV's OSD (On Screen Display) may differ slightly from what is shown in this manual. 1 Press the MENU button and then use D or E button to select the each menu....VIDEO AUDIO TIME OPTION SCREEN LOCK Lock System Set Password Block Channel Movie Rating TV Rating-Children TV Rating-General Aux. XGA Mode Reset TIME SETUP VIDEO AUDIO TIME OPTION SCREEN LOCK Auto Clock Manual Clock Off Timer On Timer Auto Off OPTION SETUP VIDEO AUDIO TIME OPTION ...
Owners Manual
Page 38
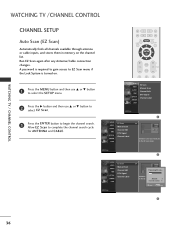
... LOG 9 Found Channel(s) 4 Next MENU Prev. 3 36 Selection ( G or ) leads you to begin the channel search. WATCHING TV / CHANNEL CONTROL WATCHING TV /CHANNEL CONTROL CHANNEL SETUP Auto Scan (EZ Scan) Automatically finds all channels available through antenna or cable inputs, and stores them in memory...button to select EZ Scan. 3 Press the ENTER button to the EZ scan screen. 2 SETUP VIDEO AUDIO TIME OPTION SCREEN LOCK EZ Scan Manual Scan Channel Edit DTV Signal Channel Label G Processing EZ scan... Allow EZ Scan to the EZ scan screAeNnA. CH A password is required ...
... LOG 9 Found Channel(s) 4 Next MENU Prev. 3 36 Selection ( G or ) leads you to begin the channel search. WATCHING TV / CHANNEL CONTROL WATCHING TV /CHANNEL CONTROL CHANNEL SETUP Auto Scan (EZ Scan) Automatically finds all channels available through antenna or cable inputs, and stores them in memory...button to select EZ Scan. 3 Press the ENTER button to the EZ scan screen. 2 SETUP VIDEO AUDIO TIME OPTION SCREEN LOCK EZ Scan Manual Scan Channel Edit DTV Signal Channel Label G Processing EZ scan... Allow EZ Scan to the EZ scan screAeNnA. CH A password is required ...
Owners Manual
Page 39
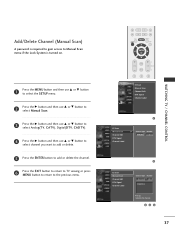
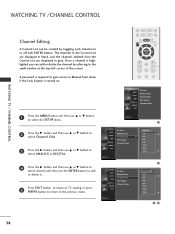
...5 6 8 9 Press the MENU button and then use D or E button 0 1 to select the SETUP menu. 2 Press the G button and then use D or E button to select Manual Scan. 3 Press the G button and then use D or E button to select Analog(T V, CATV), Digital(D T V, CADTV). 4 Press the G button and then use D or E button ... the channel. 6 Press the EXIT button to return to TV viewing or press MENU button to return to delete the channel. 345 37 WATCHING TV / CHANNEL CONTROL Add/Delete Channel (Manual Scan) A password is required to gain access to Manual Scan menu if the Lock System is turned on.
...5 6 8 9 Press the MENU button and then use D or E button 0 1 to select the SETUP menu. 2 Press the G button and then use D or E button to select Manual Scan. 3 Press the G button and then use D or E button to select Analog(T V, CATV), Digital(D T V, CADTV). 4 Press the G button and then use D or E button ... the channel. 6 Press the EXIT button to return to TV viewing or press MENU button to return to delete the channel. 345 37 WATCHING TV / CHANNEL CONTROL Add/Delete Channel (Manual Scan) A password is required to gain access to Manual Scan menu if the Lock System is turned on.
Owners Manual
Page 40
... OPTION Channel Label 9-0 SCREEN 11-0 LOCK 13-0 14-0 E SETUP VIDEO AUDIO TIME OPTION SCREEN LOCK EZ Scan Manual Scan Channel Edit DTV Signal Channel Label 2 D E ANALOG G 2-0 D 4-0 6-0 9-0 11-0 13-0 14-0 E 34 38 WATCHING TV /CHANNEL CONTROL Channel Editing A Custom List can add or delete the channel by toggling each channel on . 7... button to select channel and then use the ENTER button to add or delete it. 5 Press EXIT button to return to TV viewing or press MENU button to return to Manual Scan menu 4 5 6 if the Lock System is turned on or off with ENTER button.
... OPTION Channel Label 9-0 SCREEN 11-0 LOCK 13-0 14-0 E SETUP VIDEO AUDIO TIME OPTION SCREEN LOCK EZ Scan Manual Scan Channel Edit DTV Signal Channel Label 2 D E ANALOG G 2-0 D 4-0 6-0 9-0 11-0 13-0 14-0 E 34 38 WATCHING TV /CHANNEL CONTROL Channel Editing A Custom List can add or delete the channel by toggling each channel on . 7... button to select channel and then use the ENTER button to add or delete it. 5 Press EXIT button to return to TV viewing or press MENU button to return to Manual Scan menu 4 5 6 if the Lock System is turned on or off with ENTER button.
Owners Manual
Page 41
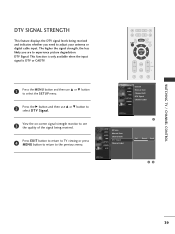
Press EXIT button to return to TV viewing or press 4 MENU button to return to select DTV Signal. CC EXIT RATIO MENU SAP ENTER VOL TIMER MUTE CH PAGE 1 2 3 SETUP VIDEO AUDIO TIME OPTION SCREEN LOCK EZ Scan Manual Scan Channel Edit DTV Signal Channel Label SETUP VIDEO AUDIO ...monitor to see 3 the quality of the signal being received and indicates whether you are to adjust your antenna or digital cable input. WATCHING TV / CHANNEL CONTROL DTV SIGNAL STRENGTH This feature displays the DTV signal levels being received. DTV Signal: This function is only available when the...
Press EXIT button to return to TV viewing or press 4 MENU button to return to select DTV Signal. CC EXIT RATIO MENU SAP ENTER VOL TIMER MUTE CH PAGE 1 2 3 SETUP VIDEO AUDIO TIME OPTION SCREEN LOCK EZ Scan Manual Scan Channel Edit DTV Signal Channel Label SETUP VIDEO AUDIO ...monitor to see 3 the quality of the signal being received and indicates whether you are to adjust your antenna or digital cable input. WATCHING TV / CHANNEL CONTROL DTV SIGNAL STRENGTH This feature displays the DTV signal levels being received. DTV Signal: This function is only available when the...
Owners Manual
Page 42
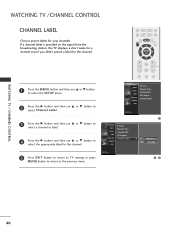
... Channel Edit DTV Signal Channel Label SETUP VIDEO AUDIO TIME OPTION SCREEN LOCK EZ Scan Manual Scan Channel Edit DTV Signal Channel Label 1 G Ch. WATCHING TV / CHANNEL CONTROL 2 Press the G button and then use D or E button to select Channel Label. 3 Press the G button and then use... D or E button to select a channel to label. 4 Press the G button and then use D or E button to select the SETUP menu. WATCHING TV /CHANNEL CONTROL CHANNEL LABEL Choose preset labels for the channel. CC EXIT RATIO MENU SAP ENTER CH 1 2 3 4 5 6 7 8 9 0 1 Press the ...
... Channel Edit DTV Signal Channel Label SETUP VIDEO AUDIO TIME OPTION SCREEN LOCK EZ Scan Manual Scan Channel Edit DTV Signal Channel Label 1 G Ch. WATCHING TV / CHANNEL CONTROL 2 Press the G button and then use D or E button to select Channel Label. 3 Press the G button and then use... D or E button to select a channel to label. 4 Press the G button and then use D or E button to select the SETUP menu. WATCHING TV /CHANNEL CONTROL CHANNEL LABEL Choose preset labels for the channel. CC EXIT RATIO MENU SAP ENTER CH 1 2 3 4 5 6 7 8 9 0 1 Press the ...
Owners Manual
Page 49
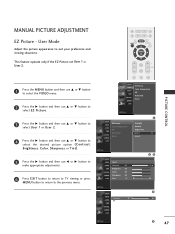
User Mode Adjust the picture appearance to the previous menu. MANUAL PICTURE ADJUSTMENT EZ Picture - CC EXIT RATIO MENU SAP ENTER VOL TIMER MUTE CH PAGE 1 2 3 SETUP VIDEO AUDIO TIME OPTION SCREEN LOCK EZ Picture Color ... picture option ( C o n t r a s t, Brightness, Color, Sharpness, or Tint). 5 Press the G button and then use F or G button to make appropriate adjustments. 6 Press EXIT button to return to TV viewing or press MENU button to return to suit your preference and viewing situations.
User Mode Adjust the picture appearance to the previous menu. MANUAL PICTURE ADJUSTMENT EZ Picture - CC EXIT RATIO MENU SAP ENTER VOL TIMER MUTE CH PAGE 1 2 3 SETUP VIDEO AUDIO TIME OPTION SCREEN LOCK EZ Picture Color ... picture option ( C o n t r a s t, Brightness, Color, Sharpness, or Tint). 5 Press the G button and then use F or G button to make appropriate adjustments. 6 Press EXIT button to return to TV viewing or press MENU button to return to suit your preference and viewing situations.


