

Owner's Manual
Page 1
...) ID Number(s): 4560: 37LY95 4534: 42LY95 4558: 47LY95 4537: 42LF65 4605: 42LY96 4607: 52LY96 4609: 42LF66 4611: 52LF65 4725: 42LF75 4615: 60PF96 4551: 60PF95 4535: 37LF65 4536: 47LF65 4604: 37LY96 4606: 47LY96 4608: 37LF66 4610: 47LF66 4612: 52LF66 4614: 50PF96 4724: 37LF75 4911: 42LY99 4965: 50PF95(50PF95-ZJ) 4613: 50PF95 (50PF95...
...) ID Number(s): 4560: 37LY95 4534: 42LY95 4558: 47LY95 4537: 42LF65 4605: 42LY96 4607: 52LY96 4609: 42LF66 4611: 52LF65 4725: 42LF75 4615: 60PF96 4551: 60PF95 4535: 37LF65 4536: 47LF65 4604: 37LY96 4606: 47LY96 4608: 37LF66 4610: 47LF66 4612: 52LF66 4614: 50PF96 4724: 37LF75 4911: 42LY99 4965: 50PF95(50PF95-ZJ) 4613: 50PF95 (50PF95...

Owner's Manual
Page 5
... Sound Output Selection 81 On-Screen Menu Language/Country Selection . . . . . 82 Language selection (In Digital Mode only 83 DIGITAL TELETEXT Teletext within Digital Service 92 Teletext in Digital Service 92 APPENDIX Troubleshooting 93 Maintenance 95 Product Specifications 96 Programming the Remote Control 98 IR Codes 102 External Control Device Setup 104 TIME...
... Sound Output Selection 81 On-Screen Menu Language/Country Selection . . . . . 82 Language selection (In Digital Mode only 83 DIGITAL TELETEXT Teletext within Digital Service 92 Teletext in Digital Service 92 APPENDIX Troubleshooting 93 Maintenance 95 Product Specifications 96 Programming the Remote Control 98 IR Codes 102 External Control Device Setup 104 TIME...

Owner's Manual
Page 9
...2 RGB IN RGB (PC) AUDIO (RGB/DVI) AV 1 AV 2 ANTENNA IN DIGITAL AUDIO OUT OPTICAL VIDEO AUDIO COMPONENT IN RS-232C IN (CONTROL & SERVICE) 45 6 1 PCMCIA (Personal Computer Memory Card International Association) Card Slot (This feature is not available in all countries.) 2 HDMI Input Connect a HDMI signal... to HDMI IN. Note: In standby mode, these ports do not work. 7 8 6 RS-232C IN (CONTROL & SERVICE) PORT Connect to the RS-232C port on a PC. 7 Component Input Connect a component video/audio device to these jacks. 9 Power Cord Socket This TV ...
...2 RGB IN RGB (PC) AUDIO (RGB/DVI) AV 1 AV 2 ANTENNA IN DIGITAL AUDIO OUT OPTICAL VIDEO AUDIO COMPONENT IN RS-232C IN (CONTROL & SERVICE) 45 6 1 PCMCIA (Personal Computer Memory Card International Association) Card Slot (This feature is not available in all countries.) 2 HDMI Input Connect a HDMI signal... to HDMI IN. Note: In standby mode, these ports do not work. 7 8 6 RS-232C IN (CONTROL & SERVICE) PORT Connect to the RS-232C port on a PC. 7 Component Input Connect a component video/audio device to these jacks. 9 Power Cord Socket This TV ...

Owner's Manual
Page 10
... AUDIO OUT VIDEO L/MONO AUDIO R DIGITAL AUDIO OUT VIDEO L/MONO AUDIO R VIDEO L/MONO AUDIO R S-VIDEO 9 S-VIDEO AV IN 3 AV IN 3 RS-232C IN (CONTROL & SERVICE) 45 6 7 8 AV IN 3 S-Video Input Connect S-Video out from an SVIDEO device. 1 PCMCIA CARD SLOT EJECT HDMI/DVI IN 1 2 HDMI IN 2 HDMI IN 3 ...from an external device to operate the TV on DC power. 8 Note: In standby mode, these ports do not work. 6 RS-232C IN (CONTROL & SERVICE) PORT Connect to the RS-232C port on a PC. 7 Component Input Connect a component video/audio device to these jacks. 8 Euro Scart Socket (AV1/...
... AUDIO OUT VIDEO L/MONO AUDIO R DIGITAL AUDIO OUT VIDEO L/MONO AUDIO R VIDEO L/MONO AUDIO R S-VIDEO 9 S-VIDEO AV IN 3 AV IN 3 RS-232C IN (CONTROL & SERVICE) 45 6 7 8 AV IN 3 S-Video Input Connect S-Video out from an SVIDEO device. 1 PCMCIA CARD SLOT EJECT HDMI/DVI IN 1 2 HDMI IN 2 HDMI IN 3 ...from an external device to operate the TV on DC power. 8 Note: In standby mode, these ports do not work. 6 RS-232C IN (CONTROL & SERVICE) PORT Connect to the RS-232C port on a PC. 7 Component Input Connect a component video/audio device to these jacks. 8 Euro Scart Socket (AV1/...

Owner's Manual
Page 11
... a PC. 9 Or DVI(VIDEO)signal to HDMI/DVI port with DVI to the RS-232C port on DC power. 5 RS-232C IN (CONTROL & SERVICE) PORT Connect to HDMI cable. 3 DIGITAL AUDIO OUT OPTICAL Connect digital audio from an external device to these jacks. 9 Power Cord Socket This TV operates...SLOT EJECT HDMI/DVI IN 1 AV 1 AV 2 HDMI IN 2 HDMI IN 3 OPTICAL AV 1 AV 2 RS-232C IN ENNA N ANTENNA IN RS-232C IN (CONTROL & SERVICE) RGB(PC) AUDIO IN (RGB/DVI) RGB IN VIDEO AUDIO COMPONENT IN VIDEO AUDIO 4 56 7 8 1 PCMCIA (Personal Computer Memory Card International Association) Card Slot (This...
... a PC. 9 Or DVI(VIDEO)signal to HDMI/DVI port with DVI to the RS-232C port on DC power. 5 RS-232C IN (CONTROL & SERVICE) PORT Connect to HDMI cable. 3 DIGITAL AUDIO OUT OPTICAL Connect digital audio from an external device to these jacks. 9 Power Cord Socket This TV operates...SLOT EJECT HDMI/DVI IN 1 AV 1 AV 2 HDMI IN 2 HDMI IN 3 OPTICAL AV 1 AV 2 RS-232C IN ENNA N ANTENNA IN RS-232C IN (CONTROL & SERVICE) RGB(PC) AUDIO IN (RGB/DVI) RGB IN VIDEO AUDIO COMPONENT IN VIDEO AUDIO 4 56 7 8 1 PCMCIA (Personal Computer Memory Card International Association) Card Slot (This...

Owner's Manual
Page 20
VIDEO AUDIO 1 COMPONENT IN 18 OPTIC RS-232C IN (CONTROL & SERVICE) RGB(PC) AUD (RGB 2 Turn on the digital set -top box.) 3 Select HDMI1, HDMI2 or HDMI3 input source with using the INPUT button on the .... EJECT HDMI/DVI IN 1 HDMI IN 2 RGB IN RGB(PC) AUD (RG ANTENNA IN OPTICAL COMPONENT I VIDEO AUDIO DIGITAL AUDIO OUT RS-232C IN 1(CONTROL & SERVICE) AV 1 AV Only 37/42LF7*, 42LY99 PCMCIA CARD SLOT EJECT HDMI/DVI IN 1 HDMI IN 2 HDMI IN 3 AV 1 1 Connect the digital set-top box to...
VIDEO AUDIO 1 COMPONENT IN 18 OPTIC RS-232C IN (CONTROL & SERVICE) RGB(PC) AUD (RGB 2 Turn on the digital set -top box.) 3 Select HDMI1, HDMI2 or HDMI3 input source with using the INPUT button on the .... EJECT HDMI/DVI IN 1 HDMI IN 2 RGB IN RGB(PC) AUD (RG ANTENNA IN OPTICAL COMPONENT I VIDEO AUDIO DIGITAL AUDIO OUT RS-232C IN 1(CONTROL & SERVICE) AV 1 AV Only 37/42LF7*, 42LY99 PCMCIA CARD SLOT EJECT HDMI/DVI IN 1 HDMI IN 2 HDMI IN 3 AV 1 1 Connect the digital set-top box to...

Owner's Manual
Page 21
... HDMI/DVI IN 1 jack on the set. Turn on the digital set-top box. (Refer to the owner's (CONTROL & SERVICE) manual for the digital set-top box.) RS-232C IN (CONTROL & SERVICE) ANTENNA IN RGB(PC) OPTICAL AUDIO IN (RGB/DVI) RGB IN VIDEO AUDIO 1 COMPONENT IN 2 DIGITAL AUDIO OUT AV 1 AV...
... HDMI/DVI IN 1 jack on the set. Turn on the digital set-top box. (Refer to the owner's (CONTROL & SERVICE) manual for the digital set-top box.) RS-232C IN (CONTROL & SERVICE) ANTENNA IN RGB(PC) OPTICAL AUDIO IN (RGB/DVI) RGB IN VIDEO AUDIO 1 COMPONENT IN 2 DIGITAL AUDIO OUT AV 1 AV...
Owner's Manual
Page 24
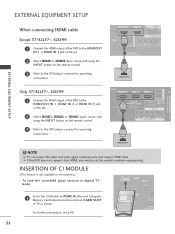
RS-232C IN (CONTROL & SERVICE) ANTENNA IN RGB(PC) OPTICAL AUDIO IN (RGB/DVI) RGB IN 2 Select HDMI1, HDMI2 or HDMI3 input source with using a HDMI cable. NOTE G TV can ... signal simultaneously with using the INPUT button on the remote control. 3 Refer to the DVD player's manual for operating instructions. ! To view the scrambled (pay) services in all countries.) - EXTERNAL EQUIPMENT SETUP DIGITAL AUDIO OUT Only 37/42LF7*, 42LY99 PCMCIA CARD SLOT EJECT HDMI/DVI IN 1 HDMI IN 2 HDMI IN 3 AV...
RS-232C IN (CONTROL & SERVICE) ANTENNA IN RGB(PC) OPTICAL AUDIO IN (RGB/DVI) RGB IN 2 Select HDMI1, HDMI2 or HDMI3 input source with using a HDMI cable. NOTE G TV can ... signal simultaneously with using the INPUT button on the remote control. 3 Refer to the DVD player's manual for operating instructions. ! To view the scrambled (pay) services in all countries.) - EXTERNAL EQUIPMENT SETUP DIGITAL AUDIO OUT Only 37/42LF7*, 42LY99 PCMCIA CARD SLOT EJECT HDMI/DVI IN 1 HDMI IN 2 HDMI IN 3 AV...

Owner's Manual
Page 25
... 1 HDMI IN 2 AV 1 AV 2 When connecting with an antenna ANTENNA IN OPTICAL 1 ANT OUT S-VIDEO VIDEO L R VIDEO AUDIO DIGITAL AUDIO OU RS-232C IN (CONTROL & SERVICE) ANT IN OUTPUT SWITCH Wall Jack 2 Antenna 1 Connect the ANT OUT socket of the VCR. AV 1 AV 2 2 Connect the antenna cable to the ANT IN...
... 1 HDMI IN 2 AV 1 AV 2 When connecting with an antenna ANTENNA IN OPTICAL 1 ANT OUT S-VIDEO VIDEO L R VIDEO AUDIO DIGITAL AUDIO OU RS-232C IN (CONTROL & SERVICE) ANT IN OUTPUT SWITCH Wall Jack 2 Antenna 1 Connect the ANT OUT socket of the VCR. AV 1 AV 2 2 Connect the antenna cable to the ANT IN...
Owner's Manual
Page 27
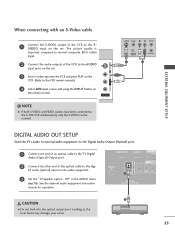
... operation. Looking at the laser beam may damage your vision. 25 AV IN 3 ! tal audio (optical) input on the remote control. RS-232C IN (CONTROL & SERVICE) 2 CAUTION GDo not look into the VCR and press PLAY on the set . 3 Insert a video tape into the optical output port. compared to normal composite...
... operation. Looking at the laser beam may damage your vision. 25 AV IN 3 ! tal audio (optical) input on the remote control. RS-232C IN (CONTROL & SERVICE) 2 CAUTION GDo not look into the VCR and press PLAY on the set . 3 Insert a video tape into the optical output port. compared to normal composite...

Owner's Manual
Page 29
... 2 Connect the PC audio output to the TV's settings. DVI-PC OUTPUT AUDIO ! DIGITAL AUDIO OUT ANTENNA IN COMPONENT IN VIDEO AVUIDDEIOO RS-232C IN SERVICE) RS-232C IN AV 1 AV 2 AV 1 AV 2 AUDIO 3 Turn on the PC and the set. 1 2 4 Select RGB input source with using the INPUT button on...
... 2 Connect the PC audio output to the TV's settings. DVI-PC OUTPUT AUDIO ! DIGITAL AUDIO OUT ANTENNA IN COMPONENT IN VIDEO AVUIDDEIOO RS-232C IN SERVICE) RS-232C IN AV 1 AV 2 AV 1 AV 2 AUDIO 3 Turn on the PC and the set. 1 2 4 Select RGB input source with using the INPUT button on...

Owner's Manual
Page 43
...Tuning Programme Edit 5V Antenna Power Software Update Diagnostics CI Information 1 Start 2 Auto Tuning 0 0 UHF CH. will be updated. The message "All service-information will be deleted. 1 Press the MENU button and then D or E button to select the SETUP menu. 2 Press the G button and ...TIMEO Software Update OPTIONO Diagnostics SCREENO CI Information Move MENU Prev. Use NUMBER buttons to automatically find and store all the stored service information will appear. Then, press the OK button. WATCHING TV / PROGRAMME CONTROL AUTO PROGRAMME TUNING (IN DIGITAL MODE) Use ...
...Tuning Programme Edit 5V Antenna Power Software Update Diagnostics CI Information 1 Start 2 Auto Tuning 0 0 UHF CH. will be updated. The message "All service-information will be deleted. 1 Press the MENU button and then D or E button to select the SETUP menu. 2 Press the G button and ...TIMEO Software Update OPTIONO Diagnostics SCREENO CI Information Move MENU Prev. Use NUMBER buttons to automatically find and store all the stored service information will appear. Then, press the OK button. WATCHING TV / PROGRAMME CONTROL AUTO PROGRAMME TUNING (IN DIGITAL MODE) Use ...

Owner's Manual
Page 49
... Tuning Programme Edit 5V Antenna Power Software Update Diagnostics G CI Information To Set WATCHING TV / PROGRAMME CONTROL 2 Engineerinig DCihaagnnnoestl i3cs0 Manufacturer : LG Electronics Inc. It's displayed the signal information and service name of the turned MUX. Si:g6n0a4l SKtGre0n0g0t0h006 53% Software Version : 1.1.0 Signal Quality CH 30 100% CH 34 D 1 YLE PEU 3 YLE...
... Tuning Programme Edit 5V Antenna Power Software Update Diagnostics G CI Information To Set WATCHING TV / PROGRAMME CONTROL 2 Engineerinig DCihaagnnnoestl i3cs0 Manufacturer : LG Electronics Inc. It's displayed the signal information and service name of the turned MUX. Si:g6n0a4l SKtGre0n0g0t0h006 53% Software Version : 1.1.0 Signal Quality CH 30 100% CH 34 D 1 YLE PEU 3 YLE...

Owner's Manual
Page 50
... 48 23 45 WATCHING TV /PROGRAMME CONTROL CI [COMMON INTERFACE] INFORMATION (IN DIGITAL MODE ONLY) This function enables you to watch the pay services. GUIDE INFO i SLEEP BACK SUBTITLE TV/RADIO I/II RATIO PICTURE SOUND MENU TEXT EXIT OK VOL Q.VIEW PR MUTE BACK MENU INFO i ...Update Diagnostics CI Information G Module 6 Press the EXIT button to return to normal TV viewing. • This OSD is inserted to the Digital pay services). Do not often insert or remove a CAM module from the set turned on country broadcasting circumstance. 1 Press the MENU button and then D or ...
... 48 23 45 WATCHING TV /PROGRAMME CONTROL CI [COMMON INTERFACE] INFORMATION (IN DIGITAL MODE ONLY) This function enables you to watch the pay services. GUIDE INFO i SLEEP BACK SUBTITLE TV/RADIO I/II RATIO PICTURE SOUND MENU TEXT EXIT OK VOL Q.VIEW PR MUTE BACK MENU INFO i ...Update Diagnostics CI Information G Module 6 Press the EXIT button to return to normal TV viewing. • This OSD is inserted to the Digital pay services). Do not often insert or remove a CAM module from the set turned on country broadcasting circumstance. 1 Press the MENU button and then D or ...

Owner's Manual
Page 51
...) DK : PAL D/K, SECAM D/K (East Europe / China / Africa / CIS) 4 Press the E button to a station, the channel number is stored for stations which broadcast VPS (Video Programme Service), PDC (Programme Delivery Control) or TELETEXT data. If no station name can be assigned to select Storage From. INDEX i HOLD FAV VOL PR MUTE 1 2 3 4 5 6 7 8 9 LIST...
...) DK : PAL D/K, SECAM D/K (East Europe / China / Africa / CIS) 4 Press the E button to a station, the channel number is stored for stations which broadcast VPS (Video Programme Service), PDC (Programme Delivery Control) or TELETEXT data. If no station name can be assigned to select Storage From. INDEX i HOLD FAV VOL PR MUTE 1 2 3 4 5 6 7 8 9 LIST...

Owner's Manual
Page 60
... CONTROL PICTURE CONTROL EPG (ELECTRONIC PROGRAMME GUIDE) (IN DIGITAL MODE) This system has an Electronic Programme Guide (EPG) to help your navigation through all available services.
... CONTROL PICTURE CONTROL EPG (ELECTRONIC PROGRAMME GUIDE) (IN DIGITAL MODE) This system has an Electronic Programme Guide (EPG) to help your navigation through all available services.

Owner's Manual
Page 62
... DTV-OUT terminal, using a SCART cable. Remote Control Buttons Function YELLOW Change to Guide or Timer list mode Save Timer Record/Remind F or G Select Type, Service, Date or Start/End time D or E Function setting Button Function in Record/Remind Setting Mode - PICTURE CONTROL Button Function in Extended Description Box Remote Control...
... DTV-OUT terminal, using a SCART cable. Remote Control Buttons Function YELLOW Change to Guide or Timer list mode Save Timer Record/Remind F or G Select Type, Service, Date or Start/End time D or E Function setting Button Function in Record/Remind Setting Mode - PICTURE CONTROL Button Function in Extended Description Box Remote Control...

Owner's Manual
Page 85
... TEXT EXIT OK SIMPLINK TEXT RATIO I/II BACK MENU INFO i EXIT GUIDE OK SLEEP HOLD ? If the audio data in selected language is broadcast by service provider. - If the subtitle data in selected language is not broadcasted, default language audio will be displayed simpler form with 1 to 3 characters which is not...
... TEXT EXIT OK SIMPLINK TEXT RATIO I/II BACK MENU INFO i EXIT GUIDE OK SLEEP HOLD ? If the audio data in selected language is broadcast by service provider. - If the subtitle data in selected language is not broadcasted, default language audio will be displayed simpler form with 1 to 3 characters which is not...

Owner's Manual
Page 92
... displayed on news, weather, television programmes, share prices and many other topics. Press the TEXT or EXIT button to teletext. TELETEXT This feature is a free service broadcast by most TV stations which are selected by entering it as a three digit number with the NUMBER buttons.
... displayed on news, weather, television programmes, share prices and many other topics. Press the TEXT or EXIT button to teletext. TELETEXT This feature is a free service broadcast by most TV stations which are selected by entering it as a three digit number with the NUMBER buttons.

Owner's Manual
Page 94
... UK only. To know which broadcast digital teletext. When pressing these buttons again, the teletext service is appeared. 92 APPENDIX When pressing these buttons again, the teletext service is appeared. text and return to a digital teletext which broadcasts digital teletext. DIGITAL TELETEXT *...or NUMBER buttons and so on digital teletext and move onto the next step by special digital teletext services and specific services which are digital teletext services, refer to the EPG service list. 2 Follow the indications on . 4 Press the TEXT or colour button to switch off...
... UK only. To know which broadcast digital teletext. When pressing these buttons again, the teletext service is appeared. 92 APPENDIX When pressing these buttons again, the teletext service is appeared. text and return to a digital teletext which broadcasts digital teletext. DIGITAL TELETEXT *...or NUMBER buttons and so on digital teletext and move onto the next step by special digital teletext services and specific services which are digital teletext services, refer to the EPG service list. 2 Follow the indications on . 4 Press the TEXT or colour button to switch off...


