

Owner's Manual
Page 1
... Mark of the set . See the label attached on the back cover and quote this manual carefully before operating your dealer when you require service. LCD TV PLASMA TV OWNER'S MANUAL LCD TV MODELS 37LF6* 42LF6* 47LF6* 52LF6* 37LF7* 42LF7* 37LY9* 42LY9* 47LY9*... 52LY9* PLASMA TV MODELS 50PF9* 60PF9* Please read this information to 1996) ID Number(s): 4560: 37LY95 4534: 42LY95 4558: 47LY95 4537: 42LF65 4605: 42LY96 4607: 52LY96 4609: 42LF66 4611: 52LF65 4725: 42LF75 4615: 60PF96 4551: 60PF95 4535: 37LF65...
... Mark of the set . See the label attached on the back cover and quote this manual carefully before operating your dealer when you require service. LCD TV PLASMA TV OWNER'S MANUAL LCD TV MODELS 37LF6* 42LF6* 47LF6* 52LF6* 37LF7* 42LF7* 37LY9* 42LY9* 47LY9*... 52LY9* PLASMA TV MODELS 50PF9* 60PF9* Please read this information to 1996) ID Number(s): 4560: 37LY95 4534: 42LY95 4558: 47LY95 4537: 42LF65 4605: 42LY96 4607: 52LY96 4609: 42LF66 4611: 52LF65 4725: 42LF75 4615: 60PF96 4551: 60PF95 4535: 37LF65...
Owner's Manual
Page 3
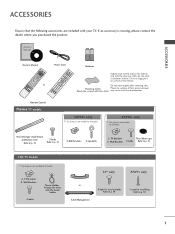
Please be cautious of the exterior. TV Brackets Two rubber caps 2- Do not wipe roughly when removing stain. Owner's Manual Owner's manual Owner's Manual D/A I/II MENU TV GUIDE DVD SLEEP INFO i RATIO BACK TEXT PICTURE POWER VCR SUBTITTLVE/RADIO INPUT SOUND EXIT OK VOL 1 MUTE Q.VIEW 4 PR 2 7 LIST 5 8 3 SIZE 0 6 ...
Please be cautious of the exterior. TV Brackets Two rubber caps 2- Do not wipe roughly when removing stain. Owner's Manual Owner's manual Owner's Manual D/A I/II MENU TV GUIDE DVD SLEEP INFO i RATIO BACK TEXT PICTURE POWER VCR SUBTITTLVE/RADIO INPUT SOUND EXIT OK VOL 1 MUTE Q.VIEW 4 PR 2 7 LIST 5 8 3 SIZE 0 6 ...

Owner's Manual
Page 4
...39 Volume Adjustment 39 On Screen Menus Selection and Adjustment . . . . 40 Auto Programme Tuning (In Digital Mode) . . . . . 41 Manual Programme Tuning (In Digital Mode) . . . 42 Programme Edit (In Digital Mode 43 5V antenna Power (In Digital Mode only 45 Software Update ... SIMPLINK 56 PICTURE CONTROL EPG (Electronic programme guide) (In Digital Mode) - Auto Colour Tone Control (Warm/Medium/Cool) . . . 64 Manual Picture Adjustment - TruMotion 69 Advanced - Picture Mode-Preset 63 - CONTENTS CONTENTS ACCESSORIES 1 PREPARATION Front Panel Controls 4 Back Panel Information 7 Stand...
...39 Volume Adjustment 39 On Screen Menus Selection and Adjustment . . . . 40 Auto Programme Tuning (In Digital Mode) . . . . . 41 Manual Programme Tuning (In Digital Mode) . . . 42 Programme Edit (In Digital Mode 43 5V antenna Power (In Digital Mode only 45 Software Update ... SIMPLINK 56 PICTURE CONTROL EPG (Electronic programme guide) (In Digital Mode) - Auto Colour Tone Control (Warm/Medium/Cool) . . . 64 Manual Picture Adjustment - TruMotion 69 Advanced - Picture Mode-Preset 63 - CONTENTS CONTENTS ACCESSORIES 1 PREPARATION Front Panel Controls 4 Back Panel Information 7 Stand...
Owner's Manual
Page 6
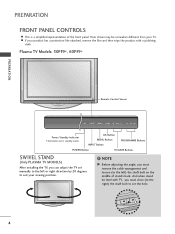
... POWER Button VOLUME Buttons SWIVEL STAND (Only PLASMA TV MODELS) After installing the TV, you must close (to the right) the shaft bolt to set manually to suit your TV. PREPARATION FRONT PANEL CONTROLS A This is a simplified representation of stand's back. A If your product has a protection film attached, remove the film...
... POWER Button VOLUME Buttons SWIVEL STAND (Only PLASMA TV MODELS) After installing the TV, you must close (to the right) the shaft bolt to set manually to suit your TV. PREPARATION FRONT PANEL CONTROLS A This is a simplified representation of stand's back. A If your product has a protection film attached, remove the film...

Owner's Manual
Page 19
... a component cable 1 Connect the video outputs (Y, PB, PR) of EXTERNAL EQUIPMENT SETUP mainly use pictures for the digital set -top box. (Refer to the owner's manual for the LCD TV models. I This TV can receive Digital Over-the-air/Cable signals without an external digital set top box to the figure...
... a component cable 1 Connect the video outputs (Y, PB, PR) of EXTERNAL EQUIPMENT SETUP mainly use pictures for the digital set -top box. (Refer to the owner's manual for the LCD TV models. I This TV can receive Digital Over-the-air/Cable signals without an external digital set top box to the figure...

Owner's Manual
Page 20
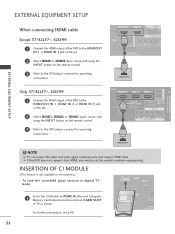
ANTENNA IN RGB IN (Refer to the owner's manual for the digital set -top box. EJECT HDMI/DVI IN 1 HDMI IN 2 RGB IN RGB(PC) AUD (RG ANTENNA IN OPTICAL COMPONENT I VIDEO AUDIO DIGITAL ... set-top box to HDMI/DVI IN 1 or HDMI IN 2 jack on the set. 2 Turn on the digital set-top box. (Refer to the owner's manual for the digital set . VIDEO AUDIO 1 COMPONENT IN 18 OPTIC RS-232C IN (CONTROL & SERVICE) RGB(PC) AUD (RGB 2 Turn on the digital set -top...
ANTENNA IN RGB IN (Refer to the owner's manual for the digital set -top box. EJECT HDMI/DVI IN 1 HDMI IN 2 RGB IN RGB(PC) AUD (RG ANTENNA IN OPTICAL COMPONENT I VIDEO AUDIO DIGITAL ... set-top box to HDMI/DVI IN 1 or HDMI IN 2 jack on the set. 2 Turn on the digital set-top box. (Refer to the owner's manual for the digital set . VIDEO AUDIO 1 COMPONENT IN 18 OPTIC RS-232C IN (CONTROL & SERVICE) RGB(PC) AUD (RGB 2 Turn on the digital set -top...

Owner's Manual
Page 21
... OPTICAL VIDEO AUDIO the AUDIO IN (RGB/DVI) jack on the set . Turn on the digital set-top box. (Refer to the owner's (CONTROL & SERVICE) manual for the digital set -top box.) AV 1 AV 2 4 Select HDMI1 input source with using the INPUT I IN 1 HDMI IN 2 button on the remote control. 19... RS-232C IN 1 RS-232C IN 2 3 Turn on the digital set-top box. (Refer to the owner's manual for the digital set -top box.) RS-232C IN (CONTROL & SERVICE) ANTENNA IN RGB(PC) OPTICAL AUDIO IN (RGB/DVI) RGB IN VIDEO AUDIO 1 COMPONENT...
... OPTICAL VIDEO AUDIO the AUDIO IN (RGB/DVI) jack on the set . Turn on the digital set-top box. (Refer to the owner's (CONTROL & SERVICE) manual for the digital set -top box.) AV 1 AV 2 4 Select HDMI1 input source with using the INPUT I IN 1 HDMI IN 2 button on the remote control. 19... RS-232C IN 1 RS-232C IN 2 3 Turn on the digital set-top box. (Refer to the owner's manual for the digital set -top box.) RS-232C IN (CONTROL & SERVICE) ANTENNA IN RGB(PC) OPTICAL AUDIO IN (RGB/DVI) RGB IN VIDEO AUDIO 1 COMPONENT...
Owner's Manual
Page 23
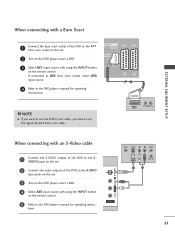
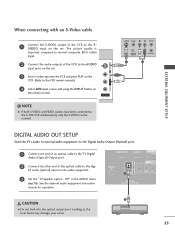
NOTE G If you want to use the EURO scart cable, you have to the DVD player's manual for operating instruc- AUDIO/ VIDEO (R) AUDIO (L) EXTERNAL EQUIPMENT SETUP When connecting with an S-Video cable VIDEO S-VIDEO L R ANT IN 1 Connect the S-VIDEO output of the ...DVD to the S VIDEO input on the set. 2 Connect the audio outputs of the DVD to the DVD player's manual for operating instructions. tions. RGB IN C) AUDIO IN (RGB/DVI) AV 1 AV 2 PONENT IN AUDIO 1 ! AV 1 AV 2 3 Turn on the DVD player, insert a DVD. 4 Select...
NOTE G If you want to use the EURO scart cable, you have to the DVD player's manual for operating instruc- AUDIO/ VIDEO (R) AUDIO (L) EXTERNAL EQUIPMENT SETUP When connecting with an S-Video cable VIDEO S-VIDEO L R ANT IN 1 Connect the S-VIDEO output of the ...DVD to the S VIDEO input on the set. 2 Connect the audio outputs of the DVD to the DVD player's manual for operating instructions. tions. RGB IN C) AUDIO IN (RGB/DVI) AV 1 AV 2 PONENT IN AUDIO 1 ! AV 1 AV 2 3 Turn on the DVD player, insert a DVD. 4 Select...
Owner's Manual
Page 24
... 1 Connect the HDMI output of the DVD to the HDMI/DVI IN 1 or HDMI IN 2 jack on the remote control. 3 Refer to the DVD player's manual for operating instructions. ! VIDEO AUDIO 1 COMPONENT IN 3 Refer to the DVD player...
... 1 Connect the HDMI output of the DVD to the HDMI/DVI IN 1 or HDMI IN 2 jack on the remote control. 3 Refer to the DVD player's manual for operating instructions. ! VIDEO AUDIO 1 COMPONENT IN 3 Refer to the DVD player...

Owner's Manual
Page 26
... = yellow, Audio Left = white, and Audio Right = red) 2 Insert a video tape into the VCR and press PLAY on the VCR. (Refer to the VCR owner's manual.) 3 Select AV3 input source using thRSe-23I2NC INPUT button on the remote control. EXTERNAL EQUIPMENT SETUP When connecting with a Euro Scart VI IN 1 HDMI IN... socket of the set . (RGB/DVI) MPONENT IN AV 1 AV 2 2 Insert a video tape intoANtThIENNeNAVCR and press PLAY on the VCR. (Refer to the VCR owner's manual.) VIDEO AUDIO VIDEO 3 AUDIO Select AV1 input source with a RCA cable 1 Connect the AUDIO/VIDEO jacks between TV and VCR.
... = yellow, Audio Left = white, and Audio Right = red) 2 Insert a video tape into the VCR and press PLAY on the VCR. (Refer to the VCR owner's manual.) 3 Select AV3 input source using thRSe-23I2NC INPUT button on the remote control. EXTERNAL EQUIPMENT SETUP When connecting with a Euro Scart VI IN 1 HDMI IN... socket of the set . (RGB/DVI) MPONENT IN AV 1 AV 2 2 Insert a video tape intoANtThIENNeNAVCR and press PLAY on the VCR. (Refer to the VCR owner's manual.) VIDEO AUDIO VIDEO 3 AUDIO Select AV1 input source with a RCA cable 1 Connect the AUDIO/VIDEO jacks between TV and VCR.
Owner's Manual
Page 27
... input on the set . 3 Insert a video tape into the optical output port. tal audio (optical) input on the set . See the external audio equipment instruction manual for operation. Looking at the laser beam may damage your vision. 25 AV IN 3 ! VIDEO L/MONO AUDIO R S-VIDEO S-VIDEO VIDEO L R ANT IN OUTPUT ...IN (CONTROL & SERVICE) 2 CAUTION GDo not look into the VCR and press PLAY on the VCR. (Refer to the VCR owner's manual.) 4 Select AV3 input source with an S-Video cable VIDEO 1 AUCDIOonnect the S-VIDEO output of the VCR to external audio equipment via the ...
... input on the set . 3 Insert a video tape into the optical output port. tal audio (optical) input on the set . See the external audio equipment instruction manual for operation. Looking at the laser beam may damage your vision. 25 AV IN 3 ! VIDEO L/MONO AUDIO R S-VIDEO S-VIDEO VIDEO L R ANT IN OUTPUT ...IN (CONTROL & SERVICE) 2 CAUTION GDo not look into the VCR and press PLAY on the VCR. (Refer to the VCR owner's manual.) 4 Select AV3 input source with an S-Video cable VIDEO 1 AUCDIOonnect the S-VIDEO output of the VCR to external audio equipment via the ...
Owner's Manual
Page 32
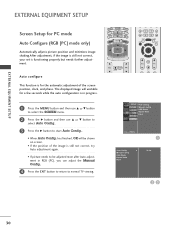
... picture position and minimizes image shaking.After adjustment, if the image is still not correct, your set is functioning properly but needs further adjustment. G Manual Config. The displayed image will be adjusted more after Auto adjustment in progress. 1 Press the M E N U button and then use D or... EXTERNAL EQUIPMENT SETUP EXTERNAL EQUIPMENT SETUP Screen Setup for a few seconds while the auto configuration is in RGB (PC), you can adjust the Manual Config.. 4 Press the EXIT button to return to start Auto Config.. • When Auto Config. XGA Mode Aspect Ratio Reset To Set...
... picture position and minimizes image shaking.After adjustment, if the image is still not correct, your set is functioning properly but needs further adjustment. G Manual Config. The displayed image will be adjusted more after Auto adjustment in progress. 1 Press the M E N U button and then use D or... EXTERNAL EQUIPMENT SETUP EXTERNAL EQUIPMENT SETUP Screen Setup for a few seconds while the auto configuration is in RGB (PC), you can adjust the Manual Config.. 4 Press the EXIT button to return to start Auto Config.. • When Auto Config. XGA Mode Aspect Ratio Reset To Set...
Owner's Manual
Page 33
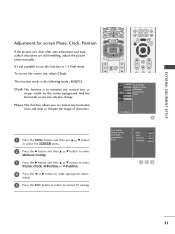
...Adjustment for screen Phase, Clock, Position If the picture isn't clear after auto adjustment and especially if characters are still trembling, adjust the picture phase manually. ments. 5 Press the EXIT button to return to make appropriate adjust- XGA Mode Aspect Ratio Reset G Phase 0 Clock 0 H-Position 0 ...0 23 4 31 It's not available to use D or E button to select the SCREEN menu. 2 Press the G button and then D or E button to select Manual Config.. 3 Press the G button and then D or E button to select Phase, Clock, H-Position or V-Position. 4 Press the F or G button to normal TV...
...Adjustment for screen Phase, Clock, Position If the picture isn't clear after auto adjustment and especially if characters are still trembling, adjust the picture phase manually. ments. 5 Press the EXIT button to return to make appropriate adjust- XGA Mode Aspect Ratio Reset G Phase 0 Clock 0 H-Position 0 ...0 23 4 31 It's not available to use D or E button to select the SCREEN menu. 2 Press the G button and then D or E button to select Manual Config.. 3 Press the G button and then D or E button to select Phase, Clock, H-Position or V-Position. 4 Press the F or G button to normal TV...
Owner's Manual
Page 34
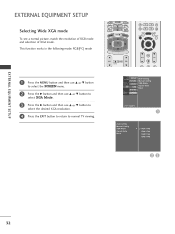
Manual Config. AUDIOO XGA Mode Aspect Ratio TIMEO Reset OPTIONO SCREENO Move MENU Prev. 1 Auto Config. EXTERNAL EQUIPMENT SETUP EXTERNAL EQUIPMENT SETUP Selecting Wide XGA mode ... RATIO PICTURE SOUND MENU TEXT EXIT OK BACK MENU INFO i EXIT GUIDE OK VOL Q.VIEW PR MUTE FAV VOL PR MUTE 1 2 3 SETUPO Auto Config. PICTUREO Manual Config.
Manual Config. AUDIOO XGA Mode Aspect Ratio TIMEO Reset OPTIONO SCREENO Move MENU Prev. 1 Auto Config. EXTERNAL EQUIPMENT SETUP EXTERNAL EQUIPMENT SETUP Selecting Wide XGA mode ... RATIO PICTURE SOUND MENU TEXT EXIT OK BACK MENU INFO i EXIT GUIDE OK VOL Q.VIEW PR MUTE FAV VOL PR MUTE 1 2 3 SETUPO Auto Config. PICTUREO Manual Config.

Owner's Manual
Page 42
... WATCHING TV /PROGRAMME CONTROL ON SCREEN MENUS SELECTION AND ADJUSTMENT Your TV's OSD (On Screen Display) may differ slightly from what is shown in this manual. 1 Press the MENU button and then D or E button to display each menu. 2 Press the G button and then D or E button to... models. G In Analogue mode, 5V Antenna Power, CI Information, Software Update and Diagnostics will not display. SETUPO Auto Tuning PICTUREO Manual Tuning AUDIOO Programme Edit 5V Antenna Power TIMEO Software Update OPTIONO Diagnostics SCREENO CI Information *: This feature is not all countries. Move ...
... WATCHING TV /PROGRAMME CONTROL ON SCREEN MENUS SELECTION AND ADJUSTMENT Your TV's OSD (On Screen Display) may differ slightly from what is shown in this manual. 1 Press the MENU button and then D or E button to display each menu. 2 Press the G button and then D or E button to... models. G In Analogue mode, 5V Antenna Power, CI Information, Software Update and Diagnostics will not display. SETUPO Auto Tuning PICTUREO Manual Tuning AUDIOO Programme Edit 5V Antenna Power TIMEO Software Update OPTIONO Diagnostics SCREENO CI Information *: This feature is not all countries. Move ...

Owner's Manual
Page 43
... Auto Tuning. 3 Press the G button to input a 4-digit password in digital mode, all of the programmes. Otherwise select NO. Auto Tuning G Manual Tuning Programme Edit 5V Antenna Power Software Update Diagnostics CI Information 1 Start 2 Auto Tuning 0 0 UHF CH. GUIDE INFO i SLEEP BACK SUBTITLE TV/...OK BACK MENU INFO i EXIT GUIDE OK VOL Q.VIEW PR MUTE FAV VOL PR MUTE 1 2 3 SETUPO Auto Tuning PICTUREO Manual Tuning AUDIOO Programme Edit 5V Antenna Power TIMEO Software Update OPTIONO Diagnostics SCREENO CI Information Move MENU Prev. Use NUMBER buttons to ...
... Auto Tuning. 3 Press the G button to input a 4-digit password in digital mode, all of the programmes. Otherwise select NO. Auto Tuning G Manual Tuning Programme Edit 5V Antenna Power Software Update Diagnostics CI Information 1 Start 2 Auto Tuning 0 0 UHF CH. GUIDE INFO i SLEEP BACK SUBTITLE TV/...OK BACK MENU INFO i EXIT GUIDE OK VOL Q.VIEW PR MUTE FAV VOL PR MUTE 1 2 3 SETUPO Auto Tuning PICTUREO Manual Tuning AUDIOO Programme Edit 5V Antenna Power TIMEO Software Update OPTIONO Diagnostics SCREENO CI Information Move MENU Prev. Use NUMBER buttons to ...
Owner's Manual
Page 44
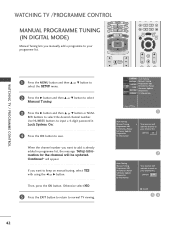
...select NO. 5 Press the EXIT button to return to save. Software Update Diagnostics UHF CH. 35 CI Information 2 Auto Tuning Manual Tuning Programme Edit 5V Antenna Power Software Update Diagnostics CI Information Your receiver will Programme Edit add this channel to your programme list.... the G button and then D or E button or NUM- WATCHING TV / PROGRAMME CONTROL WATCHING TV /PROGRAMME CONTROL MANUAL PROGRAMME TUNING (IN DIGITAL MODE) Manual Tuning lets you manually add a programme to your channel list. GUIDE INFO i SLEEP BACK SUBTITLE TV/RADIO I/II RATIO PICTURE SOUND MENU ...
...select NO. 5 Press the EXIT button to return to save. Software Update Diagnostics UHF CH. 35 CI Information 2 Auto Tuning Manual Tuning Programme Edit 5V Antenna Power Software Update Diagnostics CI Information Your receiver will Programme Edit add this channel to your programme list.... the G button and then D or E button or NUM- WATCHING TV / PROGRAMME CONTROL WATCHING TV /PROGRAMME CONTROL MANUAL PROGRAMME TUNING (IN DIGITAL MODE) Manual Tuning lets you manually add a programme to your channel list. GUIDE INFO i SLEEP BACK SUBTITLE TV/RADIO I/II RATIO PICTURE SOUND MENU ...
Owner's Manual
Page 45
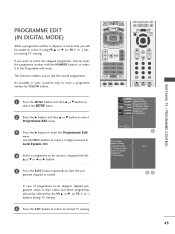
...PR + or -) button during TV viewing. 6 Press the EXIT button to return to have the pro- Auto Tuning Manual Tuning Programme Edit G 5V Antenna Power Software Update Diagnostics CI Information 1 To Set 23 43 It's available in the Programme... SIZE UPDATE TIME REVEAL INDEX i HOLD FAV VOL PR MUTE 1 2 3 4 5 6 7 8 9 LIST 0 Q.VIEW POSITION INDEX TIME ? SETUPO Auto Tuning PICTUREO Manual Tuning AUDIOO Programme Edit 5V Antenna Power TIMEO Software Update OPTIONO Diagnostics SCREENO CI Information Move MENU Prev. If you to move a programme number by...
...PR + or -) button during TV viewing. 6 Press the EXIT button to return to have the pro- Auto Tuning Manual Tuning Programme Edit G 5V Antenna Power Software Update Diagnostics CI Information 1 To Set 23 43 It's available in the Programme... SIZE UPDATE TIME REVEAL INDEX i HOLD FAV VOL PR MUTE 1 2 3 4 5 6 7 8 9 LIST 0 Q.VIEW POSITION INDEX TIME ? SETUPO Auto Tuning PICTUREO Manual Tuning AUDIOO Programme Edit 5V Antenna Power TIMEO Software Update OPTIONO Diagnostics SCREENO CI Information Move MENU Prev. If you to move a programme number by...

Owner's Manual
Page 47
... MENU TEXT EXIT OK BACK MENU INFO i EXIT GUIDE OK VOL Q.VIEW PR MUTE FAV VOL PR MUTE 1 2 3 SETUPO Auto Tuning PICTUREO Manual Tuning AUDIOO Programme Edit 5V Antenna Power TIMEO Software Update OPTIONO Diagnostics SCREENO CI Information Move MENU Prev. 1 Auto Tuning... Manual Tuning Programme Edit 5V Antenna Power G Off Software Update On Diagnostics CI Information 23 45 Automatically switched off." will automatically return to ...
... MENU TEXT EXIT OK BACK MENU INFO i EXIT GUIDE OK VOL Q.VIEW PR MUTE FAV VOL PR MUTE 1 2 3 SETUPO Auto Tuning PICTUREO Manual Tuning AUDIOO Programme Edit 5V Antenna Power TIMEO Software Update OPTIONO Diagnostics SCREENO CI Information Move MENU Prev. 1 Auto Tuning... Manual Tuning Programme Edit 5V Antenna Power G Off Software Update On Diagnostics CI Information 23 45 Automatically switched off." will automatically return to ...

Owner's Manual
Page 48
...INFO i EXIT GUIDE OK 1 Press the MENU button and then D or E button to restart. 23 - SETUPO Auto Tuning PICTUREO Manual Tuning AUDIOO Programme Edit 5V Antenna Power TIMEO Software Update OPTIONO Diagnostics SCREENO CI Information Move MENU Prev. 1 WATCHING TV / PROGRAMME CONTROL... * When setting "Software Update" Auto Tuning Manual Tuning Programme Edit 5V Antenna Power Software Update G Off Diagnostics On CI Information Occasionally, a transmission of the set must not be ...
...INFO i EXIT GUIDE OK 1 Press the MENU button and then D or E button to restart. 23 - SETUPO Auto Tuning PICTUREO Manual Tuning AUDIOO Programme Edit 5V Antenna Power TIMEO Software Update OPTIONO Diagnostics SCREENO CI Information Move MENU Prev. 1 WATCHING TV / PROGRAMME CONTROL... * When setting "Software Update" Auto Tuning Manual Tuning Programme Edit 5V Antenna Power Software Update G Off Diagnostics On CI Information Occasionally, a transmission of the set must not be ...


