

Owner's Manual
Page 1
...carefully before operating your dealer when you require service. LCD TV PLASMA TV OWNER'S MANUAL LCD TV MODELS 37LF6* 42LF6* 47LF6* 52LF6* 37LF7* 42LF7* 37LY9* 42LY9* 47LY9* 52LY9* PLASMA TV MODELS 50PF9* 60PF9* Please read this information to ...1996) ID Number(s): 4560: 37LY95 4534: 42LY95 4558: 47LY95 4537: 42LF65 4605: 42LY96 4607: 52LY96 4609: 42LF66 4611: 52LF65 4725: 42LF75 4615: 60PF96 4551: 60PF95 4535: 37LF65...
...carefully before operating your dealer when you require service. LCD TV PLASMA TV OWNER'S MANUAL LCD TV MODELS 37LF6* 42LF6* 47LF6* 52LF6* 37LF7* 42LF7* 37LY9* 42LY9* 47LY9* 52LY9* PLASMA TV MODELS 50PF9* 60PF9* Please read this information to ...1996) ID Number(s): 4560: 37LY95 4534: 42LY95 4558: 47LY95 4537: 42LF65 4605: 42LY96 4607: 52LY96 4609: 42LF66 4611: 52LF65 4725: 42LF75 4615: 60PF96 4551: 60PF95 4535: 37LF65...
Owner's Manual
Page 3
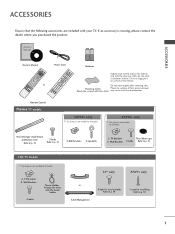
... rubber caps 2- Owner's Manual Owner's manual Owner's Manual D/A I/II MENU TV GUIDE DVD SLEEP INFO i RATIO BACK TEXT PICTURE POWER VCR SUBTITTLVE/RADIO INPUT ... to p. 15 2-Wall brackets 2-eye-bolts 2- Polishing Cloth Polish the screen with your TV. TV Brackets 2- ACCESSORIES ACCESSORIES Ensure that excessive power may cause scratch or discoloration. Do not wipe...stand fixture protection cover Refer to p. 15 3-bolts Refer to p. 10 1 Remote Control Plasma TV models 50PF9* only I This feature is stain or fingerprint on surface of that the following accessories...
... rubber caps 2- Owner's Manual Owner's manual Owner's Manual D/A I/II MENU TV GUIDE DVD SLEEP INFO i RATIO BACK TEXT PICTURE POWER VCR SUBTITTLVE/RADIO INPUT ... to p. 15 2-Wall brackets 2-eye-bolts 2- Polishing Cloth Polish the screen with your TV. TV Brackets 2- ACCESSORIES ACCESSORIES Ensure that excessive power may cause scratch or discoloration. Do not wipe...stand fixture protection cover Refer to p. 15 3-bolts Refer to p. 10 1 Remote Control Plasma TV models 50PF9* only I This feature is stain or fingerprint on surface of that the following accessories...

Owner's Manual
Page 7
Remote Control Sensor • illuminates green when the set is switched on. 5 PREPARATION LCD TV Models: 37LF6*, 42LF6*, 47LF6*, 52LF6* PR VOL OK MENU INPUT /I PROGRAMME Buttons VOLUME Buttons OK Button MENU Button INPUT Button POWER Button Intelligent Eye Adjusts picture according to the surrounding conditions. Power/Standby Indicator • illuminates red in standby mode.
Remote Control Sensor • illuminates green when the set is switched on. 5 PREPARATION LCD TV Models: 37LF6*, 42LF6*, 47LF6*, 52LF6* PR VOL OK MENU INPUT /I PROGRAMME Buttons VOLUME Buttons OK Button MENU Button INPUT Button POWER Button Intelligent Eye Adjusts picture according to the surrounding conditions. Power/Standby Indicator • illuminates red in standby mode.

Owner's Manual
Page 8
... Indicator • illuminates red in standby mode. • illuminates green when the set is switched on . PREPARATION LCD TV Models: 37LY9*, 42LY9*, 47LY9*, 52LY9* PREPARATION Intelligent Eye Adjusts picture according to the surrounding conditions. LCD TV Models: 37/42LF7* VOL PR CH PROGRAM Buttons CH VOL VOLUME Buttons VOL OK Button MENU Button OK...
... Indicator • illuminates red in standby mode. • illuminates green when the set is switched on . PREPARATION LCD TV Models: 37LY9*, 42LY9*, 47LY9*, 52LY9* PREPARATION Intelligent Eye Adjusts picture according to the surrounding conditions. LCD TV Models: 37/42LF7* VOL PR CH PROGRAM Buttons CH VOL VOLUME Buttons VOL OK Button MENU Button OK...

Owner's Manual
Page 10
PREPARATION S-VIDEO VIDEO L/MONO AUDIO R LCD TV Models (Except 37/42LF7*) ANTENNA IN PREPARATION AV 3 1 2 3 PCMCIA CARD SLOT EJECT HDMI/DVI IN 1 HDMI IN 2... output from various types of equipment. The voltage is not available in all countries.) 2 HDMI Input Connect a HDMI signal to operate the TV on DC power. 8 VIDEO AUDIO COMPONENT IN 4 67 3 8 1 PCMCIA (Personal Computer Memory Card International Association) Card Slot (This... Connect scart socket input or output from an external device to these jacks. 9 Power Cord Socket This TV operates on the Specifications page.
PREPARATION S-VIDEO VIDEO L/MONO AUDIO R LCD TV Models (Except 37/42LF7*) ANTENNA IN PREPARATION AV 3 1 2 3 PCMCIA CARD SLOT EJECT HDMI/DVI IN 1 HDMI IN 2... output from various types of equipment. The voltage is not available in all countries.) 2 HDMI Input Connect a HDMI signal to operate the TV on DC power. 8 VIDEO AUDIO COMPONENT IN 4 67 3 8 1 PCMCIA (Personal Computer Memory Card International Association) Card Slot (This... Connect scart socket input or output from an external device to these jacks. 9 Power Cord Socket This TV operates on the Specifications page.

Owner's Manual
Page 11
...the appropriate input port. 8 Euro Scart Socket (AV1/AV2) Connect scart socket input or output from various types of equipment. Never attempt to operate the TV on a PC. 9 Or DVI(VIDEO)signal to HDMI/DVI port with DVI to the RS-232C port on DC power. 5 RS-232C IN ... in all countries.) 2 HDMI Input Connect a HDMI signal to these jacks. 9 Power Cord Socket This TV operates on the Specifications page. Audio/Video Input Connect audio/video output from an SVIDEO device. PREPARATION LCD TV Models : 37/42LF7* VIDEO L/MONO AUDIO R VIDEO L/MONO AUDIO R USB IN DIGITAL AUDIO OUT VIDEO...
...the appropriate input port. 8 Euro Scart Socket (AV1/AV2) Connect scart socket input or output from various types of equipment. Never attempt to operate the TV on a PC. 9 Or DVI(VIDEO)signal to HDMI/DVI port with DVI to the RS-232C port on DC power. 5 RS-232C IN ... in all countries.) 2 HDMI Input Connect a HDMI signal to these jacks. 9 Power Cord Socket This TV operates on the Specifications page. Audio/Video Input Connect audio/video output from an SVIDEO device. PREPARATION LCD TV Models : 37/42LF7* VIDEO L/MONO AUDIO R VIDEO L/MONO AUDIO R USB IN DIGITAL AUDIO OUT VIDEO...

Owner's Manual
Page 12
... Tipping, shaking, or rocking the machine may cause injury. 10 WARNING G To prevent TV from damage. 2 Assemble the product stand with the product as shown. PREPARATION STAND INSTALLATION (Only 37 inch LCD TV Models) 1 Carefully place the product screen side down on a cushioned surface that will ...protect product and screen from falling over, the TV should be pulled in the holes provided. ATTACHING THE TV TO A DESK (Only 37LF7*) The TV must be attached to desk...
... Tipping, shaking, or rocking the machine may cause injury. 10 WARNING G To prevent TV from damage. 2 Assemble the product stand with the product as shown. PREPARATION STAND INSTALLATION (Only 37 inch LCD TV Models) 1 Carefully place the product screen side down on a cushioned surface that will ...protect product and screen from falling over, the TV should be pulled in the holes provided. ATTACHING THE TV TO A DESK (Only 37LF7*) The TV must be attached to desk...

Owner's Manual
Page 15
To connect an additional equipment, see the External equipment Connections section. 2 Install the CABLE MANAGEMENT as necessary. PREPARATION LCD TV models (Except 37/42LF7*) 1 Connect the cables as shown. 3 Bundle the cables using the supplied twister holder. (This feature is dropped, you may be injured or the product may be broken. 13 If the product is not available for all models.) CABLE MANAGEMENT How to remove the cable management Hold the CABLE MANAGEMENT with both hands and pull it upward. ! NOTE G Do not hold the CABLE MANAGEMENT when moving the product. -
To connect an additional equipment, see the External equipment Connections section. 2 Install the CABLE MANAGEMENT as necessary. PREPARATION LCD TV models (Except 37/42LF7*) 1 Connect the cables as shown. 3 Bundle the cables using the supplied twister holder. (This feature is dropped, you may be injured or the product may be broken. 13 If the product is not available for all models.) CABLE MANAGEMENT How to remove the cable management Hold the CABLE MANAGEMENT with both hands and pull it upward. ! NOTE G Do not hold the CABLE MANAGEMENT when moving the product. -

Owner's Manual
Page 16
... available for all models.) CABLE MANAGEMENT How to remove the cable management Hold the CABLE MANAGEMENT with both sides of the cable management.) ! PREPARATION PREPARATION LCD TV model (Only 37/42LF7*) 1 Connect the cables as holding the loops on the both sides of the cable management.) 3 Bundle the cables using the supplied...
... available for all models.) CABLE MANAGEMENT How to remove the cable management Hold the CABLE MANAGEMENT with both sides of the cable management.) ! PREPARATION PREPARATION LCD TV model (Only 37/42LF7*) 1 Connect the cables as holding the loops on the both sides of the cable management.) 3 Bundle the cables using the supplied...

Owner's Manual
Page 19
...(60Hz only) (24Hz/50Hz/60Hz) (24Hz/50Hz/60Hz) AV 1 AV 2 ANTENNA IN RS-232C IN VIDEO AUDIO 17 EXTERNAL EQUIPMENT SETUP I This TV can receive Digital Over-the-air/Cable signals without an external digital set-top box.However,if you have finished connecting all equipment. EXTERNAL EQUIPMENT...1 2 4 Select COMPONENT input source with a component cable 1 Connect the video outputs (Y, PB, PR) of EXTERNAL EQUIPMENT SETUP mainly use pictures for the LCD TV models. I This part of the digital set top box to the COMPONENT IN VIDEO jacks on the digital set-top box. (Refer to the figure...
...(60Hz only) (24Hz/50Hz/60Hz) (24Hz/50Hz/60Hz) AV 1 AV 2 ANTENNA IN RS-232C IN VIDEO AUDIO 17 EXTERNAL EQUIPMENT SETUP I This TV can receive Digital Over-the-air/Cable signals without an external digital set-top box.However,if you have finished connecting all equipment. EXTERNAL EQUIPMENT...1 2 4 Select COMPONENT input source with a component cable 1 Connect the video outputs (Y, PB, PR) of EXTERNAL EQUIPMENT SETUP mainly use pictures for the LCD TV models. I This part of the digital set top box to the COMPONENT IN VIDEO jacks on the digital set-top box. (Refer to the figure...
Owner's Manual
Page 35
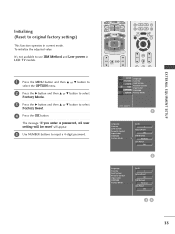
EXTERNAL EQUIPMENT SETUP Initializing (Reset to original factory settings) This function operates in LCD TV models. 1 Press the MENU button and then D or E button to select the OPTION menu. 2 Press the G button and then D or E button to select Factory Mode. 3 ... user setting will be reset" will appear. 5 Use NUMBER buttons to use ISM Method and Low power in current mode. GUIDE INFO i SLEEP BACK SUBTITLE TV/RADIO I/II RATIO PICTURE SOUND MENU TEXT EXIT OK BACK MENU INFO i EXIT GUIDE OK VOL Q.VIEW PR MUTE FAV VOL PR MUTE 1 2 3 SETUPO Language...
EXTERNAL EQUIPMENT SETUP Initializing (Reset to original factory settings) This function operates in LCD TV models. 1 Press the MENU button and then D or E button to select the OPTION menu. 2 Press the G button and then D or E button to select Factory Mode. 3 ... user setting will be reset" will appear. 5 Use NUMBER buttons to use ISM Method and Low power in current mode. GUIDE INFO i SLEEP BACK SUBTITLE TV/RADIO I/II RATIO PICTURE SOUND MENU TEXT EXIT OK BACK MENU INFO i EXIT GUIDE OK VOL Q.VIEW PR MUTE FAV VOL PR MUTE 1 2 3 SETUPO Language...

Owner's Manual
Page 42
...not all countries. AUDIOO XGA Mode Aspect Ratio TIMEO Reset OPTIONO SCREENO SETUPO Sound Mode PICTUREO Auto Volume AUDIOO Balance 0 TV Speaker TIMEO Digital Audio Out OPTIONO SCREENO WATCHING TV / PROGRAMME CONTROL 40 Move MENU Prev. SETUPO Clock PICTUREO Off Time AUDIOO On Time Auto Sleep TIMEO Time Zone ... not available to the higher level menu by pressing the O K or MENU button. You can move to use ISM Method and Low power in LCD TV models. SETUPO Auto Config. G In Analogue mode, 5V Antenna Power, CI Information, Software Update and Diagnostics will not display.
...not all countries. AUDIOO XGA Mode Aspect Ratio TIMEO Reset OPTIONO SCREENO SETUPO Sound Mode PICTUREO Auto Volume AUDIOO Balance 0 TV Speaker TIMEO Digital Audio Out OPTIONO SCREENO WATCHING TV / PROGRAMME CONTROL 40 Move MENU Prev. SETUPO Clock PICTUREO Off Time AUDIOO On Time Auto Sleep TIMEO Time Zone ... not available to the higher level menu by pressing the O K or MENU button. You can move to use ISM Method and Low power in LCD TV models. SETUPO Auto Config. G In Analogue mode, 5V Antenna Power, CI Information, Software Update and Diagnostics will not display.

Owner's Manual
Page 74
Orbiter Orbiter may be impossible to normal TV viewing. GUIDE INFO i SLEEP BACK SUBTITLE TV/RADIO I/II RATIO PICTURE SOUND MENU TEXT EXIT OK BACK MENU INFO i EXIT GUIDE OK VOL Q.VIEW PR MUTE FAV VOL PR MUTE 1 2 3 SETUPO Language ... is the function to remain on the screen, the screen will result in a ghost image remaining even when you unnecessary to set this function in LCD models.
Orbiter Orbiter may be impossible to normal TV viewing. GUIDE INFO i SLEEP BACK SUBTITLE TV/RADIO I/II RATIO PICTURE SOUND MENU TEXT EXIT OK BACK MENU INFO i EXIT GUIDE OK VOL Q.VIEW PR MUTE FAV VOL PR MUTE 1 2 3 SETUPO Language ... is the function to remain on the screen, the screen will result in a ghost image remaining even when you unnecessary to set this function in LCD models.
Owner's Manual
Page 75
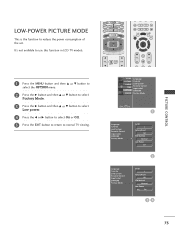
PICTURE CONTROL LOW-POWER PICTURE MODE This is the function to normal TV viewing. GUIDE INFO i SLEEP BACK SUBTITLE TV/RADIO I/II RATIO PICTURE SOUND MENU TEXT EXIT OK BACK MENU INFO i EXIT GUIDE OK VOL Q.VIEW PR MUTE FAV VOL PR MUTE 1 2 3 SETUPO Language ... SIMPLINK Factory Mode Set ID 1 Factory Reset OK ISM Method Normal Low Power FG On 34 73 It's not available to use this function in LCD TV models. 1 Press the MENU button and then D or E button to select the OPTION menu. 2 Press the G button and then D or E button to select Factory Mode...
PICTURE CONTROL LOW-POWER PICTURE MODE This is the function to normal TV viewing. GUIDE INFO i SLEEP BACK SUBTITLE TV/RADIO I/II RATIO PICTURE SOUND MENU TEXT EXIT OK BACK MENU INFO i EXIT GUIDE OK VOL Q.VIEW PR MUTE FAV VOL PR MUTE 1 2 3 SETUPO Language ... SIMPLINK Factory Mode Set ID 1 Factory Reset OK ISM Method Normal Low Power FG On 34 73 It's not available to use this function in LCD TV models. 1 Press the MENU button and then D or E button to select the OPTION menu. 2 Press the G button and then D or E button to select Factory Mode...

Owner's Manual
Page 111
... 2 : q) G To reduce the power consumption of the set. It's not available to use this function in LCD TV models. ISM Method (Command 1 : j, Command 2 : p) G To control the ISM method. It's not available to use this function in LCD TV models. You can also adjust ISM Method in OPTION menu. Transmission Data 0: Normal 1: White wash 2: Orbiter...
... 2 : q) G To reduce the power consumption of the set. It's not available to use this function in LCD TV models. ISM Method (Command 1 : j, Command 2 : p) G To control the ISM method. It's not available to use this function in LCD TV models. You can also adjust ISM Method in OPTION menu. Transmission Data 0: Normal 1: White wash 2: Orbiter...

