
Owner's Manual
Page 3
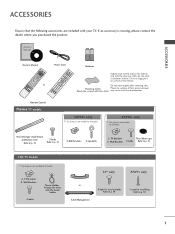
... with the cloth. Please be cautious of the exterior. Owner's Manual Owner's manual Owner's Manual D/A I/II MENU TV GUIDE DVD SLEEP INFO i RATIO BACK TEXT PICTURE POWER VCR SUBTITTLVE/RADIO INPUT SOUND EXIT OK VOL 1 MUTE Q.VIEW 4 PR 2 7 LIST 5 8 3 SIZE 0 6 TIME RE?VEAULPDATE INDEX 9 FAV i HOLD or Power Cord DIN/APUT...
... with the cloth. Please be cautious of the exterior. Owner's Manual Owner's manual Owner's Manual D/A I/II MENU TV GUIDE DVD SLEEP INFO i RATIO BACK TEXT PICTURE POWER VCR SUBTITTLVE/RADIO INPUT SOUND EXIT OK VOL 1 MUTE Q.VIEW 4 PR 2 7 LIST 5 8 3 SIZE 0 6 TIME RE?VEAULPDATE INDEX 9 FAV i HOLD or Power Cord DIN/APUT...

Owner's Manual
Page 4
... Setup 27 - Select a programme 58 - Auto Colour Tone Control (Warm/Medium/Cool) . . . 64 Manual Picture Adjustment - User option 66 XD - Picture Improvement Technology 67 XD Demo 68 TruMotion Demo 68 Advanced - Switch on the TV 38 Programme Selection 39 Volume Adjustment ... - Button function in timer list mode 60 Picture Size (Aspect Ratio) Control 61 Preset Picture Settings - Button function in date change mode 59 - Black(Darkness) Level 70 Picture Reset 71 Image Sticking Minimization(ISM) Method 72 Low-Power Picture Mode 73 2 Button function in record/remind ...
... Setup 27 - Select a programme 58 - Auto Colour Tone Control (Warm/Medium/Cool) . . . 64 Manual Picture Adjustment - User option 66 XD - Picture Improvement Technology 67 XD Demo 68 TruMotion Demo 68 Advanced - Switch on the TV 38 Programme Selection 39 Volume Adjustment ... - Button function in timer list mode 60 Picture Size (Aspect Ratio) Control 61 Preset Picture Settings - Button function in date change mode 59 - Black(Darkness) Level 70 Picture Reset 71 Image Sticking Minimization(ISM) Method 72 Low-Power Picture Mode 73 2 Button function in record/remind ...

Owner's Manual
Page 7
PREPARATION LCD TV Models: 37LF6*, 42LF6*, 47LF6*, 52LF6* PR VOL OK MENU INPUT /I PROGRAMME Buttons VOLUME Buttons OK Button MENU Button INPUT Button POWER Button Intelligent Eye Adjusts picture according to the surrounding conditions. Remote Control Sensor • illuminates green when the set is switched on. 5 Power/Standby Indicator • illuminates red in standby mode.
PREPARATION LCD TV Models: 37LF6*, 42LF6*, 47LF6*, 52LF6* PR VOL OK MENU INPUT /I PROGRAMME Buttons VOLUME Buttons OK Button MENU Button INPUT Button POWER Button Intelligent Eye Adjusts picture according to the surrounding conditions. Remote Control Sensor • illuminates green when the set is switched on. 5 Power/Standby Indicator • illuminates red in standby mode.

Owner's Manual
Page 8
... Buttons CH VOL VOLUME Buttons VOL OK Button MENU Button OK MENU INPUT /I Intelligent Eye Adjusts picture according to the surrounding conditions. PREPARATION LCD TV Models: 37LY9*, 42LY9*, 47LY9*, 52LY9* PREPARATION Intelligent Eye Adjusts picture according to the surrounding conditions. Remote Control Sensor PR VOL OK MENU INPUT PROGRAMME Buttons VOLUME Buttons...
... Buttons CH VOL VOLUME Buttons VOL OK Button MENU Button OK MENU INPUT /I Intelligent Eye Adjusts picture according to the surrounding conditions. PREPARATION LCD TV Models: 37LY9*, 42LY9*, 47LY9*, 52LY9* PREPARATION Intelligent Eye Adjusts picture according to the surrounding conditions. Remote Control Sensor PR VOL OK MENU INPUT PROGRAMME Buttons VOLUME Buttons...

Owner's Manual
Page 13
... the product from the product. 1 1 2 or 2 1 Use the eye-bolts or TV brackets/bolts to fix the product to the wall as shown in the picture. (If your product has the bolts in the eye-bolts position before inserting the eye-bolts, loosen the bolts.) * Insert the eye-bolts or TV...
... the product from the product. 1 1 2 or 2 1 Use the eye-bolts or TV brackets/bolts to fix the product to the wall as shown in the picture. (If your product has the bolts in the eye-bolts position before inserting the eye-bolts, loosen the bolts.) * Insert the eye-bolts or TV...

Owner's Manual
Page 18
... signal needs to be split for two TVs,use an antenna signal splitter for outdoor antenna) - I For optimum picture quality, adjust antenna direction. PREPARATION PREPARATION I In poor signal areas,to get better picture quality, install a signal amplifier to the antenna as shown to the right. Wall Antenna Socket Outdoor Antenna (VHF, UHF...
... signal needs to be split for two TVs,use an antenna signal splitter for outdoor antenna) - I For optimum picture quality, adjust antenna direction. PREPARATION PREPARATION I In poor signal areas,to get better picture quality, install a signal amplifier to the antenna as shown to the right. Wall Antenna Socket Outdoor Antenna (VHF, UHF...

Owner's Manual
Page 19
.../60Hz) (24Hz/50Hz/60Hz) AV 1 AV 2 ANTENNA IN RS-232C IN VIDEO AUDIO 17 HD RECEIVER SETUP I This part of EXTERNAL EQUIPMENT SETUP mainly use pictures for the digital set-top box.) 1 2 4 Select COMPONENT input source with a component cable 1 Connect the video outputs (Y, PB, PR) of the digital set-top box...
.../60Hz) (24Hz/50Hz/60Hz) AV 1 AV 2 ANTENNA IN RS-232C IN VIDEO AUDIO 17 HD RECEIVER SETUP I This part of EXTERNAL EQUIPMENT SETUP mainly use pictures for the digital set-top box.) 1 2 4 Select COMPONENT input source with a component cable 1 Connect the video outputs (Y, PB, PR) of the digital set-top box...

Owner's Manual
Page 22
...(PC) AUDIO IN (RGB/DVI) AV 1 AV 2 ANTENNA IN COMPONENT IN VIDEO AUDIO DIGITAL AUDIO OUT RS-232C IN Component Input ports To get better picture quality, connect a DVD player to the DVD player's mPaCnMuCaIAl for opEeJrEaCtiTng instructions.
...(PC) AUDIO IN (RGB/DVI) AV 1 AV 2 ANTENNA IN COMPONENT IN VIDEO AUDIO DIGITAL AUDIO OUT RS-232C IN Component Input ports To get better picture quality, connect a DVD player to the DVD player's mPaCnMuCaIAl for opEeJrEaCtiTng instructions.

Owner's Manual
Page 25
If the 4:3 picture format is used; the fixed images on the screen. HDMI/DVI IN 1 HDMI IN 2 AV 1 AV 2 When connecting with an antenna ANTENNA IN OPTICAL 1 ANT ... sides of the VCR to the ANT IN socket of the VCR. EXTERNAL EQUIPMENT SETUP VCR SETUP I Typically a frozen still picture from a VCR. O 3 AUDIO Press the P L A Y button on the set. I To avoid picture noise (interference), leave an adequate distance between the TV and VCR for viewing. 23 AV 1 AV 2 2 Connect the antenna...
If the 4:3 picture format is used; the fixed images on the screen. HDMI/DVI IN 1 HDMI IN 2 AV 1 AV 2 When connecting with an antenna ANTENNA IN OPTICAL 1 ANT ... sides of the VCR to the ANT IN socket of the VCR. EXTERNAL EQUIPMENT SETUP VCR SETUP I Typically a frozen still picture from a VCR. O 3 AUDIO Press the P L A Y button on the set. I To avoid picture noise (interference), leave an adequate distance between the TV and VCR for viewing. 23 AV 1 AV 2 2 Connect the antenna...
Owner's Manual
Page 27
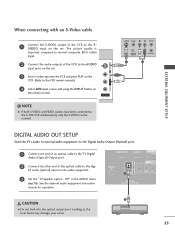
... S-VHS VCR simultaneously, only the S-VIDEO can be received. tal audio (optical) input on the set. 3 Insert a video tape into the optical output port. The picture quality is IN improved; AV IN 3 ! compared to normal composite (RCA cable) input. 2 Connect the audio outputs of the VCR to the AUDIO input jacks...
... S-VHS VCR simultaneously, only the S-VIDEO can be received. tal audio (optical) input on the set. 3 Insert a video tape into the optical output port. The picture quality is IN improved; AV IN 3 ! compared to normal composite (RCA cable) input. 2 Connect the audio outputs of the VCR to the AUDIO input jacks...

Owner's Manual
Page 30
...separate. G In Plasma TV models, we recommend using 1024x768, 60Hz for Plug and Play functionally. G This set . It provides the best picture quality. 28 If the refresh rate of PC accordingly. The PC adjusts automatically when using a sound card, adjust PC sound as required. ...HDMI (Digital RGB) mode. G If using this set . G The synchronization input waveform for the PC mode, they provide the best picture quality. We recommend using 1920x1080 (Reduced Blanking Timing), 60Hz for Horizontal and Vertical frequencies are not included with a DDC protocol. NOTE G To...
...separate. G In Plasma TV models, we recommend using 1024x768, 60Hz for Plug and Play functionally. G This set . It provides the best picture quality. 28 If the refresh rate of PC accordingly. The PC adjusts automatically when using a sound card, adjust PC sound as required. ...HDMI (Digital RGB) mode. G If using this set . G The synchronization input waveform for the PC mode, they provide the best picture quality. We recommend using 1920x1080 (Reduced Blanking Timing), 60Hz for Horizontal and Vertical frequencies are not included with a DDC protocol. NOTE G To...
Owner's Manual
Page 32
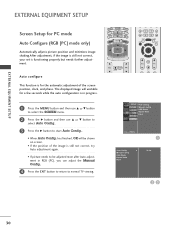
EXTERNAL EQUIPMENT SETUP EXTERNAL EQUIPMENT SETUP Screen Setup for PC mode Auto Configure (RGB [PC] mode only) Automatically adjusts picture position and minimizes image shaking.After adjustment, if the image is still not correct, your set is in RGB (PC), you can adjust the Manual... automatic adjustment of the image is still not correct, try Auto adjustment again. • If picture needs to start Auto Config.. • When Auto Config. GUIDE INFO i SLEEP BACK SUBTITLE TV/RADIO I/II RATIO PICTURE SOUND MENU TEXT EXIT OK BACK MENU INFO i EXIT GUIDE OK VOL Q.VIEW PR MUTE FAV...
EXTERNAL EQUIPMENT SETUP EXTERNAL EQUIPMENT SETUP Screen Setup for PC mode Auto Configure (RGB [PC] mode only) Automatically adjusts picture position and minimizes image shaking.After adjustment, if the image is still not correct, your set is in RGB (PC), you can adjust the Manual... automatic adjustment of the image is still not correct, try Auto adjustment again. • If picture needs to start Auto Config.. • When Auto Config. GUIDE INFO i SLEEP BACK SUBTITLE TV/RADIO I/II RATIO PICTURE SOUND MENU TEXT EXIT OK BACK MENU INFO i EXIT GUIDE OK VOL Q.VIEW PR MUTE FAV...
Owner's Manual
Page 33
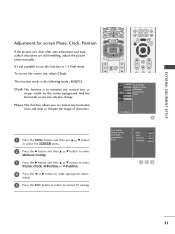
.... To correct the screen size, adjust Clock. Phase This function allows you to make appropriate adjust- GUIDE INFO i SLEEP BACK SUBTITLE TV/RADIO I/II RATIO PICTURE SOUND MENU TEXT EXIT OK BACK MENU INFO i EXIT GUIDE OK VOL Q.VIEW PR MUTE FAV VOL PR MUTE 1 2 3 SETUPO Auto Config. It's not ...F or G button to remove any vertical bars or stripes visible on the screen background. EXTERNAL EQUIPMENT SETUP Adjustment for screen Phase, Clock, Position If the picture isn't clear after auto adjustment and especially if characters are still trembling, adjust the...
.... To correct the screen size, adjust Clock. Phase This function allows you to make appropriate adjust- GUIDE INFO i SLEEP BACK SUBTITLE TV/RADIO I/II RATIO PICTURE SOUND MENU TEXT EXIT OK BACK MENU INFO i EXIT GUIDE OK VOL Q.VIEW PR MUTE FAV VOL PR MUTE 1 2 3 SETUPO Auto Config. It's not ...F or G button to remove any vertical bars or stripes visible on the screen background. EXTERNAL EQUIPMENT SETUP Adjustment for screen Phase, Clock, Position If the picture isn't clear after auto adjustment and especially if characters are still trembling, adjust the...
Owner's Manual
Page 34
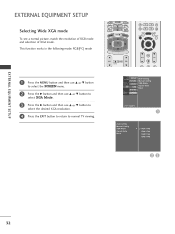
... Ratio Reset G 1024 X 768 1280 X 768 1360 X 768 1366 X 768 23 32 EXTERNAL EQUIPMENT SETUP EXTERNAL EQUIPMENT SETUP Selecting Wide XGA mode To see a normal picture, match the resolution of RGB mode and selection of XGA mode. GUIDE INFO i SLEEP BACK SUBTITLE TV/RADIO I/II RATIO...
... Ratio Reset G 1024 X 768 1280 X 768 1360 X 768 1366 X 768 23 32 EXTERNAL EQUIPMENT SETUP EXTERNAL EQUIPMENT SETUP Selecting Wide XGA mode To see a normal picture, match the resolution of RGB mode and selection of XGA mode. GUIDE INFO i SLEEP BACK SUBTITLE TV/RADIO I/II RATIO...
Owner's Manual
Page 35
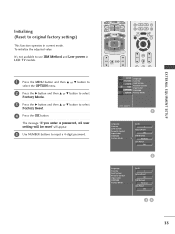
... reset" will appear. 5 Use NUMBER buttons to use ISM Method and Low power in current mode. GUIDE INFO i SLEEP BACK SUBTITLE TV/RADIO I/II RATIO PICTURE SOUND MENU TEXT EXIT OK BACK MENU INFO i EXIT GUIDE OK VOL Q.VIEW PR MUTE FAV VOL PR MUTE 1 2 3 SETUPO Language PICTUREO Country AUDIOO Lock...
... reset" will appear. 5 Use NUMBER buttons to use ISM Method and Low power in current mode. GUIDE INFO i SLEEP BACK SUBTITLE TV/RADIO I/II RATIO PICTURE SOUND MENU TEXT EXIT OK BACK MENU INFO i EXIT GUIDE OK VOL Q.VIEW PR MUTE FAV VOL PR MUTE 1 2 3 SETUPO Language PICTUREO Country AUDIOO Lock...

Owner's Manual
Page 36
... control, aim it at the remote control sensor on from standby. D/A POWER INPUT TV GUIDE DVD INFO i SLEEP BACK VCR SUBTITLE TV/RADIO I/II RATIO PICTURE SOUND MENU TEXT EXIT OK D/A Selects digital or analogue mode. Switches the set on the TV. VOL Q.VIEW PR MUTE 1 2 3 4 5 6 7 8 9 LIST 0 FAV SIZE UPDATE TIME...
... control, aim it at the remote control sensor on from standby. D/A POWER INPUT TV GUIDE DVD INFO i SLEEP BACK VCR SUBTITLE TV/RADIO I/II RATIO PICTURE SOUND MENU TEXT EXIT OK D/A Selects digital or analogue mode. Switches the set on the TV. VOL Q.VIEW PR MUTE 1 2 3 4 5 6 7 8 9 LIST 0 FAV SIZE UPDATE TIME...

Owner's Manual
Page 37
...further details, see the 'Teletext' section. Installing Batteries I Open the battery compartment cover on -screen displays and returns to your desired picture format. RATIO Selects your viewing programme. I Close cover. 35 MENU Selects a menu. 1 TELETEXT These buttons are used batteries with... batteries matching correct polarity (+with +,-with new ones. See a list of AV devices connected to the room. SLEEP Sets the sleep timer. I /II RATIO PICTURE SOUND 1 MENU TEXT EXIT OK VOL Q.VIEW PR MUTE 1 2 3 4 5 6 7 8 9 LIST 0 FAV SIZE UPDATE INDEX HOLD 1 i TIME...
...further details, see the 'Teletext' section. Installing Batteries I Open the battery compartment cover on -screen displays and returns to your desired picture format. RATIO Selects your viewing programme. I Close cover. 35 MENU Selects a menu. 1 TELETEXT These buttons are used batteries with... batteries matching correct polarity (+with +,-with new ones. See a list of AV devices connected to the room. SLEEP Sets the sleep timer. I /II RATIO PICTURE SOUND 1 MENU TEXT EXIT OK VOL Q.VIEW PR MUTE 1 2 3 4 5 6 7 8 9 LIST 0 FAV SIZE UPDATE INDEX HOLD 1 i TIME...

Owner's Manual
Page 39
... polarity (+with +,-with new ones. Control connected AV devices by pressing the D or E or F or G, OK buttons and buttons for teletext. OK Accepts your desired picture format. I /II Selects the sound output. When you toggle this button, the Simplink menu appears at the screen. 1 TELETEXT These buttons are used batteries with...
... polarity (+with +,-with new ones. Control connected AV devices by pressing the D or E or F or G, OK buttons and buttons for teletext. OK Accepts your desired picture format. I /II Selects the sound output. When you toggle this button, the Simplink menu appears at the screen. 1 TELETEXT These buttons are used batteries with...

Owner's Manual
Page 41
... I /II BACK MENU INFO i EXIT GUIDE OK FAV VOL PR MUTE 1 2 3 39 WATCHING TV / PROGRAMME CONTROL GUIDE INFO i SLEEP BACK SUBTITLE TV/RADIO I/II RATIO PICTURE SOUND MENU TEXT EXIT OK VOL Q.VIEW PR MUTE 1 2 3 4 5 6 VCR SIMPLINK TEXT RATIO I /II button. VOLUME ADJUSTMENT 1 Press the VOL D or E (or VOL + or -) button...
... I /II BACK MENU INFO i EXIT GUIDE OK FAV VOL PR MUTE 1 2 3 39 WATCHING TV / PROGRAMME CONTROL GUIDE INFO i SLEEP BACK SUBTITLE TV/RADIO I/II RATIO PICTURE SOUND MENU TEXT EXIT OK VOL Q.VIEW PR MUTE 1 2 3 4 5 6 VCR SIMPLINK TEXT RATIO I /II button. VOLUME ADJUSTMENT 1 Press the VOL D or E (or VOL + or -) button...

Owner's Manual
Page 42
... MENU Prev. Move MENU Prev. G In Analogue mode, 5V Antenna Power, CI Information, Software Update and Diagnostics will not display. SETUPO Picture Mode PICTUREO Colour Temperature AUDIOO Advanced TIMEO Picture Reset OPTIONO Demo SCREENO Move MENU Prev. SETUPO Language PICTUREO Country AUDIOO Lock System Parental Control TIMEO Input Label OPTIONO SIMPLINK SCREENO...
... MENU Prev. Move MENU Prev. G In Analogue mode, 5V Antenna Power, CI Information, Software Update and Diagnostics will not display. SETUPO Picture Mode PICTUREO Colour Temperature AUDIOO Advanced TIMEO Picture Reset OPTIONO Demo SCREENO Move MENU Prev. SETUPO Language PICTUREO Country AUDIOO Lock System Parental Control TIMEO Input Label OPTIONO SIMPLINK SCREENO...


