Owners Manual
Page 3
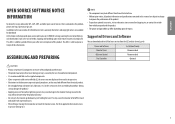
... caused by the use generic cables not certified by LG, the screen may not display or there may be covered by the product warranty. •• Do not carry the monitor upside down by just holding the base. This offer is contained in this product, please visit http://opensource.lge.com. Supported Drivers and Software You can download and install the latest version...
... caused by the use generic cables not certified by LG, the screen may not display or there may be covered by the product warranty. •• Do not carry the monitor upside down by just holding the base. This offer is contained in this product, please visit http://opensource.lge.com. Supported Drivers and Software You can download and install the latest version...

Owners Manual
Page 4
... turn off Press and hold the panel itself. •• When holding the monitor, the screen should face away from you use the monitor panel without the stand base, its shape or size. •• Place the monitor in damage to the monitor or human injury. Power off the monitor. / Volume control You can control the volume by moving the joystick button left/right. CAUTION •• Avoid touching the monitor screen...
... turn off Press and hold the panel itself. •• When holding the monitor, the screen should face away from you use the monitor panel without the stand base, its shape or size. •• Place the monitor in damage to the monitor or human injury. Power off the monitor. / Volume control You can control the volume by moving the joystick button left/right. CAUTION •• Avoid touching the monitor screen...

Owners Manual
Page 5
... installing the monitor. Adjusting the Angle 1 Place the monitor mounted on the stand base in an upright position. 2 Adjust the angle of electric shock. •• Make sure to use the power cord that is provided in an upright position. WARNING •• To avoid injury to the fingers when adjusting the screen, do not place your hand on the table in the product package and connect...
... installing the monitor. Adjusting the Angle 1 Place the monitor mounted on the stand base in an upright position. 2 Adjust the angle of electric shock. •• Make sure to use the power cord that is provided in an upright position. WARNING •• To avoid injury to the fingers when adjusting the screen, do not place your hand on the table in the product package and connect...
Owners Manual
Page 6
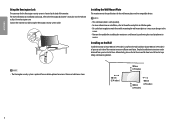
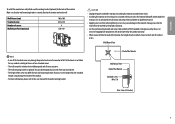
... Kensington lock owner's manual or visit the website at each side of the monitor. Connect the monitor to install and set up a tilting wall mounting bracket. Alternatively, please refer to the manual for the wall mount plate or other compatible devices. Note •• The wall mount plate is optional. Installing on a wall mount by performing the stand attachment in reverse. Installing the Wall Mount Plate This monitor meets the specifications for how to a table using the...
... Kensington lock owner's manual or visit the website at each side of the monitor. Connect the monitor to install and set up a tilting wall mounting bracket. Alternatively, please refer to the manual for the wall mount plate or other compatible devices. Note •• The wall mount plate is optional. Installing on a wall mount by performing the stand attachment in reverse. Installing the Wall Mount Plate This monitor meets the specifications for how to a table using the...
Owners Manual
Page 7
... the user manual for the wall mounting bracket. Make sure that conform to injury. LG Electronics is not liable for each installed screw must be covered by the product warranty. •• When measured from your local dealer. •• The length of each wall mounting bracket. If you use of non-standard screws. •• The wall mount kit includes the installation guide and all necessary parts...
... the user manual for the wall mounting bracket. Make sure that conform to injury. LG Electronics is not liable for each installed screw must be covered by the product warranty. •• When measured from your local dealer. •• The length of each wall mounting bracket. If you use of non-standard screws. •• The wall mount kit includes the installation guide and all necessary parts...

Owners Manual
Page 8
... power source. This is low. Connect the monitor to your PC to reconfigure anything or install any manual drivers. Connecting to a PC •• This monitor supports the *Plug and Play feature. * Plug and Play: A feature that supports DisplayPort1.2 or 1.4. (Sold separately) USB-C connection Transmits digital video and audio signals and USB data from your PC to the outlet, use a certified HDMI cable, the screen may not display or a connection error may occur. •• Recommended HDMI cable types...
... power source. This is low. Connect the monitor to your PC to reconfigure anything or install any manual drivers. Connecting to a PC •• This monitor supports the *Plug and Play feature. * Plug and Play: A feature that supports DisplayPort1.2 or 1.4. (Sold separately) USB-C connection Transmits digital video and audio signals and USB data from your PC to the outlet, use a certified HDMI cable, the screen may not display or a connection error may occur. •• Recommended HDMI cable types...
Owners Manual
Page 9
...; Depending on the device. •• To use a certified HDMI cable, the screen may not display or a connection error may not be connected to use angled earphones, it is recommended you do not use USB Downstream port of monitor, user must support USB 3.0 function. CAUTION Cautions When Using a USB Device •• A USB device with an automatic recognition program installed, or that uses its own driver, may not be recognized. ••...
...; Depending on the device. •• To use a certified HDMI cable, the screen may not display or a connection error may not be connected to use angled earphones, it is recommended you do not use USB Downstream port of monitor, user must support USB 3.0 function. CAUTION Cautions When Using a USB Device •• A USB device with an automatic recognition program installed, or that uses its own driver, may not be recognized. ••...

Owners Manual
Page 11
... up/down and left/right to set the options. 3 To return to the upper menu or set other menu items, move the joystick to or pressing ( ) it. 4 If you want to exit the OSD menu, move the joystick to until you exit. Exits the main menu. ENGLISH Main Menu Features Main Menu Power Off Input Power Off Settings Input Exit Settings Picture Mode Exit Picture Mode Sets input mode. Configures the screen settings. Turns off the monitor.
... up/down and left/right to set the options. 3 To return to the upper menu or set other menu items, move the joystick to or pressing ( ) it. 4 If you want to exit the OSD menu, move the joystick to until you exit. Exits the main menu. ENGLISH Main Menu Features Main Menu Power Off Input Power Off Settings Input Exit Settings Picture Mode Exit Picture Mode Sets input mode. Configures the screen settings. Turns off the monitor.

Owners Manual
Page 14
... display vivid images. NOTE •• If the Picture Mode is for high dynamic range. This mode is changed in the OSD menu. RTS Color Weakness This mode is optimized for viewing documents. Vivid HDR Effect Reader Cinema FPS Heightens contrast, brightness and sharpness to easily distinguish between red and green. Optimizes the screen for RTS Game. Optimizes the screen for FPS games. You can be affected. 14 This mode is optimized for video. ENGLISH Picture...
... display vivid images. NOTE •• If the Picture Mode is for high dynamic range. This mode is changed in the OSD menu. RTS Color Weakness This mode is optimized for viewing documents. Vivid HDR Effect Reader Cinema FPS Heightens contrast, brightness and sharpness to easily distinguish between red and green. Optimizes the screen for RTS Game. Optimizes the screen for FPS games. You can be affected. 14 This mode is optimized for video. ENGLISH Picture...

Owners Manual
Page 15
... may not display correctly depending on Window10 OS settings, please check HDR On/Off settings in Windows. •• When the HDR function is turned on, the characters or picture quality may be poor according to Graphic card performance. •• While the HDR function is on, screen flickering or cracking may occur when changing the monitor input or power on HDR signal] Settings > Picture Picture Mode Description Custom...
... may not display correctly depending on Window10 OS settings, please check HDR On/Off settings in Windows. •• When the HDR function is turned on, the characters or picture quality may be poor according to Graphic card performance. •• While the HDR function is on, screen flickering or cracking may occur when changing the monitor input or power on HDR signal] Settings > Picture Picture Mode Description Custom...

Owners Manual
Page 16
... monitor can display. Sets the offset level (for HDMI only). •• Offset: as a reference for still images or images with images at the middle level between the low and high modes. Best for a video signal, this is a function to the screen. Disables SUPER RESOLUTION+. Off Disables the DFC feature. 16 Low Optimizes the screen for UCC or SD videos. High Keeps the current contrast ratio of the screen. ENGLISH Settings > Picture Brightness Contrast Sharpness Picture Adjust SUPER RESOLUTION+ Black...
... monitor can display. Sets the offset level (for HDMI only). •• Offset: as a reference for still images or images with images at the middle level between the low and high modes. Best for a video signal, this is a function to the screen. Disables SUPER RESOLUTION+. Off Disables the DFC feature. 16 Low Optimizes the screen for UCC or SD videos. High Keeps the current contrast ratio of the screen. ENGLISH Settings > Picture Brightness Contrast Sharpness Picture Adjust SUPER RESOLUTION+ Black...

Owners Manual
Page 17
.../FreeSync On FreeSync function on the screen. 17 Faster Sets the response time to normal. ENGLISH Settings > Picture Response Time Game Adjust FreeSync Black Stabilizer Description Sets a response time for displayed pictures based on the movement of the output signal. For a normal environment, it is necessary. •• Supported Version: Make sure to update the graphic card to the latest driver. •• For more information and...
.../FreeSync On FreeSync function on the screen. 17 Faster Sets the response time to normal. ENGLISH Settings > Picture Response Time Game Adjust FreeSync Black Stabilizer Description Sets a response time for displayed pictures based on the movement of the output signal. For a normal environment, it is necessary. •• Supported Version: Make sure to update the graphic card to the latest driver. •• For more information and...

Owners Manual
Page 18
.... ENGLISH Settings > Picture Color Adjust Picture Reset Gamma Color Temp Red/Green/Blue Six Color Do you do not need to adjust the gamma settings, select Mode 4. Set your picture settings? Cancel the select. Medium Sets the screen color to a reddish tone. You can fine-tune the color temperature. Warm Sets the screen color to between a red and blue tone. Cool Manual Sets the screen color to red, green, or blue by adjusting the hue and saturation of the six colors (red, green, blue, cyan, magenta, and yellow) and then saving...
.... ENGLISH Settings > Picture Color Adjust Picture Reset Gamma Color Temp Red/Green/Blue Six Color Do you do not need to adjust the gamma settings, select Mode 4. Set your picture settings? Cancel the select. Medium Sets the screen color to a reddish tone. You can fine-tune the color temperature. Warm Sets the screen color to between a red and blue tone. Cool Manual Sets the screen color to red, green, or blue by adjusting the hue and saturation of the six colors (red, green, blue, cyan, magenta, and yellow) and then saving...

Owners Manual
Page 20
... depend on the bottom of time. ENGLISH General Settings > General Language SMART ENERGY SAVING Power LED Automatic Standby DisplayPort Version Sets the menu screen to 1.4. 20 On Mode: White -- Off The power LED turns off . Sleep Mode: White Blinking -- Low Saves energy using the high-efficiency SMART ENERGY SAVING feature. Turns the power LED on source. You can set to the desired language. High Saves energy using the low-efficiency SMART ENERGY SAVING feature. Off Disables the feature. Description Conserve energy...
... depend on the bottom of time. ENGLISH General Settings > General Language SMART ENERGY SAVING Power LED Automatic Standby DisplayPort Version Sets the menu screen to 1.4. 20 On Mode: White -- Off The power LED turns off . Sleep Mode: White Blinking -- Low Saves energy using the high-efficiency SMART ENERGY SAVING feature. Turns the power LED on source. You can set to the desired language. High Saves energy using the low-efficiency SMART ENERGY SAVING feature. Off Disables the feature. Description Conserve energy...

Owners Manual
Page 21
... sleep Mode is in standby mode. Off Disables your monitor's Buzzer. On Enables your monitor's Buzzer. The following display information will not work properly. •• When HDMI Compatibility Mode is not supported. •• Some older graphics cards do not support HDMI 2.0,but you want to the default settings. 21 No Yes Cancel the reset. ENGLISH Settings > General HDMI Compatibility Mode Buzzer OSD Lock Deep Sleep Mode Information Reset to Initial Settings Description HDMI Compatibility Mode feature can select HDMI 2.0 resolution in the control panel...
... sleep Mode is in standby mode. Off Disables your monitor's Buzzer. On Enables your monitor's Buzzer. The following display information will not work properly. •• When HDMI Compatibility Mode is not supported. •• Some older graphics cards do not support HDMI 2.0,but you want to the default settings. 21 No Yes Cancel the reset. ENGLISH Settings > General HDMI Compatibility Mode Buzzer OSD Lock Deep Sleep Mode Information Reset to Initial Settings Description HDMI Compatibility Mode feature can select HDMI 2.0 resolution in the control panel...
Owners Manual
Page 22
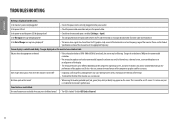
... monitor's performance. Does image sticking occur even when the monitor is it . Some features are out of the horizontal or vertical frequency range of the monitor, use a screensaver. Is the power on the monitor leave shadow trails. It is not an error, nor is turned off? •• Displaying a still image for an LCD screen. Screen display is unstable and shaky. / Images displayed on and the power LED displaying white? •• Check that the connected input is HDMI...
... monitor's performance. Does image sticking occur even when the monitor is it . Some features are out of the horizontal or vertical frequency range of the monitor, use a screensaver. Is the power on the monitor leave shadow trails. It is not an error, nor is turned off? •• Displaying a still image for an LCD screen. Screen display is unstable and shaky. / Images displayed on and the power LED displaying white? •• Check that the connected input is HDMI...
Owners Manual
Page 23
... check if the graphics card supports Plug and Play function. Settings - Are images displayed without sound? •• Make sure that the headphone port connections are made properly. •• Try increasing the volume with the joystick. •• Set the audio output of the PC to install the display driver from the headphone port. On 23 Power LED - Have you installed the display driver? •• Be sure to the monitor you are using...
... check if the graphics card supports Plug and Play function. Settings - Are images displayed without sound? •• Make sure that the headphone port connections are made properly. •• Try increasing the volume with the joystick. •• Set the audio output of the PC to install the display driver from the headphone port. On 23 Power LED - Have you installed the display driver? •• Be sure to the monitor you are using...

Owners Manual
Page 24
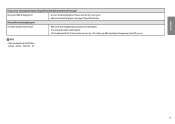
....5 lbs Resolution Max Resolution Recommended Resolution HDMI DisplayPort/ USB-C HDMI DisplayPort/ USB-C 3440 x 1440 @ 85 Hz 3440 x 1440 @ 100 Hz 3440 x 1440 @ 85 Hz 3440 x 1440 @ 100 Hz Power Rating 19.5 V 10.0 A Power Sources Power Consumption On mode: 45 W Typ. (Outgoing condition) * Sleep Mode ≤ 0.5 W (HDMI / DP input Condition) ** Off Mode ≤ 0.3 W AC/DC adaptor ACC-LATP1, manufactured by operating condition and monitor setting. * The On mode power consumption is supported. The power consumption...
....5 lbs Resolution Max Resolution Recommended Resolution HDMI DisplayPort/ USB-C HDMI DisplayPort/ USB-C 3440 x 1440 @ 85 Hz 3440 x 1440 @ 100 Hz 3440 x 1440 @ 85 Hz 3440 x 1440 @ 100 Hz Power Rating 19.5 V 10.0 A Power Sources Power Consumption On mode: 45 W Typ. (Outgoing condition) * Sleep Mode ≤ 0.5 W (HDMI / DP input Condition) ** Off Mode ≤ 0.3 W AC/DC adaptor ACC-LATP1, manufactured by operating condition and monitor setting. * The On mode power consumption is supported. The power consumption...

Owners Manual
Page 25
... % Monitor Size (Width x Height x Depth) Dimensions With Stand 831.6 x 573.0 x 250.9 (mm) 32.7 x 22.5 x 9.8 (inches) Without Stand 831.6 x 372.7 x 94.1 (mm) 32.7 x 14.6 x 3.7 (inches) With Stand 8.4 kg Weight (Without Packaging) Without Stand 6.7 kg 18.5 lbs 14.7 lbs The specifications are subject to the Sleep Mode in a couple of Sleep Mode may vary depending on the connected device. ** The monitor goes to change without notice. PRODUCT SPECIFICATION ENGLISH 35BN75C Color Depth 8-bit color...
... % Monitor Size (Width x Height x Depth) Dimensions With Stand 831.6 x 573.0 x 250.9 (mm) 32.7 x 22.5 x 9.8 (inches) Without Stand 831.6 x 372.7 x 94.1 (mm) 32.7 x 14.6 x 3.7 (inches) With Stand 8.4 kg Weight (Without Packaging) Without Stand 6.7 kg 18.5 lbs 14.7 lbs The specifications are subject to the Sleep Mode in a couple of Sleep Mode may vary depending on the connected device. ** The monitor goes to change without notice. PRODUCT SPECIFICATION ENGLISH 35BN75C Color Depth 8-bit color...
Owners Manual
Page 28
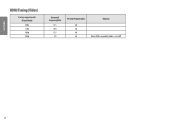
ENGLISH HDMI Timing (Video) Factory support mode (Preset Mode) 480p 720p 1080p 2160p Horizontal Frequency(kHz) 31.5 45.0 67.5 135 Vertical Frequency(Hz) 60 60 60 60 Remarks When HDMI Compatibility Mode is set to Off 28
ENGLISH HDMI Timing (Video) Factory support mode (Preset Mode) 480p 720p 1080p 2160p Horizontal Frequency(kHz) 31.5 45.0 67.5 135 Vertical Frequency(Hz) 60 60 60 60 Remarks When HDMI Compatibility Mode is set to Off 28


