
Owners Manual
Page 1
All Rights Reserved. OWNER'S MANUAL LG Digital Signage (MONITOR SIGNAGE) Please read this manual carefully before operating your set and retain it for future reference. 49VH7E 55VH7E 49VM5E 55VM5E www.lg.com Copyright © 2019 LG Electronics Inc.
All Rights Reserved. OWNER'S MANUAL LG Digital Signage (MONITOR SIGNAGE) Please read this manual carefully before operating your set and retain it for future reference. 49VH7E 55VH7E 49VM5E 55VM5E www.lg.com Copyright © 2019 LG Electronics Inc.
Owners Manual
Page 2
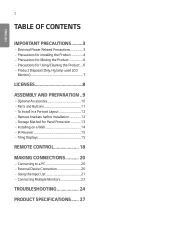
... used LCD Monitor 7 LICENSES 8 ASSEMBLY AND PREPARATION...9 --Optional Accessories 10 --Parts and Buttons 11 --To Install in a Portrait Layout 12 --Remove brackets before Installation 12 --Storage Method for Panel Protection 13 --Installing on a Wall 14 --IR Receiver 15 --Tiling Displays 15 REMOTE CONTROL 18 MAKING CONNECTIONS 20 --Connecting to a PC 20 --External Device Connection 20 --Using the Input List 21 --Connecting Multiple Monitors 22 TROUBLESHOOTING 24 PRODUCT SPECIFICATIONS...
... used LCD Monitor 7 LICENSES 8 ASSEMBLY AND PREPARATION...9 --Optional Accessories 10 --Parts and Buttons 11 --To Install in a Portrait Layout 12 --Remove brackets before Installation 12 --Storage Method for Panel Protection 13 --Installing on a Wall 14 --IR Receiver 15 --Tiling Displays 15 REMOTE CONTROL 18 MAKING CONNECTIONS 20 --Connecting to a PC 20 --External Device Connection 20 --Using the Input List 21 --Connecting Multiple Monitors 22 TROUBLESHOOTING 24 PRODUCT SPECIFICATIONS...
Owners Manual
Page 3
...Use a power strip with a grounding terminal designed for exclusive use a damaged or loose plug. -- A fire can occur or you may cause electrical shock or fire. •• Operate the display only from a power source(i.e. If you may be slightly injured or the product may result in the product specification...thunder and lightning, never touch the power cord and signal cable because it can cause electric shock. •• Do not connect several extension cords, electrical appliances or electrical heaters to the product. •• Use only a properly grounded plug and ...
...Use a power strip with a grounding terminal designed for exclusive use a damaged or loose plug. -- A fire can occur or you may cause electrical shock or fire. •• Operate the display only from a power source(i.e. If you may be slightly injured or the product may result in the product specification...thunder and lightning, never touch the power cord and signal cable because it can cause electric shock. •• Do not connect several extension cords, electrical appliances or electrical heaters to the product. •• Use only a properly grounded plug and ...
Owners Manual
Page 5
...use...power cord and contact LG Customer Service. -- Contact LG Customer Service. •• Do not drop an object on the floor. -- Install the product more than 100 mm (3.9 inches) from direct sunlight. -- The product can cause injury to humans, problems to the product and damage the display...wall. -- up. •• Do not cover the product with glossy bezels the user should consider the placement of children and do not place toys near water. -- Small Children and others may be deformed or fire can occur. If the product is broken, turn off the product and unplug the power...
...use...power cord and contact LG Customer Service. -- Contact LG Customer Service. •• Do not drop an object on the floor. -- Install the product more than 100 mm (3.9 inches) from direct sunlight. -- The product can cause injury to humans, problems to the product and damage the display...wall. -- up. •• Do not cover the product with glossy bezels the user should consider the placement of children and do not place toys near water. -- Small Children and others may be deformed or fire can occur. If the product is broken, turn off the product and unplug the power...
Owners Manual
Page 6
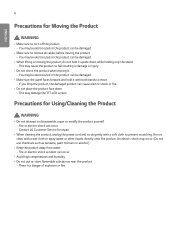
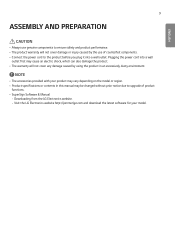
... An electric shock may damage the TFT-LCD screen. Precautions for Using/Cleaning the Product WARNING •• Do not attempt to remove all cables before moving it. -- Contact LG Customer Service for repair. •• When cleaning the product, unplug the power cord and scrub gently with a wet cloth ...hold it with both hands to turn off the product. -- You may cause the product to prevent scratching. Fire or electric shock can cause electric shock or fire. •• Do not place the product face down while holding only the stand. -- There is a danger ...
... An electric shock may damage the TFT-LCD screen. Precautions for Using/Cleaning the Product WARNING •• Do not attempt to remove all cables before moving it. -- Contact LG Customer Service for repair. •• When cleaning the product, unplug the power cord and scrub gently with a wet cloth ...hold it with both hands to turn off the product. -- You may cause the product to prevent scratching. Fire or electric shock can cause electric shock or fire. •• Do not place the product face down while holding only the stand. -- There is a danger ...

Owners Manual
Page 7
...Disposal (Only, Hg lamp used LCD Monitor) •• The fluorescent lamp used . Your vision may leave persistent image or stain on the monitor screen. Monitor may cause staining. To avoid this problem, use a screen saver and power off when this product is not used in this product contains a ...the User's Guide. •• Keep small accessories out of the reach of children. •• Displaying a still image for too long. •• Set the appropriate resolution by the warranty on this product. •• Do not use products using high voltage around the Monitor. (...
...Disposal (Only, Hg lamp used LCD Monitor) •• The fluorescent lamp used . Your vision may leave persistent image or stain on the monitor screen. Monitor may cause staining. To avoid this problem, use a screen saver and power off when this product is not used in this product contains a ...the User's Guide. •• Keep small accessories out of the reach of children. •• Displaying a still image for too long. •• Set the appropriate resolution by the warranty on this product. •• Do not use products using high voltage around the Monitor. (...
Owners Manual
Page 9
... power cord into a wall outlet first may cause an electric shock, which can also damage the product. •• The warranty will not cover damage or injury caused by using the product in this manual may vary depending on the model or region. •• Product specifications or contents in an excessively dusty environment. Downloading from the LG...
... power cord into a wall outlet first may cause an electric shock, which can also damage the product. •• The warranty will not cover damage or injury caused by using the product in this manual may vary depending on the model or region. •• Product specifications or contents in an excessively dusty environment. Downloading from the LG...
Owners Manual
Page 10
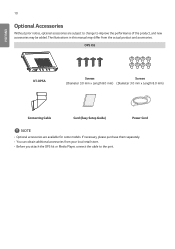
The illustrations in this manual may be added. If necessary, please purchase them separately. •• You can obtain additional accessories from your local retail store. •• Before you attach the OPS kit or Media Player, connect the cable to improve the performance..., and new accessories may differ from the actual product and accessories. OPS Kit KT-OPSA Screws Screws (Diameter 3.0 mm x Length 8.0 mm) (Diameter 3.0 mm x Length 8.0 mm) Connecting Cable Card (Easy Setup Guide) Power Cord NOTE •• Optional accessories are subject to change to the port...
The illustrations in this manual may be added. If necessary, please purchase them separately. •• You can obtain additional accessories from your local retail store. •• Before you attach the OPS kit or Media Player, connect the cable to improve the performance..., and new accessories may differ from the actual product and accessories. OPS Kit KT-OPSA Screws Screws (Diameter 3.0 mm x Length 8.0 mm) (Diameter 3.0 mm x Length 8.0 mm) Connecting Cable Card (Easy Setup Guide) Power Cord NOTE •• Optional accessories are subject to change to the port...
Owners Manual
Page 15
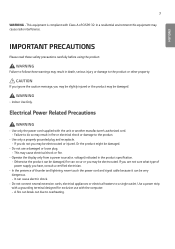
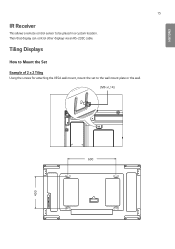
ENGLISH 15 IR Receiver This allows a remote control sensor to the wall mount plate or the wall. (M6 x L14) 600 400 Then that display can control other displays via an RS-232C cable. Tiling Displays How to Mount the Set Example of 2 x 2 Tiling Using the screws for attaching the VESA wall mount, mount the set to be placed in a custom location.
ENGLISH 15 IR Receiver This allows a remote control sensor to the wall mount plate or the wall. (M6 x L14) 600 400 Then that display can control other displays via an RS-232C cable. Tiling Displays How to Mount the Set Example of 2 x 2 Tiling Using the screws for attaching the VESA wall mount, mount the set to be placed in a custom location.
Owners Manual
Page 16
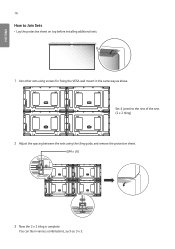
ENGLISH 16 How to the rest of the sets (2 x 2 tiling) 2 Adjust the spacing between the sets using screws for fixing the VESA wall mount in various combinations, such as above. Set 4 joined to Join Sets •• Lay the protective sheet on top before installing additional sets. 1 Join other sets using the tiling guide, and remove the protective sheet. (M4 x L6) 3 Now the 2 x 2 tiling is complete. You can tile in the same way as 3 x 3.
ENGLISH 16 How to the rest of the sets (2 x 2 tiling) 2 Adjust the spacing between the sets using screws for fixing the VESA wall mount in various combinations, such as above. Set 4 joined to Join Sets •• Lay the protective sheet on top before installing additional sets. 1 Join other sets using the tiling guide, and remove the protective sheet. (M4 x L6) 3 Now the 2 x 2 tiling is complete. You can tile in the same way as 3 x 3.

Owners Manual
Page 17
...8226;• The load applied to each set should be supported by the wall mount plate or the wall using a VESA wall mount (600 x 400). •• The load applied to each set should be supported by the wall mount plate using a VESA wall mount. (Each set without using the tiling guide; this does not affect the performance of...components in damage to the wall mount plate or the wall.) •• You may mount the set must be firmly mounted to the panel. ENGLISH 17 CAUTION •• Failure to lay the protective sheet on top before installing additional sets may result in the ...
...8226;• The load applied to each set should be supported by the wall mount plate or the wall using a VESA wall mount (600 x 400). •• The load applied to each set should be supported by the wall mount plate using a VESA wall mount. (Each set without using the tiling guide; this does not affect the performance of...components in damage to the wall mount plate or the wall.) •• You may mount the set must be firmly mounted to the panel. ENGLISH 17 CAUTION •• Failure to lay the protective sheet on top before installing additional sets may result in the ...
Owners Manual
Page 18
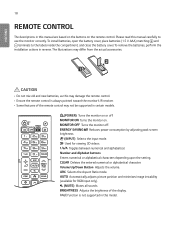
... batteries, as this may damage the remote control. •• Ensure the remote control is not supported in this model. Reduces power consumption by adjusting peak screen (INPUT) Selects the input mode. ENGLISH 18 REMOTE CONTROL The descriptions in this manual are based on the buttons on . To remove the batteries, perform the installation actions in certain models. (POWER) Turns the monitor on or off . brightness. Toggles...
... batteries, as this may damage the remote control. •• Ensure the remote control is not supported in this model. Reduces power consumption by adjusting peak screen (INPUT) Selects the input mode. ENGLISH 18 REMOTE CONTROL The descriptions in this manual are based on the buttons on . To remove the batteries, perform the installation actions in certain models. (POWER) Turns the monitor on or off . brightness. Toggles...
Owners Manual
Page 19
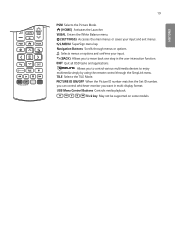
... be supported on some models. Navigation Buttons Scrolls through the SimpLink menu. Selects the TILE Mode. Enters the White Balance menu. (SETTINGS) Accesses the main menus or saves your input. (BACK) Allows you to control various multimedia devices to move back one step in multi-display format. Allows you to enjoy multimedia simply by using the remote control through...
... be supported on some models. Navigation Buttons Scrolls through the SimpLink menu. Selects the TILE Mode. Enters the White Balance menu. (SETTINGS) Accesses the main menus or saves your input. (BACK) Allows you to control various multimedia devices to move back one step in multi-display format. Allows you to enjoy multimedia simply by using the remote control through...
Owners Manual
Page 20
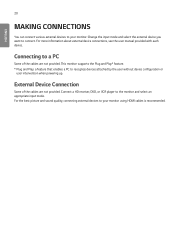
This monitor supports the Plug and Play* feature. * Plug and Play: a feature that enables a PC to your monitor using HDMI cables is recommended. ENGLISH 20 MAKING CONNECTIONS You can connect various external devices to recognize devices attached by the user without device configuration or user intervention when powering up. Change the input mode and select the external device you want to a PC...
This monitor supports the Plug and Play* feature. * Plug and Play: a feature that enables a PC to your monitor using HDMI cables is recommended. ENGLISH 20 MAKING CONNECTIONS You can connect various external devices to recognize devices attached by the user without device configuration or user intervention when powering up. Change the input mode and select the external device you want to a PC...
Owners Manual
Page 21
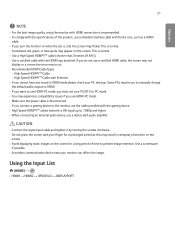
... compatibility issues if you use HDMI-PC mode. •• Make sure the power cable is cold, the screen may flicker. This is normal. •• Sometimes red, green, or blue spots may appear on the screen for a prolonged period as a HDMI cable. •• If you turn the monitor on when the set your PC settings. Some PCs require you to manually...
... compatibility issues if you use HDMI-PC mode. •• Make sure the power cable is cold, the screen may flicker. This is normal. •• Sometimes red, green, or blue spots may appear on the screen for a prolonged period as a HDMI cable. •• If you turn the monitor on when the set your PC settings. Some PCs require you to manually...
Owners Manual
Page 22
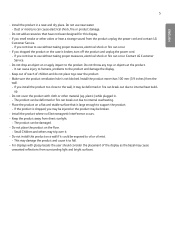
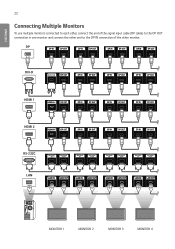
DP DVI-D DVI-D IN HDMI 1 HDMI 2 RS-232C LAN MONITOR 1 MONITOR 2 MONITOR 3 MONITOR 4 ENGLISH 22 Connecting Multiple Monitors To use multiple monitors connected to each other, connect the end of the signal input cable (DP cable) to the DP OUT connection in one monitor and connect the other end to the DP IN connection of the other monitor.
DP DVI-D DVI-D IN HDMI 1 HDMI 2 RS-232C LAN MONITOR 1 MONITOR 2 MONITOR 3 MONITOR 4 ENGLISH 22 Connecting Multiple Monitors To use multiple monitors connected to each other, connect the end of the signal input cable (DP cable) to the DP OUT connection in one monitor and connect the other end to the DP IN connection of the other monitor.
Owners Manual
Page 24
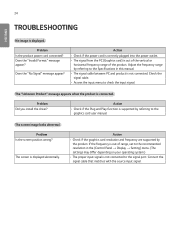
.... Problem Did you install the driver? Action •• Check if the graphics card resolution and frequency are supported by referring to the Specifications in the (Control Panel → Display → Setting) menu. (The settings may differ depending on your operating system.) •• The proper input signal is not connected. Problem Is the product power cord connected? Problem Is the screen position wrong? Connect the...
.... Problem Did you install the driver? Action •• Check if the graphics card resolution and frequency are supported by referring to the Specifications in the (Control Panel → Display → Setting) menu. (The settings may differ depending on your operating system.) •• The proper input signal is not connected. Problem Is the product power cord connected? Problem Is the screen position wrong? Connect the...
Owners Manual
Page 25
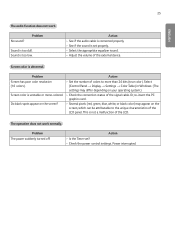
...malfunction of the LCD. Action •• Set the number of the external device. No sound? Screen color is too dull. Do black spots appear on your operating system.) •• Check the connection status of the LCD panel. Action •... screen? Select (Control Panel → Display → Settings → Color Table) in Windows. (The settings may appear on the screen, which can be attributable to more than 24 bits (true color). This is set ? •• Check the power control settings. The operation does not work . Problem The power suddenly turned ...
...malfunction of the LCD. Action •• Set the number of the external device. No sound? Screen color is too dull. Do black spots appear on your operating system.) •• Check the connection status of the LCD panel. Action •... screen? Select (Control Panel → Display → Settings → Color Table) in Windows. (The settings may appear on the screen, which can be attributable to more than 24 bits (true color). This is set ? •• Check the power control settings. The operation does not work . Problem The power suddenly turned ...

Owners Manual
Page 30
... divided by the screen image changing dozens of image displays per second. It is recommended that you can be tabulated as the horizontal frequency. ENGLISH 30 NOTE •• When the cable is connected to the DVI-D, HDMI or the Display Port, you select PC mode when connecting to a PC and select DTV mode when connecting to other devices...
... divided by the screen image changing dozens of image displays per second. It is recommended that you can be tabulated as the horizontal frequency. ENGLISH 30 NOTE •• When the cable is connected to the DVI-D, HDMI or the Display Port, you select PC mode when connecting to a PC and select DTV mode when connecting to other devices...
Owners Manual
Page 31
...Safety Precautions before using the product. MODEL SERIAL Temporary noise is not certified with EPA's ENERGY STAR. *55VH7E is normal when powering ON or OFF this device. This product qualifies for ENERGY STAR® certification. Changing the factory default configuration and settings or enabling ...certain optional features and functionalities may increase energy consumption beyond the limits required for ENERGY STAR®. Record them below in case you ever need service. Address 111 Sylvan Avenue, North Building, Englewood Cliffs, NJ 07632 E-mail lg....
...Safety Precautions before using the product. MODEL SERIAL Temporary noise is not certified with EPA's ENERGY STAR. *55VH7E is normal when powering ON or OFF this device. This product qualifies for ENERGY STAR® certification. Changing the factory default configuration and settings or enabling ...certain optional features and functionalities may increase energy consumption beyond the limits required for ENERGY STAR®. Record them below in case you ever need service. Address 111 Sylvan Avenue, North Building, Englewood Cliffs, NJ 07632 E-mail lg....

