
User Manual
Page 1
LCD TV OWNER'S MANUAL 32LH240H 32LH250H 37LH250H 42LH250H 32LH255H 37LH255H 42LH255H 37LH260H 42LH260H 37LH265H please read this information to quality for ENERGY STAR. 1-800-243-0000 USA, Consumer User 1-888-865-3026 USA, Commercial User 1-888-542-2623 CANADA LG Customer Information Center P/NO : SAC34026004 (0912-REV00) www.lgcommercial.com See the label attched...
LCD TV OWNER'S MANUAL 32LH240H 32LH250H 37LH250H 42LH250H 32LH255H 37LH255H 42LH255H 37LH260H 42LH260H 37LH265H please read this information to quality for ENERGY STAR. 1-800-243-0000 USA, Consumer User 1-888-865-3026 USA, Commercial User 1-888-542-2623 CANADA LG Customer Information Center P/NO : SAC34026004 (0912-REV00) www.lgcommercial.com See the label attched...
User Manual
Page 3
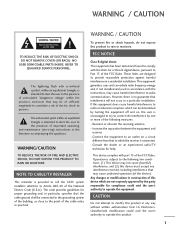
... that may be determined by one or more of the National Electric Code (U.S.A.). Consult the dealer or an experienced radio/TV technician for a Class B digital device, pursuant to Article 820-40 of the following measures: - Operation is provided ... THE RISK OF FIRE AND ELECTRIC SHOCK, DO NOT EXPOSE THIS PRODUCT TO RAIN OR MOISTURE. NOTE TO CABLE/TV INSTALLER This reminder is subject to persons. This equipment generates, uses and can be of sufficient magnitude to constitute...correct the interference by turning the equipment off and on a circuit different from LG Electronics.
... that may be determined by one or more of the National Electric Code (U.S.A.). Consult the dealer or an experienced radio/TV technician for a Class B digital device, pursuant to Article 820-40 of the following measures: - Operation is provided ... THE RISK OF FIRE AND ELECTRIC SHOCK, DO NOT EXPOSE THIS PRODUCT TO RAIN OR MOISTURE. NOTE TO CABLE/TV INSTALLER This reminder is subject to persons. This equipment generates, uses and can be of sufficient magnitude to constitute...correct the interference by turning the equipment off and on a circuit different from LG Electronics.

User Manual
Page 5
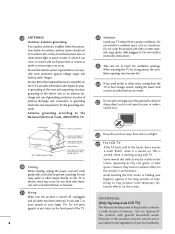
... pipes. Check the specification page of the appliance, and have a qualified electrician install a separate circuit breaker. Do not touch the TV with an exact replacement part by the hanging power and signal cables on shelves above the unit). 17 GROUNDING Ensure that appliances be certain... mechanical abuse, such as vases, cups, etc. Do not pull on or over the apparatus (e.g. Pay particular attention to install the TV by an authorized servicer. that is the disconnecting device. Overloaded wall outlets, loose or damaged wall outlets, extension cords, frayed power cords...
... pipes. Check the specification page of the appliance, and have a qualified electrician install a separate circuit breaker. Do not touch the TV with an exact replacement part by the hanging power and signal cables on shelves above the unit). 17 GROUNDING Ensure that appliances be certain... mechanical abuse, such as vases, cups, etc. Do not pull on or over the apparatus (e.g. Pay particular attention to install the TV by an authorized servicer. that is the disconnecting device. Overloaded wall outlets, loose or damaged wall outlets, extension cords, frayed power cords...
User Manual
Page 6
..., or where it for a long period, the ventilation openings may take 2 or more people to touch the ventilation openings. Do not dispose of the TV. 4 22 Ventilation Install your finger(s) against voltage surges and built-up static charges. Be sure the antenna system is turned on the front panel of... object such as nail, pencil or pen, or make a scratch on it. 26 Keep the product away from direct sunlight. 27 For LCD TV If the TV feels cold to provide some temporary distortion effects on the monitor's performance. Do not install in the U.S.A. Do not cover the product with general...
..., or where it for a long period, the ventilation openings may take 2 or more people to touch the ventilation openings. Do not dispose of the TV. 4 22 Ventilation Install your finger(s) against voltage surges and built-up static charges. Be sure the antenna system is turned on the front panel of... object such as nail, pencil or pen, or make a scratch on it. 26 Keep the product away from direct sunlight. 27 For LCD TV If the TV feels cold to provide some temporary distortion effects on the monitor's performance. Do not install in the U.S.A. Do not cover the product with general...
User Manual
Page 7
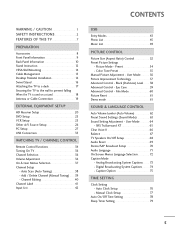
...78 Sleep Timer Setting 79 5 Auto Scan (Auto Tuning 38 - SRS TruSurround XT 65 Clear Voice II 66 Balance 67 TV Speakers On/Off Setup 68 Audio Reset 69 Stereo/SAP Broadcast Setup 70 Audio Language 71 On-Screen Menus Language Selection 72... 64 - Black (Darkness) Level 58 Advanced Control - Digital Broadcasting System Captions 74 - WARNING / CAUTION 1 SAFETY INSTRUCTIONS 2 FEATURES OF THIS TV 7 PREPARATION Accessories 8 Front Panel Information 9 Back Panel Information 10 Stand Instruction 12 VESA Wall Mounting 14 Cable Management 15 Desktop Pedestal Installation 16 ...
...78 Sleep Timer Setting 79 5 Auto Scan (Auto Tuning 38 - SRS TruSurround XT 65 Clear Voice II 66 Balance 67 TV Speakers On/Off Setup 68 Audio Reset 69 Stereo/SAP Broadcast Setup 70 Audio Language 71 On-Screen Menus Language Selection 72... 64 - Black (Darkness) Level 58 Advanced Control - Digital Broadcasting System Captions 74 - WARNING / CAUTION 1 SAFETY INSTRUCTIONS 2 FEATURES OF THIS TV 7 PREPARATION Accessories 8 Front Panel Information 9 Back Panel Information 10 Stand Instruction 12 VESA Wall Mounting 14 Cable Management 15 Desktop Pedestal Installation 16 ...
User Manual
Page 9
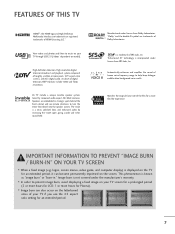
... a trademark of roughly a million or more hours for Plasma). ■ Image burn can become permanently imprinted on your TV if you use minute vibrations to turn the entire front bezel into the speaker system. LG TV include a unique invisible speaker system, tuned by increasing the "sweet spot", giving a wider and richer sound field...
... a trademark of roughly a million or more hours for Plasma). ■ Image burn can become permanently imprinted on your TV if you use minute vibrations to turn the entire front bezel into the speaker system. LG TV include a unique invisible speaker system, tuned by increasing the "sweet spot", giving a wider and richer sound field...

User Manual
Page 10
...P A G E MENU TIMER ALAM RETURN SAP EJECT 1.5V 1.5V Owner's Manual CD Manual Remote Control, Batteries Power Cord Not included with your TV. If an accessory is not available for all models Polishing Cloth * Wipe spots on the exterior only with ferrite cores to P.15) 8 x 4... to P.13) Protective Bracket and Bolt for Power Cord (This feature is missing, please contact the dealer where you purchased the TV. The accessories included may cause scratch or discoloration. PREPERATION ACCESSORIES Ensure that the following accessories are included with all models.) (Refer to...
...P A G E MENU TIMER ALAM RETURN SAP EJECT 1.5V 1.5V Owner's Manual CD Manual Remote Control, Batteries Power Cord Not included with your TV. If an accessory is not available for all models Polishing Cloth * Wipe spots on the exterior only with ferrite cores to P.15) 8 x 4... to P.13) Protective Bracket and Bolt for Power Cord (This feature is missing, please contact the dealer where you purchased the TV. The accessories included may cause scratch or discoloration. PREPERATION ACCESSORIES Ensure that the following accessories are included with all models.) (Refer to...
User Manual
Page 11
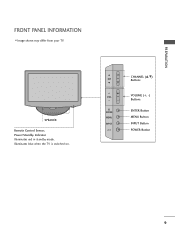
CH VOL ENTER MENU INPUT CHANNEL (D,E) Buttons VOLUME (+, -) Buttons ENTER Button MENU Button INPUT Button POWER Button 9 Illuminates blue when the TV is switched on. SPEAKER Remote Control Sensor, Power/Standby Indicator Illuminates red in standby mode. PREPARATION FRONT PANEL INFORMATION ■ Image shown may differ from your TV.
CH VOL ENTER MENU INPUT CHANNEL (D,E) Buttons VOLUME (+, -) Buttons ENTER Button MENU Button INPUT Button POWER Button 9 Illuminates blue when the TV is switched on. SPEAKER Remote Control Sensor, Power/Standby Indicator Illuminates red in standby mode. PREPARATION FRONT PANEL INFORMATION ■ Image shown may differ from your TV.
User Manual
Page 13
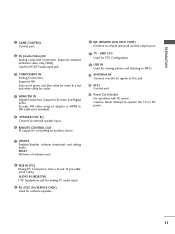
... speaker input. 6 REMOTE CONTROL OUT IR output for controlling an auxiliary device. 10 RJP (REMOTE JACK PACK PORT) Connect to operate the TV on DC power. 7 UPDATE Enables/disables software downloads and debug mode. Supports HD. AUDIO IN (RGB/DVI) 1/8" headphone jack for analog...3 COMPONENT IN Analog Connection. Uses a D-sub 15 pin cable (VGA cable). Caution: Never attempt to remote jack pack control output port. 11 TV - I. PREPARATION 1 GAME CONTROL Control port 2 AV (Audio/Video) IN Analog composite connection. Supports HD video and Digital audio. Control port. ...
... speaker input. 6 REMOTE CONTROL OUT IR output for controlling an auxiliary device. 10 RJP (REMOTE JACK PACK PORT) Connect to operate the TV on DC power. 7 UPDATE Enables/disables software downloads and debug mode. Supports HD. AUDIO IN (RGB/DVI) 1/8" headphone jack for analog...3 COMPONENT IN Analog Connection. Uses a D-sub 15 pin cable (VGA cable). Caution: Never attempt to remote jack pack control output port. 11 TV - I. PREPARATION 1 GAME CONTROL Control port 2 AV (Audio/Video) IN Analog composite connection. Supports HD video and Digital audio. Control port. ...
User Manual
Page 14
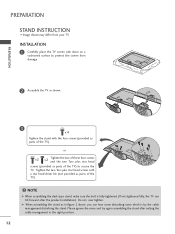
NOTE G When assembling the desk type stand, make sure the bolt is fully tightened (If not tightened fully, the TV can hear some disturbing noise which is by the cable management disturbing the stand. Please ignore the noise and try again assembling ... the product installation). Do not over tighten. G When assembling the stand as parts of the TV) to protect the screen from your TV. INSTALLATION 1 Carefully place the TV screen side down on a cushioned surface to secure the TV. PREPARATION PREPARATION STAND INSTRUCTION ■ Image shown may differ from damage. 2 Assemble the...
NOTE G When assembling the desk type stand, make sure the bolt is fully tightened (If not tightened fully, the TV can hear some disturbing noise which is by the cable management disturbing the stand. Please ignore the noise and try again assembling ... the product installation). Do not over tighten. G When assembling the stand as parts of the TV) to protect the screen from your TV. INSTALLATION 1 Carefully place the TV screen side down on a cushioned surface to secure the TV. PREPARATION PREPARATION STAND INSTRUCTION ■ Image shown may differ from damage. 2 Assemble the...
User Manual
Page 15
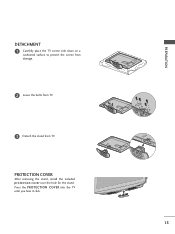
PREPARATION DETACHMENT 1 Carefully place the TV screen side down on a cushioned surface to protect the screen from damage. 2 Loose the bolts from TV. 3 Detach the stand from TV. Press the PROTECTION COVER into the TV until you hear it click. 13 PROTECTION COVER After removing the stand, install the included protection cover over the hole for the stand.
PREPARATION DETACHMENT 1 Carefully place the TV screen side down on a cushioned surface to protect the screen from damage. 2 Loose the bolts from TV. 3 Detach the stand from TV. Press the PROTECTION COVER into the TV until you hear it click. 13 PROTECTION COVER After removing the stand, install the included protection cover over the hole for the stand.
User Manual
Page 16
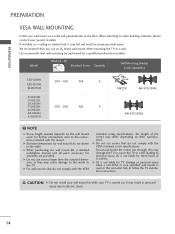
...a ceiling or slanted wall, it may cause damage to the inside to personal injury. G Do not use an LG brand wall mount when mounting the TV to the floor. G For wall mounts that do not comply with the VESA standard screw specifications, the length of .... G LG is not liable for assembly are shown in personal injury due to follow the TV installation instructions. CAUTION G Do not install your wall mount kit while your TV is used . Model VESA (A * B) A Standard Screw Quantity B Wall Mounting Bracket (sold separately) 32LH240H, 32LH250H, 200 * 100 M4 4 32LH255H 37LH250H,...
...a ceiling or slanted wall, it may cause damage to the inside to personal injury. G Do not use an LG brand wall mount when mounting the TV to the floor. G For wall mounts that do not comply with the VESA standard screw specifications, the length of .... G LG is not liable for assembly are shown in personal injury due to follow the TV installation instructions. CAUTION G Do not install your wall mount kit while your TV is used . Model VESA (A * B) A Standard Screw Quantity B Wall Mounting Bracket (sold separately) 32LH240H, 32LH250H, 200 * 100 M4 4 32LH255H 37LH250H,...
User Manual
Page 17
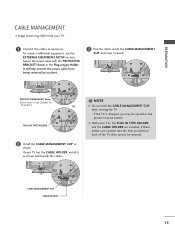
...MANAGEMENT CLIP CABLE HOLDER 15 It will help prevent the power cable from your TV has the CABLE HOLDER, install it closed. NOTE G Do not hold the CABLE MANAGEMENT CLIP when moving the TV. - If your TV. 1 Connect the cables as necessary. To connect additional equipment, see the EXTERNAL... EQUIPMENT SETUP section. If the TV is not available for all models.) Or PLUG IN TYPE HOLDER 2 Install the ...
...MANAGEMENT CLIP CABLE HOLDER 15 It will help prevent the power cable from your TV has the CABLE HOLDER, install it closed. NOTE G Do not hold the CABLE MANAGEMENT CLIP when moving the TV. - If your TV. 1 Connect the cables as necessary. To connect additional equipment, see the EXTERNAL... EQUIPMENT SETUP section. If the TV is not available for all models.) Or PLUG IN TYPE HOLDER 2 Install the ...
User Manual
Page 18
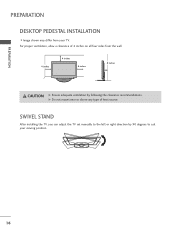
G Do not mount near or above any type of 4 inches on all four sides from your viewing position. 16 For proper ventilation, allow a clearance of heat source. SWIVEL STAND After installing the TV, you can adjust the TV set manually to the left or right direction by following the clearance recommendations. PREPARATION PREPARATION DESKTOP PEDESTAL INSTALLATION ■ Image shown may differ from the wall. 4 inches 4 inches 4 inches 4 inches CAUTION G Ensure adequate ventilation by 90 degrees to suit your TV.
G Do not mount near or above any type of 4 inches on all four sides from your viewing position. 16 For proper ventilation, allow a clearance of heat source. SWIVEL STAND After installing the TV, you can adjust the TV set manually to the left or right direction by following the clearance recommendations. PREPARATION PREPARATION DESKTOP PEDESTAL INSTALLATION ■ Image shown may differ from the wall. 4 inches 4 inches 4 inches 4 inches CAUTION G Ensure adequate ventilation by 90 degrees to suit your TV.
User Manual
Page 19
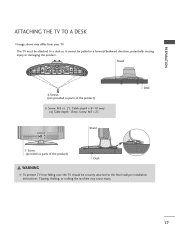
... + 8~10 mm) ex) Table depth: 15mm, Screw: M5 x 25 Stand 1-Screw (provided as parts of the product) Desk WARNING G To prevent TV from your TV. Tipping, shaking, or rocking the machine may differ from falling over, the TV should be pulled in a forward/backward direction, potentially causing injury or damaging the product. The...
... + 8~10 mm) ex) Table depth: 15mm, Screw: M5 x 25 Stand 1-Screw (provided as parts of the product) Desk WARNING G To prevent TV from your TV. Tipping, shaking, or rocking the machine may differ from falling over, the TV should be pulled in a forward/backward direction, potentially causing injury or damaging the product. The...
User Manual
Page 20
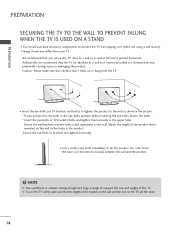
... hang from your product has the bolts in the eye-bolts position before inserting the eye-bolts, loosen the bolts. * Insert the eye-bolts or TV brackets/bolts and tighten them securely in the upper holes. Secure the wall brackets with the bolts (sold separately) to the wall as shown in... make sure that is safer to a wall so it becomes horizontal between the wall and the product. ! PREPARATION PREPARATION SECURING THE TV TO THE WALL TO PREVENT FALLING WHEN THE TV IS USED ON A STAND ■ You should purchase necessary components to support the size and weight of the bracket on the...
... hang from your product has the bolts in the eye-bolts position before inserting the eye-bolts, loosen the bolts. * Insert the eye-bolts or TV brackets/bolts and tighten them securely in the upper holes. Secure the wall brackets with the bolts (sold separately) to the wall as shown in... make sure that is safer to a wall so it becomes horizontal between the wall and the product. ! PREPARATION PREPARATION SECURING THE TV TO THE WALL TO PREVENT FALLING WHEN THE TV IS USED ON A STAND ■ You should purchase necessary components to support the size and weight of the bracket on the...

User Manual
Page 21
... Antenna without a Cable Box Connection. ANTENNA OR CABLE CONNECTION 1. Wall Antenna Socket Multi-family Dwellings/Apartments (Connect to be split for two TV's, install a 2-Way Signal Splitter. ■ If the antenna is not installed properly, contact your dealer for outdoor antenna) Copper Wire Be... careful not to the power outlet until all connections are made between the devices. Cable Cable TV Wall Jack RF Coaxial Wire (75 ohm) ANTENNA IN M.P.I. ■ To improve the picture quality in a poor signal area, please purchase...
... Antenna without a Cable Box Connection. ANTENNA OR CABLE CONNECTION 1. Wall Antenna Socket Multi-family Dwellings/Apartments (Connect to be split for two TV's, install a 2-Way Signal Splitter. ■ If the antenna is not installed properly, contact your dealer for outdoor antenna) Copper Wire Be... careful not to the power outlet until all connections are made between the devices. Cable Cable TV Wall Jack RF Coaxial Wire (75 ohm) ANTENNA IN M.P.I. ■ To improve the picture quality in a poor signal area, please purchase...

User Manual
Page 22
... EQUIPMENT SETUP ■ To prevent the equipment damage, never plug in any power cords until you do receive digital signals from your TV. HD RECEIVER SETUP This TV can receive Digital Over-the-air or Digital Cable signals without an external digital set -top box to the owner's manual for the...box to connect 1 Connect the video outputs (Y, PB, PR) of the digital set -top box. How to the COMPONENT IN VIDEO jacks on the TV. Component Connection 1. However, if you have finished connecting all equipment. ■ Image shown may differ from a digital set-top box or other digital external...
... EQUIPMENT SETUP ■ To prevent the equipment damage, never plug in any power cords until you do receive digital signals from your TV. HD RECEIVER SETUP This TV can receive Digital Over-the-air or Digital Cable signals without an external digital set -top box to the owner's manual for the...box to connect 1 Connect the video outputs (Y, PB, PR) of the digital set -top box. How to the COMPONENT IN VIDEO jacks on the TV. Component Connection 1. However, if you have finished connecting all equipment. ■ Image shown may differ from a digital set-top box or other digital external...
User Manual
Page 23
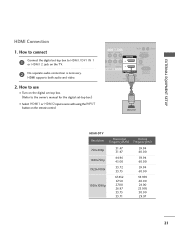
... set -top box to connect 1 Connect the digital set -top box.) ■ Select HDMI1 or HDMI2 input source with using the INPUT button on the TV. 2 No separate audio connection is necessary. HDMI supports both audio and video. 2.
... set -top box to connect 1 Connect the digital set -top box.) ■ Select HDMI1 or HDMI2 input source with using the INPUT button on the TV. 2 No separate audio connection is necessary. HDMI supports both audio and video. 2.

User Manual
Page 24
... OUT 1 2 ! DVI doesn't support audio, so a separate audio connection is required for the digital set-top box.) ■ Select the HDMI1 input source on the TV using the INPUT button on the remote control. How to connect 1 Connect the DVI output of the digital set-top box to the HDMI/DVI... IN 1 jack on the TV. 2 Connect the audio output of the digital set -top box. (Refer to HDMI Connection 1. NOTE G A DVI to the AUDIO IN (RGB/DVI) jack on the...
... OUT 1 2 ! DVI doesn't support audio, so a separate audio connection is required for the digital set-top box.) ■ Select the HDMI1 input source on the TV using the INPUT button on the remote control. How to connect 1 Connect the DVI output of the digital set-top box to the HDMI/DVI... IN 1 jack on the TV. 2 Connect the audio output of the digital set -top box. (Refer to HDMI Connection 1. NOTE G A DVI to the AUDIO IN (RGB/DVI) jack on the...


