
Owner's Manual (English)
Page 1
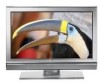
LCD TV PLASMA TV OWNER'S MANUAL LCD TV MODELS PLASMA TV MODEL 32LC5DC 32LC50C 42PX8DC 32LC5DCS 32LC50CS 32LC5DCB 32LC50CB 37LC5DC 32LX50C 37LC5DCB 32LX50CS 37LC5DC1 37LC50C 42LC5DC 37LC50CB 32LX5DC 42LB50C 32LX5DCS 42LC50C 42LB5DC Please read this manual carefully before operating your dealer when you require service. Record model number and serial number of the set . Retain it for future reference. See the label attached on the back cover and quote t tion to your set . www.lgcommercial.com
LCD TV PLASMA TV OWNER'S MANUAL LCD TV MODELS PLASMA TV MODEL 32LC5DC 32LC50C 42PX8DC 32LC5DCS 32LC50CS 32LC5DCB 32LC50CB 37LC5DC 32LX50C 37LC5DCB 32LX50CS 37LC5DC1 37LC50C 42LC5DC 37LC50CB 32LX5DC 42LB50C 32LX5DCS 42LC50C 42LB5DC Please read this manual carefully before operating your dealer when you require service. Record model number and serial number of the set . Retain it for future reference. See the label attached on the back cover and quote t tion to your set . www.lgcommercial.com

Owner's Manual (English)
Page 5
... cord replaced 16 GROUNDING Ensure that is damaged, liquid has been spilled or objects have fallen into the product, and do not expose this owner's manual to be damaged.) 12 Refer all servicing to avoid injury from physical or mechanical abuse, such as vases, shall be placed on or over . Servicing...
... cord replaced 16 GROUNDING Ensure that is damaged, liquid has been spilled or objects have fallen into the product, and do not expose this owner's manual to be damaged.) 12 Refer all servicing to avoid injury from physical or mechanical abuse, such as vases, shall be placed on or over . Servicing...
Owner's Manual (English)
Page 6
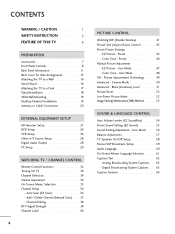
... Other A/V Source Setup 28 Digital Audio Output 28 PC Setup 29 WATCHING TV / CHANNEL CONTROL Remote Control Functions 32 Turning On TV 34 Channel Selection 34 Volume Adjustment 34 On-Screen Menus Selection 35 Channel Setup 36 - Preset 45 - Preset 46 Manual Picture Adjustment - Picture Improvement Technology 49 Advanced - Channel Editing 38 DTV Signal...
... Other A/V Source Setup 28 Digital Audio Output 28 PC Setup 29 WATCHING TV / CHANNEL CONTROL Remote Control Functions 32 Turning On TV 34 Channel Selection 34 Volume Adjustment 34 On-Screen Menus Selection 35 Channel Setup 36 - Preset 45 - Preset 46 Manual Picture Adjustment - Picture Improvement Technology 49 Advanced - Channel Editing 38 DTV Signal...
Owner's Manual (English)
Page 7
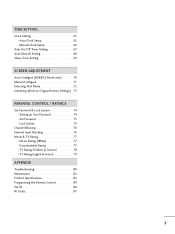
... On/Off Timer Setting 67 Auto Shut-off Setting 68 Sleep Timer Setting 69 SCREEN ADJUSTMENT Auto Configure (RGB(PC) Mode only 70 Manual Configure 71 Selecting XGA Mode 72 Initializing (Reset to Original Factory Settings) . 73 PARENTAL CONTROL / RATINGS Set Password & Lock System ... Setting up Your Password 74 Set Password 75 Lock System 75 Channel Blocking 76 External Input Blocking 76 Movie & TV Rating 77 - TV Rating Children & General 78 TV Rating English & French 79 APPENDIX Troubleshooting 80 Maintenance 82 Product Specifications 83 Programming the Remote Control 84 Set ID...
... On/Off Timer Setting 67 Auto Shut-off Setting 68 Sleep Timer Setting 69 SCREEN ADJUSTMENT Auto Configure (RGB(PC) Mode only 70 Manual Configure 71 Selecting XGA Mode 72 Initializing (Reset to Original Factory Settings) . 73 PARENTAL CONTROL / RATINGS Set Password & Lock System ... Setting up Your Password 74 Set Password 75 Lock System 75 Channel Blocking 76 External Input Blocking 76 Movie & TV Rating 77 - TV Rating Children & General 78 TV Rating English & French 79 APPENDIX Troubleshooting 80 Maintenance 82 Product Specifications 83 Programming the Remote Control 84 Set ID...

Owner's Manual (English)
Page 9
... 4-Bolts for stand Cable Holder assembly (Refer to p.13) (Refer to p.18) 32/37LC5DC*, 32/37LC50C* models only M4xL22 Torx plus Star head screw (Refer to maintain standard compliance for the product exteri- LCD TV PLASMA TV Owner's Manual http://www.lgusa.com www.lg.ca Copyright© 2007 LGE, All Rights Reserved. Option Extras 2- may cause...
... 4-Bolts for stand Cable Holder assembly (Refer to p.13) (Refer to p.18) 32/37LC5DC*, 32/37LC50C* models only M4xL22 Torx plus Star head screw (Refer to maintain standard compliance for the product exteri- LCD TV PLASMA TV Owner's Manual http://www.lgusa.com www.lg.ca Copyright© 2007 LGE, All Rights Reserved. Option Extras 2- may cause...

Owner's Manual (English)
Page 23
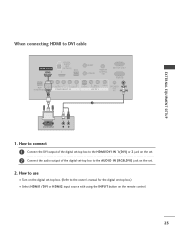
... source with using the INPUT button on the remote control. How to 2 the COMPONENT IN AUDIO jacks on the set top box to the owner's manual for LCD TV models. Match the jack colors (Y = green, PB = blue, and PR = red). How to connect 1 Connect the video outputs (Y, PB, PR) of external equipment setup... all equipment. ■ This part of the digital set . When connecting Component cable 1. HDMI/DVI IN 1(DVI) 1 2 DIGITAL AUDIO OUT (OPTICAL) 2 M.P.I. HD RECEIVER SETUP This TV can receive Digital Over-the-air/Cable signals without an external digital set . 2.
... source with using the INPUT button on the remote control. How to 2 the COMPONENT IN AUDIO jacks on the set top box to the owner's manual for LCD TV models. Match the jack colors (Y = green, PB = blue, and PR = red). How to connect 1 Connect the video outputs (Y, PB, PR) of external equipment setup... all equipment. ■ This part of the digital set . When connecting Component cable 1. HDMI/DVI IN 1(DVI) 1 2 DIGITAL AUDIO OUT (OPTICAL) 2 M.P.I. HD RECEIVER SETUP This TV can receive Digital Over-the-air/Cable signals without an external digital set . 2.

Owner's Manual (English)
Page 24
HDMI supports both audio and video. 2. How to use ■ Turn on the digital set-top box. ( ) (Refer to the owner's manual for the digital set-top box.) ■ Select HDMI1/DVI or HDMI2 input source with using the INPUT button on the set. 2 No separated audio ...
HDMI supports both audio and video. 2. How to use ■ Turn on the digital set-top box. ( ) (Refer to the owner's manual for the digital set-top box.) ■ Select HDMI1/DVI or HDMI2 input source with using the INPUT button on the set. 2 No separated audio ...
Owner's Manual (English)
Page 25
... the set. 2 Connect the audio output of the digital set . 2. How to use ■ Turn on the digital set-top box. (Refer to the owner's manual for the digital set-top box.) ■ Select HDMI1/DVI or HDMI2 input source with using the INPUT button on the set -top box to...
... the set. 2 Connect the audio output of the digital set . 2. How to use ■ Turn on the digital set-top box. (Refer to the owner's manual for the digital set-top box.) ■ Select HDMI1/DVI or HDMI2 input source with using the INPUT button on the set -top box to...

Owner's Manual (English)
Page 26
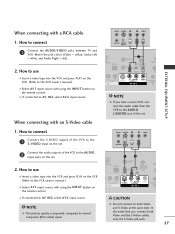
... audio outputs of the DVD to the 2 COMPONENT IN AUDIO jacks on the set . Component ports on the TV Y Y Video output ports Y on the remote control. ■ Refer to the DVD player's manual for operating instructions. EXTERNAL EQUIPMENT SETUP EXTERNAL EQUIPMENT SETUP DVD SETUP When connecting Component cable 1. How to connect 1 Connect...
... audio outputs of the DVD to the 2 COMPONENT IN AUDIO jacks on the set . Component ports on the TV Y Y Video output ports Y on the remote control. ■ Refer to the DVD player's manual for operating instructions. EXTERNAL EQUIPMENT SETUP EXTERNAL EQUIPMENT SETUP DVD SETUP When connecting Component cable 1. How to connect 1 Connect...
Owner's Manual (English)
Page 27
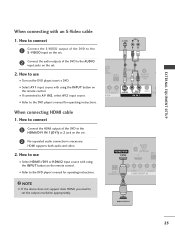
...select A V 2 input source. ■ Refer to use HDMI/DVI IN 1(DVI) DIGITAL AUDIO OUT (OPTICAL) 2 M.P.I . How to the DVD player's manual for operating instructions. S REMOTE CONTROL UPDATE OUT AUDIO NT IN S-VIDEO (MONO) AUDIO AV IN 1 VIDEO SPE O When connecting HDMI cable 1. How to ...is necessary. RJP INTERFACE VIDEO AUDIO COMPONENT IN 1 NOTE G If the device does not support Auto HDMI, you need to the DVD player's manual for operating instructions. 1 2 GITAL UDIO OUT RESET TICAL) M.P.I ■ Select HDMI1/DVI or HDMI2 input source with an S-Video cable 1....
...select A V 2 input source. ■ Refer to use HDMI/DVI IN 1(DVI) DIGITAL AUDIO OUT (OPTICAL) 2 M.P.I . How to the DVD player's manual for operating instructions. S REMOTE CONTROL UPDATE OUT AUDIO NT IN S-VIDEO (MONO) AUDIO AV IN 1 VIDEO SPE O When connecting HDMI cable 1. How to ...is necessary. RJP INTERFACE VIDEO AUDIO COMPONENT IN 1 NOTE G If the device does not support Auto HDMI, you need to the DVD player's manual for operating instructions. 1 2 GITAL UDIO OUT RESET TICAL) M.P.I ■ Select HDMI1/DVI or HDMI2 input source with an S-Video cable 1....
Owner's Manual (English)
Page 28
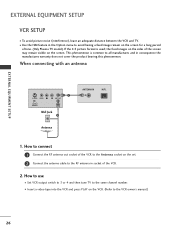
... 2 Connect the antenna cable to the RF antenna in socket of time. (Only Plasma TV model). EXTERNAL EQUIPMENT SETUP EXTERNAL EQUIPMENT SETUP VCR SETUP ■ To avoid picture noise (interference), leave ...an adequate distance between the VCR and TV. ■ Use the ISM feature in the Option menu to avoid having a fixed image remain on the VCR. (Refer to the VCR owner's manual.) 26 How to use ■ Set... VCR output switch to 3 or 4 and then tune TV to the same channel number. ■ Insert a video tape ...
... 2 Connect the antenna cable to the RF antenna in socket of time. (Only Plasma TV model). EXTERNAL EQUIPMENT SETUP EXTERNAL EQUIPMENT SETUP VCR SETUP ■ To avoid picture noise (interference), leave ...an adequate distance between the VCR and TV. ■ Use the ISM feature in the Option menu to avoid having a fixed image remain on the VCR. (Refer to the VCR owner's manual.) 26 How to use ■ Set... VCR output switch to 3 or 4 and then tune TV to the same channel number. ■ Insert a video tape ...
Owner's Manual (English)
Page 29
...set . ANT IN S-VIDEO L R VIDEO ANT OUT OUTPUT SWITCH 2 Connect the audio outputs of the VCR to the VCR owner's manual.) ■ Select A V 1 input source with an S-Video cable ANT OUT OUTPUT SWITCH TAL DIO UT CAL) M.P.I . 2. ... REMOTE CONTROL UPDATE OUT ■ Insert a video tape into the VCR and press PLAY on the VCR. (Refer to the VCR owner's manual.) ■ Select A V 1 input source with a RCA cable ANT IN S-VIDEO L R VIDEO EXTERNAL EQUIPMENT SETUP 1. In the event... SPEAK OUT 8 ■ If connected to connect 1 Connect the AUDIO/VIDEO jacks between TV and VCR.
...set . ANT IN S-VIDEO L R VIDEO ANT OUT OUTPUT SWITCH 2 Connect the audio outputs of the VCR to the VCR owner's manual.) ■ Select A V 1 input source with an S-Video cable ANT OUT OUTPUT SWITCH TAL DIO UT CAL) M.P.I . 2. ... REMOTE CONTROL UPDATE OUT ■ Insert a video tape into the VCR and press PLAY on the VCR. (Refer to the VCR owner's manual.) ■ Select A V 1 input source with a RCA cable ANT IN S-VIDEO L R VIDEO EXTERNAL EQUIPMENT SETUP 1. In the event... SPEAK OUT 8 ■ If connected to connect 1 Connect the AUDIO/VIDEO jacks between TV and VCR.
Owner's Manual (English)
Page 30
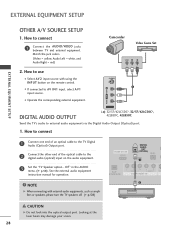
See the external audio equipment instruction manual for operation. S-VIDEO 1 VIDEO L/MONO AUDIO R AV IN 2 DIGITAL AUDIO OUTPUT i.e) 32/37/42LC5DC*, 32/37/42LC50C*, 42LB5DC, 42LB50C Send the TV's audio to connect 1 Connect the AUDIO/VIDEO jacks between TV and external equipment. HDMI/DVI IN 1(DVI) DIGITAL AUDIO OUT (OPTICAL) 2 M.P.I. 1 ( RJP VIDEO AUDIO S-V NTERFACE COMPONENT IN...
See the external audio equipment instruction manual for operation. S-VIDEO 1 VIDEO L/MONO AUDIO R AV IN 2 DIGITAL AUDIO OUTPUT i.e) 32/37/42LC5DC*, 32/37/42LC50C*, 42LB5DC, 42LB50C Send the TV's audio to connect 1 Connect the AUDIO/VIDEO jacks between TV and external equipment. HDMI/DVI IN 1(DVI) DIGITAL AUDIO OUT (OPTICAL) 2 M.P.I. 1 ( RJP VIDEO AUDIO S-V NTERFACE COMPONENT IN...

Owner's Manual (English)
Page 37
...SETUP VIDEO AUDIO TIME OPTION SCREEN LOCK Lock System Set Password Block Channel Movie Rating TV Rating-Children TV Rating-General Aux. XGA Mode Reset TIME SETUP VIDEO AUDIO TIME OPTION SCREEN LOCK Auto Clock Manual Clock Off Timer On Timer Auto Off OPTION SETUP VIDEO AUDIO TIME OPTION SCREEN ... Aspect Ratio Caption/Text Caption Options Language ISM Method Low Power Set ID Only Plasma TV model 35 ON-SCREEN MENUS SELECTION Your TV's OSD (On Screen Display) may differ slightly from what is shown in this manual. 1 Press the MENU button and then use D or E button to select the each ...
...SETUP VIDEO AUDIO TIME OPTION SCREEN LOCK Lock System Set Password Block Channel Movie Rating TV Rating-Children TV Rating-General Aux. XGA Mode Reset TIME SETUP VIDEO AUDIO TIME OPTION SCREEN LOCK Auto Clock Manual Clock Off Timer On Timer Auto Off OPTION SETUP VIDEO AUDIO TIME OPTION SCREEN ... Aspect Ratio Caption/Text Caption Options Language ISM Method Low Power Set ID Only Plasma TV model 35 ON-SCREEN MENUS SELECTION Your TV's OSD (On Screen Display) may differ slightly from what is shown in this manual. 1 Press the MENU button and then use D or E button to select the each ...

Owner's Manual (English)
Page 38
...VOL TIMER MUTE CH PAGE 1 2 3 SETUP VIDEO AUDIO TIME OPTION SCREEN LOCK EZ Scan Manual Scan Channel Edit DTV Signal Channel Label SETUP VIDEO AUDIO TIME OPTION SCREEN LOCK EZ Scan Manual Scan Channel Edit DTV Signal Channel Label 1 G Selection ( G or ) leads you to... the EZ scan screen. 2 SETUP VIDEO AUDIO TIME OPTION SCREEN LOCK EZ Scan Manual Scan Channel Edit DTV Signal Channel Label G Processing EZ scan... WATCHING TV / CHANNEL CONTROL WATCHING TV /CHANNEL CONTROL CHANNEL SETUP Auto Scan (EZ Scan) Automatically finds all channels available through antenna or...
...VOL TIMER MUTE CH PAGE 1 2 3 SETUP VIDEO AUDIO TIME OPTION SCREEN LOCK EZ Scan Manual Scan Channel Edit DTV Signal Channel Label SETUP VIDEO AUDIO TIME OPTION SCREEN LOCK EZ Scan Manual Scan Channel Edit DTV Signal Channel Label 1 G Selection ( G or ) leads you to... the EZ scan screen. 2 SETUP VIDEO AUDIO TIME OPTION SCREEN LOCK EZ Scan Manual Scan Channel Edit DTV Signal Channel Label G Processing EZ scan... WATCHING TV / CHANNEL CONTROL WATCHING TV /CHANNEL CONTROL CHANNEL SETUP Auto Scan (EZ Scan) Automatically finds all channels available through antenna or...

Owner's Manual (English)
Page 39
... menu if the Lock System is required to gain access to delete the channel. 345 37 WATCHING TV / CHANNEL CONTROL Add/Delete Channel (Manual Scan) A password is turned on. CH 2 3 5 6 8 9 Press the MENU button and then use D or E button 0 1 to select the SETUP menu. 2 ...Press the G button and then use D or E button to select Manual Scan. 3 Press the G button and then use D or E button to select Analog(T V, CATV), Digital(D T V, CADTV). 4 Press the G button and then use D or E button...
... menu if the Lock System is required to gain access to delete the channel. 345 37 WATCHING TV / CHANNEL CONTROL Add/Delete Channel (Manual Scan) A password is turned on. CH 2 3 5 6 8 9 Press the MENU button and then use D or E button 0 1 to select the SETUP menu. 2 ...Press the G button and then use D or E button to select Manual Scan. 3 Press the G button and then use D or E button to select Analog(T V, CATV), Digital(D T V, CADTV). 4 Press the G button and then use D or E button...

Owner's Manual (English)
Page 40
... or E button to select channel and then use the ENTER button to add or delete it. 5 Press EXIT button to return to TV viewing or press MENU button to return to the previous menu. The channels in the Custom List are displayed in black, and the channels ... 2-0 D AUDIO Channel Edit G 4-0 TIME DTV Signal 6-0 OPTION Channel Label 9-0 SCREEN 11-0 LOCK 13-0 14-0 E SETUP VIDEO AUDIO TIME OPTION SCREEN LOCK EZ Scan Manual Scan Channel Edit DTV Signal Channel Label 2 D E ANALOG G 2-0 D 4-0 6-0 9-0 11-0 13-0 14-0 E 34 38 Once a channel is highlighted you can be created ...
... or E button to select channel and then use the ENTER button to add or delete it. 5 Press EXIT button to return to TV viewing or press MENU button to return to the previous menu. The channels in the Custom List are displayed in black, and the channels ... 2-0 D AUDIO Channel Edit G 4-0 TIME DTV Signal 6-0 OPTION Channel Label 9-0 SCREEN 11-0 LOCK 13-0 14-0 E SETUP VIDEO AUDIO TIME OPTION SCREEN LOCK EZ Scan Manual Scan Channel Edit DTV Signal Channel Label 2 D E ANALOG G 2-0 D 4-0 6-0 9-0 11-0 13-0 14-0 E 34 38 Once a channel is highlighted you can be created ...

Owner's Manual (English)
Page 41
...SETUP VIDEO AUDIO TIME OPTION SCREEN LOCK EZ Scan Manual Scan Channel Edit DTV Signal Channel Label 1 Bad Normal Good 23 39 View the on-screen signal strength monitor to the previous menu. Press EXIT button to return to TV viewing or press 4 MENU button to return ...to see 3 the quality of the signal being received and indicates whether you are to experience picture degradation. WATCHING TV / CHANNEL CONTROL DTV SIGNAL STRENGTH This feature displays the DTV signal levels being received. CH 2 3 5 6 8 9 0 1 Press the MENU button and ...
...SETUP VIDEO AUDIO TIME OPTION SCREEN LOCK EZ Scan Manual Scan Channel Edit DTV Signal Channel Label 1 Bad Normal Good 23 39 View the on-screen signal strength monitor to the previous menu. Press EXIT button to return to TV viewing or press 4 MENU button to return ...to see 3 the quality of the signal being received and indicates whether you are to experience picture degradation. WATCHING TV / CHANNEL CONTROL DTV SIGNAL STRENGTH This feature displays the DTV signal levels being received. CH 2 3 5 6 8 9 0 1 Press the MENU button and ...

Owner's Manual (English)
Page 42
... the signal from the broadcasting station, the TV displays a short name for a channel even if you didn't preset a label for your channels. VOL TIMER MUTE CH PAGE 1 2 3 SETUP VIDEO AUDIO TIME OPTION SCREEN LOCK EZ Scan Manual Scan Channel Edit DTV Signal Channel Label SETUP...AUDIO TIME OPTION SCREEN LOCK EZ Scan Manual Scan Channel Edit DTV Signal Channel Label 1 G Ch. CC EXIT RATIO MENU SAP ENTER CH 1 2 3 4 5 6 7 8 9 0 1 Press the MENU button and then use D or E button to select the appropriate label for the channel. WATCHING TV / CHANNEL CONTROL 2 Press the ...
... the signal from the broadcasting station, the TV displays a short name for a channel even if you didn't preset a label for your channels. VOL TIMER MUTE CH PAGE 1 2 3 SETUP VIDEO AUDIO TIME OPTION SCREEN LOCK EZ Scan Manual Scan Channel Edit DTV Signal Channel Label SETUP...AUDIO TIME OPTION SCREEN LOCK EZ Scan Manual Scan Channel Edit DTV Signal Channel Label 1 G Ch. CC EXIT RATIO MENU SAP ENTER CH 1 2 3 4 5 6 7 8 9 0 1 Press the MENU button and then use D or E button to select the appropriate label for the channel. WATCHING TV / CHANNEL CONTROL 2 Press the ...
Owner's Manual (English)
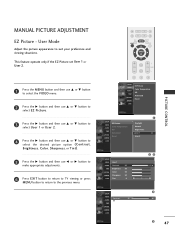
Page 49
... picture option ( C o n t r a s t, Brightness, Color, Sharpness, or Tint). 5 Press the G button and then use F or G button to make appropriate adjustments. 6 Press EXIT button to return to TV viewing or press MENU button to return to suit your preference and viewing situations...
... picture option ( C o n t r a s t, Brightness, Color, Sharpness, or Tint). 5 Press the G button and then use F or G button to make appropriate adjustments. 6 Press EXIT button to return to TV viewing or press MENU button to return to suit your preference and viewing situations...


