Owners Manual - English
Page 1
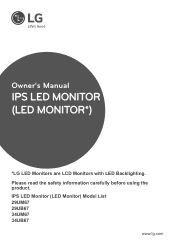
Owner's Manual IPS LED MONITOR (LED MONITOR*) *LG LED Monitors are LCD Monitors with LED Backlighting. Please read the safety information carefully before using the product. IPS LED Monitor (LED Monitor) Model List 29UM67 29UB67 34UM67 34UB67 www.lg.com
Owner's Manual IPS LED MONITOR (LED MONITOR*) *LG LED Monitors are LCD Monitors with LED Backlighting. Please read the safety information carefully before using the product. IPS LED Monitor (LED Monitor) Model List 29UM67 29UB67 34UM67 34UB67 www.lg.com

Owners Manual - English
Page 2
... 30 - -PBP 31 - -Picture 33 - -Sound 34 - -General 35 - -Reset 36 - -Picture mode 37 TROUBLESHOOTING 39 SPECIFICATIONS 39 29UM67 40 29UB67 41 34UM67 42 34UB67 43 Factory support mode (DVI-D/ HDMI/ DisplayPort) 43 HDMI Timing (Video) 43 Indicator 44 PROPER POSTURE 44 Proper ... DisplayPort connection 20 - Adjusting the angle 16 - Installing the wall mount plate 18 - USB Cable connection - PC 22 - Connecting Headphones 23 INSTALLING LG MONITOR SOFTWARE 26 Installing The Dual Controller 28 USER SETTINGS 29 Customizing settings 29 - How to a PC 19 - Pivot feature 17 - Installing to a ...
... 30 - -PBP 31 - -Picture 33 - -Sound 34 - -General 35 - -Reset 36 - -Picture mode 37 TROUBLESHOOTING 39 SPECIFICATIONS 39 29UM67 40 29UB67 41 34UM67 42 34UB67 43 Factory support mode (DVI-D/ HDMI/ DisplayPort) 43 HDMI Timing (Video) 43 Indicator 44 PROPER POSTURE 44 Proper ... DisplayPort connection 20 - Adjusting the angle 16 - Installing the wall mount plate 18 - USB Cable connection - PC 22 - Connecting Headphones 23 INSTALLING LG MONITOR SOFTWARE 26 Installing The Dual Controller 28 USER SETTINGS 29 Customizing settings 29 - How to a PC 19 - Pivot feature 17 - Installing to a ...

Owners Manual - English
Page 3
Visit www.lg.com for dual-mode source are trademarks or registered trademarks of HDMI Licensing LLC in OSD menu of the Video Electronics Standards Association. ENEGNLGISH LICENSE 3 ... Interface, and the HDMI logo are all registered trademarks of "Automatic Standby". The following content is only applied to the monitor which is sold in Europe market and which needs to meet the ErP Directive: * This monitor is set to be turned off automatically in 4 hours after you turned on the license.
Visit www.lg.com for dual-mode source are trademarks or registered trademarks of HDMI Licensing LLC in OSD menu of the Video Electronics Standards Association. ENEGNLGISH LICENSE 3 ... Interface, and the HDMI logo are all registered trademarks of "Automatic Standby". The following content is only applied to the monitor which is sold in Europe market and which needs to meet the ErP Directive: * This monitor is set to be turned off automatically in 4 hours after you turned on the license.

Owners Manual - English
Page 8
NOTE yy The joystick button is located at the bottom of the monitor by moving it left /right. ENEGNLGISH 8 ASSEMBLING AND PREPARING How to Use the Joystick Button You can control the volume by pressing the joystick button or moving the joystick button left /right with your finger to turn on Press the joystick button once with your finger to turn off Press and hold the joystick button once with your finger. Power off the monitor. ◄/► Volume Control You can easily control the functions of the monitor. Basic Functions Power on the monitor.
NOTE yy The joystick button is located at the bottom of the monitor by moving it left /right. ENEGNLGISH 8 ASSEMBLING AND PREPARING How to Use the Joystick Button You can control the volume by pressing the joystick button or moving the joystick button left /right with your finger to turn on Press the joystick button once with your finger to turn off Press and hold the joystick button once with your finger. Power off the monitor. ◄/► Volume Control You can easily control the functions of the monitor. Basic Functions Power on the monitor.
Owners Manual - English
Page 9
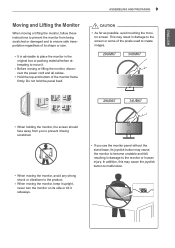
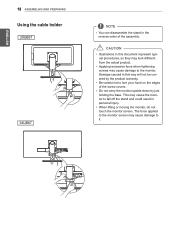
...button may cause the monitor to become unstable and fall, resulting in damage to the monitor or human injury. ENEGNLGISH ASSEMBLING AND PREPARING 9 Moving and Lifting the Monitor When moving or lifting the monitor, follow these instructions to prevent the monitor from you use the monitor panel without the stand...shape or size. yyWhen moving or lifting the monitor, disconnect the power cord and all cables. yyBefore moving the monitor, avoid any strong shock or vibrations to the product. yyWhen moving the monitor, keep it upright, never turn the monitor on its side or tilt it . yyIt ...
...button may cause the monitor to become unstable and fall, resulting in damage to the monitor or human injury. ENEGNLGISH ASSEMBLING AND PREPARING 9 Moving and Lifting the Monitor When moving or lifting the monitor, follow these instructions to prevent the monitor from you use the monitor panel without the stand...shape or size. yyWhen moving or lifting the monitor, disconnect the power cord and all cables. yyBefore moving the monitor, avoid any strong shock or vibrations to the product. yyWhen moving the monitor, keep it upright, never turn the monitor on its side or tilt it . yyIt ...
Owners Manual - English
Page 10
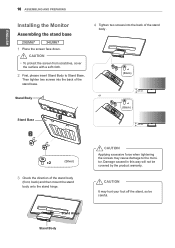
... body onto the stand hinge. CAUTION yyTo protect the screen from scratches, cover the surface with a soft cloth. 2 First, please insert Stand Body to the monitor. Damage caused in this way will not be careful. Stand Hinge Stand Body CAUTION Applying excessive force when tightening the screws may hurt your foot... body . (Black) 120 mm or (Black) Stand Base 100 mm (Silver) 3 Check the direction of the stand base. ENEGNLGISH 10 ASSEMBLING AND PREPARING Installing the Monitor Assembling the stand base 29UM67 34UM67 1 Place the screen face down.
... body onto the stand hinge. CAUTION yyTo protect the screen from scratches, cover the surface with a soft cloth. 2 First, please insert Stand Body to the monitor. Damage caused in this way will not be careful. Stand Hinge Stand Body CAUTION Applying excessive force when tightening the screws may hurt your foot... body . (Black) 120 mm or (Black) Stand Base 100 mm (Silver) 3 Check the direction of the stand base. ENEGNLGISH 10 ASSEMBLING AND PREPARING Installing the Monitor Assembling the stand base 29UM67 34UM67 1 Place the screen face down.
Owners Manual - English
Page 12
...of the screw covers. CAUTION yy Illustrations in this way will not be covered by just holding the base. This may cause the monitor to the monitor. yy Applying excessive force when tightening screws may cause damage to fall off the stand and could result in this document represent typical... hand on the edges of the assembly. The force applied to the monitor screen may look different from the actual product. yy When lifting or moving the monitor, do not touch the monitor screen. yy Do not carry the monitor upside down by the product warranty. Damage caused in personal injury.
...of the screw covers. CAUTION yy Illustrations in this way will not be covered by just holding the base. This may cause the monitor to the monitor. yy Applying excessive force when tightening screws may cause damage to fall off the stand and could result in this document represent typical... hand on the edges of the assembly. The force applied to the monitor screen may look different from the actual product. yy When lifting or moving the monitor, do not touch the monitor screen. yy Do not carry the monitor upside down by the product warranty. Damage caused in personal injury.
Owners Manual - English
Page 13
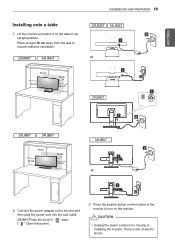
Place at least 10 cm away from the wall to moving or installing the monitor. ENEGNLGISH Installing onto a table 1 Lift the monitor and place it on the monitor. There is risk of the monitor to the monitor and then plug the power cord into the wall outlet. 29UB67:Press the knob in an upright position. or...
Place at least 10 cm away from the wall to moving or installing the monitor. ENEGNLGISH Installing onto a table 1 Lift the monitor and place it on the monitor. There is risk of the monitor to the monitor and then plug the power cord into the wall outlet. 29UB67:Press the knob in an upright position. or...

Owners Manual - English
Page 14
... between the screen and the base (chassis) when adjusting the screen's height. ENEGNLGISH 14 ASSEMBLING AND PREPARING Adjusting the stand height 29UB67 34UB67 1 Stand the monitor assembled with the stand base in an upright position Head 2 Remove the tape attached to adjust the height. Tape Locking Pin 130.0 mm Head 130...
... between the screen and the base (chassis) when adjusting the screen's height. ENEGNLGISH 14 ASSEMBLING AND PREPARING Adjusting the stand height 29UB67 34UB67 1 Stand the monitor assembled with the stand base in an upright position Head 2 Remove the tape attached to adjust the height. Tape Locking Pin 130.0 mm Head 130...

Owners Manual - English
Page 15
Rear Side Front Side Rear Side Front Side yyBe careful not to the fingers when adjusting the screen, do not hold the lower part of the monitor. WARNING yyTo avoid injury to touch or press the screen area when adjusting the angle of the monitor's frame as illustrated below. The angle of the screen. ed on the stand base. 2 Adjust the angle of the screen can be adjusted forwards or backwards for a comfortable viewing experience. ENEGNLGISH ASSEMBLING AND PREPARING 15 Adjusting the angle 1 Place the monitor in an upright position, mount- Rear Side Front Side
Rear Side Front Side Rear Side Front Side yyBe careful not to the fingers when adjusting the screen, do not hold the lower part of the monitor. WARNING yyTo avoid injury to touch or press the screen area when adjusting the angle of the monitor's frame as illustrated below. The angle of the screen. ed on the stand base. 2 Adjust the angle of the screen can be adjusted forwards or backwards for a comfortable viewing experience. ENEGNLGISH ASSEMBLING AND PREPARING 15 Adjusting the angle 1 Place the monitor in an upright position, mount- Rear Side Front Side
Owners Manual - English
Page 16
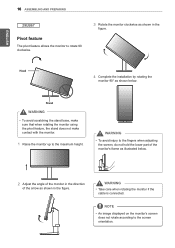
...the screen, do not hold the lower part of the monitor's frame as illustrated below . ENEGNLGISH 16 ASSEMBLING AND PREPARING 29UB67 Pivot feature The pivot feature allows the monitor to rotate 90 clockwise. 3 Rotate the monitor clockwise as shown in the figure. NOTE yyAn image displayed... on the monitor's screen does not rotate according to the maximum height. Stand WARNING yyTo ...
...the screen, do not hold the lower part of the monitor's frame as illustrated below . ENEGNLGISH 16 ASSEMBLING AND PREPARING 29UB67 Pivot feature The pivot feature allows the monitor to rotate 90 clockwise. 3 Rotate the monitor clockwise as shown in the figure. NOTE yyAn image displayed... on the monitor's screen does not rotate according to the maximum height. Stand WARNING yyTo ...
Owners Manual - English
Page 17
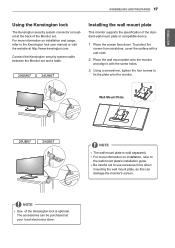
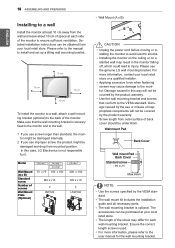
... . To protect the screen from scratches, cover the surface with a soft cloth. 2 Place the wall mount plate onto the monitor and align it with the screw holes. 3 Using a screwdriver, tighten the four screws to the Kensington lock user manual or visit the website at http://...www.kensington.com. yyBe careful not to the wall mount plate's installation guide. The accessories can damage the monitor's screen. yyFor more information on installation, refer to use excessive force when mounting the wall mount plate, as this can be purchased at the back...
... . To protect the screen from scratches, cover the surface with a soft cloth. 2 Place the wall mount plate onto the monitor and align it with the screw holes. 3 Using a screwdriver, tighten the four screws to the Kensington lock user manual or visit the website at http://...www.kensington.com. yyBe careful not to the wall mount plate's installation guide. The accessories can damage the monitor's screen. yyFor more information on installation, refer to use excessive force when mounting the wall mount plate, as this can be purchased at the back...
Owners Manual - English
Page 18
...the wall. 1 If you use screw longer than standard, the monitor might be damaged internally. 2 If you use improper screw, the product might be covered by the product warranty. Damage caused in this case, LG Electronics is optional. Wall mount Pad Back Cover Wall mount Pad ... VESA standard. yyFor more information, contact your local retail store. Detailed installation instructions can be obtained from outer surface of screws Wall Mount Plate (Optional) 29UM67 75 x 75 34UM67 34UB67 100 x 100 M4 x L10 4 RW120 29UB67 200 x 100 M4 x L10 4 LSW140 yyWall Mount (A x B) AB CAUTION...
...the wall. 1 If you use screw longer than standard, the monitor might be damaged internally. 2 If you use improper screw, the product might be covered by the product warranty. Damage caused in this case, LG Electronics is optional. Wall mount Pad Back Cover Wall mount Pad ... VESA standard. yyFor more information, contact your local retail store. Detailed installation instructions can be obtained from outer surface of screws Wall Mount Plate (Optional) 29UM67 75 x 75 34UM67 34UB67 100 x 100 M4 x L10 4 RW120 29UB67 200 x 100 M4 x L10 4 LSW140 yyWall Mount (A x B) AB CAUTION...
Owners Manual - English
Page 19
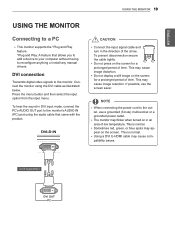
...product. To hear the sound in the direction of time. To prevent disconnection secure the cable tightly. This may cause image distortion. yyThe monitor may flicker when turned on the screen. DVI connection Transmits digital video signals to the outlet, use the screen saver. This may cause image... below. Press the menu button and then select the input option from the input menu. NOTE yyWhen connecting the power cord to the monitor. CAUTION yyConnect the input signal cable and turn in DVI input mode, connect the PC's AUDIO OUT port to reconfigure anything or install...
...product. To hear the sound in the direction of time. To prevent disconnection secure the cable tightly. This may cause image distortion. yyThe monitor may flicker when turned on the screen. DVI connection Transmits digital video signals to the outlet, use the screen saver. This may cause image... below. Press the menu button and then select the input option from the input menu. NOTE yyWhen connecting the power cord to the monitor. CAUTION yyConnect the input signal cable and turn in DVI input mode, connect the PC's AUDIO OUT port to reconfigure anything or install...

Owners Manual - English
Page 20
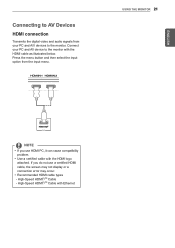
... Ethernet HDMI connection Transmits the digital video and audio signals from the input menu. yyRecommended HDMI cable types - Connect your PC to the monitor with the HDMI cable as illustrated below . If you use a certified HDMI cable, the screen may not display or a connection error may...HDMI logo attached. Press the menu button and then select the input option from your PC and AV device to the monitor. ENEGNLGISH 20 USING THE MONITOR DisplayPort connection Transmits the digital video and audio signals from the input menu. (sold separately) NOTE yyThere may be available...
... Ethernet HDMI connection Transmits the digital video and audio signals from the input menu. yyRecommended HDMI cable types - Connect your PC to the monitor with the HDMI cable as illustrated below . If you use a certified HDMI cable, the screen may not display or a connection error may...HDMI logo attached. Press the menu button and then select the input option from your PC and AV device to the monitor. ENEGNLGISH 20 USING THE MONITOR DisplayPort connection Transmits the digital video and audio signals from the input menu. (sold separately) NOTE yyThere may be available...
Owners Manual - English
Page 21
... input option from your PC and AV device to the monitor. yyRecommended HDMI cable types - ENEGNLGISH Connecting to AV Devices HDMI connection Transmits the digital video and audio signals from the input menu. Connect your PC and A/V devices to the monitor with the HDMI cable as illustrated below. High-Speed HDMI...®/TM Cable with the HDMI logo attached. USING THE MONITOR 21 NOTE yyIf you do not use HDMI PC, it can cause compatibility problem. yyUse a certified cable with Ethernet High-Speed HDMI®/TM Cable -...
... input option from your PC and AV device to the monitor. yyRecommended HDMI cable types - ENEGNLGISH Connecting to AV Devices HDMI connection Transmits the digital video and audio signals from the input menu. Connect your PC and A/V devices to the monitor with the HDMI cable as illustrated below. High-Speed HDMI...®/TM Cable with the HDMI logo attached. USING THE MONITOR 21 NOTE yyIf you do not use HDMI PC, it can cause compatibility problem. yyUse a certified cable with Ethernet High-Speed HDMI®/TM Cable -...
Owners Manual - English
Page 22
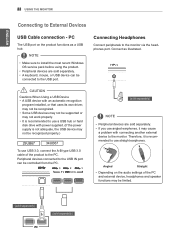
...be recognized properly.) 29UB67 34UB67 To use a USB hub or hard disk drive with power supplied. (If the power supply is recommended to the monitor via the headphones port. yy It is recommended to use USB 3.0, connect the A-B type USB 3.0 cable of the PC and external device,... device with connecting another external device to the USB IN port can be recognized. Connect as a USB hub. Peripheral devices connected to the monitor. Angled Straight yy Depending on the product functions as illustrated. PC The USB port on the audio settings of the product to the USB ...
...be recognized properly.) 29UB67 34UB67 To use a USB hub or hard disk drive with power supplied. (If the power supply is recommended to the monitor via the headphones port. yy It is recommended to use USB 3.0, connect the A-B type USB 3.0 cable of the PC and external device,... device with connecting another external device to the USB IN port can be recognized. Connect as a USB hub. Peripheral devices connected to the monitor. Angled Straight yy Depending on the product functions as illustrated. PC The USB port on the audio settings of the product to the USB ...
Owners Manual - English
Page 23
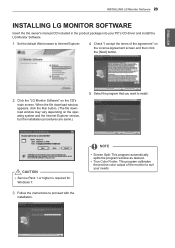
... "I accept the terms of the agreement" on the License Agreement screen and then click the [Next] button. 2 Click the "LG Monitor Software" on the operating system and the Internet Explorer version, but the installation procedures are same.) 5 Select the program that you want... Follow the instructions to install. NOTE yyScreen Split: This program automatically splits the program window as desired. ENEGNLGISH INSTALLING LG Monitor Software 23 INSTALLING LG MONITOR SOFTWARE Insert the the owner's manual CD included in the product package into your needs. When the file download window...
... "I accept the terms of the agreement" on the License Agreement screen and then click the [Next] button. 2 Click the "LG Monitor Software" on the operating system and the Internet Explorer version, but the installation procedures are same.) 5 Select the program that you want... Follow the instructions to install. NOTE yyScreen Split: This program automatically splits the program window as desired. ENEGNLGISH INSTALLING LG Monitor Software 23 INSTALLING LG MONITOR SOFTWARE Insert the the owner's manual CD included in the product package into your needs. When the file download window...
Owners Manual - English
Page 24
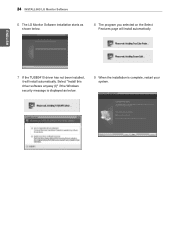
Select "Install this driver software anyway (I)" if the Windows security message is complete, restart your system. ENEGNLGISH 7 If the TUSB3410 driver has not been installed, it will install automatically. 24 INSTALLING LG Monitor Software 6 The LG Monitor Software installation starts as below. 9 When the installation is displayed as shown below. 8 The program you selected on the Select Features page will install automatically.
Select "Install this driver software anyway (I)" if the Windows security message is complete, restart your system. ENEGNLGISH 7 If the TUSB3410 driver has not been installed, it will install automatically. 24 INSTALLING LG Monitor Software 6 The LG Monitor Software installation starts as below. 9 When the installation is displayed as shown below. 8 The program you selected on the Select Features page will install automatically.
Owners Manual - English
Page 25
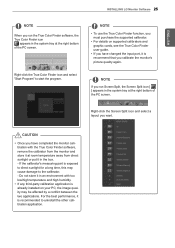
.../high temperature and high humidity. yyFor details on your PC, the image quality may cause damage to uninstall the other calibration application. ENEGNLGISH INSTALLING LG Monitor Software 25 NOTE When you run Screen Split, the Screen Split icon [ ] appears in the system tray at the right bottom of the ...PC screen. Do not store it in an environment with the True Color Finder software, remove the calibrator from the monitor and store it at room temperature away from direct sunlight or put it is already installed on supported calibrators and graphic cards, see the...
.../high temperature and high humidity. yyFor details on your PC, the image quality may cause damage to uninstall the other calibration application. ENEGNLGISH INSTALLING LG Monitor Software 25 NOTE When you run Screen Split, the Screen Split icon [ ] appears in the system tray at the right bottom of the ...PC screen. Do not store it in an environment with the True Color Finder software, remove the calibrator from the monitor and store it at room temperature away from direct sunlight or put it is already installed on supported calibrators and graphic cards, see the...


