

Owners Manual
Page 1
OWNER'S MANUAL IPS LED MONITOR Please read this manual carefully before operating your set and retain it for future reference. IPS LED MONITOR MODEL 22EA63V 23EA63V 27EA63V www.lg.com ENGLISH
OWNER'S MANUAL IPS LED MONITOR Please read this manual carefully before operating your set and retain it for future reference. IPS LED MONITOR MODEL 22EA63V 23EA63V 27EA63V www.lg.com ENGLISH
Owners Manual
Page 2
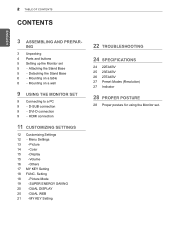
...20 -DUAL DISPLAY 20 -DUAL WEB 21 -MY KEY Setting 22 TROUBLESHOOTING 24 SPECIFICATIONS 24 22EA63V 25 23EA63V 26 27EA63V 27 Preset Modes (Resolution) 27 Indicator 28 Proper posture 28 Proper posture for using the Monitor set 5 - HDMI connection 11 CUSTOMIZING SETTINGS 12 Customizing Settings 12 - Menu Settings 13 -Picture 14...KEY Setting 18 FUNC. Detaching the Stand Base 6 - D-SUB connection 9 - 2 TABLE OF CONTENTS Contents ENEGNLGISH 3 ASSEMBLING AND PREPAR- Mounting on a wall 9 USING THE MONITOR SET 9 Connecting to a PC 9 - ING 3 Unpacking 4 Parts and buttons 5 Setting up the...
...20 -DUAL DISPLAY 20 -DUAL WEB 21 -MY KEY Setting 22 TROUBLESHOOTING 24 SPECIFICATIONS 24 22EA63V 25 23EA63V 26 27EA63V 27 Preset Modes (Resolution) 27 Indicator 28 Proper posture 28 Proper posture for using the Monitor set 5 - HDMI connection 11 CUSTOMIZING SETTINGS 12 Customizing Settings 12 - Menu Settings 13 -Picture 14...KEY Setting 18 FUNC. Detaching the Stand Base 6 - D-SUB connection 9 - 2 TABLE OF CONTENTS Contents ENEGNLGISH 3 ASSEMBLING AND PREPAR- Mounting on a wall 9 USING THE MONITOR SET 9 Connecting to a PC 9 - ING 3 Unpacking 4 Parts and buttons 5 Setting up the...
Owners Manual
Page 5
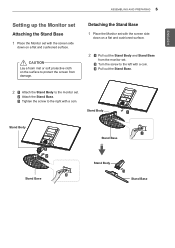
CAUTION Lay a foam mat or soft protective cloth on the surface to protect the screen from the monitor set. 2 Turn the screw to the left with a coin. 3 Pull out the Stand Base. 2 1 Attach the Stand Body to the right with the screen side ... a flat and cushioned surface. Stand Body Stand Body Stand Base Stand Base Stand Body Stand Base ASSEMBLING AND PREPARING 5 Detaching the Stand Base 1 Place the Monitor set with the screen side down on a flat and cushioned surface. 2 1 Pull out the Stand Body and Stand Base from damage. ENEGNLGISH Setting up the...
CAUTION Lay a foam mat or soft protective cloth on the surface to protect the screen from the monitor set. 2 Turn the screw to the left with a coin. 3 Pull out the Stand Base. 2 1 Attach the Stand Body to the right with the screen side ... a flat and cushioned surface. Stand Body Stand Body Stand Base Stand Base Stand Body Stand Base ASSEMBLING AND PREPARING 5 Detaching the Stand Base 1 Place the Monitor set with the screen side down on a flat and cushioned surface. 2 1 Pull out the Stand Body and Stand Base from damage. ENEGNLGISH Setting up the...

Owners Manual
Page 6
Otherwise electric shock may occur. 2 Connect the AC-DC Adapter and Power Cord to another location. CAUTION Unplug the power cord before moving the Monitor to a wall outlet. Leave a 10 cm (minimum) space from the wall for proper ventilation. 10 cm 10 cm 10 cm 10 cm 3 Press (Power) button on the bottom switch panel to turn the power on a table. ENEGNLGISH 6 ASSEMBLING AND PREPARING Mounting on a table 1 Lift and tilt the Monitor set into its upright position on . or
Otherwise electric shock may occur. 2 Connect the AC-DC Adapter and Power Cord to another location. CAUTION Unplug the power cord before moving the Monitor to a wall outlet. Leave a 10 cm (minimum) space from the wall for proper ventilation. 10 cm 10 cm 10 cm 10 cm 3 Press (Power) button on the bottom switch panel to turn the power on a table. ENEGNLGISH 6 ASSEMBLING AND PREPARING Mounting on a table 1 Lift and tilt the Monitor set into its upright position on . or
Owners Manual
Page 7
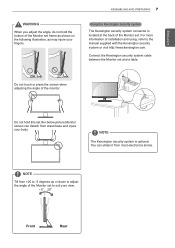
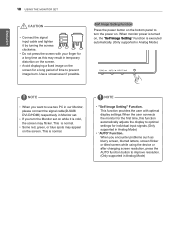
...up or down to the manual supplied with the Kensington security system or visit http://www.kensington.com. Do not hold the bottom of the Monitor set. ENEGNLGISH warning When you adjust the angle, do not hold this set frame as shown on the following illustration, as may injure ...your fingers. NOTE The Kensington security system is located at the back of the Monitor set like below picture.Monitor screen can obtain it from most electronics stores. Do not touch or press the screen when adjusting the angle of installation and ...
...up or down to the manual supplied with the Kensington security system or visit http://www.kensington.com. Do not hold the bottom of the Monitor set. ENEGNLGISH warning When you adjust the angle, do not hold this set frame as shown on the following illustration, as may injure ...your fingers. NOTE The Kensington security system is located at the back of the Monitor set like below picture.Monitor screen can obtain it from most electronics stores. Do not touch or press the screen when adjusting the angle of installation and ...
Owners Manual
Page 8
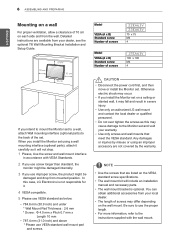
...mounting interface (optional parts), attach it carefully so it will include an installation manual and necessary parts. yyUse only an authorized LG wall mount and contact the local dealer or qualified personnel. yyThe wall mount bracket is not responsible for it may differ ...internally. 3 If you intend to mount the Monitor set to a wall, attach Wall mounting interface (optional parts) to the back of the set using an improper accessory are available from mounted position. Model VESA (A x B) Standard screw Number of screws 22EA63V 23EA63V 75 x 75 M4 4 Model VESA (A...
...mounting interface (optional parts), attach it carefully so it will include an installation manual and necessary parts. yyUse only an authorized LG wall mount and contact the local dealer or qualified personnel. yyThe wall mount bracket is not responsible for it may differ ...internally. 3 If you intend to mount the Monitor set to a wall, attach Wall mounting interface (optional parts) to the back of the set using an improper accessory are available from mounted position. Model VESA (A x B) Standard screw Number of screws 22EA63V 23EA63V 75 x 75 M4 4 Model VESA (A...
Owners Manual
Page 9
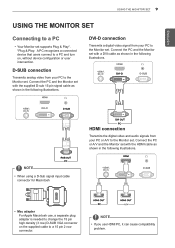
...signal input cable connector for Macintosh HDMI connection Transmits the digital video and audio signals from your PC or A/V to the Monitor set. D-SUB connection Transmits analog video from your PC to the Monitor set. yyMac adapter For Apple Macintosh use HDMI PC, it can cause compatibility problem. ENEGNLGISH USING THE... with the supplied D-sub 15 pin signal cable as shown in the following illustrations. Connect the PC or A/V and the Monitor set with the HDMI cable as shown in the following illustrations. NOTE yyIf you use , a separate plug adapter is needed to change ...
...signal input cable connector for Macintosh HDMI connection Transmits the digital video and audio signals from your PC or A/V to the Monitor set. D-SUB connection Transmits analog video from your PC to the Monitor set. yyMac adapter For Apple Macintosh use HDMI PC, it can cause compatibility problem. ENEGNLGISH USING THE... with the supplied D-sub 15 pin signal cable as shown in the following illustrations. Connect the PC or A/V and the Monitor set with the HDMI cable as shown in the following illustrations. NOTE yyIf you use , a separate plug adapter is needed to change ...
Owners Manual
Page 10
...while using the device or after changing screen resolution, press the AUTO function button to optimal settings for individual input signals.(Only supported in Monitor set on the screen. This is normal. yyIf you want to prevent image burn. yyDo not press the screen with optimal display settings....When the user connects the monitor for the first time, this may result in Analog Mode) This function provides the user with your finger for a long period of time...
...while using the device or after changing screen resolution, press the AUTO function button to optimal settings for individual input signals.(Only supported in Monitor set on the screen. This is normal. yyIf you want to prevent image burn. yyDo not press the screen with optimal display settings....When the user connects the monitor for the first time, this may result in Analog Mode) This function provides the user with your finger for a long period of time...

Owners Manual
Page 11
..., SUPER ENERGY SAVING, DUAL DISPLAY, DUAL WEB,MY KEY Setting menus.(See p.18) When adjusting your display settings, always press the AUTO button on the MONITOR SETUP OSD. (Only supported in Sleep Mode, the power indicator blinks red. Use this button to enter MY KEY menu.For more information.(See p.17...) Use this button to leave the OSD menu. ENEGNLGISH CUSTOMIZING SETTINGS 11 CUSTOMIZING SETTINGS 1 Press the desired button on the bottom of the Monitor set. 2 Change the value of the Monitor set. Power Indicator The power indicator stays red if the display is D-SUB.
..., SUPER ENERGY SAVING, DUAL DISPLAY, DUAL WEB,MY KEY Setting menus.(See p.18) When adjusting your display settings, always press the AUTO button on the MONITOR SETUP OSD. (Only supported in Sleep Mode, the power indicator blinks red. Use this button to enter MY KEY menu.For more information.(See p.17...) Use this button to leave the OSD menu. ENEGNLGISH CUSTOMIZING SETTINGS 11 CUSTOMIZING SETTINGS 1 Press the desired button on the bottom of the Monitor set. 2 Change the value of the Monitor set. Power Indicator The power indicator stays red if the display is D-SUB.

Owners Manual
Page 12
... is explained below. Menu Brightness Contrast Wide/Original Reset Analog Digital HDMI Description ● ● ● To adjust the brightness, contrast of the Monitor set the SUPER+RESOLUTION Color Gamma Color Temp Six Color ● ● ● To customize the color of the screen Color Reset Display Horizontal ...menu or set ratio (16:9). ● ● ● Restore all factory default settings. yyHDMI: HDMI(Digital signal) input. Each option is lower than Monitor set other menu items, use the up arrow ( ) button. To return to reset immediately.
... is explained below. Menu Brightness Contrast Wide/Original Reset Analog Digital HDMI Description ● ● ● To adjust the brightness, contrast of the Monitor set the SUPER+RESOLUTION Color Gamma Color Temp Six Color ● ● ● To customize the color of the screen Color Reset Display Horizontal ...menu or set ratio (16:9). ● ● ● Restore all factory default settings. yyHDMI: HDMI(Digital signal) input. Each option is lower than Monitor set other menu items, use the up arrow ( ) button. To return to reset immediately.

Owners Manual
Page 13
...OSD menu. To select the range of the screen. SUPER+ Resolution can set the offset level. The image is the darkest screen the monitor can show the clear video image even with the enlargement with the picture quality improvement technology that adjusts the blurred focus and rough outline due...▼ button. 4 Set the options by pressing the ◄ or ► or ▼ buttons. 5 Select Exit to turn on the bottom of the Monitor set other menu items, use the up arrow ( ) button. Menu > Next Menu > Picture Sharpness Black Level Over Scan SUPER+RESOLUTION Description To adjust the clearness...
...OSD menu. To select the range of the screen. SUPER+ Resolution can set the offset level. The image is the darkest screen the monitor can show the clear video image even with the enlargement with the picture quality improvement technology that adjusts the blurred focus and rough outline due...▼ button. 4 Set the options by pressing the ◄ or ► or ▼ buttons. 5 Select Exit to turn on the bottom of the Monitor set other menu items, use the up arrow ( ) button. Menu > Next Menu > Picture Sharpness Black Level Over Scan SUPER+RESOLUTION Description To adjust the clearness...
Owners Manual
Page 14
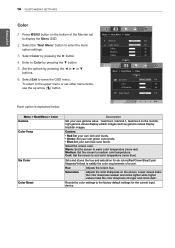
...Set the screen to medium color temperature. Medium: Set the screen to warm color temperature (more red). Saturation Adjusts the color sharpness on the monitor, high gamma values display whitish images and low gamma values display blackish images. Lower values make the color sharpness weaker and colors lighter while .... 6 Select Exit to the factory default settings for six colors(Red/Green/Blue/Cyan/ Magenta/Yellow) to satisfy the color requirements of the Monitor set other menu items, use the up arrow ( ) button. Sets and stores the hue and saturation for the current input device.
...Set the screen to medium color temperature. Medium: Set the screen to warm color temperature (more red). Saturation Adjusts the color sharpness on the monitor, high gamma values display whitish images and low gamma values display blackish images. Lower values make the color sharpness weaker and colors lighter while .... 6 Select Exit to the factory default settings for six colors(Red/Green/Blue/Cyan/ Magenta/Yellow) to satisfy the color requirements of the Monitor set other menu items, use the up arrow ( ) button. Sets and stores the hue and saturation for the current input device.
Owners Manual
Page 15
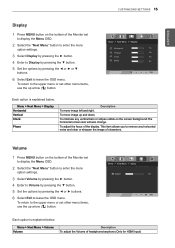
To adjust the focus of headphone/earphone.(Only for HDMI input) Volume 1 Press MENU button on the bottom of the Monitor set to display the Menu OSD. 2 Select the "Next Menu" button to enter the more option settings. 3 Select Volume by pressing the ► button. 4 Enter... clear or sharpen the image of characters. Each option is explained below . ENEGNLGISH CUSTOMIZING SETTINGS 15 Display 1 Press MENU button on the bottom of the Monitor set to display the Menu OSD. 2 Select the "Next Menu" button to enter the more option settings. 3 Select Display by pressing the ► button. 4 ...
To adjust the focus of headphone/earphone.(Only for HDMI input) Volume 1 Press MENU button on the bottom of the Monitor set to display the Menu OSD. 2 Select the "Next Menu" button to enter the more option settings. 3 Select Volume by pressing the ► button. 4 Enter... clear or sharpen the image of characters. Each option is explained below . ENEGNLGISH CUSTOMIZING SETTINGS 15 Display 1 Press MENU button on the bottom of the Monitor set to display the Menu OSD. 2 Select the "Next Menu" button to enter the more option settings. 3 Select Display by pressing the ► button. 4 ...

Owners Manual
Page 16
... On or Off.If you use 'Off'. You can set a response time for displayed pictures based on the bottom of the Monitor set Off, it will automatically be turned on. Menu > Next Menu > Others Language Power Indicator Response Time Description To choose the language in which the ...
... On or Off.If you use 'Off'. You can set a response time for displayed pictures based on the bottom of the Monitor set Off, it will automatically be turned on. Menu > Next Menu > Others Language Power Indicator Response Time Description To choose the language in which the ...

Owners Manual
Page 17
CUSTOMIZING SETTINGS 17 Each option is short key. MY KEY MY KEY Setting Back Description MY KEY is explained below. You can select one of the Monitor set to display the MY KEY OSD. 2 Set the options by pressing the ◄or►or▼buttons. 3 Select Exit to return MY KEY menu. Select Back to leave the OSD menu. ENEGNLGISH MY KEY Setting 1 Press MY KEY button on the bottom of FUNC. (Picture Mode, SUPER ENERGY SAVING, DUAL DISPLAY, DUAL WEB) as your favorite feature.
CUSTOMIZING SETTINGS 17 Each option is short key. MY KEY MY KEY Setting Back Description MY KEY is explained below. You can select one of the Monitor set to display the MY KEY OSD. 2 Set the options by pressing the ◄or►or▼buttons. 3 Select Exit to return MY KEY menu. Select Back to leave the OSD menu. ENEGNLGISH MY KEY Setting 1 Press MY KEY button on the bottom of FUNC. (Picture Mode, SUPER ENERGY SAVING, DUAL DISPLAY, DUAL WEB) as your favorite feature.
Owners Manual
Page 18
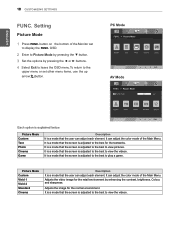
... SETTINGS FUNC. Adjusts the image for the textworks. It is a mode that the screen is explained below. It can adjust the color mode of the Monitor set other menu items, use the up arrow( )button.
... SETTINGS FUNC. Adjusts the image for the textworks. It is a mode that the screen is explained below. It can adjust the color mode of the Monitor set other menu items, use the up arrow( )button.

Owners Manual
Page 19
...NOTE yyTOTAL POWER REDUCTION: How much power can save energy with this energy- button on the Panel. Each option is saved while using the monitor. efficient function Disables SUPER ENERGY SAVING. yyLG calculated these values by pressing the ◄ or ► or ▼buttons. 5 Select ... ENERGY SAVING On Off Reset Description Enables SUPER ENERGY SAVING you can be different from each panel and panel vendor. Resets the values of the Monitor set other menu items, use the up arrow ( ) button. So,those values should be saved using "broadcast video signal" (including broadcast...
...NOTE yyTOTAL POWER REDUCTION: How much power can save energy with this energy- button on the Panel. Each option is saved while using the monitor. efficient function Disables SUPER ENERGY SAVING. yyLG calculated these values by pressing the ◄ or ► or ▼buttons. 5 Select ... ENERGY SAVING On Off Reset Description Enables SUPER ENERGY SAVING you can be different from each panel and panel vendor. Resets the values of the Monitor set other menu items, use the up arrow ( ) button. So,those values should be saved using "broadcast video signal" (including broadcast...

Owners Manual
Page 20
...; or ► buttons. 5 Select Exit to leave the OSD menu.To return to the upper menu or set other menu items, use secondary monitor as done mode of primary monitor. OSD. 2 Select DUAL WEB by pressing the ► button. 3 Enter to DUAL WEB by pressing the ▼ button. 4 Set the options ...-> Pressing any button -> OSD appear and user should press dual button -> User can use the up arrow ( ) button. button on the bottom of the Monitor set to display the FUNC. Each option is off . * Before using below functions, please install DUAL SMART SOLUTION programme. NOTE yyWhen...
...; or ► buttons. 5 Select Exit to leave the OSD menu.To return to the upper menu or set other menu items, use secondary monitor as done mode of primary monitor. OSD. 2 Select DUAL WEB by pressing the ► button. 3 Enter to DUAL WEB by pressing the ▼ button. 4 Set the options ...-> Pressing any button -> OSD appear and user should press dual button -> User can use the up arrow ( ) button. button on the bottom of the Monitor set to display the FUNC. Each option is off . * Before using below functions, please install DUAL SMART SOLUTION programme. NOTE yyWhen...

Owners Manual
Page 21
... you can use the up arrow ( ) button. MY KEY Setting Picture Mode SUPER ENERGY SAVING DUAL DISPLAY DUAL WEB Description Picture Mode adjust the Monitor set other convenience in another monitor. Help user to display the FUNC. ENEGNLGISH MY KEY Setting 1 Press FUNC. button on the bottom of the... Monitor set to browse web efficiently by pressing the ◄ or ► buttons. 5 Select Exit to leave the OSD menu.To return to the upper ...
... you can use the up arrow ( ) button. MY KEY Setting Picture Mode SUPER ENERGY SAVING DUAL DISPLAY DUAL WEB Description Picture Mode adjust the Monitor set other convenience in another monitor. Help user to display the FUNC. ENEGNLGISH MY KEY Setting 1 Press FUNC. button on the bottom of the... Monitor set to browse web efficiently by pressing the ◄ or ► buttons. 5 Select Exit to leave the OSD menu.To return to the upper ...
Owners Manual
Page 22
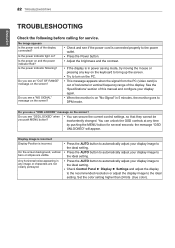
... is on the screen? Is the power on ? yy This message appears when the signal from the PC (video card) is incorrect. yy When the monitor is connected properly to bring up the screen. Do you push MENU button? yy Check Control Panel ► Display ► Settings and adjust the display... brightness and the contrast. yy Try to the ideal setting. See the 'Specifications' section of the display connected? Any horizontal noise appearing in 5 minutes, the monitor goes to the ideal setting.
... is on the screen? Is the power on ? yy This message appears when the signal from the PC (video card) is incorrect. yy When the monitor is connected properly to bring up the screen. Do you push MENU button? yy Check Control Panel ► Display ► Settings and adjust the display... brightness and the contrast. yy Try to the ideal setting. See the 'Specifications' section of the display connected? Any horizontal noise appearing in 5 minutes, the monitor goes to the ideal setting.


