LG 22M38D-B Support and Manuals
Get Help and Manuals for this LG item
LG 22M38D-B Videos

???????????? ???????? 21.5" LG 22M38D-B ? Rozetka.com.ua
Duration: 2:17
Total Views: 234
Duration: 2:17
Total Views: 234
Popular LG 22M38D-B Manual Pages
Owners Manual - Page 1
LED LCD MONITOR MODEL
19M38A 19M38D 19M38H
20M38A 20M38D 20M38H
22M38A 22M38D 22M38H
24M38A 24M38D 24M38H
27MP38VQ 27MP38HQ
www.lg.com
OWNER'S MANUAL
LED LCD Monitor (LED Monitor*)
*LG LED Monitors are LCD Monitors with LED Backlighting. Please read this manual carefully before operating your set and retain it for future reference.
Owners Manual - Page 2

...25 -Picture Mode 26 -Color Weakness
27 TROUBLESHOOTING
29 SPECIFICATIONS
39 Preset Modes (Resolution) 40 Indicator
41 PROPER POSTURE
41 Proper posture for using the Monitor set 8 - Attaching the Stand Base 9 - Using the cable holder 12 - ING
4 Unpacking 6 Parts and buttons 7 Moving and Lifting the Monitor 8 Setting up the Monitor set . 2 TABLE OF CONTENTS
CONTENTS
ENEGNLGISH
3 LICENSE...
Owners Manual - Page 3
in OSD menu of HDMI Licensing Administrator, Inc. Visit www.lg.com for more information on display if there is no adjustment to display. *To make this setting be disabled, change the ... ErP Directive: *This monitor is set to 'Off' in the United States and other countries. The terms HDMI and HDMI High-Definition Multimedia Interface, and the HDMI Logo are trademarks or registered trademarks ...
Owners Manual - Page 4
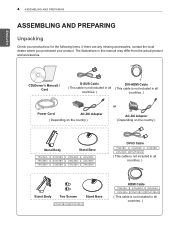
... not included in all
countries. )
Power Cord
AC-DC Adapter
( Depending on the country )
or
AC-DC Adapter ( Depending on the country )
Stand Body
Stand Base
DVI-D Cable
( This cable is not included in all countries. )
Stand Body
Two Screws
Stand Base
HDMI Cable
( This cable is not included in this manual may differ from the actual...
Owners Manual - Page 8
Stand Body
Stand Body
Stand Base
Stand Body Stand Base
ENEGNLGISH
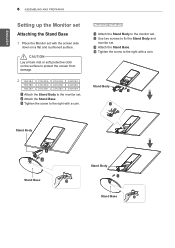
8 ASSEMBLING AND PREPARING
Setting up the Monitor set
Attaching the Stand Base
1 Place the Monitor set with the screen side
down on the surface to protect the screen from damage.
2 19M38A
19M38D
19M38H
20M38A 20M38D 20M38H
22M38A 22M38D 22M38H
24M38A 24M38D 24M38H
1 Attach the Stand Body to the monitor set. 2 Attach the...
Owners Manual - Page 9
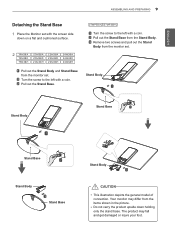
... left with a coin. 2 Pull out the Stand Base from the Stand Body. 3 Remove two screws and pull out the Stand
Body from the items shown in the picture. The product may differ from the monitor set. Stand Body
Stand Body
Stand Base
Stand Base
Stand Body
Stand Base
Stand Body
CAUTION yyThis illustration depicts the general model of
connection. Your monitor may fall...
Owners Manual - Page 11
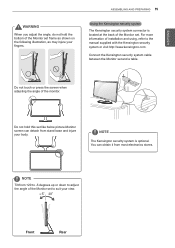
... of the monitor.
Connect the Kensington security system cable between the Monitor set . You can detach from stand base and injure your view. Do not touch or press the screen when adjusting the angle of installation and using, refer to the manual supplied with the Kensington security system or visit http://www.kensington.com.
ENEGNLGISH...
Owners Manual - Page 12
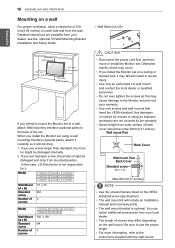
... install the Monitor set using an improper accessory are listed on the VESA standard screw specifications.
yyIf you use screw longer than standard, the moni-
yyUse only screws and wall mounts that are not covered by misuse or using a wall
mounting interface (optional parts), attach it
carefully so it may cause damage to the instructions supplied...
Owners Manual - Page 13
... time as shown in the following illustrations. Connect the PC and the Monitor set with the supplied D-sub 15 pin signal cable as shown in temporary distortion on the screen....image burn.
ENEGNLGISH
USING THE MONITOR SET 13
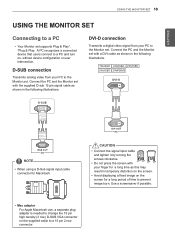
USING THE MONITOR SET
Connecting to a PC
yyYour Monitor set . D-SUB connection
Transmits analog video from your PC to the Monitor set supports Plug & Play*. *Plug & ...
Owners Manual - Page 14

... and the Monitor set . NOTE
yyIf you want to use a certified HDMI cable, the screen may not display or a connection error may appear on while it is cold, the screen may occur. yyRecommended HDMI cable types - High-Speed HDMI®/TM Cable with Ethernet
NOTE yyWhen you use HDMI PC, it can cause compatibility problem. If you...
Owners Manual - Page 15
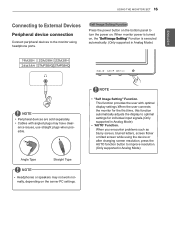
... provides the user with angled plugs may not work normally, depending on the server PC settings. Self Image Setting Function
Press the power button on the bottom panel to turn the power on , the "Self Image Setting" Function is executed automatically. (Only supported in Analog Mode)
ENEGNLGISH
NOTE
yyPeripheral devices are sold separately.
USING THE MONITOR...
Owners Manual - Page 16
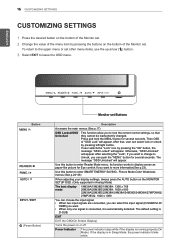
... button to enter SMART ENERGY SAVING , Picture Mode,Color Weakness menus.(See p.24~26)
When adjusting your display settings, always press the AUTO button on the MONITOR SETUP OSD. (Only supported in Sleep Mode, the power indicator blinks white.
If user selects the "Lock" icon by pressing the "OK" button, the message "OSD Locked...
Owners Manual - Page 27
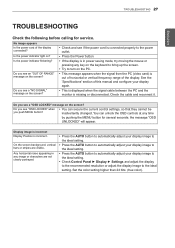
... the AUTO button to automatically adjust your display image to the ideal setting. Set the color setting higher than 24 bits (true color). No image appears
Is the power cord of this manual and configure your display image to the ideal setting. yy Press the Power button.
Check the cable and reconnect it. Do you see a "OSD...
Owners Manual - Page 28
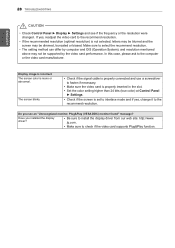
... mono or abnormal.
The screen blinks.
Do you installed the display driver? In this case, please ask to the recommend resolution. yy Make sure to the recommend resolution. lg.com.
yyThe setting method can differ by computer and O/S (Operation System), and resolution mentioned above may be supported by the video card performance. Display image is...
Owners Manual - Page 42

... serial number of the product are located on the back and on one side of Conformity
Trade Name
LG
Responsible Party LG Electronics USA, Inc. MODEL
SERIAL
Record them below in case you ever need service. Supplier's Declaration of the product.
Address
1000 Sylvan Ave Englewood Cliffs,
NJ 07632
Telephone
(201)266-2215
Make...
LG 22M38D-B Reviews
We have not received any reviews for LG yet.