
Owners Manual
Page 1
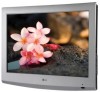
... setting or enabling other features will be achieved. before operating Record model number and serial number of the set . Life's Good LCD TV OWNER'S MANUAL 22LG3DCH 26LG3DCH 32LG3DCH 32LG3DC Please read this manual carefully your dealer when you require service. (Only 32LG3DC model) This product qualifies for ENERGYSTAR in which power savings will increasepower consumption...
... setting or enabling other features will be achieved. before operating Record model number and serial number of the set . Life's Good LCD TV OWNER'S MANUAL 22LG3DCH 26LG3DCH 32LG3DCH 32LG3DC Please read this manual carefully your dealer when you require service. (Only 32LG3DC model) This product qualifies for ENERGYSTAR in which power savings will increasepower consumption...
Owners Manual
Page 4
... your appliance, and if its appearance indicates damage or deterioration, unplug it to be certain. Periodically examine the cord of this owner's manual to telephone wires, lightening rods, or gas pipes. Do not use of fire or electrical shock, do grasp the plug when unplugging... power cord from direct sunlight. 3 To reduce the risk of the appliance, and have a qualified electrician install a separate circuit breaker. a TV with a three-prong grounded AC plug must remain readily operable. Keep the product away from physical or mechanical abuse, such as gasoline or candles...
... your appliance, and if its appearance indicates damage or deterioration, unplug it to be certain. Periodically examine the cord of this owner's manual to telephone wires, lightening rods, or gas pipes. Do not use of fire or electrical shock, do grasp the plug when unplugging... power cord from direct sunlight. 3 To reduce the risk of the appliance, and have a qualified electrician install a separate circuit breaker. a TV with a three-prong grounded AC plug must remain readily operable. Keep the product away from physical or mechanical abuse, such as gasoline or candles...
Owners Manual
Page 6
... Setting Adjustment - User Mode 56 Balance 58 TV Speakers On/Off Setup 59 Audio Reset 60 Stereo/SAP Broadcast Setup 61 Audio Language 62 On-Screen Menus Language Selection 63 Caption Mode - Analog Broadcasting System Captions ....... 64 - Manual Clock Setup 68 Auto On/Off Time Setting ...69 Sleep Timer Setting 70 Auto Shut-off Setting 71 Set Password & Lock System 72 Channel Blocking 75 Movie & TV Rating 76 Downloadable Rating 79 External Input Blocking 80 APPEN ...
... Setting Adjustment - User Mode 56 Balance 58 TV Speakers On/Off Setup 59 Audio Reset 60 Stereo/SAP Broadcast Setup 61 Audio Language 62 On-Screen Menus Language Selection 63 Caption Mode - Analog Broadcasting System Captions ....... 64 - Manual Clock Setup 68 Auto On/Off Time Setting ...69 Sleep Timer Setting 70 Auto Shut-off Setting 71 Set Password & Lock System 72 Channel Blocking 75 Movie & TV Rating 76 Downloadable Rating 79 External Input Blocking 80 APPEN ...
Owners Manual
Page 8
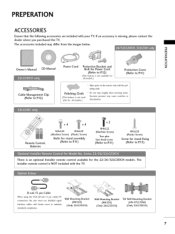
... the polishing cloth. Excessive pressure may differ from the images below. _D rT1 _D © Power Cord Protective Bracket and z Owner's Manual CD Manual Bolt for Power Cord Protection Cover (Refer to R12) * Wipe spots on the exterior only with ferrite cores to R13) installer remote... control is missing, please contact the dealer where you purchased the TV. Polishing Cloth (This feature is not available for (Refer to Rll ) all ...
... the polishing cloth. Excessive pressure may differ from the images below. _D rT1 _D © Power Cord Protective Bracket and z Owner's Manual CD Manual Bolt for Power Cord Protection Cover (Refer to R12) * Wipe spots on the exterior only with ferrite cores to R13) installer remote... control is missing, please contact the dealer where you purchased the TV. Polishing Cloth (This feature is not available for (Refer to Rll ) all ...
Owners Manual
Page 18
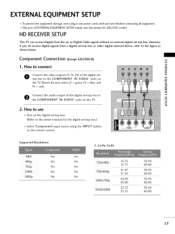
...00 Yes 44.96 1280x720p 45.00 59.94 60.00 33.72 59.94 1920x 1080i 33.75 60.00 17 HD RECEIVERSETUP This TV can receive Digital Over-the-air or Digital Cable signals without an external digital set -top box to the COMPONENT IN AUDIO jacks on ...digital signals from a digital set-top box or other digital external device, refer to the COMPONENT IN VIDEO jacks on X_ the TV. m c 2. Component Connection (Excep2t2LG3DCH) I"11 x 1. How to the owner's manual for 32LG3 DC model. m z O onnect the audio output of EXTERNAL EQUIPMENT SETUP mainly uses the picture for the digital ...
...00 Yes 44.96 1280x720p 45.00 59.94 60.00 33.72 59.94 1920x 1080i 33.75 60.00 17 HD RECEIVERSETUP This TV can receive Digital Over-the-air or Digital Cable signals without an external digital set -top box to the COMPONENT IN AUDIO jacks on ...digital signals from a digital set-top box or other digital external device, refer to the COMPONENT IN VIDEO jacks on X_ the TV. m c 2. Component Connection (Excep2t2LG3DCH) I"11 x 1. How to the owner's manual for 32LG3 DC model. m z O onnect the audio output of EXTERNAL EQUIPMENT SETUP mainly uses the picture for the digital ...
Owners Manual
Page 19
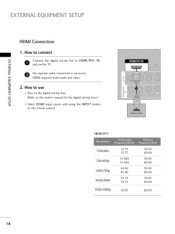
... 59.94 60.00 59.94 60.00 60.00 18 How to use m z Turn on the digital set-top box. (Refer to the owner's manual for the digital set -top box to connect m x Connect the digital set -top box.) m c Select HDMI input source with using the INPUT button on the...
... 59.94 60.00 59.94 60.00 60.00 18 How to use m z Turn on the digital set-top box. (Refer to the owner's manual for the digital set -top box to connect m x Connect the digital set -top box.) m c Select HDMI input source with using the INPUT button on the...
Owners Manual
Page 21
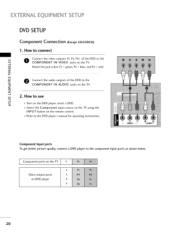
... DVD player to the DVD player's manual for operating instructions. EXTERNALEQUIPMENT SETUP DVD SETUP Component Connection (Excep2t 2LG3DCH) 1. Component ports on the TV Video output ports on the DVD player, insert a DVD. "O _ Select the Component input source on the TV using the INPUT button on the remote ... input ports as shown below. z 2. How to the COMPONENT IN VIDEO jacks on the TV. How to connect m x O Connect the video outputs (Y, PB, PR) of the DVD to the COMPONENT IN AUDIO jacks on the TV. Match the jack colors (Y = green, PB = blue, and PR = red). _o...
... DVD player to the DVD player's manual for operating instructions. EXTERNALEQUIPMENT SETUP DVD SETUP Component Connection (Excep2t 2LG3DCH) 1. Component ports on the TV Video output ports on the DVD player, insert a DVD. "O _ Select the Component input source on the TV using the INPUT button on the remote ... input ports as shown below. z 2. How to the COMPONENT IN VIDEO jacks on the TV. How to connect m x O Connect the video outputs (Y, PB, PR) of the DVD to the COMPONENT IN AUDIO jacks on the TV. Match the jack colors (Y = green, PB = blue, and PR = red). _o...
Owners Manual
Page 22
... the AV1 input source on the TV using the INPUT button on the remote control. c "O Refer to the DVD player's manual for operating instructions. HDMI supports both audio and video. 2. How to use Select the HDMI input source on the TV using the INPUT r_l button on ...the remote control. How to use r_l z Turn on the TV. O No separate audio connection is necessary. ...
... the AV1 input source on the TV using the INPUT button on the remote control. c "O Refer to the DVD player's manual for operating instructions. HDMI supports both audio and video. 2. How to use Select the HDMI input source on the TV using the INPUT r_l button on ...the remote control. How to use r_l z Turn on the TV. O No separate audio connection is necessary. ...
Owners Manual
Page 23
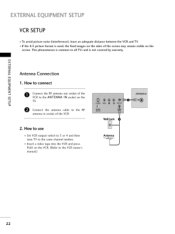
.... (Refer to the RF antenna in socket of the VCR. 2. How to use _ Set VCR output switch to 3 or 4 and then tune TV to the same channel number. _ Insert a video tape into the VCR and press PLAY on the screen. c "0 Connect the antenna cable to the... VCR owner's manual.) Wall Jack 22 x r_l _o z Antenna Connection r_l X:) c 1. This phenomenon is common to connect "0 r_l z O CVConRnetcot thtehe ARNFTEaNnNteAnna oINut ssoocckkeett oonf tthhee r_l TV. How to all TVs and is used;
.... (Refer to the RF antenna in socket of the VCR. 2. How to use _ Set VCR output switch to 3 or 4 and then tune TV to the same channel number. _ Insert a video tape into the VCR and press PLAY on the screen. c "0 Connect the antenna cable to the... VCR owner's manual.) Wall Jack 22 x r_l _o z Antenna Connection r_l X:) c 1. This phenomenon is common to connect "0 r_l z O CVConRnetcot thtehe ARNFTEaNnNteAnna oINut ssoocckkeett oonf tthhee r_l TV. How to all TVs and is used;
Owners Manual
Page 24
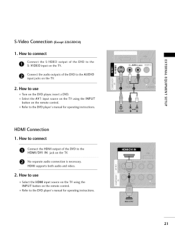
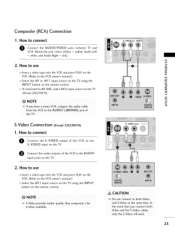
... = red) m x 2. the AUDIO 2. z rT1 c from theVCR t0theAUDIO the TV. How to connect O Connect the S-VIDEO output of the VCR to the VCR owner's manual.) rT1 Select the AV or AV1 input source on the TV using the INPUT button on the remote control. S-Video provides better quality than...the S,Video will work. 23 Use it when available. _ Do not connect to the VCR owner's manual.) Select the AVl input source on the TV using the XD c INPUT button on the TV rT1 (Except 22 LG3DCH). L(MONO)jack0f S-Video Connection (Excep2t2LG3DCH) I. Connect the audio outputs oftheVCRto input...
... = red) m x 2. the AUDIO 2. z rT1 c from theVCR t0theAUDIO the TV. How to connect O Connect the S-VIDEO output of the VCR to the VCR owner's manual.) rT1 Select the AV or AV1 input source on the TV using the INPUT button on the remote control. S-Video provides better quality than...the S,Video will work. 23 Use it when available. _ Do not connect to the VCR owner's manual.) Select the AVl input source on the TV using the XD c INPUT button on the TV rT1 (Except 22 LG3DCH). L(MONO)jack0f S-Video Connection (Excep2t2LG3DCH) I. Connect the audio outputs oftheVCRto input...

Owners Manual
Page 31
... you prefer. The Phase adjustment range is not clear after auto adjustment and especially if characters are still trembling, adjust the picture phase manually. Make appropriate adjustments. Size: This function is to remove any vertical bars or stripes visible on the screen background. And the horizontal ...screen size will also change. Select Position, Size, or Phase. Return to TV viewing. :: _ Position: This function is -30 ~ 30. The Size adjustment range is to adjust picture to left/right and up/down as...
... you prefer. The Phase adjustment range is not clear after auto adjustment and especially if characters are still trembling, adjust the picture phase manually. Make appropriate adjustments. Size: This function is to remove any vertical bars or stripes visible on the screen background. And the horizontal ...screen size will also change. Select Position, Size, or Phase. Return to TV viewing. :: _ Position: This function is -30 ~ 30. The Size adjustment range is to adjust picture to left/right and up/down as...

Owners Manual
Page 37
WATCHING l°V / CHANNEL CONTROL ON-SCREENMENUSSELECTION Your TV's OSD (On Screen Display) may differ slightly from that shown in this manual. -r" z < N -r" > Z Z fT1 N 0 Z _m 0 m Display each menu. Return to the pop up menu. Enter to TV viewing. 36 Select a menu item.
WATCHING l°V / CHANNEL CONTROL ON-SCREENMENUSSELECTION Your TV's OSD (On Screen Display) may differ slightly from that shown in this manual. -r" z < N -r" > Z Z fT1 N 0 Z _m 0 m Display each menu. Return to the pop up menu. Enter to TV viewing. 36 Select a menu item.
Owners Manual
Page 39
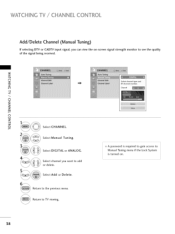
WATCHING TV / CHANNEL CONTROL Add/Delete Channel (Manual Tuning) If selecting DTV or CADTV input signal, you want to add or delete. Select channel you can view the on . Return to TV viewing. 58 A password is required to gain access to Manual Tuning menu if the Lock System is turned on -screen signal strength monitor to the previous menu. Select Add or Delete. Select Manual Tuning. Return to see the quality of the signal being received. -r" z < N I > z z I"11 N © Z © Select CHANNEL. Select DIGITAL or ANALOG.
WATCHING TV / CHANNEL CONTROL Add/Delete Channel (Manual Tuning) If selecting DTV or CADTV input signal, you want to add or delete. Select channel you can view the on . Return to TV viewing. 58 A password is required to gain access to Manual Tuning menu if the Lock System is turned on -screen signal strength monitor to the previous menu. Select Add or Delete. Select Manual Tuning. Return to see the quality of the signal being received. -r" z < N I > z z I"11 N © Z © Select CHANNEL. Select DIGITAL or ANALOG.
Owners Manual
Page 46
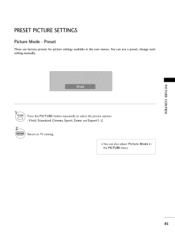
"O N C _o m N © Z _o © Press the PICTURE button repeatedly to TV viewing. _You can use a preset, change each setting manually. You can also adjust Picture Mode in the user menus. Return to select the picture options : Vivid, Standard, Cinema, Sport, Game and Expert1-2. Preset There are factory presets for picture settings available in the PICTURE menu. 45 PRESETPICTURE SETTINGS Picture Mode -
"O N C _o m N © Z _o © Press the PICTURE button repeatedly to TV viewing. _You can use a preset, change each setting manually. You can also adjust Picture Mode in the user menus. Return to select the picture options : Vivid, Standard, Cinema, Sport, Game and Expert1-2. Preset There are factory presets for picture settings available in the PICTURE menu. 45 PRESETPICTURE SETTINGS Picture Mode -
Owners Manual
Page 48
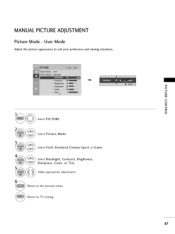
Select Picture Mode. Make appropriate adjustments. Return to the previous menu. Select Vivid, Standard, Cinema, Sport, or Game. Select Blacklight, Contrast, Brightness, Sharpness, Color, or Tint. Return to TV viewing. 47 "O N C m N O Z O Select PICTURE. MANUAL PICTUREADJUSTMENT Picture Mode - User Mode Adjust the picture appearance to suit your preference and viewing situations.
Select Picture Mode. Make appropriate adjustments. Return to the previous menu. Select Vivid, Standard, Cinema, Sport, or Game. Select Blacklight, Contrast, Brightness, Sharpness, Color, or Tint. Return to TV viewing. 47 "O N C m N O Z O Select PICTURE. MANUAL PICTUREADJUSTMENT Picture Mode - User Mode Adjust the picture appearance to suit your preference and viewing situations.
Owners Manual
Page 68
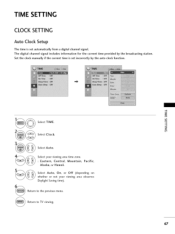
station. Select TIME. Select your viewing area observes Daylight Saving time). Return to TV viewing. 67 TIME SETTING CLOCK SETTING Auto Clock Setup The time is set automatically from a digital channel signal. m z Select Clock. Select Auto. Pacific, Select Auto, ..., Alaska, or Hawaii. Return to the previous menu. The digital channel signal includes information for the current time provided by the broadcasting Set the clock manually if the current time is set incorrectly by the auto clock function.
station. Select TIME. Select your viewing area observes Daylight Saving time). Return to TV viewing. 67 TIME SETTING CLOCK SETTING Auto Clock Setup The time is set automatically from a digital channel signal. m z Select Clock. Select Auto. Pacific, Select Auto, ..., Alaska, or Hawaii. Return to the previous menu. The digital channel signal includes information for the current time provided by the broadcasting Set the clock manually if the current time is set incorrectly by the auto clock function.
Owners Manual
Page 69
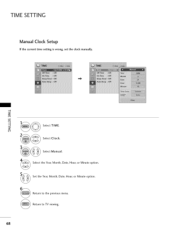
Return to the previous menu. z c_ Select Clock. Return to TV viewing. 68 Select Manual. Set the Year, Month, Date, Hour, or Minute option. TIME SETTING Manual Clock Setup If the current time setting is wrong, set the clock manually. m m Select TIME. Select the Year, Month, Date, Hour, or Minute option.
Return to the previous menu. z c_ Select Clock. Return to TV viewing. 68 Select Manual. Set the Year, Month, Date, Hour, or Minute option. TIME SETTING Manual Clock Setup If the current time setting is wrong, set the clock manually. m m Select TIME. Select the Year, Month, Date, Hour, or Minute option.
Owners Manual
Page 80
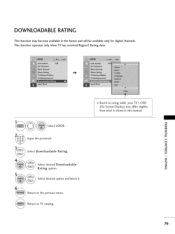
This function operates only when TV has received Regions Rating data. 01_Based on rating table, your TV's OSD (On Screen Display) may become available in this manual. ___ Select LOCK. _D m z Input the password. O z _D Select Downloadable Rating. Return to TV viewing. 79 Return to the previous menu. Select desired option and block it. DOWNLOADABLE RATING This function may differ slightly from what is shown in the future and will be available only for digital channels. O _D Select desired Downloadable z Rating option.
This function operates only when TV has received Regions Rating data. 01_Based on rating table, your TV's OSD (On Screen Display) may become available in this manual. ___ Select LOCK. _D m z Input the password. O z _D Select Downloadable Rating. Return to TV viewing. 79 Return to the previous menu. Select desired option and block it. DOWNLOADABLE RATING This function may differ slightly from what is shown in the future and will be available only for digital channels. O _D Select desired Downloadable z Rating option.


