Owners Manual
Page 6
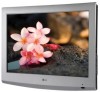
... Channel Label 40 Input List 41 PICTURE CONTROl. Preset 46 Manual Picture Adjustment - Caption Option 66 TIME SETTING Clock Setting - Auto Clock Setup 67 - CONTENTS WARNING / CAUTION 1 SAFETY INSTRUCTIONS 2 FEATURES OF THIS TV 6 PREPARATION Accessories 7 Front Panel Information 8 Back Panel Information... TV is used on a stand 15 Antenna or Cable Connection 16 EXTERNAL EQUIPMENT SETUP HD Receiver Setup 17 DVD Setup 20 VCR Setup 22 Other A/V Source Setup 24 Pillow Speaker Setup 25 PC Setup 26 WATCHING Z Z7 7 TV / CHANN EL CONTROL Remote Control Functions 32...
... Channel Label 40 Input List 41 PICTURE CONTROl. Preset 46 Manual Picture Adjustment - Caption Option 66 TIME SETTING Clock Setting - Auto Clock Setup 67 - CONTENTS WARNING / CAUTION 1 SAFETY INSTRUCTIONS 2 FEATURES OF THIS TV 6 PREPARATION Accessories 7 Front Panel Information 8 Back Panel Information... TV is used on a stand 15 Antenna or Cable Connection 16 EXTERNAL EQUIPMENT SETUP HD Receiver Setup 17 DVD Setup 20 VCR Setup 22 Other A/V Source Setup 24 Pillow Speaker Setup 25 PC Setup 26 WATCHING Z Z7 7 TV / CHANN EL CONTROL Remote Control Functions 32...
Owners Manual
Page 13
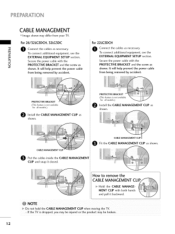
...the power cable from your TV. To connect additional equipment, see the EXTERNAL EQUIPMENT SETUP section. m To connect additional equipment, see the EXTERNAL EQUIPMENT SETUP section. If the TV is not available for all models.) Install the CABLE MANAGEMENT... shown. CLIP as iiiiP' i CABLE MANAGEMENT CLIP O CABLE MANAGEMENT CLIP Fit the CABLE MANAGEMENT CLIP as shown. O ut the cables inside the CABLE MANAGEMENT CLIP and snap it backward. For 26/32LG3DCH, 32LG3DC For 22LG3DCH...
...the power cable from your TV. To connect additional equipment, see the EXTERNAL EQUIPMENT SETUP section. m To connect additional equipment, see the EXTERNAL EQUIPMENT SETUP section. If the TV is not available for all models.) Install the CABLE MANAGEMENT... shown. CLIP as iiiiP' i CABLE MANAGEMENT CLIP O CABLE MANAGEMENT CLIP Fit the CABLE MANAGEMENT CLIP as shown. O ut the cables inside the CABLE MANAGEMENT CLIP and snap it backward. For 26/32LG3DCH, 32LG3DC For 22LG3DCH...
Owners Manual
Page 18
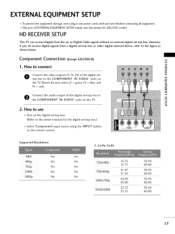
... Component input source using the INPUT button on X_ the TV. How to connect m _D z > O Connect the video outputs (Y, PB, PR) of EXTERNAL EQUIPMENT SETUP mainly uses the picture for the digital set -top box. (Refer to the figure as shown below. Supported Resolutions 480i Yes 480p Yes Yes 1080i... connecting all equipment. This part of the digital set -top box to the COMPONENT IN VIDEO jacks on the remote control. EXTERNAL EQUIPMENT SETUP To prevent the equipment damage, never plug in any power cords until you do receive digital signals from a digital set -top box.
... Component input source using the INPUT button on X_ the TV. How to connect m _D z > O Connect the video outputs (Y, PB, PR) of EXTERNAL EQUIPMENT SETUP mainly uses the picture for the digital set -top box. (Refer to the figure as shown below. Supported Resolutions 480i Yes 480p Yes Yes 1080i... connecting all equipment. This part of the digital set -top box to the COMPONENT IN VIDEO jacks on the remote control. EXTERNAL EQUIPMENT SETUP To prevent the equipment damage, never plug in any power cords until you do receive digital signals from a digital set -top box.
Owners Manual
Page 19
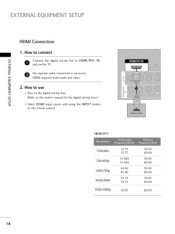
EXTERNALEQUIPMENT SETUP HDMI Connection 1. m HDMI supports both audio and video. How to use m z Turn on the digital set-top box. (Refer to the owner's manual for the ...
EXTERNALEQUIPMENT SETUP HDMI Connection 1. m HDMI supports both audio and video. How to use m z Turn on the digital set-top box. (Refer to the owner's manual for the ...
Owners Manual
Page 21
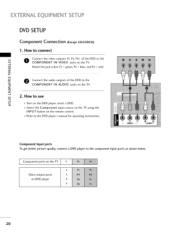
Component ports on the TV Video output ports on the DVD player, insert a DVD. How to use c _ Turn on DVD player 2O EXTERNALEQUIPMENT SETUP DVD SETUP Component Connection (Excep2t 2LG3DCH) 1. Component Input ports To get better picture quality, connect a DVD player to the DVD player's manual for operating instructions. Match the ...
Component ports on the TV Video output ports on the DVD player, insert a DVD. How to use c _ Turn on DVD player 2O EXTERNALEQUIPMENT SETUP DVD SETUP Component Connection (Excep2t 2LG3DCH) 1. Component Input ports To get better picture quality, connect a DVD player to the DVD player's manual for operating instructions. Match the ...
Owners Manual
Page 23
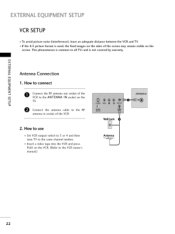
... to the RF antenna in socket of the screen may remain visible on the VCR. (Refer to the VCR owner's manual.) Wall Jack 22 EXTERNALEQUIPMENT SETUP VCR SETUP _ To avoid picture noise (interference), leave an adequate distance between the VCR and TV. _ If the 4:3 picture format is not covered by warranty. This...
... to the RF antenna in socket of the screen may remain visible on the VCR. (Refer to the VCR owner's manual.) Wall Jack 22 EXTERNALEQUIPMENT SETUP VCR SETUP _ To avoid picture noise (interference), leave an adequate distance between the VCR and TV. _ If the 4:3 picture format is not covered by warranty. This...
Owners Manual
Page 25
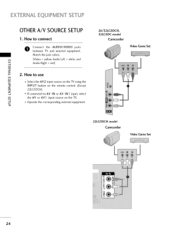
... Audio Right = red) I c Operate the corresponding external equipment. 26/32LG3DCH, 32LG3DC model Camcorder Video Game Set 22LG3DCH model Camcorder Video Game Set 24 EXTERNALEQUIPMENT SETUP OTHERA/V SOURCESETUP 1. How to use I"1"1 ,0 c Select the AV2 input source on the TV using the INPUT ...button on the remote control. (Except I"1"1 22LG3DCH) z ,,-I If connected toAV IN or AV IN1 input, select I"1"1...
... Audio Right = red) I c Operate the corresponding external equipment. 26/32LG3DCH, 32LG3DC model Camcorder Video Game Set 22LG3DCH model Camcorder Video Game Set 24 EXTERNALEQUIPMENT SETUP OTHERA/V SOURCESETUP 1. How to use I"1"1 ,0 c Select the AV2 input source on the TV using the INPUT ...button on the remote control. (Except I"1"1 22LG3DCH) z ,,-I If connected toAV IN or AV IN1 input, select I"1"1...
Owners Manual
Page 27
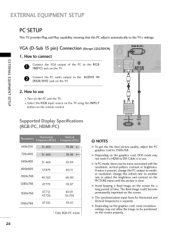
...audio output to use . 640x480 800x600 1024x768 31.469 59.94 3Z879 60.31 48.363 60.00 In PC mode. EXTERNALEQUIPMENT SETUP PC SETUP This TV provides Plug and Play capability, meaning that the PC adjusts automatically to DVI Cable is clear. 1280x768 47.776 59....87 Avoid keeping a fixed image on the screen for Horizontal and 1366x768 4Z130 59.65 Vertical frequencies is separate. VGA (D-Sub 15 pin) Connection (Excep2t2LG3DCH) 1....
...audio output to use . 640x480 800x600 1024x768 31.469 59.94 3Z879 60.31 48.363 60.00 In PC mode. EXTERNALEQUIPMENT SETUP PC SETUP This TV provides Plug and Play capability, meaning that the PC adjusts automatically to DVI Cable is clear. 1280x768 47.776 59....87 Avoid keeping a fixed image on the screen for Horizontal and 1366x768 4Z130 59.65 Vertical frequencies is separate. VGA (D-Sub 15 pin) Connection (Excep2t2LG3DCH) 1....

Owners Manual
Page 29
m x m _o z Screen c, Move _P .... Select the desired resolution. Select Resolution. EXTERNALEQUIPMENT SETUP Screen Setup for PC mode (Excep2t 2LG3DCH) Selecting Resolution You can also adjust Screen(RGB-PC) in RGB mode. Return to TV viewing. _You can choose the resolution in the PICTURE menu. 28 Reso_tio_ _ J 1024x768 m 1280 x 768 X_ AUto config. 1360 x 768 c "O Posi_n 1366 x 768 m Size z Phase L_ m Reset c "O Press the ADJUST button. The Position, Phase, and Size can also be adjusted.
m x m _o z Screen c, Move _P .... Select the desired resolution. Select Resolution. EXTERNALEQUIPMENT SETUP Screen Setup for PC mode (Excep2t 2LG3DCH) Selecting Resolution You can also adjust Screen(RGB-PC) in RGB mode. Return to TV viewing. _You can choose the resolution in the PICTURE menu. 28 Reso_tio_ _ J 1024x768 m 1280 x 768 X_ AUto config. 1360 x 768 c "O Posi_n 1366 x 768 m Size z Phase L_ m Reset c "O Press the ADJUST button. The Position, Phase, and Size can also be adjusted.

Owners Manual
Page 31
... to TV viewing. :: _ Position: This function is not clear after auto adjustment and especially if characters are still trembling, adjust the picture phase manually. EXTERNALEQUIPMENT SETUP Adjustment for screen Position, Size, and Phase If the picture is to adjust picture to left/right and up/down as you to remove any...
... to TV viewing. :: _ Position: This function is not clear after auto adjustment and especially if characters are still trembling, adjust the picture phase manually. EXTERNALEQUIPMENT SETUP Adjustment for screen Position, Size, and Phase If the picture is to adjust picture to left/right and up/down as you to remove any...

Owners Manual
Page 60
z c Select TV Speaker. Return to the previous menu. l'rl N 0 Z Select 0 n or Off. .-I 0 Return to TV viewing. 59 TV SPEAKERSON/OFF SETUP Turn the TV speakers off if using external audio equipment. 0 c Z Select AUDIO.
z c Select TV Speaker. Return to the previous menu. l'rl N 0 Z Select 0 n or Off. .-I 0 Return to TV viewing. 59 TV SPEAKERSON/OFF SETUP Turn the TV speakers off if using external audio equipment. 0 c Z Select AUDIO.
Owners Manual
Page 68
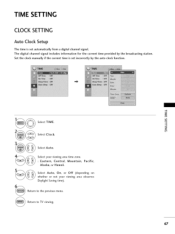
Select TIME. Select Auto. station. Select your viewing area observes Daylight Saving time). Return to TV viewing. 67 TIME SETTING CLOCK SETTING Auto Clock Setup The time is set automatically from a digital channel signal. Return to the previous menu. Pacific, Select Auto, On, or Off (depending on whether or not ...
Select TIME. Select Auto. station. Select your viewing area observes Daylight Saving time). Return to TV viewing. 67 TIME SETTING CLOCK SETTING Auto Clock Setup The time is set automatically from a digital channel signal. Return to the previous menu. Pacific, Select Auto, On, or Off (depending on whether or not ...
Owners Manual
Page 69
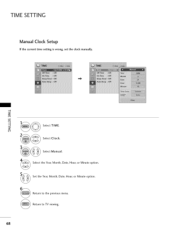
Select Manual. Select the Year, Month, Date, Hour, or Minute option. m m Select TIME. Set the Year, Month, Date, Hour, or Minute option. Return to TV viewing. 68 z c_ Select Clock. Return to the previous menu. TIME SETTING Manual Clock Setup If the current time setting is wrong, set the clock manually.
Select Manual. Select the Year, Month, Date, Hour, or Minute option. m m Select TIME. Set the Year, Month, Date, Hour, or Minute option. Return to TV viewing. 68 z c_ Select Clock. Return to the previous menu. TIME SETTING Manual Clock Setup If the current time setting is wrong, set the clock manually.

