Owners Manual
Page 1
before operating Record model number and serial number of the set . Life's Good LCD TV OWNER'S MANUAL 22LG3DCH 26LG3DCH 32LG3DCH 32LG3DC Please read this manual carefully your dealer when you require service. (Only 32LG3DC model) This product... qualifies for ENERGYSTAR in the "factory default (Home mode)" setting and this information to quality for future reference. P/NO : SAC30708026 (090S-REV09) Changing the factory default picture...
before operating Record model number and serial number of the set . Life's Good LCD TV OWNER'S MANUAL 22LG3DCH 26LG3DCH 32LG3DCH 32LG3DC Please read this manual carefully your dealer when you require service. (Only 32LG3DC model) This product... qualifies for ENERGYSTAR in the "factory default (Home mode)" setting and this information to quality for future reference. P/NO : SAC30708026 (090S-REV09) Changing the factory default picture...
Owners Manual
Page 6
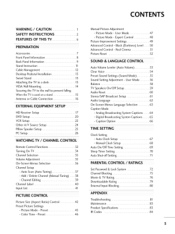
...Auto Scan (Auto Tuning 37 - Black (Darkness) Level....... 50 Advanced Control- Analog Broadcasting System Captions ....... 64 - Preset 46 Manual Picture Adjustment - CONTENTS WARNING / CAUTION 1 SAFETY INSTRUCTIONS 2 FEATURES OF THIS TV 6 PREPARATION Accessories 7 Front Panel Information 8 Back Panel.../ Delete Channel (Manual Tuning) ...... 38 - Channel Editing 39 Channel Label 40 Input List 41 PICTURE CONTROl. Picture Mode - Real Cinema 51 Picture Reset 52 SOUND & LANGUAGE CONTROL Auto Volume Leveler (Auto Volume 53 Clear Voice 54 Preset Sound ...
...Auto Scan (Auto Tuning 37 - Black (Darkness) Level....... 50 Advanced Control- Analog Broadcasting System Captions ....... 64 - Preset 46 Manual Picture Adjustment - CONTENTS WARNING / CAUTION 1 SAFETY INSTRUCTIONS 2 FEATURES OF THIS TV 6 PREPARATION Accessories 7 Front Panel Information 8 Back Panel.../ Delete Channel (Manual Tuning) ...... 38 - Channel Editing 39 Channel Label 40 Input List 41 PICTURE CONTROl. Picture Mode - Real Cinema 51 Picture Reset 52 SOUND & LANGUAGE CONTROL Auto Volume Leveler (Auto Volume 53 Clear Voice 54 Preset Sound ...
Owners Manual
Page 16
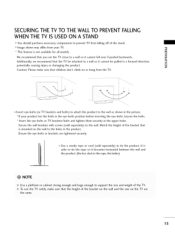
... in a forward direction, potentially causing injury or damaging the product. © z Caution: Please make sure that is safer to the wall as shown in the picture. Secure the wall brackets with screws (sold separately) to the wall. Ensure the eye-bolts or brackets are the same. 15 Insert the eye-bolts...
... in a forward direction, potentially causing injury or damaging the product. © z Caution: Please make sure that is safer to the wall as shown in the picture. Secure the wall brackets with screws (sold separately) to the wall. Ensure the eye-bolts or brackets are the same. 15 Insert the eye-bolts...
Owners Manual
Page 17
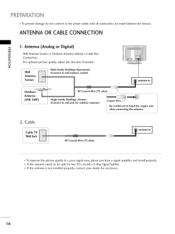
For optimum picture quality, adjust the direction if needed. © z , _ Multi-family Dwellings/Apartments Antenna Soc Wall e, enna socket) II Outdoor _" Antenna (VHF, UHHFF) ] RF Coaxial Wire (75 ... split for assistance. 16 CaNe Cable TV Wall Jack ....U..i...... If the antenna needs to bend the copper wire I when connecting the antenna. 2. To improve the picture quality in a poor signal area, please purchase a signal amplifier and install properly. Antenna (Analog or Digital) l-rl Wall Antenna Socket or Outdoor Antenna without a Cable...
For optimum picture quality, adjust the direction if needed. © z , _ Multi-family Dwellings/Apartments Antenna Soc Wall e, enna socket) II Outdoor _" Antenna (VHF, UHHFF) ] RF Coaxial Wire (75 ... split for assistance. 16 CaNe Cable TV Wall Jack ....U..i...... If the antenna needs to bend the copper wire I when connecting the antenna. 2. To improve the picture quality in a poor signal area, please purchase a signal amplifier and install properly. Antenna (Analog or Digital) l-rl Wall Antenna Socket or Outdoor Antenna without a Cable...
Owners Manual
Page 18
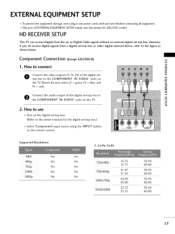
... IN VIDEO jacks on the remote control. m top box to connect m _D z > O Connect the video outputs (Y, PB, PR) of EXTERNAL EQUIPMENT SETUP mainly uses the picture for the digital set -top box. This part of the digital set- However, if you have finished connecting all equipment. HD RECEIVERSETUP This TV can...
... IN VIDEO jacks on the remote control. m top box to connect m _D z > O Connect the video outputs (Y, PB, PR) of EXTERNAL EQUIPMENT SETUP mainly uses the picture for the digital set -top box. This part of the digital set- However, if you have finished connecting all equipment. HD RECEIVERSETUP This TV can...
Owners Manual
Page 21
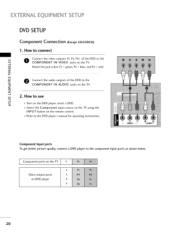
...) of the DVD to the component input ports as shown below. EXTERNALEQUIPMENT SETUP DVD SETUP Component Connection (Excep2t 2LG3DCH) 1. Component Input ports To get better picture quality, connect a DVD player to the COMPONENT IN AUDIO jacks on DVD player 2O
...) of the DVD to the component input ports as shown below. EXTERNALEQUIPMENT SETUP DVD SETUP Component Connection (Excep2t 2LG3DCH) 1. Component Input ports To get better picture quality, connect a DVD player to the COMPONENT IN AUDIO jacks on DVD player 2O
Owners Manual
Page 23
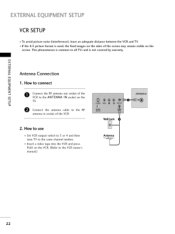
... visible on the sides of the VCR. 2. x r_l _o z Antenna Connection r_l X:) c 1. EXTERNALEQUIPMENT SETUP VCR SETUP _ To avoid picture noise (interference), leave an adequate distance between the VCR and TV. _ If the 4:3 picture format is common to the VCR owner's manual.) Wall Jack 22 c "0 Connect the antenna cable to connect "0 r_l z O CVConRnetcot...
... visible on the sides of the VCR. 2. x r_l _o z Antenna Connection r_l X:) c 1. EXTERNALEQUIPMENT SETUP VCR SETUP _ To avoid picture noise (interference), leave an adequate distance between the VCR and TV. _ If the 4:3 picture format is common to the VCR owner's manual.) Wall Jack 22 c "0 Connect the antenna cable to connect "0 r_l z O CVConRnetcot...
Owners Manual
Page 27
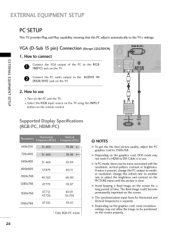
..., change the refresh rate to another rate or adjust the brightness and contrast on the PICTURE menu until the picture is clear. 1280x768 47.776 59.87 Avoid keeping a fixed image on the screen for Horizontal and 1366x768 4Z130 59.65 Vertical frequencies is in use -H m Turn on the PC and the ... mode on the screen. How to DVI Cable is separate. Supported Display Specifications (RGB°PC, HDM[oPC) NOTES 640x350 To get the the best picture quality, adjust the PC ii__ i i i !?!__,:i_! there may not allow the image to the AUDIO IN c (RGB/DVI) jack on the remote control....
..., change the refresh rate to another rate or adjust the brightness and contrast on the PICTURE menu until the picture is clear. 1280x768 47.776 59.87 Avoid keeping a fixed image on the screen for Horizontal and 1366x768 4Z130 59.65 Vertical frequencies is in use -H m Turn on the PC and the ... mode on the screen. How to DVI Cable is separate. Supported Display Specifications (RGB°PC, HDM[oPC) NOTES 640x350 To get the the best picture quality, adjust the PC ii__ i i i !?!__,:i_! there may not allow the image to the AUDIO IN c (RGB/DVI) jack on the remote control....

Owners Manual
Page 29
The Position, Phase, and Size can also be adjusted. Select Resolution. Return to TV viewing. _You can also adjust Screen(RGB-PC) in RGB mode. Reso_tio_ _ J 1024x768 m 1280 x 768 X_ AUto config. 1360 x 768 c "O Posi_n 1366 x 768 m Size z Phase L_ m Reset c "O Press the ADJUST button. EXTERNALEQUIPMENT SETUP Screen Setup for PC mode (Excep2t 2LG3DCH) Selecting Resolution You can choose the resolution in the PICTURE menu. 28 m x m _o z Screen c, Move _P .... Select the desired resolution.
The Position, Phase, and Size can also be adjusted. Select Resolution. Return to TV viewing. _You can also adjust Screen(RGB-PC) in RGB mode. Reso_tio_ _ J 1024x768 m 1280 x 768 X_ AUto config. 1360 x 768 c "O Posi_n 1366 x 768 m Size z Phase L_ m Reset c "O Press the ADJUST button. EXTERNALEQUIPMENT SETUP Screen Setup for PC mode (Excep2t 2LG3DCH) Selecting Resolution You can choose the resolution in the PICTURE menu. 28 m x m _o z Screen c, Move _P .... Select the desired resolution.
Owners Manual
Page 30
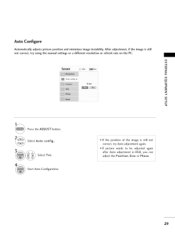
i¸...• If the position of the image is still not correct, try Auto adjustment again. • If picture needs to be adjusted again ii after Auto adjustment in RGB, you can ii adjust the Position, Size or Phase. 29 Select Yes. z Resolution Au_ ... manual settings or a different resolution or refresh rate on the PC. Select Auto config.. Start Auto Configuration. x r'rl Screen + mo_o Prey. Auto Configure Automatically adjusts picture position and minimizes image instability.
i¸...• If the position of the image is still not correct, try Auto adjustment again. • If picture needs to be adjusted again ii after Auto adjustment in RGB, you can ii adjust the Position, Size or Phase. 29 Select Yes. z Resolution Au_ ... manual settings or a different resolution or refresh rate on the PC. Select Auto config.. Start Auto Configuration. x r'rl Screen + mo_o Prey. Auto Configure Automatically adjusts picture position and minimizes image instability.

Owners Manual
Page 31
... z > Screen c, Move _ P.... The Phase adjustment range is -30 ~ 30. Return to TV viewing. :: _ Position: This function is to adjust picture to remove any vertical bars or stripes visible on the screen background. Select Position, Size, or Phase. r'rl / Resolution ,0 c _uto cOnfig. And the ...horizontal screen size will also change. EXTERNALEQUIPMENT SETUP Adjustment for screen Position, Size, and Phase If the picture is to minimize any horizontal noise and clear or sharpen the image of characters. Size: This function is not clear after auto...
... z > Screen c, Move _ P.... The Phase adjustment range is -30 ~ 30. Return to TV viewing. :: _ Position: This function is to adjust picture to remove any vertical bars or stripes visible on the screen background. Select Position, Size, or Phase. r'rl / Resolution ,0 c _uto cOnfig. And the ...horizontal screen size will also change. EXTERNALEQUIPMENT SETUP Adjustment for screen Position, Size, and Phase If the picture is to minimize any horizontal noise and clear or sharpen the image of characters. Size: This function is not clear after auto...
Owners Manual
Page 33
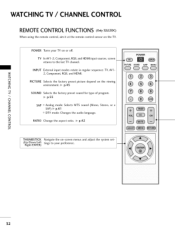
... type of program. _ p.SS N I > z SAP _:_Analog mode: Selects MTS sound (Mono, Stereo, or a z SAP) t_ p.61 fT1 o DTV mode: Changes the audio language. "T" PICTURE Selects the factory preset picture depend on -screen menus and adjust the system set- WATCHING TV / CHANNEL CONTROL REMOTE CONTROL FUNCTIONS (Only 32LG3DC) When using the remote control...
... type of program. _ p.SS N I > z SAP _:_Analog mode: Selects MTS sound (Mono, Stereo, or a z SAP) t_ p.61 fT1 o DTV mode: Changes the audio language. "T" PICTURE Selects the factory preset picture depend on -screen menus and adjust the system set- WATCHING TV / CHANNEL CONTROL REMOTE CONTROL FUNCTIONS (Only 32LG3DC) When using the remote control...
Owners Manual
Page 43
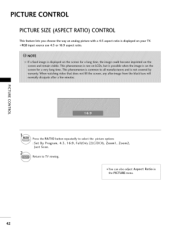
"O i N C _o m N O Z _o O Press the RATIO button repeatedly to select the picture options :Set By Program, Just Scan. 4:3, 1 6:9, Full(Only 22LG3DCH), Zoom1, Zoom2, Return to TV viewing. _You can also adjust Aspect Ratio in the PICTURE menu. 42 PICTURE CONTROL PICTURE SIZE (ASPECT RATIO) CONTROL This feature lets you choose the way an analog picture with a 4:3 aspect ratio is displayed on your TV. RGB input source use 4:3 or 16:9 aspect ratio.
"O i N C _o m N O Z _o O Press the RATIO button repeatedly to select the picture options :Set By Program, Just Scan. 4:3, 1 6:9, Full(Only 22LG3DCH), Zoom1, Zoom2, Return to TV viewing. _You can also adjust Aspect Ratio in the PICTURE menu. 42 PICTURE CONTROL PICTURE SIZE (ASPECT RATIO) CONTROL This feature lets you choose the way an analog picture with a 4:3 aspect ratio is displayed on your TV. RGB input source use 4:3 or 16:9 aspect ratio.
Owners Manual
Page 44
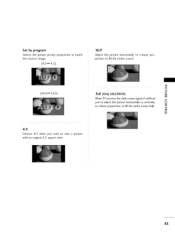
Set by program Selects the proper picture proportion to match the source'simage. (4:3"-_ 4:3) 16:9 Adjust the picture horizontally, in a linear proportion, to view a picture with an original 4:3 aspect ratio. 43 Z _D © 4:3 Choose 4:3 when you to adjust the picture horizontally or vertically, © in a linear proportion to fill the entire screen. (16:9"* 16:9) _3 Full (Only 22LG3DCH) c _D m When TV receives the wide screen signal, it will lead _3 you want to fill the entire screen fully.
Set by program Selects the proper picture proportion to match the source'simage. (4:3"-_ 4:3) 16:9 Adjust the picture horizontally, in a linear proportion, to view a picture with an original 4:3 aspect ratio. 43 Z _D © 4:3 Choose 4:3 when you to adjust the picture horizontally or vertically, © in a linear proportion to fill the entire screen. (16:9"* 16:9) _3 Full (Only 22LG3DCH) c _D m When TV receives the wide screen signal, it will lead _3 you want to fill the entire screen fully.

Owners Manual
Page 45
... are cropped 1-2%. Notes: If there is activated. C _o m Zoom 2 N © Choose Zoom 2 when you want the picture to view the picture without any alteration. DTV (720p/1080i/1080p), -O N m m I -DTV/DVI- PICTURE CONTROL Zoom 1 just Scan Choose Zoom 1 when you want to be cropped. Just Scan turns off between alteration and... Component(720p/1080i) input sources. f Normally the edges of the original signal, it will be Z altered, both vertically extended and cropped. _o © The picture taking a halfway trade off this cropping and shows the complete video.
... are cropped 1-2%. Notes: If there is activated. C _o m Zoom 2 N © Choose Zoom 2 when you want the picture to view the picture without any alteration. DTV (720p/1080i/1080p), -O N m m I -DTV/DVI- PICTURE CONTROL Zoom 1 just Scan Choose Zoom 1 when you want to be cropped. Just Scan turns off between alteration and... Component(720p/1080i) input sources. f Normally the edges of the original signal, it will be Z altered, both vertically extended and cropped. _o © The picture taking a halfway trade off this cropping and shows the complete video.
Owners Manual
Page 46
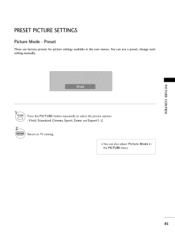
You can also adjust Picture Mode in the user menus. "O N C _o m N © Z _o © Press the PICTURE button repeatedly to TV viewing. _You can use a preset, change each setting manually. Preset There are factory presets for picture settings available in the PICTURE menu. 45 Return to select the picture options : Vivid, Standard, Cinema, Sport, Game and Expert1-2. PRESETPICTURE SETTINGS Picture Mode -
You can also adjust Picture Mode in the user menus. "O N C _o m N © Z _o © Press the PICTURE button repeatedly to TV viewing. _You can use a preset, change each setting manually. Preset There are factory presets for picture settings available in the PICTURE menu. 45 Return to select the picture options : Vivid, Standard, Cinema, Sport, Game and Expert1-2. PRESETPICTURE SETTINGS Picture Mode -

Owners Manual
Page 47
Select Cool, Medium, or Warm. Return to TV viewing. 46 "0 N C N 0 Z 0 Select PICTURE. Select Advanced Control. Select Color Temperature. Preset Choose one of three automatic color adjustments. Return to the previous menu. Set to warm to enhance hotter colors such as red, or set to cool to see less intense colors with more blue. PICTURE CONTROL Color Tone -
Select Cool, Medium, or Warm. Return to TV viewing. 46 "0 N C N 0 Z 0 Select PICTURE. Select Advanced Control. Select Color Temperature. Preset Choose one of three automatic color adjustments. Return to the previous menu. Set to warm to enhance hotter colors such as red, or set to cool to see less intense colors with more blue. PICTURE CONTROL Color Tone -
Owners Manual
Page 48
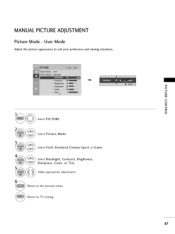
MANUAL PICTUREADJUSTMENT Picture Mode - User Mode Adjust the picture appearance to TV viewing. 47 Select Blacklight, Contrast, Brightness, Sharpness, Color, or Tint. Return to suit your preference and viewing situations. Make appropriate adjustments. "O N C m N O Z O Select PICTURE. Select Picture Mode. Select Vivid, Standard, Cinema, Sport, or Game. Return to the previous menu.
MANUAL PICTUREADJUSTMENT Picture Mode - User Mode Adjust the picture appearance to TV viewing. 47 Select Blacklight, Contrast, Brightness, Sharpness, Color, or Tint. Return to suit your preference and viewing situations. Make appropriate adjustments. "O N C m N O Z O Select PICTURE. Select Picture Mode. Select Vivid, Standard, Cinema, Sport, or Game. Return to the previous menu.

Owners Manual
Page 49
Expert Control Expert1 and Expert2 allow you set you own custom settings. Select Expert Control. Select your desired menu option. Select Picture Mode. PICTURE CONTROL Picture Mode - Return to the previous menu. "O N C m N © Z © Select PICTURE. Make appropriate adjustments. Select Expert1 or Expert2. Return to TV viewing. 48
Expert Control Expert1 and Expert2 allow you set you own custom settings. Select Expert Control. Select your desired menu option. Select Picture Mode. PICTURE CONTROL Picture Mode - Return to the previous menu. "O N C m N © Z © Select PICTURE. Make appropriate adjustments. Select Expert1 or Expert2. Return to TV viewing. 48

Owners Manual
Page 50
... your desired options. Return to the point where it does not damage the original picture. Gamma: High gamma values display whitish images and low gamma values display high contrast images. Select Fresh Contrast, Fresh Color, Noise Reduction,... or Gamma. Noise Reduction: Removes interference up to TV viewing. 49 Select Advanced Control. PICTURE IMPROVEMENT SETTINGS Fresh Contrast: Optimizes the contrast automatically according to reproduce as close as possible natural colors. Fresh Color: Adjusts the color of the ...
... your desired options. Return to the point where it does not damage the original picture. Gamma: High gamma values display whitish images and low gamma values display high contrast images. Select Fresh Contrast, Fresh Color, Noise Reduction,... or Gamma. Noise Reduction: Removes interference up to TV viewing. 49 Select Advanced Control. PICTURE IMPROVEMENT SETTINGS Fresh Contrast: Optimizes the contrast automatically according to reproduce as close as possible natural colors. Fresh Color: Adjusts the color of the ...

