KM-NET Viewer Operation Guide Rev-5.2-2010.10
Page 51
... Overwrite settings on one category of settings can click Edit settings to a log file. Click Next. 3 The Confirmation page shows a list of device accounts with information about print, copy, scan and FAX counts. The file is selected in .XML format. 5 Click Finish. 4-9 Click Close. You have made .... want to the destination device. The settings are copied from the current software version (*.xml) 3 Click Open, and then click Next. 4 The Confirmation page shows a list of the errors. If you have the option to open a dialog box to make changes to the settings. Click Save,...
... Overwrite settings on one category of settings can click Edit settings to a log file. Click Next. 3 The Confirmation page shows a list of device accounts with information about print, copy, scan and FAX counts. The file is selected in .XML format. 5 Click Finish. 4-9 Click Close. You have made .... want to the destination device. The settings are copied from the current software version (*.xml) 3 Click Open, and then click Next. 4 The Confirmation page shows a list of the errors. If you have the option to open a dialog box to make changes to the settings. Click Save,...
KM-NET Viewer Operation Guide Rev-5.2-2010.10
Page 58
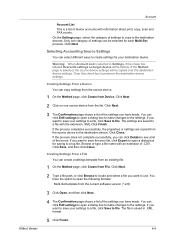
... or type a file name with the extension .XML.Click Finish. Device Address Book Number, Name, Furigana (if applicable), E-mail, FTP address, SMB address, FAX, Internet FAX addresses, and address groups. Click Next. 2 Click on the device, and administrator access permission. If the process does not complete successfully, you want to save...can create a settings template from an existing file. 1 On the Method page, click Create from Device. These settings vary by device. Click Next. 3 The Confirmation page shows a list of the errors. If you have the option to the destination device.
... or type a file name with the extension .XML.Click Finish. Device Address Book Number, Name, Furigana (if applicable), E-mail, FTP address, SMB address, FAX, Internet FAX addresses, and address groups. Click Next. 2 Click on the device, and administrator access permission. If the process does not complete successfully, you want to save...can create a settings template from an existing file. 1 On the Method page, click Create from Device. These settings vary by device. Click Next. 3 The Confirmation page shows a list of the errors. If you have the option to the destination device.

FS-C2026MFP/C2126MFP Operation Guide
Page 252
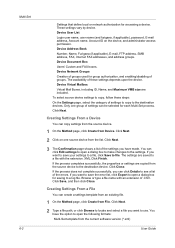
... Menu/Count. Sound Set options for buzzer sound during the machine operations. Emit a sound when a print job is used. Sound: a b *1 **B*u*z*z*e*r 2 FAX Speaker 3 FAX Monitor [ Exit ] 3 Press the U or V key to select [Buzzer]. 8-6 Completed. Menu/Count.: a b 4 User/Job Account 5 User Property ... sound when errors occur. is a default setting. Item Value Key Off, On * Confirmation Job Finish Off*, On Ready Off*, On Warning Off, On* Keyboard Confirm Off*, On Description Emit a sound when the control panel are pressed. The asterisk in...
... Menu/Count. Sound Set options for buzzer sound during the machine operations. Emit a sound when a print job is used. Sound: a b *1 **B*u*z*z*e*r 2 FAX Speaker 3 FAX Monitor [ Exit ] 3 Press the U or V key to select [Buzzer]. 8-6 Completed. Menu/Count.: a b 4 User/Job Account 5 User Property ... sound when errors occur. is a default setting. Item Value Key Off, On * Confirmation Job Finish Off*, On Ready Off*, On Warning Off, On* Keyboard Confirm Off*, On Description Emit a sound when the control panel are pressed. The asterisk in...

FS-C2026MFP/C2126MFP Operation Guide
Page 316
You can register one of the following sending function options. • Select Key Set ...8-70 • Destination confirmation screen before transmission ...8-72 NOTE: If user login administration is enabled, you can quickly set the function when using...Orig.Orientation • Continuous Scan • File Format • File Name Entry • Subject/Body • JobFinish Notice • FAX Resolution • FAX Direct TX • FAX Delayed TX • FAX RX Polling • Density • Duplex • FTP Encrypted TX • File Separation • Sharpness • Backgrnd Density ...
You can register one of the following sending function options. • Select Key Set ...8-70 • Destination confirmation screen before transmission ...8-72 NOTE: If user login administration is enabled, you can quickly set the function when using...Orig.Orientation • Continuous Scan • File Format • File Name Entry • Subject/Body • JobFinish Notice • FAX Resolution • FAX Direct TX • FAX Delayed TX • FAX RX Polling • Density • Duplex • FTP Encrypted TX • File Separation • Sharpness • Backgrnd Density ...

FS-C2026MFP/C2126MFP Operation Guide
Page 478
...or V key to display and reset the counter. 11-28 is reset. z Total JobAccounting 9 Press the OK key. If you sure? A confirmation screen appears. [ Yes ] [ No ] 10 Press [Yes] (the Left Select key). The counter is displayed and the screen returns to ... Y or Z key to select the function of pages for each account and resets the counts by account. Management Total Accounting:a b *1**P*r*i*n*t*e*d**P*a*g*e*s****** 2 Scanned Pages 3 FAX TX Pages [ Exit ] 5 Press the OK key. The Total Accounting menu appears. Copy/Print Pages:C b Copy(B & W): 1/5 1234567 6 Press the ...
...or V key to display and reset the counter. 11-28 is reset. z Total JobAccounting 9 Press the OK key. If you sure? A confirmation screen appears. [ Yes ] [ No ] 10 Press [Yes] (the Left Select key). The counter is displayed and the screen returns to ... Y or Z key to select the function of pages for each account and resets the counts by account. Management Total Accounting:a b *1**P*r*i*n*t*e*d**P*a*g*e*s****** 2 Scanned Pages 3 FAX TX Pages [ Exit ] 5 Press the OK key. The Total Accounting menu appears. Copy/Print Pages:C b Copy(B & W): 1/5 1234567 6 Press the ...

Kyocera Command Center Operation Guide Rev 6.3
Page 11
...Full Color). For more information, refer to Basic > Defaults > Address Book > Groups on page 3-14. For more information, refer to the Kyocera Mita Corporation web sites. Scanner This allows you to Rule3) on page 3-51; Visit the following web site for each operation. for IPSec, refer...> Security > IPSec > Rule1 (to verify the settings made on the Basic and the Printer pages. for IEEE802.1x, refer to confirm the log of pages copied, faxed, and other (scanned), respectively. Device/Printer This allows you to Advanced > Security > IEEE802.1x on page 3-53. For more ...
...Full Color). For more information, refer to Basic > Defaults > Address Book > Groups on page 3-14. For more information, refer to the Kyocera Mita Corporation web sites. Scanner This allows you to Rule3) on page 3-51; Visit the following web site for each operation. for IPSec, refer...> Security > IPSec > Rule1 (to verify the settings made on the Basic and the Printer pages. for IEEE802.1x, refer to confirm the log of pages copied, faxed, and other (scanned), respectively. Device/Printer This allows you to Advanced > Security > IEEE802.1x on page 3-53. For more ...
Kyocera Command Center Operation Guide Rev 6.3
Page 15
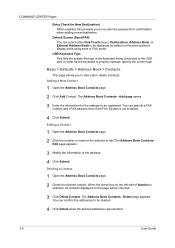
...specified by time of period before the machine reverts to normal mode, after the interrupt copy mode has been engaged. Except, the received FAXes are cleared automatically. The message is displayed when the machine's Start key is enabled and the printing speed increases. Interrupt Clear Time ...Off) the paper empty message when the MP tray becomes empty. The range is On. After you have changed the setting, you to confirm the destination to the print system operation guide. The additional information varies depending on the Job page. Dest(ination) Check Before Send This ...
...specified by time of period before the machine reverts to normal mode, after the interrupt copy mode has been engaged. Except, the received FAXes are cleared automatically. The message is displayed when the machine's Start key is enabled and the printing speed increases. Interrupt Clear Time ...Off) the paper empty message when the MP tray becomes empty. The range is On. After you have changed the setting, you to confirm the destination to the print system operation guide. The additional information varies depending on the Job page. Dest(ination) Check Before Send This ...
Kyocera Command Center Operation Guide Rev 6.3
Page 16
...the address. 4 Click Submit. Add page opens. 3 Enter the information for the address to be checked. 3 Click Delete Contact. You can confirm the addresses to be deleted. 4 Click Delete when the desired addresses are selected. 3-9 User Guide When the check box on the left side... port. Basic > Defaults > Address Book > Contacts This page allows you to re-enter the password for confirmation when adding a new destination. You can specify a FAX number and i-FAX address even if the FAX System is selected, all contacts displayed on the print system's display while using send or...
...the address. 4 Click Submit. Add page opens. 3 Enter the information for the address to be checked. 3 Click Delete Contact. You can confirm the addresses to be deleted. 4 Click Delete when the desired addresses are selected. 3-9 User Guide When the check box on the left side... port. Basic > Defaults > Address Book > Contacts This page allows you to re-enter the password for confirmation when adding a new destination. You can specify a FAX number and i-FAX address even if the FAX System is selected, all contacts displayed on the print system's display while using send or...
Kyocera Command Center Operation Guide Rev 6.3
Page 26
...of the items displayed on the Send and Forward page. Delete To delete a destination from the following section provides a summary of either FAX, FTP, SMB or E-mail to a shared folder on or off. The following : • Email - To add a destination, ... Settings, click the check box next to the destination, then click Delete. Scanner > Send and Forward When sending a FAX, FTP, SMB or a E-mail job, Send and Forward automatically forwards the same job to a folder, Login User.... 3-19 4 The Send and Forward page appears. Check that you accept the confirming prompt, click Delete.
...of the items displayed on the Send and Forward page. Delete To delete a destination from the following section provides a summary of either FAX, FTP, SMB or E-mail to a shared folder on or off. The following : • Email - To add a destination, ... Settings, click the check box next to the destination, then click Delete. Scanner > Send and Forward When sending a FAX, FTP, SMB or a E-mail job, Send and Forward automatically forwards the same job to a folder, Login User.... 3-19 4 The Send and Forward page appears. Check that you accept the confirming prompt, click Delete.
Kyocera Command Center Operation Guide Rev 6.3
Page 33
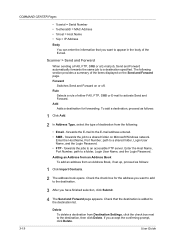
... type of phone line you are two types of telephone service that the Destination is added, faxes are Tone (DTMF) or Pulse (10pps), or Pulse (20pps). After confirming the settings, click Submit. Local FAX Number (Port 1/ 2) Specifies your FAX system ID. For how to register an address in an address book, refer to the...
... type of phone line you are two types of telephone service that the Destination is added, faxes are Tone (DTMF) or Pulse (10pps), or Pulse (20pps). After confirming the settings, click Submit. Local FAX Number (Port 1/ 2) Specifies your FAX system ID. For how to register an address in an address book, refer to the...
Kyocera Command Center Operation Guide Rev 6.3
Page 35
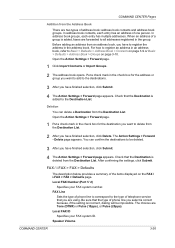
...display the Permit ID List - If you accept the confirming prompt, click Delete. Add Clicking Add will display the Permit Number List - Add page. Add page. COMMAND CENTER 3-28 COMMAND CENTER Pages FAX / i-FAX > FAX > FAX Restrictions > General The table below provides a summary of...Address Book. Enter in Permit FAX Number the FAX number to reject, then click Submit. Select Permit to permit reception of unknown numbered FAXes and select Reject to add, then click Submit. If you accept the confirming prompt, click Delete. FAX / i-FAX > FAX > FAX Restrictions > Permit ID List ...
...display the Permit ID List - If you accept the confirming prompt, click Delete. Add Clicking Add will display the Permit Number List - Add page. Add page. COMMAND CENTER 3-28 COMMAND CENTER Pages FAX / i-FAX > FAX > FAX Restrictions > General The table below provides a summary of...Address Book. Enter in Permit FAX Number the FAX number to reject, then click Submit. Select Permit to permit reception of unknown numbered FAXes and select Reject to add, then click Submit. If you accept the confirming prompt, click Delete. FAX / i-FAX > FAX > FAX Restrictions > Permit ID List ...
Kyocera Command Center Operation Guide Rev 6.3
Page 36
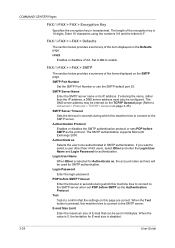
...name set here will be authenticated in seconds during which this machine tries to connect to confirm that can be sent in hexadecimal. The length of the item displayed on page 3-35). FAX / i-FAX > i-FAX > SMTP The section below provides a summary of the encryption key is pressed, this ... server when set POP before SMTP as the Authentication Protocol. When the value is disabled. 3-29 User Guide COMMAND CENTER Pages FAX / i-FAX > FAX > Encryption Key Specifies the encryption key in Kilobytes. SMTP Port Number Set the SMTP Port Number or use the SMTP default port...
...name set here will be authenticated in seconds during which this machine tries to connect to confirm that can be sent in hexadecimal. The length of the item displayed on page 3-35). FAX / i-FAX > i-FAX > SMTP The section below provides a summary of the encryption key is pressed, this ... server when set POP before SMTP as the Authentication Protocol. When the value is disabled. 3-29 User Guide COMMAND CENTER Pages FAX / i-FAX > FAX > Encryption Key Specifies the encryption key in Kilobytes. SMTP Port Number Set the SMTP Port Number or use the SMTP default port...
Kyocera Command Center Operation Guide Rev 6.3
Page 37
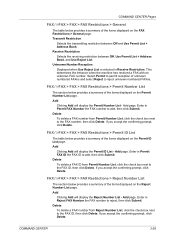
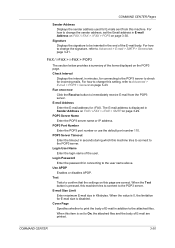
...the limitation for E-mail size is pressed, this page are printed. Signature Displays the signature to be inserted in Sender Address on FAX / i-FAX > i-FAX > SMTP on page 3-30. FAX / i-FAX > i-FAX > POP3 The section below provides a summary of the user. POP3 Port Number Enter the POP3 port number or use the ...setting, refer to the POP3 server. Login User Name Enter the login name of the items displayed on page 3-43. Test Tests to confirm that the settings on page 3-41. When the Test button is disabled. E-mail Size Limit Enter maximum E-mail size in addition to ...
...the limitation for E-mail size is pressed, this page are printed. Signature Displays the signature to be inserted in Sender Address on FAX / i-FAX > i-FAX > SMTP on page 3-30. FAX / i-FAX > i-FAX > POP3 The section below provides a summary of the user. POP3 Port Number Enter the POP3 port number or use the ...setting, refer to the POP3 server. Login User Name Enter the login name of the items displayed on page 3-43. Test Tests to confirm that the settings on page 3-41. When the Test button is disabled. E-mail Size Limit Enter maximum E-mail size in addition to ...
Kyocera Command Center Operation Guide Rev 6.3
Page 39
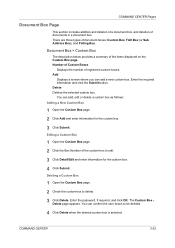
You can confirm the user boxes to be deleted. 4 Click Delete when the desired custom box is selected. Editing a Custom Box 1 Open the Custom Box page. 2 Click the ... page appears. Enter the required information and click the Submit button. Document Box > Custom Box The description below provides a summary of document boxes: Custom Box, FAX Box (or Sub Address Box), and Polling Box. Number of Custom Boxes Displays the number of documents in a document box. COMMAND CENTER Pages Document Box...
You can confirm the user boxes to be deleted. 4 Click Delete when the desired custom box is selected. Editing a Custom Box 1 Open the Custom Box page. 2 Click the ... page appears. Enter the required information and click the Submit button. Document Box > Custom Box The description below provides a summary of document boxes: Custom Box, FAX Box (or Sub Address Box), and Polling Box. Number of Custom Boxes Displays the number of documents in a document box. COMMAND CENTER Pages Document Box...
Kyocera Command Center Operation Guide Rev 6.3
Page 40
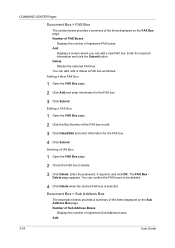
...2 Click the Box Number of the FAX box to be deleted. 4 Click Delete when the desired FAX box is selected. Document Box > Sub Address Box The description below provides a summary of the items displayed on the Sub Address Box page. You can confirm the FAX boxes to edit. 3 Click Detail/...Edit and enter information for the FAX box. 3 Click Submit. Add 3-33 User Guide You can add a new FAX box. Deleting a FAX Box 1 Open the FAX Box page. 2 Check the FAX box to delete. 3 Click Delete. Number ...
...2 Click the Box Number of the FAX box to be deleted. 4 Click Delete when the desired FAX box is selected. Document Box > Sub Address Box The description below provides a summary of the items displayed on the Sub Address Box page. You can confirm the FAX boxes to edit. 3 Click Detail/...Edit and enter information for the FAX box. 3 Click Submit. Add 3-33 User Guide You can add a new FAX box. Deleting a FAX Box 1 Open the FAX Box page. 2 Check the FAX box to delete. 3 Click Delete. Number ...

FS-C2126MFP Fax Operation Guide
Page 5
...Selection of Transmit Terminal Identification (TTI 2-3 Setting the TTI information 2-4 Date and Time Entry 2-6 3 FAX Operation (Basic) Automatic Send 3-2 FAX Automatic Reception 3-9 Cancelling Communication 3-12 Using the Address Book 3-15 Using One-touch Keys 3-26 Dialing... Status 5-2 Checking FAX Job History 5-3 Printing Administrative Reports 5-5 Reporting FAX Receipt Result by E-mail 5-11 Confirmation Screen of Destinations 5-13 6 Setup and Registration FAX/TEL Auto Switch Reception 6-2 FAX/Answering Machine Auto Switch Reception 6-4 FAX Country Code 6-6 ...
...Selection of Transmit Terminal Identification (TTI 2-3 Setting the TTI information 2-4 Date and Time Entry 2-6 3 FAX Operation (Basic) Automatic Send 3-2 FAX Automatic Reception 3-9 Cancelling Communication 3-12 Using the Address Book 3-15 Using One-touch Keys 3-26 Dialing... Status 5-2 Checking FAX Job History 5-3 Printing Administrative Reports 5-5 Reporting FAX Receipt Result by E-mail 5-11 Confirmation Screen of Destinations 5-13 6 Setup and Registration FAX/TEL Auto Switch Reception 6-2 FAX/Answering Machine Auto Switch Reception 6-4 FAX Country Code 6-6 ...

FS-C2126MFP Fax Operation Guide
Page 38
... press the Start key. This cancels the transmission. NOTE: Pressing the Stop key on page 5-13. For details, refer to Confirmation Screen of send job statuses appears. A list of Destinations on the operation panel while originals are being scanned cancels the transmission. ...3-8 Checking the Send Status 1 Press the Status/Job Cancel key. Send Start FAX Operation (Basic) 7 Press the Start key. Transmission begins. NOTE: When On is selected in Destination Check before Send, a destination confirmation screen is displayed when you want to select [Send Job Status]. 3 Press...
... press the Start key. This cancels the transmission. NOTE: Pressing the Stop key on page 5-13. For details, refer to Confirmation Screen of send job statuses appears. A list of Destinations on the operation panel while originals are being scanned cancels the transmission. ...3-8 Checking the Send Status 1 Press the Status/Job Cancel key. Send Start FAX Operation (Basic) 7 Press the Start key. Transmission begins. NOTE: When On is selected in Destination Check before Send, a destination confirmation screen is displayed when you want to select [Send Job Status]. 3 Press...

FS-C2126MFP Fax Operation Guide
Page 59
...Ready to Retry Times on the destination list. Recall information is canceled in Destination Check before Send, a destination confirmation screen is displayed when you log out 3-29 FAX Operation (Basic) Dialing the Same Receiving System (Redial) Redial is a function allowing you do not need to... automatically redials a receiving system that does not respond when you have tried to send fax. 3 No particular setting is waiting for automatic redial. When you want to send the fax to Confirmation Screen of automatic redials from between 0 and 14. The receiving system you dialed on...
...Ready to Retry Times on the destination list. Recall information is canceled in Destination Check before Send, a destination confirmation screen is displayed when you log out 3-29 FAX Operation (Basic) Dialing the Same Receiving System (Redial) Redial is a function allowing you do not need to... automatically redials a receiving system that does not respond when you have tried to send fax. 3 No particular setting is waiting for automatic redial. When you want to send the fax to Confirmation Screen of automatic redials from between 0 and 14. The receiving system you dialed on...

FS-C2126MFP Fax Operation Guide
Page 63
...Press the U or V key to select [Scheduled Job]. 3 Press the OK key. 4 Press the U or V key to select the job you press the Start key. FAX Operation (Advanced) Start Time: a b Hour Min. ***11*: 45 (Current Time 11:45) 7 Press the OK key. 8 Press the Y or Z key to check the... details of a scheduled job. Originals are scanned, and transmission begins at the preset time. NOTE: When On is selected in Destination Check before Send, a destination confirmation screen is displayed when you want to check. 5 Press [Menu] (the Right Select key). 6 Press the U or V key to select [Detail]. 7 ...
...Press the U or V key to select [Scheduled Job]. 3 Press the OK key. 4 Press the U or V key to select the job you press the Start key. FAX Operation (Advanced) Start Time: a b Hour Min. ***11*: 45 (Current Time 11:45) 7 Press the OK key. 8 Press the Y or Z key to check the... details of a scheduled job. Originals are scanned, and transmission begins at the preset time. NOTE: When On is selected in Destination Check before Send, a destination confirmation screen is displayed when you want to check. 5 Press [Menu] (the Right Select key). 6 Press the U or V key to select [Detail]. 7 ...

FS-C2126MFP Fax Operation Guide
Page 64
.... For details, refer to several destinations in one operation. In addition to fax, you to send the same originals to Destination confirmation screen before transmission in the Operation Guide for the machine. 1 Press the FAX key. 2 Place the originals. 3 Select the destination. For details, refer...On is displayed for the entered FAX number. You can enter the next fax number. You can select the destination by pressing the Address Book key. You can send originals to up to Sending in Entry Check for New Destination, a confirmation screen is selected in the ...
.... For details, refer to several destinations in one operation. In addition to fax, you to send the same originals to Destination confirmation screen before transmission in the Operation Guide for the machine. 1 Press the FAX key. 2 Place the originals. 3 Select the destination. For details, refer...On is displayed for the entered FAX number. You can enter the next fax number. You can select the destination by pressing the Address Book key. You can send originals to up to Sending in Entry Check for New Destination, a confirmation screen is selected in the ...


