AU-201H User Guide
Page 26
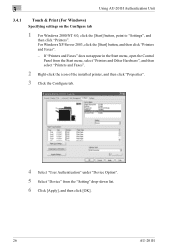
3 Using AU-201H Authentication Unit 3.4.1 Touch & Print (For Windows) Specifying settings on the Configure tab 1 For Windows 2000/NT 4.0, click the [Start] button, point to "Settings", and then click "Printers". For Windows XP/Server 2003, click the [Start] ..., select "Printers and Other Hardware", and then select "Printers and Faxes". 2 Right-click the icon of the installed printer, and then click "Properties". 3 Click the Configure tab. 4 Select "User Authentication" under "Device Option". 5 Select "Device" from the "Setting" drop-down list. 6 Click [Apply], and then click [OK]. 26 AU...
3 Using AU-201H Authentication Unit 3.4.1 Touch & Print (For Windows) Specifying settings on the Configure tab 1 For Windows 2000/NT 4.0, click the [Start] button, point to "Settings", and then click "Printers". For Windows XP/Server 2003, click the [Start] ..., select "Printers and Other Hardware", and then select "Printers and Faxes". 2 Right-click the icon of the installed printer, and then click "Properties". 3 Click the Configure tab. 4 Select "User Authentication" under "Device Option". 5 Select "Device" from the "Setting" drop-down list. 6 Click [Apply], and then click [OK]. 26 AU...
bizhub 652/552 Security Operations User Guide
Page 11
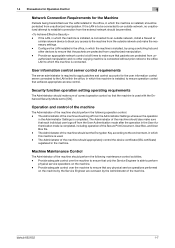
...the machine. - The Administrator of the machine. The Administrator of the machine should be protected from unauthorized manipulation. - bizhub 652/552 1-7 1.4 Precautions for Operation Control 1 Network Connection Requirements for the user information control server connected to the LAN within the...is to ensure operation control that the packets are overseen by the Service Engineer are protected from unauthorized manipulation. Configure the LAN installed in the office, in the machine. Security function operation setting operating requirements The Administrator should ...
...the machine. - The Administrator of the machine. The Administrator of the machine should be protected from unauthorized manipulation. - bizhub 652/552 1-7 1.4 Precautions for Operation Control 1 Network Connection Requirements for the user information control server connected to the LAN within the...is to ensure operation control that the packets are overseen by the Service Engineer are protected from unauthorized manipulation. Configure the LAN installed in the office, in the machine. Security function operation setting operating requirements The Administrator should ...

bizhub 652/552 CMS Replacement Instructions Guide
Page 6
the plug has pin/terminal(s) for grounding, and - provided with a plug having configuration intended for the prod- Use of inadequate cord set leads to the product connecting to inadequate power supply (voltage, current capacity, grounding), and may result ... regulatory requirements for the connection to fire or electric shock. • Attach power plug which meets the following criteria: - provided with three-conductor cable having configuration intended for the area.
the plug has pin/terminal(s) for grounding, and - provided with a plug having configuration intended for the prod- Use of inadequate cord set leads to the product connecting to inadequate power supply (voltage, current capacity, grounding), and may result ... regulatory requirements for the connection to fire or electric shock. • Attach power plug which meets the following criteria: - provided with three-conductor cable having configuration intended for the area.

bizhub 652/552 CMS Replacement Instructions Guide
Page 7
... reliability, the CE must not exceed the rating of the wall outlet. Connection to wrong voltage supply may be plugged into wall outlet having same configuration as specified. However, in daily use, any electrical equipment may result in fire or electric shock. • Connect power plug directly into the wall outlet... of an adapter leads to the product connecting to parts wear and eventual failure. SAFETY AND IMPORTANT WARNING ITEMS [3] CHECKPOINTS WHEN PERFORMING ON-SITE SERVICE KONICA MINOLTA brand products are met, in order to grounded wall outlet.
... reliability, the CE must not exceed the rating of the wall outlet. Connection to wrong voltage supply may be plugged into wall outlet having same configuration as specified. However, in daily use, any electrical equipment may result in fire or electric shock. • Connect power plug directly into the wall outlet... of an adapter leads to the product connecting to parts wear and eventual failure. SAFETY AND IMPORTANT WARNING ITEMS [3] CHECKPOINTS WHEN PERFORMING ON-SITE SERVICE KONICA MINOLTA brand products are met, in order to grounded wall outlet.
bizhub 652/552 Enlarge Display Operations User Guide
Page 2
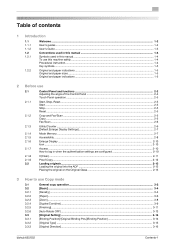
... ...2-6 [Default Enlarge Display Settings]...2-7 Mode Memory...2-7 Accessibility ...2-8 Enlarge Display ...2-10 Icon ...2-10 Access ...2-10 How to log in when the authentication settings are configured 2-10 C(Clear) ...2-11 Proof Copy...2-12 Loading originals...2-13 Loading the original into the ADF ...2-13 Placing the original on the Original Glass 2-13 3 .../Combine] ...3-9 [Finishing] ...3-11 [Auto Rotate OFF] ...3-13 [Original Setting] ...3-14 [Binding Position]/[Original Binding Pos.](Binding Position 3-14 [Original Type] ...3-15 [Original Direction]...3-16 bizhub 652/552 Contents-1
... ...2-6 [Default Enlarge Display Settings]...2-7 Mode Memory...2-7 Accessibility ...2-8 Enlarge Display ...2-10 Icon ...2-10 Access ...2-10 How to log in when the authentication settings are configured 2-10 C(Clear) ...2-11 Proof Copy...2-12 Loading originals...2-13 Loading the original into the ADF ...2-13 Placing the original on the Original Glass 2-13 3 .../Combine] ...3-9 [Finishing] ...3-11 [Auto Rotate OFF] ...3-13 [Original Setting] ...3-14 [Binding Position]/[Original Binding Pos.](Binding Position 3-14 [Original Type] ...3-15 [Original Direction]...3-16 bizhub 652/552 Contents-1

bizhub 652/552 Enlarge Display Operations User Guide
Page 3
... Original] ...3-18 4 How to use Fax/Scan mode 4.1 4.2 4.2.1 4.2.2 4.2.3 4.2.4 4.3 4.3.1 4.3.2 4.3.3 4.3.4 4.3.5 4.3.6 4.3.7 4.3.8 4.3.9 4.4 General fax/scan operation...4-2 Configuring destinations ...4-4 Transmission options ...4-4 Configuring the destinations ...4-4 [Address Book]...4-5 [Job History] ...4-6 [Address Search]...4-7 [Fax Number]...4-8 [Scan Settings] ...4-9 [Simplex/Duplex] ...4-9 [Original Type] ...4-10 [Resolution] ...4-11...Binding Position] ...4-16 [Destination Settings] ...4-17 5 Index 5.1 Index by item ...5-2 5.2 Index by button...5-3 bizhub 652/552 Contents-2
... Original] ...3-18 4 How to use Fax/Scan mode 4.1 4.2 4.2.1 4.2.2 4.2.3 4.2.4 4.3 4.3.1 4.3.2 4.3.3 4.3.4 4.3.5 4.3.6 4.3.7 4.3.8 4.3.9 4.4 General fax/scan operation...4-2 Configuring destinations ...4-4 Transmission options ...4-4 Configuring the destinations ...4-4 [Address Book]...4-5 [Job History] ...4-6 [Address Search]...4-7 [Fax Number]...4-8 [Scan Settings] ...4-9 [Simplex/Duplex] ...4-9 [Original Type] ...4-10 [Resolution] ...4-11...Binding Position] ...4-16 [Destination Settings] ...4-17 5 Index 5.1 Index by item ...5-2 5.2 Index by button...5-3 bizhub 652/552 Contents-2

bizhub 652/552 Enlarge Display Operations User Guide
Page 10
... using the hard keys in the Control Panel. For details on configuration using the Touch Panel, refer to "3 How to use Copy mode" and "4 How to use Fax/Scan mode" - - This section describes the configuration and operations in the enlarge display mode that are displayed. When... turned off machine operations. You can configure various settings by directly pressing the Touch Panel. Press this machine. bizhub 652/552 2-2 Reference "3 How to use Copy mode", "4 How to use Fax/Scan mode". d Reference For details on ...
... using the hard keys in the Control Panel. For details on configuration using the Touch Panel, refer to "3 How to use Copy mode" and "4 How to use Fax/Scan mode" - - This section describes the configuration and operations in the enlarge display mode that are displayed. When... turned off machine operations. You can configure various settings by directly pressing the Touch Panel. Press this machine. bizhub 652/552 2-2 Reference "3 How to use Copy mode", "4 How to use Fax/Scan mode". d Reference For details on ...
bizhub 652/552 Enlarge Display Operations User Guide
Page 11
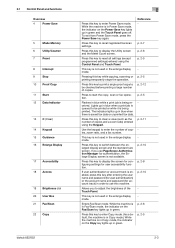
...the number of copies. Enters Fax/Scan mode. p. 2-11 p. 2-10 p. 2-8 p. 2-10 p. 2-6 p. 2-5 2-3 Press this key to display the screen for configuring settings for account track) in the enlarge display mode. 2.1 Control Panel and functions Overview 4 Power Save 5 Mode Memory 6 Utility/Counter 7 Reset 8 Interrupt 9 Stop ...14 Keypad 15 Guidance 16 Enlarge Display 17 Accessibility 18 Access 19 Brightness dial 20 User Box 21 Fax/Scan 22 Copy bizhub 652/552 2 Press this key to display the Utility screen and the Meter Count screen. Press this key to enter Power Save ...
...the number of copies. Enters Fax/Scan mode. p. 2-11 p. 2-10 p. 2-8 p. 2-10 p. 2-6 p. 2-5 2-3 Press this key to display the screen for configuring settings for account track) in the enlarge display mode. 2.1 Control Panel and functions Overview 4 Power Save 5 Mode Memory 6 Utility/Counter 7 Reset 8 Interrupt 9 Stop ...14 Keypad 15 Guidance 16 Enlarge Display 17 Accessibility 18 Access 19 Brightness dial 20 User Box 21 Fax/Scan 22 Copy bizhub 652/552 2 Press this key to display the Utility screen and the Meter Count screen. Press this key to enter Power Save ...

bizhub 652/552 Enlarge Display Operations User Guide
Page 14
bizhub 652/552 2-6 2.1 Control Panel and functions 2 Fax/Scan % Press the Fax/Scan key to configure or check the usage status of this machine. The basic settings screen for Fax/Scan mode appears. 2.1.3 Utility/Counter Press the Utility/Counter key to display the Utility screen, which allows you to enter Fax/scan mode. You can configure the default enlarge display settings in [User Settings].
bizhub 652/552 2-6 2.1 Control Panel and functions 2 Fax/Scan % Press the Fax/Scan key to configure or check the usage status of this machine. The basic settings screen for Fax/Scan mode appears. 2.1.3 Utility/Counter Press the Utility/Counter key to display the Utility screen, which allows you to enter Fax/scan mode. You can configure the default enlarge display settings in [User Settings].
bizhub 652/552 Enlarge Display Operations User Guide
Page 15
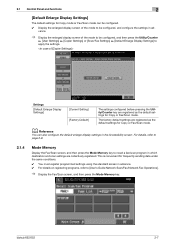
... key. Settings [Default Enlarge Display Settings] [Current Setting] [Factory Default] The settings configured before pressing the Utility/Counter key are registered as the default settings for Copy or Fax/Scan mode. The factory default settings are collectively registered. bizhub 652/552 2-7 For details, refer to page 2-8. 2.1.4 Mode Memory Display the Fax/Scan screen...
... key. Settings [Default Enlarge Display Settings] [Current Setting] [Factory Default] The settings configured before pressing the Utility/Counter key are registered as the default settings for Copy or Fax/Scan mode. The factory default settings are collectively registered. bizhub 652/552 2-7 For details, refer to page 2-8. 2.1.4 Mode Memory Display the Fax/Scan screen...

bizhub 652/552 Enlarge Display Operations User Guide
Page 16
... List] [Previous Page] [Next Page] [Main Screen] Select the desired program. bizhub 652/552 2-8 For details on adding an address, refer to the basic settings screen with the changed settings applied. Press this button to return to page 4-4. 2.1.5 Accessibility To configure the Control Panel settings or adjust the Touch Panel, press the Accessibility...
... List] [Previous Page] [Next Page] [Main Screen] Select the desired program. bizhub 652/552 2-8 For details on adding an address, refer to the basic settings screen with the changed settings applied. Press this button to return to page 4-4. 2.1.5 Accessibility To configure the Control Panel settings or adjust the Touch Panel, press the Accessibility...

bizhub 652/552 Enlarge Display Operations User Guide
Page 17
...[Interval] defines the time interval of a continuous operation when a button is kept pressed for a prolonged time. Configure this setting to display the screen that the message is to enter the enlarge display mode or continuing the operation ... Start key. • The check point buttons [+] can be correctly aligned with the actual position of the touch sensor. Configure this setting to select either [Factory Default] or [Current Setting]. • [Default Enlarge Display Settings] can be displayed.... screen. [Time To Start] defines the time before the Ac- bizhub 652/552 2-9
...[Interval] defines the time interval of a continuous operation when a button is kept pressed for a prolonged time. Configure this setting to display the screen that the message is to enter the enlarge display mode or continuing the operation ... Start key. • The check point buttons [+] can be correctly aligned with the actual position of the touch sensor. Configure this setting to select either [Factory Default] or [Current Setting]. • [Default Enlarge Display Settings] can be displayed.... screen. [Time To Start] defines the time before the Ac- bizhub 652/552 2-9

bizhub 652/552 Enlarge Display Operations User Guide
Page 18
... consumables must be managed for logging in the enlarge display mode. tings, those settings that appears differs depending on the authentication settings configured on the machine. 0 Alternately, the optional authentication unit can be replaced or the machine requires maintenance. Press the icon to the... contact your administrator of this machine. bizhub 652/552 2-10 For the necessary settings to log in to enlarge the message currently displayed. Press this machine can be used for logging in the enlarge display mode will be configured in to the standard size screen, ...
... consumables must be managed for logging in the enlarge display mode. tings, those settings that appears differs depending on the authentication settings configured on the machine. 0 Alternately, the optional authentication unit can be replaced or the machine requires maintenance. Press the icon to the... contact your administrator of this machine. bizhub 652/552 2-10 For the necessary settings to log in to enlarge the message currently displayed. Press this machine can be used for logging in the enlarge display mode will be configured in to the standard size screen, ...
bizhub 652/552 Enlarge Display Operations User Guide
Page 20
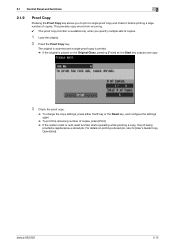
... key outputs one copy. 3 Check the proof copy. % To change the copy settings, press either the C key or the Reset key, and configure the settings again. % To print the remaining number of copies, press [Print]. % If the system reset or auto reset function starts operating while ...proofing a copy, the job being proofed is available only when you to [User's Guide Copy Operations]. bizhub 652/552 2-12 This prevents copy errors from occurring. 0 This proof copy function is registered as a stored job. 2.1 Control Panel and functions 2 2.1.9...
... key outputs one copy. 3 Check the proof copy. % To change the copy settings, press either the C key or the Reset key, and configure the settings again. % To print the remaining number of copies, press [Print]. % If the system reset or auto reset function starts operating while ...proofing a copy, the job being proofed is available only when you to [User's Guide Copy Operations]. bizhub 652/552 2-12 This prevents copy errors from occurring. 0 This proof copy function is registered as a stored job. 2.1 Control Panel and functions 2 2.1.9...

bizhub 652/552 Enlarge Display Operations User Guide
Page 23
... the number of copies was incorrectly entered, press the C (clear) key in the enlarge display mode. For details, refer to page 2-13. 3 Configure the desired copy settings. % For details on the Basic tab, refer to page 3-4. % For details on Original Setting, refer to the [User's Guide... Copy Operations]. d Reference For details on the Control Panel. bizhub 652/552 3-2 3.1 General copy operation 3 3 3.1 How to use Copy mode This section describes the basic copy operations in the keypad, and then enter the...
... the number of copies was incorrectly entered, press the C (clear) key in the enlarge display mode. For details, refer to page 2-13. 3 Configure the desired copy settings. % For details on the Basic tab, refer to page 3-4. % For details on Original Setting, refer to the [User's Guide... Copy Operations]. d Reference For details on the Control Panel. bizhub 652/552 3-2 3.1 General copy operation 3 3 3.1 How to use Copy mode This section describes the basic copy operations in the keypad, and then enter the...

bizhub 652/552 Enlarge Display Operations User Guide
Page 24
...password for each other. If they are scanned at the same time, you enter the password. - The setting configured last is given priority. (The setting configured first is given priority. (A warning message appears.) - If multiple originals with copy guard patterns embedded is scanned...can scan the next original. 3.1 General copy operation 3 5 Press the Start key. The original is discarded. - The setting configured first is canceled.) - bizhub 652/552 3-3 Some settings cannot be given priorities in either of the two ways described below. - For details, refer to display [Next ...
...password for each other. If they are scanned at the same time, you enter the password. - The setting configured last is given priority. (The setting configured first is given priority. (A warning message appears.) - If multiple originals with copy guard patterns embedded is scanned...can scan the next original. 3.1 General copy operation 3 5 Press the Start key. The original is discarded. - The setting configured first is canceled.) - bizhub 652/552 3-3 Some settings cannot be given priorities in either of the two ways described below. - For details, refer to display [Next ...
bizhub 652/552 Enlarge Display Operations User Guide
Page 25
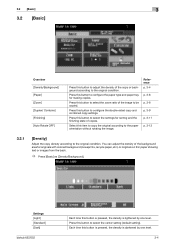
... state of the background area for making copies. Settings [Light] [Standard] [Dark] bizhub 652/552 Each time this button is pressed, the density is darkened by one level. 3-4 Press this button to the original condition. Press this button to configure the paper type and paper tray for originals with colored background (newsprints, recycle... according to the paper orientation without rotating the image. Press this item to copy the original according to the original condition. Select this button to configure the double-sided copy and combined copy settings.
... state of the background area for making copies. Settings [Light] [Standard] [Dark] bizhub 652/552 Each time this button is pressed, the density is darkened by one level. 3-4 Press this button to the original condition. Press this button to configure the paper type and paper tray for originals with colored background (newsprints, recycle... according to the paper orientation without rotating the image. Press this item to copy the original according to the original condition. Select this button to configure the double-sided copy and combined copy settings.
bizhub 652/552 Enlarge Display Operations User Guide
Page 27
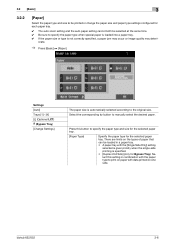
... button to the original size. 3.2 [Basic] 3 3.2.2 [Paper] Select the paper type and size to be printed or change the paper size and paper type settings configured for the selected paper tray. Press this button to specify the paper type and size for the selected paper tray. [Paper Type] Specify the paper...) # (Bypass Tray) [Change Settings] The paper size is not correctly specified, a paper jam may occur or image quality may deteri- orate. % Press [Basic] ö [Paper]. bizhub 652/552 3-6
... button to the original size. 3.2 [Basic] 3 3.2.2 [Paper] Select the paper type and size to be printed or change the paper size and paper type settings configured for the selected paper tray. Press this button to specify the paper type and size for the selected paper tray. [Paper Type] Specify the paper...) # (Bypass Tray) [Change Settings] The paper size is not correctly specified, a paper jam may occur or image quality may deteri- orate. % Press [Basic] ö [Paper]. bizhub 652/552 3-6

bizhub 652/552 Enlarge Display Operations User Guide
Page 28
...only for Bypass Tray): Select the loaded paper size from the registered custom sizes. When other than the original size can be configured when no paper in the paper tray, the icon indicating remaining paper quantities appears. When very few sheets of paper remain ... Side] [Thick 1+] [Duplex 2nd Side] [Thick 2] [Duplex 2nd Side] [Thick 3] [Duplex 2nd Side] [Thick 4] [Duplex 2nd Side] [User Paper 1] bizhub 652/552 3-7 3.2 [Basic] 3 Settings [Change Settings] [Main Screen] [Paper Size] When you have selected Tray 1/2 or Bypass Tray, press this button to return to specify...
...only for Bypass Tray): Select the loaded paper size from the registered custom sizes. When other than the original size can be configured when no paper in the paper tray, the icon indicating remaining paper quantities appears. When very few sheets of paper remain ... Side] [Thick 1+] [Duplex 2nd Side] [Thick 2] [Duplex 2nd Side] [Thick 3] [Duplex 2nd Side] [Thick 4] [Duplex 2nd Side] [User Paper 1] bizhub 652/552 3-7 3.2 [Basic] 3 Settings [Change Settings] [Main Screen] [Paper Size] When you have selected Tray 1/2 or Bypass Tray, press this button to return to specify...

bizhub 652/552 Enlarge Display Operations User Guide
Page 31
... binding position. 3.2 [Basic] Settings [Original Direction] [Original Binding Pos.] [Output Bind Direction] [Main Screen] 3 When scanning double-sided originals or configuring double-sided or combined copy settings, specify the direction of the original to the basic settings screen with the changed settings applied. A copy binding position... along the long side of the paper is automatically set either at the top or at the left. bizhub 652/552 3-10 A copy binding position along the short side of the paper is selected if the original length is 11-11...
... binding position. 3.2 [Basic] Settings [Original Direction] [Original Binding Pos.] [Output Bind Direction] [Main Screen] 3 When scanning double-sided originals or configuring double-sided or combined copy settings, specify the direction of the original to the basic settings screen with the changed settings applied. A copy binding position... along the long side of the paper is automatically set either at the top or at the left. bizhub 652/552 3-10 A copy binding position along the short side of the paper is selected if the original length is 11-11...


