
FTP Utility User Manual
Page 2
... receiving data sent from a multifunctional product, authenticates the user name and password, and saves the data in the specified receiving folder. 1.2 Trademarks and Registered Trademarks KONICA MINOLTA and the KONICA MINOLTA logo are either trademarks or registered trademarks of their respective companies. The ... appear on your computer, depending on the installed devices and specified settings. 2 Note Unauthorized reproduction, translation or duplication of KONICA MINOLTA HOLDINGS, INC. Dialog boxes The dialog boxes shown in this document may differ from those that appear in part, is...
... receiving data sent from a multifunctional product, authenticates the user name and password, and saves the data in the specified receiving folder. 1.2 Trademarks and Registered Trademarks KONICA MINOLTA and the KONICA MINOLTA logo are either trademarks or registered trademarks of their respective companies. The ... appear on your computer, depending on the installed devices and specified settings. 2 Note Unauthorized reproduction, translation or duplication of KONICA MINOLTA HOLDINGS, INC. Dialog boxes The dialog boxes shown in this document may differ from those that appear in part, is...

FTP Utility User Manual
Page 10
...receiving the data. In order to [KONICA MINOLTA], then [FTP Utility], and then click [FTP Utility]. FTP Utility Settings In the FTP Utility Settings dialog box, settings for the following parameters can be entered in the "User" and "Password" boxes differ depending on the multifunctional ...product, and a specific user name and password may be required. To receive data from a multifunctional product using the Scan to FTP operation...
...receiving the data. In order to [KONICA MINOLTA], then [FTP Utility], and then click [FTP Utility]. FTP Utility Settings In the FTP Utility Settings dialog box, settings for the following parameters can be entered in the "User" and "Password" boxes differ depending on the multifunctional ...product, and a specific user name and password may be required. To receive data from a multifunctional product using the Scan to FTP operation...

FTP Utility User Manual
Page 11
... the [OK] button. FTP Utility 4-2 If Data Cannot Be Received Correctly Check for the root folder (folder where received files are saved), user name, and password been correctly specified? Has FTP Utility been started up? -
... the [OK] button. FTP Utility 4-2 If Data Cannot Be Received Correctly Check for the root folder (folder where received files are saved), user name, and password been correctly specified? Has FTP Utility been started up? -

bizhub 181 GDI Print Controler User Manual
Page 62
...unit is entered with the machine's control panel. Using secure printing A password can data be specified for printing from a computer is temporarily saved in the machine's memory and is printed when the password is installed. Not only can be printed directly, but "Secure Print..." is also available, which requires a password for a document. Select this machine. Specifying printer driver settings 3 Output Method Select...
...unit is entered with the machine's control panel. Using secure printing A password can data be specified for printing from a computer is temporarily saved in the machine's memory and is printed when the password is installed. Not only can be printed directly, but "Secure Print..." is also available, which requires a password for a document. Select this machine. Specifying printer driver settings 3 Output Method Select...

bizhub 181 GDI Print Controler User Manual
Page 63
... application. Normal printing is performed when printing is sent. - The Print mode screen appears. 3-20 GDI Printer Controller Printing from the machine The password must be entered from the printer driver 1 Click the Setup tab. 2 From the "Output Method" drop-down list, select "Secure Print". ...3 Specifying printer driver settings Specifying secure printing from the control panel of the machine in order to type in the password. 3 Type in the printer driver. 1 Check that the "Printer" indicator is flashing or is lit, and then press the [Printer] key...
... application. Normal printing is performed when printing is sent. - The Print mode screen appears. 3-20 GDI Printer Controller Printing from the machine The password must be entered from the printer driver 1 Click the Setup tab. 2 From the "Output Method" drop-down list, select "Secure Print". ...3 Specifying printer driver settings Specifying secure printing from the control panel of the machine in order to type in the password. 3 Type in the printer driver. 1 Check that the "Printer" indicator is flashing or is lit, and then press the [Printer] key...

bizhub 181 GDI Print Controler User Manual
Page 64
Type in the password. - GDI Printer Controller 3-21 The key icon appears if the memory contains a secure print document. 3 Press the [Access] key. 4 When "PASSWORD: - - - -" appears, type in the same numbers specified as the password from the printer driver. Specifying printer driver settings 3 2 Check that the key icon appears in the upper-right corner of the screen. -
Type in the password. - GDI Printer Controller 3-21 The key icon appears if the memory contains a secure print document. 3 Press the [Access] key. 4 When "PASSWORD: - - - -" appears, type in the same numbers specified as the password from the printer driver. Specifying printer driver settings 3 2 Check that the key icon appears in the upper-right corner of the screen. -

bizhub 181 GDI Print Controler User Manual
Page 65
If the password is correct, the following screen appears, and the job is printed. 2 Note If there are multiple secure print jobs with the same password, all of those secure print jobs are printed. 3-22 GDI Printer Controller 3 Specifying printer driver settings 5 Check that the document can be printed.
If the password is correct, the following screen appears, and the job is printed. 2 Note If there are multiple secure print jobs with the same password, all of those secure print jobs are printed. 3-22 GDI Printer Controller 3 Specifying printer driver settings 5 Check that the document can be printed.
bizhub 181 GDI Print Controler User Manual
Page 88
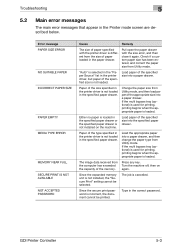
... SIZE ERROR NO SUITABLE PAPER INCORRECT PAPER SIZE PAPER EMPTY MEDIA TYPE ERROR MEMORY NEAR FULL SECURE PRINT IS NOT AVAILABLE NOT ACCEPTED PASSWORD Cause Remedy The size of paper specified with the size error, and then close it again. Either no paper is loaded in ...is used for printing, printing begins when the appropriate paper is not installed, the "Secure Print" setting cannot be printed. Since the secure print password is loaded. Load the appropriate paper into the specified paper drawer. GDI Printer Controller 5-3 If the multi bypass tray (optional) is used for ...
... SIZE ERROR NO SUITABLE PAPER INCORRECT PAPER SIZE PAPER EMPTY MEDIA TYPE ERROR MEMORY NEAR FULL SECURE PRINT IS NOT AVAILABLE NOT ACCEPTED PASSWORD Cause Remedy The size of paper specified with the size error, and then close it again. Either no paper is loaded in ...is used for printing, printing begins when the appropriate paper is not installed, the "Secure Print" setting cannot be printed. Since the secure print password is loaded. Load the appropriate paper into the specified paper drawer. GDI Printer Controller 5-3 If the multi bypass tray (optional) is used for ...

IC-206 User Manual
Page 16
... POP3 server address 7-29 Specifying the POP3 port number 7-31 Specifying the POP3 server connection timeout 7-32 Specifying the POP3 account 7-33 Specifying the POP3 password 7-34 IC-206 x-15
... POP3 server address 7-29 Specifying the POP3 port number 7-31 Specifying the POP3 server connection timeout 7-32 Specifying the POP3 account 7-33 Specifying the POP3 password 7-34 IC-206 x-15

IC-206 User Manual
Page 17
... search timeout 7-41 Specifying the maximum number of search items 7-41 Selecting the authentication method 7-42 Specifying the LDAP account name 7-43 Specifying the LDAP password 7-44 Specifying the domain name 7-44 7.7 USER SETTING 7-46 Specifying the NTP server 7-46 Specifying the time zone 7-48 8 Registering destinations 8.1 Registering destinations 8-1 Registering one...
... search timeout 7-41 Specifying the maximum number of search items 7-41 Selecting the authentication method 7-42 Specifying the LDAP account name 7-43 Specifying the LDAP password 7-44 Specifying the domain name 7-44 7.7 USER SETTING 7-46 Specifying the NTP server 7-46 Specifying the time zone 7-48 8 Registering destinations 8.1 Registering destinations 8-1 Registering one...

IC-206 User Manual
Page 84
...the Add Printer Wizard" on to log on page 2-15. IC-206 3-19 If the GDI driver is to be performed. For the password, consult with this machine.) Checking IPP-related settings from PageScope Web Connection For details on PageScope Web Connection, refer to "Using PageScope Web ...User's Guide for the GDI printer controller, included with the network administrator. 3 Click the Network tab, and then click "IPP Configuration" in the password to the Administrator mode. - If the check box is installed on the computer. (For details on installing the PCL driver, refer to "Installing...
...the Add Printer Wizard" on to log on page 2-15. IC-206 3-19 If the GDI driver is to be performed. For the password, consult with this machine.) Checking IPP-related settings from PageScope Web Connection For details on PageScope Web Connection, refer to "Using PageScope Web ...User's Guide for the GDI printer controller, included with the network administrator. 3 Click the Network tab, and then click "IPP Configuration" in the password to the Administrator mode. - If the check box is installed on the computer. (For details on installing the PCL driver, refer to "Installing...
IC-206 User Manual
Page 86
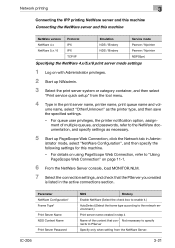
...7 Select the connection settings, and check that con- Parameter NetWare Configuration* Frame Type* Print Server Name NDS Context Name Print Server Password IC-206 NDS Bindery Enable NetWare (Select the check box to enable it.) AutoDetect (Select the frame type according to the network ...Connection" on with Administrator privileges. 2 Start up PageScope Web Connection, click the Network tab in step 4 Name of multiple queues, and passwords, refer to PServer Specify only when setting from the tool menu. 4 Type in the active connections section. For queue user privileges, the...
...7 Select the connection settings, and check that con- Parameter NetWare Configuration* Frame Type* Print Server Name NDS Context Name Print Server Password IC-206 NDS Bindery Enable NetWare (Select the check box to enable it.) AutoDetect (Select the frame type according to the network ...Connection" on with Administrator privileges. 2 Start up PageScope Web Connection, click the Network tab in step 4 Name of multiple queues, and passwords, refer to PServer Specify only when setting from the tool menu. 4 Type in the active connections section. For queue user privileges, the...

IC-206 User Manual
Page 87
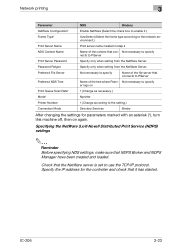
...Bindry After changing the settings for the copier. - For queue user privileges, the printer notification option, assignment of multiple queues, and passwords, refer to PServer Preferred NDS Tree Name of the file server that connects to the NetWare documentation, and specify settings as the printer... type, and then save the specified settings. - 3 Network printing Parameter NDS Bindery Password Retype Specify only when setting from the "Tools" menu. 4 Type in step4 is displayed for Printer0 and that it is listed as ...
...Bindry After changing the settings for the copier. - For queue user privileges, the printer notification option, assignment of multiple queues, and passwords, refer to PServer Preferred NDS Tree Name of the file server that connects to the NetWare documentation, and specify settings as the printer... type, and then save the specified settings. - 3 Network printing Parameter NDS Bindery Password Retype Specify only when setting from the "Tools" menu. 4 Type in step4 is displayed for Printer0 and that it is listed as ...
IC-206 User Manual
Page 88
... logs on Print Queue Scan Rate* 1 (Change as necessary.) Mode* Nprinter Printer Number 1 (Change according to PServer Print Server Password Specify only when setting from the NetWare Server. IC-206 3-23 Specify the IP address for parameters marked with an asterisk (*), turn... environment.) Print Server Name Print server name created in step 4 NDS Context Name Name of the context that it has started. Password Retype Specify only when setting from the NetWare Server. Specifying the NetWare 5.x/6 Novell Distributed Print Service (NDPS) settings 2 Reminder Before...
... logs on Print Queue Scan Rate* 1 (Change as necessary.) Mode* Nprinter Printer Number 1 (Change according to PServer Print Server Password Specify only when setting from the NetWare Server. IC-206 3-23 Specify the IP address for parameters marked with an asterisk (*), turn... environment.) Print Server Name Print server name created in step 4 NDS Context Name Name of the context that it has started. Password Retype Specify only when setting from the NetWare Server. Specifying the NetWare 5.x/6 Novell Distributed Print Service (NDPS) settings 2 Reminder Before...

IC-206 User Manual
Page 109
... "Secure Print" is available only if the optional expanded memory unit is entered with the machine's control panel. Using secure printing A password can data be specified for printing from a computer is temporarily saved in the machine's memory and is printed when the... password is installed. Not only can be printed directly, but "Secure Print" is also available, which requires a password for a document. The document printed from this setting when printing highly confidential documents. 4-20...
... "Secure Print" is available only if the optional expanded memory unit is entered with the machine's control panel. Using secure printing A password can data be specified for printing from a computer is temporarily saved in the machine's memory and is printed when the... password is installed. Not only can be printed directly, but "Secure Print" is also available, which requires a password for a document. The document printed from this setting when printing highly confidential documents. 4-20...

IC-206 User Manual
Page 110
... Setup tab. 2 From the "Output Method" drop-down list, select "Secure Print". Printing from the machine The password must be entered from the control panel of the machine in order to type in the password. 3 Type in the printer driver. 1 Check that the "Printer" indicator is flashing or is sent. - IC-206... 4-21 Specify the 4-digit password between 0000 and 9999. 4 The print job is lit, and then press the [...
... Setup tab. 2 From the "Output Method" drop-down list, select "Secure Print". Printing from the machine The password must be entered from the control panel of the machine in order to type in the password. 3 Type in the printer driver. 1 Check that the "Printer" indicator is flashing or is sent. - IC-206... 4-21 Specify the 4-digit password between 0000 and 9999. 4 The print job is lit, and then press the [...

IC-206 User Manual
Page 111
4 Specifying printer driver settings 2 Check that the key icon appears in the same numbers specified as the password from the printer driver. 4-22 IC-206 Type in the upper-right corner of the screen. - The key icon appears if the memory contains a secure print document. 3 Press the [Access] key. 4 When "PASSWORD: - - - -" appears, type in the password. -
4 Specifying printer driver settings 2 Check that the key icon appears in the same numbers specified as the password from the printer driver. 4-22 IC-206 Type in the upper-right corner of the screen. - The key icon appears if the memory contains a secure print document. 3 Press the [Access] key. 4 When "PASSWORD: - - - -" appears, type in the password. -

IC-206 User Manual
Page 112
Specifying printer driver settings 4 5 Check that the document can be printed. IC-206 4-23 If the password is correct, the following screen appears, and the job is printed. 2 Note If there are multiple secure print jobs with the same password, all of those secure print jobs are printed.
Specifying printer driver settings 4 5 Check that the document can be printed. IC-206 4-23 If the password is correct, the following screen appears, and the job is printed. 2 Note If there are multiple secure print jobs with the same password, all of those secure print jobs are printed.

IC-206 User Manual
Page 145
... as LDAP search results. 7 Network settings Parameter SEARCH METHOD LDAP TIMEOUT MAX. Consult with the network administrator. Specify the password used to o connect to the LDAP server. Consult with the network administrator. Specify the necessary domain name o used to... the LDAP server. Select the LDAP authentication meth- Consult with the network administrator. SEARCH RESULTS AUTHENTICATION LDAP ACCOUNT LDAP PASSWORD DOMAIN NAME Description Settings Machine control panel Specify the method used to connect to search for o destination names. Specify the amount...
... as LDAP search results. 7 Network settings Parameter SEARCH METHOD LDAP TIMEOUT MAX. Consult with the network administrator. Specify the password used to o connect to the LDAP server. Consult with the network administrator. Specify the necessary domain name o used to... the LDAP server. Select the LDAP authentication meth- Consult with the network administrator. SEARCH RESULTS AUTHENTICATION LDAP ACCOUNT LDAP PASSWORD DOMAIN NAME Description Settings Machine control panel Specify the method used to connect to search for o destination names. Specify the amount...
IC-206 User Manual
Page 146
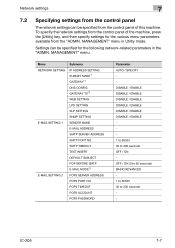
...*3 POP3 SERVER ADDRESS POP3 PORT NO. To specify the network settings from the control panel of this machine. IC-206 7-7 POP3 TIMEOUT POP3 ACCOUNT POP3 PASSWORD Parameter AUTO / SPECIFY DISABLE / ENABLE DISABLE / ENABLE DISABLE / ENABLE DISABLE / ENABLE DISABLE / ENABLE DISABLE / ENABLE 1 to 65535 30 to 300 seconds OFF / ON OFF / ON...
...*3 POP3 SERVER ADDRESS POP3 PORT NO. To specify the network settings from the control panel of this machine. IC-206 7-7 POP3 TIMEOUT POP3 ACCOUNT POP3 PASSWORD Parameter AUTO / SPECIFY DISABLE / ENABLE DISABLE / ENABLE DISABLE / ENABLE DISABLE / ENABLE DISABLE / ENABLE DISABLE / ENABLE 1 to 65535 30 to 300 seconds OFF / ON OFF / ON...


