
Cube3 User Guide
Page 2
... INFORMATION 1 FCC NOTICE 1 KCC 1 COMPLIANCE 1 WARRANTY 2 LIMITATION OF LIABILITY 2 EXTENDED WARRANTY 2 2 IMPORTANT SAFETY INFORMATION 3 Safety Symbols and Definitions 3 Safety Guidelines 3 3 CUBE 3D PRINTER FEATURES 4 Cube 3D Printer Features 4 Cube 3D Printer Properties 4 4 AT A GLANCE 5 5 SPECIFICATIONS AND REQUIREMENTS 6 Weight 6 Software 6 OpenGL Version 6 Windows Requirements 6 MAC OS X Requirements 6 Android 6 iOS 6 Wireless Options 6 USB Mass Storage...
... INFORMATION 1 FCC NOTICE 1 KCC 1 COMPLIANCE 1 WARRANTY 2 LIMITATION OF LIABILITY 2 EXTENDED WARRANTY 2 2 IMPORTANT SAFETY INFORMATION 3 Safety Symbols and Definitions 3 Safety Guidelines 3 3 CUBE 3D PRINTER FEATURES 4 Cube 3D Printer Features 4 Cube 3D Printer Properties 4 4 AT A GLANCE 5 5 SPECIFICATIONS AND REQUIREMENTS 6 Weight 6 Software 6 OpenGL Version 6 Windows Requirements 6 MAC OS X Requirements 6 Android 6 iOS 6 Wireless Options 6 USB Mass Storage...

Cube3 User Guide
Page 3
Standard 50 Print Settings - Draft 52 Connecting Cubify To Your Printer 54 Connecting Cubify To Your Printer Manually 54 Printing A Model Via Wireless Connection 62 Printing From A Desktop Application 62 Printing From A Mobile Application 65 Saving A Model to A Mass Storage Device 69 ...
Standard 50 Print Settings - Draft 52 Connecting Cubify To Your Printer 54 Connecting Cubify To Your Printer Manually 54 Printing A Model Via Wireless Connection 62 Printing From A Desktop Application 62 Printing From A Mobile Application 65 Saving A Model to A Mass Storage Device 69 ...

Cube3 User Guide
Page 4
Print Pad Calibration 81 Auto Level 81 Gap Verification 84 Manual Gap Adjustment 85 Print Pad Maintenance 86 Clean The Print Pad 86 Test Print 87 Cube Name 88 Updating the Cube Firmware 89 Updating Firmware Using Wi-F.i 89 Updating Firmware Using USB 92 Repacking the Printer 94 Contacting Support 96 12 CUBIFY SUSTAINABILITY PROGRAM 97
Print Pad Calibration 81 Auto Level 81 Gap Verification 84 Manual Gap Adjustment 85 Print Pad Maintenance 86 Clean The Print Pad 86 Test Print 87 Cube Name 88 Updating the Cube Firmware 89 Updating Firmware Using Wi-F.i 89 Updating Firmware Using USB 92 Repacking the Printer 94 Contacting Support 96 12 CUBIFY SUSTAINABILITY PROGRAM 97
Cube3 User Guide
Page 5
...void the user's authority to print in your imagination and helps you • Engage with other creative partners • Buy the Cube 3D Printer, print cartridges, and supplies COPYRIGHT INFORMATION ©2014 by 3D Systems may not cause interference, and (2) this equipment. This equipment generates, uses... to choose from that to which can be used mainly at Cubify.com. At Cubify.com you for purchasing the Cube® 3D Printer. KCC B This equipment is home use (Class B) electromagnetic wave suitability equipment and to be used in all areas. CAN ICES-3 ...
...void the user's authority to print in your imagination and helps you • Engage with other creative partners • Buy the Cube 3D Printer, print cartridges, and supplies COPYRIGHT INFORMATION ©2014 by 3D Systems may not cause interference, and (2) this equipment. This equipment generates, uses... to choose from that to which can be used mainly at Cubify.com. At Cubify.com you for purchasing the Cube® 3D Printer. KCC B This equipment is home use (Class B) electromagnetic wave suitability equipment and to be used in all areas. CAN ICES-3 ...
Cube3 User Guide
Page 6
...described in the documentation provided to you, including this user guide. 3D Systems will promptly repair or replace the Cube or CubePro 3D Printer, if required, to make it free of defects during the warranty period. For consumers who are covered by consumer protection laws or ...by such consumer protection laws and regulations, including but not limited to these additional rights. WARRANTY 3D Systems warrants that the Cube 3D Printer will be free from defects in materials and workmanship, during the applicable warranty period, when used under the normal conditions described in the...
...described in the documentation provided to you, including this user guide. 3D Systems will promptly repair or replace the Cube or CubePro 3D Printer, if required, to make it free of defects during the warranty period. For consumers who are covered by consumer protection laws or ...by such consumer protection laws and regulations, including but not limited to these additional rights. WARRANTY 3D Systems warrants that the Cube 3D Printer will be free from defects in materials and workmanship, during the applicable warranty period, when used under the normal conditions described in the...
Cube3 User Guide
Page 7
...3D Systems' print materials and genuine 3D Systems' components may damage the print jet. These 3D prints are not accessible to setting up the printer. doing so may happen that could cause personal injury. WARNING: HAZARDOUS MOVING PARTS. Be careful when operating your Cube. AVOID CONTACT WITH THESE .... Doing so is required; Caution: Read and follow all instructions prior to young children. PRIOR TO ANY PART REPLACEMENT PROCEDURE, THE PRINTER MUST BE POWERED OFF AND DISCONNECTED FROM UTILITY POWER. To ensure safety, please exercise caution when operating your Cube 3D...
...3D Systems' print materials and genuine 3D Systems' components may damage the print jet. These 3D prints are not accessible to setting up the printer. doing so may happen that could cause personal injury. WARNING: HAZARDOUS MOVING PARTS. Be careful when operating your Cube. AVOID CONTACT WITH THESE .... Doing so is required; Caution: Read and follow all instructions prior to young children. PRIOR TO ANY PART REPLACEMENT PROCEDURE, THE PRINTER MUST BE POWERED OFF AND DISCONNECTED FROM UTILITY POWER. To ensure safety, please exercise caution when operating your Cube 3D...
Cube3 User Guide
Page 8
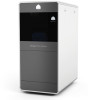
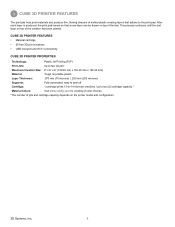
... • Material cartridge • 25 free 3D print creations • USB inlet port and Wi-Fi connectivity CUBE 3D PRINTER PROPERTIES Technology: Plastic Jet Printing (PJP) Print Jets: Up to -14 mid-size creations. This process continues until the last layer on top...: Visit www.cubify.com for a listing of color choices. *The number of jets and cartridge capacity depends on the printer model and configuration. 3D Systems, Inc. 4 3 CUBE 3D PRINTER FEATURES The print jets heat print materials and produce thin, flowing streams of melted plastic creating layers that a new layer can...
... • Material cartridge • 25 free 3D print creations • USB inlet port and Wi-Fi connectivity CUBE 3D PRINTER PROPERTIES Technology: Plastic Jet Printing (PJP) Print Jets: Up to -14 mid-size creations. This process continues until the last layer on top...: Visit www.cubify.com for a listing of color choices. *The number of jets and cartridge capacity depends on the printer model and configuration. 3D Systems, Inc. 4 3 CUBE 3D PRINTER FEATURES The print jets heat print materials and produce thin, flowing streams of melted plastic creating layers that a new layer can...
Cube3 User Guide
Page 10
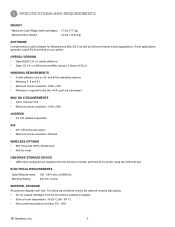
...following conditions ensure the material remains high quality: • Do not unpack cartridges from the foil until the material is required for printing on your printer. and 64-bit operating systems • Windows 7, 8 and 8.1 • Minimum screen resolution: 1024 x 768 • Windows is needed. ... with WPS Infrastructure • Ad Hoc mode USB MASS STORAGE DEVICE • USB mass storage device (supplied with the printer) to transfer print files to the printer using 3.2 library of GLU) WINDOWS REQUIREMENTS • Cubify software runs on Windows and Mac (using the USB inlet port...
...following conditions ensure the material remains high quality: • Do not unpack cartridges from the foil until the material is required for printing on your printer. and 64-bit operating systems • Windows 7, 8 and 8.1 • Minimum screen resolution: 1024 x 768 • Windows is needed. ... with WPS Infrastructure • Ad Hoc mode USB MASS STORAGE DEVICE • USB mass storage device (supplied with the printer) to transfer print files to the printer using 3.2 library of GLU) WINDOWS REQUIREMENTS • Cubify software runs on Windows and Mac (using the USB inlet port...
Cube3 User Guide
Page 12
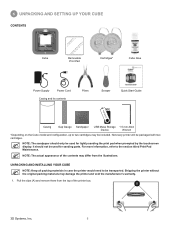
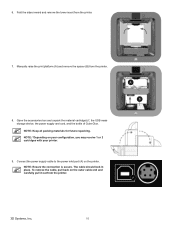
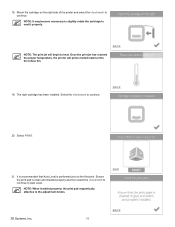
For more information, refer to two cartridges may be included. NOTE: The actual appearance of the contents may damage the printer and void the manufacturer's warranty. 1. Pull the clips (A) and remove them from the illustrations. 6 UNPACKING AND SETTING UP YOUR CUBE ...INSTALLING YOUR CUBE NOTE: Keep all packing materials in case the printer would need to be packaged with two cartridges. Shipping the printer without the original packing materials may differ from the top of the printer box. Not every printer will be transported. It should only be used for sanding parts...
For more information, refer to two cartridges may be included. NOTE: The actual appearance of the contents may damage the printer and void the manufacturer's warranty. 1. Pull the clips (A) and remove them from the illustrations. 6 UNPACKING AND SETTING UP YOUR CUBE ...INSTALLING YOUR CUBE NOTE: Keep all packing materials in case the printer would need to be packaged with two cartridges. Shipping the printer without the original packing materials may differ from the top of the printer box. Not every printer will be transported. It should only be used for sanding parts...
Cube3 User Guide
Page 13
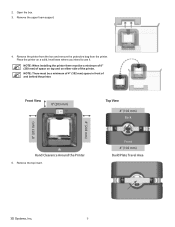
... View 8" (203 mm) Top View 4" (102 mm) Back 8" (203 mm) 8" (203 mm) Hand Clearance Around the Printer 5. NOTE: When installing the printer there must be a minimum of 8" (203 mm) of space on top and on a solid, level base where you intend to use it. Front 4" (102 mm) ...Build Plate Travel Area 3D Systems, Inc. 9 Remove the top insert. Open the box. 3. Remove the printer from the box and remove the protective bag from the...
... View 8" (203 mm) Top View 4" (102 mm) Back 8" (203 mm) 8" (203 mm) Hand Clearance Around the Printer 5. NOTE: When installing the printer there must be a minimum of 8" (203 mm) of space on top and on a solid, level base where you intend to use it. Front 4" (102 mm) ...Build Plate Travel Area 3D Systems, Inc. 9 Remove the top insert. Open the box. 3. Remove the printer from the box and remove the protective bag from the...
Cube3 User Guide
Page 14
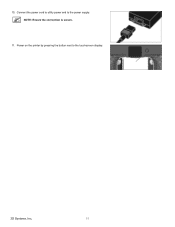
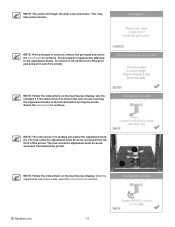
..., Inc. 10 To remove the cable, pull back on the outer cable end and carefully pull it out from the printer. 7. Fold the sides inward and remove the lower insert from the printer. 6. Connect the power supply cable to the power inlet port (A) on your configuration, you may receive 1 or 2 cartridges ...with your printer. 9. Open the accessories box and unpack the material cartridge(s)*, the USB mass storage device, the power supply and cord, and the bottle of Cube Glue....
..., Inc. 10 To remove the cable, pull back on the outer cable end and carefully pull it out from the printer. 7. Fold the sides inward and remove the lower insert from the printer. 6. Connect the power supply cable to the power inlet port (A) on your configuration, you may receive 1 or 2 cartridges ...with your printer. 9. Open the accessories box and unpack the material cartridge(s)*, the USB mass storage device, the power supply and cord, and the bottle of Cube Glue....
Cube3 User Guide
Page 15
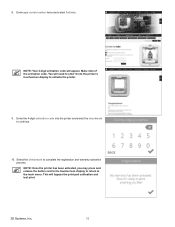
NOTE: Ensure the connection is secure. 11. Power on the printer by pressing the button next to the power supply. Connect the power cord to utility power and to the touchscreen display. 3D Systems, Inc. 11 10.
NOTE: Ensure the connection is secure. 11. Power on the printer by pressing the button next to the power supply. Connect the power cord to utility power and to the touchscreen display. 3D Systems, Inc. 11 10.
Cube3 User Guide
Page 16
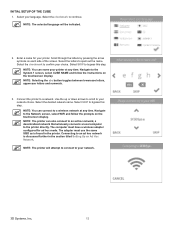
... at any time. Select SKIP to spell out the name. The computer must use the same SSID as is discussed further in the printer. NOTE: The selected language will attempt to connect to an ad hoc network is found in the section titled Setting Up an Ad ... bypass this step. Connecting to your network choice. NOTE: Selecting the abc button toggles between lowercase letters, uppercase letters and numerals. 3. NOTE: The printer can also connect to an ad hoc network, a decentralized network that wirelessly connects a local computer to bypass this step. INITIAL SETUP OF THE CUBE...
... at any time. Select SKIP to spell out the name. The computer must use the same SSID as is discussed further in the printer. NOTE: The selected language will attempt to connect to an ad hoc network is found in the section titled Setting Up an Ad ... bypass this step. Connecting to your network choice. NOTE: Selecting the abc button toggles between lowercase letters, uppercase letters and numerals. 3. NOTE: The printer can also connect to an ad hoc network, a decentralized network that wirelessly connects a local computer to bypass this step. INITIAL SETUP OF THE CUBE...
Cube3 User Guide
Page 17
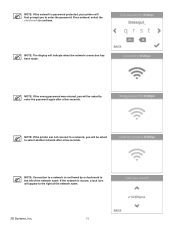
... to a network, you will be asked to the left of the network name. 3D Systems, Inc. 13 NOTE: If the network is password protected, your printer will first prompt you to enter the password again after a few seconds. NOTE: If the wrong password was entered, you will be asked to enter...
... to a network, you will be asked to the left of the network name. 3D Systems, Inc. 13 NOTE: If the network is password protected, your printer will first prompt you to enter the password again after a few seconds. NOTE: If the wrong password was entered, you will be asked to enter...
Cube3 User Guide
Page 18
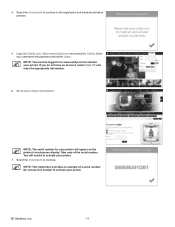
... do not have an account, select SIGN UP and enter the appropriate information. 6. You will appear on the printer's touchscreen display. Go to Cubify.com. Enter your printer will need it to activate your printer. 7. 4. Select the checkmark to www.cubify.com/activate. Go to continue. NOTE: This illustration provides an example of... the serial number. NOTE: The serial number for your username and password and select Login. Select the checkmark to continue to activate your printer. NOTE: You must be logged in to www.cubify.com and select My Cubify.
... do not have an account, select SIGN UP and enter the appropriate information. 6. You will appear on the printer's touchscreen display. Go to Cubify.com. Enter your printer will need it to activate your printer. 7. 4. Select the checkmark to www.cubify.com/activate. Go to continue. NOTE: This illustration provides an example of... the serial number. NOTE: The serial number for your username and password and select Login. Select the checkmark to continue to activate your printer. NOTE: You must be logged in to www.cubify.com and select My Cubify.
Cube3 User Guide
Page 19
... 15 This will appear. 8. You will need to enter it into the printer and select the checkmark to the main menu. Make note of the activation code. Enter the 4-digit activation code into the printer's touchscreen display to complete the registration and warranty activation process. NOTE: Once ...the printer has been activated, you may press and release the button next to the touchscreen display to ...
... 15 This will appear. 8. You will need to enter it into the printer and select the checkmark to the main menu. Make note of the activation code. Enter the 4-digit activation code into the printer's touchscreen display to complete the registration and warranty activation process. NOTE: Once ...the printer has been activated, you may press and release the button next to the touchscreen display to ...
Cube3 User Guide
Page 20
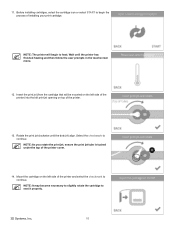
... rotate the cartridge to begin to continue. Mount the cartridge on the left print jet opening on the left side of the printer) into the left side of the printer cover. Wait until the dots (A) align. Select the checkmark to continue NOTE: As you rotate the print jet, ensure the print... jet tube is tucked under the top of the printer and select the checkmark to heat. A 14. NOTE: The printer will be mounted on top of installing your print cartridge. Before installing cartridges, select the cartridge icon or select START...
... rotate the cartridge to begin to continue. Mount the cartridge on the left print jet opening on the left side of the printer) into the left side of the printer cover. Wait until the dots (A) align. Select the checkmark to continue NOTE: As you rotate the print jet, ensure the print... jet tube is tucked under the top of the printer and select the checkmark to heat. A 14. NOTE: The printer will be mounted on top of installing your print cartridge. Before installing cartridges, select the cartridge icon or select START...
Cube3 User Guide
Page 21
... the refuse bin. 15. Once the print jet has reached the proper temperature, the printer will prime melted material into the right print jet opening on top of the printer. 17. Select the checkmark to continue. Select the checkmark to continue. A 3D Systems, Inc. 17 Rotate the print jet ...clockwise until the printer has finished heating and then follow the user prompts in the touchscreen menu. 16. NOTE: The print jet will begin to heat. Insert ...
... the refuse bin. 15. Once the print jet has reached the proper temperature, the printer will prime melted material into the right print jet opening on top of the printer. 17. Select the checkmark to continue. Select the checkmark to continue. A 3D Systems, Inc. 17 Rotate the print jet ...clockwise until the printer has finished heating and then follow the user prompts in the touchscreen menu. 16. NOTE: The print jet will begin to heat. Insert ...
Cube3 User Guide
Page 22
... to heat. NOTE: The print jet will prime melted material into the refuse bin. 19. Once the print jet has reached the proper temperature, the printer will begin to continue. 20. It is recommended that Auto Level is clean and installed properly and then select the checkmark to continue to the... properly. NOTE: When installed properly, the print pad magnetically attaches to Auto Level. Select PRINT. 21. Mount the cartridge on the right side of the printer and select the checkmark to continue.
... to heat. NOTE: The print jet will prime melted material into the refuse bin. 19. Once the print jet has reached the proper temperature, the printer will begin to continue. 20. It is recommended that Auto Level is clean and installed properly and then select the checkmark to continue to the... properly. NOTE: When installed properly, the print pad magnetically attaches to Auto Level. Select PRINT. 21. Mount the cartridge on the right side of the printer and select the checkmark to continue.
Cube3 User Guide
Page 23
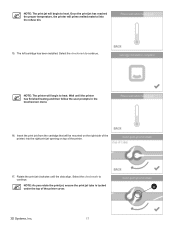
This may take a few minutes. The lock screw for adjustment knob A can be accessed from the front of the printer. NOTE: Follow the instructions on the touchscreen display. Select the checkmark to the bracket before turning the knobs. Use the included 1.5... knobs to continue. NOTE: Follow the instructions on the touchscreen display. The lock screw for adjustment knob B can be accessed from behind the printer. The print pad is located just below the adjustment knob (2). NOTE: The lock screw (1) is magnetically attached to the adjustment knobs. Once ...
This may take a few minutes. The lock screw for adjustment knob A can be accessed from the front of the printer. NOTE: Follow the instructions on the touchscreen display. Select the checkmark to the bracket before turning the knobs. Use the included 1.5... knobs to continue. NOTE: Follow the instructions on the touchscreen display. The lock screw for adjustment knob B can be accessed from behind the printer. The print pad is located just below the adjustment knob (2). NOTE: The lock screw (1) is magnetically attached to the adjustment knobs. Once ...

