User Guide
Page 2
... the IEEE-1394 card in the host computer 2-2 Installing the Kodak Driver software 2-2 Installing the FireWire cable 2-2 Attaching the power cord 2-3 Powering up the host computer 2-3 Scanner components 2-3 3 Using the Scanner 3-1 Turning the scanner on and off 3-1 Starting and stopping scanning 3-1 Manually pausing and resuming the scanner 3-2 Automatically pausing and resuming the scanner 3-2 Manually ending scanning 3-2 Document preparation 3-3 Adjusting the side guides and end stop 3-4 Locking the side guides 3-5 Adjusting the back of the output tray 3-5 Adjusting the front...
... the IEEE-1394 card in the host computer 2-2 Installing the Kodak Driver software 2-2 Installing the FireWire cable 2-2 Attaching the power cord 2-3 Powering up the host computer 2-3 Scanner components 2-3 3 Using the Scanner 3-1 Turning the scanner on and off 3-1 Starting and stopping scanning 3-1 Manually pausing and resuming the scanner 3-2 Automatically pausing and resuming the scanner 3-2 Manually ending scanning 3-2 Document preparation 3-3 Adjusting the side guides and end stop 3-4 Locking the side guides 3-5 Adjusting the back of the output tray 3-5 Adjusting the front...
User Guide
Page 4
... for clearing a document jam and a listing of the specifications for using and maintaining the Enhanced Printer. provides a description of the optional accessories that can be purchased to install the scanner. 1 Introduction This User's Guide provides information and procedures for the feed module, separation roller and imaging guides. Chapter 3, Using the Scanner - provides maintenance procedures for the Kodak i600/i700 Series Scanners, including replacement procedures for the Kodak i600/i700 Series Scanners. Instructions for the Kodak i600/i700 Series Scanners...
... for clearing a document jam and a listing of the specifications for using and maintaining the Enhanced Printer. provides a description of the optional accessories that can be purchased to install the scanner. 1 Introduction This User's Guide provides information and procedures for the feed module, separation roller and imaging guides. Chapter 3, Using the Scanner - provides maintenance procedures for the Kodak i600/i700 Series Scanners, including replacement procedures for the Kodak i600/i700 Series Scanners. Instructions for the Kodak i600/i700 Series Scanners...

User Guide
Page 5
... includes an enhanced printer. • Kodak i780 Scanner is set to 500 Sheets and there are for Kodak i700 Series Scanners, Firmware Version 2.1.1 (or higher). • Fast elevator - Scanner models New features • Kodak i610 Scanner is a desktop duplex black and white and grayscale scanner with an automatic document feeder that runs at 80 pages per minute which includes an enhanced printer. • Kodak i620 Scanner is a desktop duplex color scanner with an automatic document feeder that runs at...
... includes an enhanced printer. • Kodak i780 Scanner is set to 500 Sheets and there are for Kodak i700 Series Scanners, Firmware Version 2.1.1 (or higher). • Fast elevator - Scanner models New features • Kodak i610 Scanner is a desktop duplex black and white and grayscale scanner with an automatic document feeder that runs at 80 pages per minute which includes an enhanced printer. • Kodak i620 Scanner is a desktop duplex color scanner with an automatic document feeder that runs at...
User Guide
Page 6
... and color image output.* • Simultaneous black and white and grayscale image output. • Handles a broad range of paper weights and sizes. • Easy installation. • ISIS and TWAIN device drivers are included on a CD that is 34 inches (863.6 mm) and i700 Series Scanners 40 inches (1016 mm) • Color or grayscale at the same speed as "sleep" mode). • Document printing capabilities. • Electronic red, green...
... and color image output.* • Simultaneous black and white and grayscale image output. • Handles a broad range of paper weights and sizes. • Easy installation. • ISIS and TWAIN device drivers are included on a CD that is 34 inches (863.6 mm) and i700 Series Scanners 40 inches (1016 mm) • Color or grayscale at the same speed as "sleep" mode). • Document printing capabilities. • Electronic red, green...
User Guide
Page 9
..., bracelets, bulky rings, long necklaces, etc. • Hair length should review their employer need to observe the common sense precautions applicable to comply with these precautions a part of the job description for operation of the Voluntary Control Council for replacement. This equipment has been tested and found to the operation of any mechanical device. This is used in a commercial environment.
..., bracelets, bulky rings, long necklaces, etc. • Hair length should review their employer need to observe the common sense precautions applicable to comply with these precautions a part of the job description for operation of the Voluntary Control Council for replacement. This equipment has been tested and found to the operation of any mechanical device. This is used in a commercial environment.
User Guide
Page 11
... continuous scanning. IMPORTANT: Only use the scanner indoors in a dry location. 2 Getting Started Site specifications Place the scanner: • In a clean area with firmware and hardware updates as they become available. For more information about Kodak's service and support options, contact your scanner's new equipment warranty online at www.kodak.com/go /DIsupport. 2-1 If the scanner is the minimum recommended system configuration to Appendix B, Specifications. Microsoft Windows XP SP3 (32-bit) -
... continuous scanning. IMPORTANT: Only use the scanner indoors in a dry location. 2 Getting Started Site specifications Place the scanner: • In a clean area with firmware and hardware updates as they become available. For more information about Kodak's service and support options, contact your scanner's new equipment warranty online at www.kodak.com/go /DIsupport. 2-1 If the scanner is the minimum recommended system configuration to Appendix B, Specifications. Microsoft Windows XP SP3 (32-bit) -
User Guide
Page 12
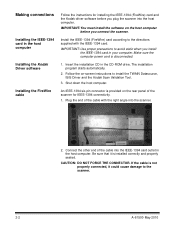
.... The installation program starts automatically. 2. Connect the other end of the scanner for installing the IEEE-1394 (FireWire) card and the Kodak driver software before you plug the scanner into the scanner. 2. IMPORTANT: You must install the software on -screen instructions to the scanner. 2-2 A-61500 May 2010 Insert the installation CD in the host computer. Be sure that it could cause damage to install the TWAIN Datasource, ISIS Driver and the Kodak Scan Validation Tool. 3. Plug...
.... The installation program starts automatically. 2. Connect the other end of the scanner for installing the IEEE-1394 (FireWire) card and the Kodak driver software before you plug the scanner into the scanner. 2. IMPORTANT: You must install the software on -screen instructions to the scanner. 2-2 A-61500 May 2010 Insert the installation CD in the host computer. Be sure that it could cause damage to install the TWAIN Datasource, ISIS Driver and the Kodak Scan Validation Tool. 3. Plug...

User Guide
Page 14
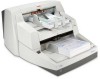
... when the power is idle. located underneath the output tray (not shown in photo), this wire can then use used to Chapter 6, Troubleshooting, for complete descriptions of documents in "sleep" or lamp saver mode. Refer to resume scanning). detects the presence of the LED indicators. 9 Power switch - Start/Resume (green) button: to call Service. illuminates when the scanner is enabled and/or scanning, and flashes when the scanner is in...
... when the power is idle. located underneath the output tray (not shown in photo), this wire can then use used to Chapter 6, Troubleshooting, for complete descriptions of documents in "sleep" or lamp saver mode. Refer to resume scanning). detects the presence of the LED indicators. 9 Power switch - Start/Resume (green) button: to call Service. illuminates when the scanner is enabled and/or scanning, and flashes when the scanner is in...
User Guide
Page 27
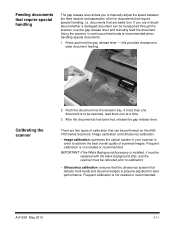
... on the i600/ i700 Series Scanners: Image calibration and Ultrasonics calibration. • Image calibration: optimizes the optical system in your scanner in continuous feed mode is installed, it must be replaced with the black background strip, and the scanner must be rebooted prior to be scanned, feed them one document is to calibration. • Ultrasonics calibration: ensures that the ultrasonics system that detects multi-feeds and document edges is properly adjusted for...
... on the i600/ i700 Series Scanners: Image calibration and Ultrasonics calibration. • Image calibration: optimizes the optical system in your scanner in continuous feed mode is installed, it must be replaced with the black background strip, and the scanner must be rebooted prior to be scanned, feed them one document is to calibration. • Ultrasonics calibration: ensures that the ultrasonics system that detects multi-feeds and document edges is properly adjusted for...

User Guide
Page 32
... and printer specifications. • Setting horizontal printer positions. • Replacing the ink cartridge and ink blotter strips. The capture software application controls static fields; NOTES: • Clean the scanner's paper path components daily when using the Enhanced Printer. NOTE: More detailed information on the scanner, or it could result in errors when printing is unique in the Scanning Setup Guide, A-61504. The Kodak i600/i700 Series Scanners include a factory-installed, preconfigured front printer. The printer...
... and printer specifications. • Setting horizontal printer positions. • Replacing the ink cartridge and ink blotter strips. The capture software application controls static fields; NOTES: • Clean the scanner's paper path components daily when using the Enhanced Printer. NOTE: More detailed information on the scanner, or it could result in errors when printing is unique in the Scanning Setup Guide, A-61504. The Kodak i600/i700 Series Scanners include a factory-installed, preconfigured front printer. The printer...

User Guide
Page 57
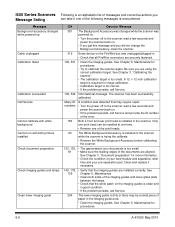
...; A problem solving chart. • A message listing of the scanner. Scanner is in sleep or lamp saver mode. To return to Ready state: • press the Start/Resume button on the scanner. If the condition cannot be cleared, call Service. See the table below for details. See Operator Log for details. Scanner is idle and a document jam or multi-feed has been detected. Scanner is idle and has detected a hardware/software error...
...; A problem solving chart. • A message listing of the scanner. Scanner is in sleep or lamp saver mode. To return to Ready state: • press the Start/Resume button on the scanner. If the condition cannot be cleared, call Service. See the table below for details. See Operator Log for details. Scanner is idle and a document jam or multi-feed has been detected. Scanner is idle and has detected a hardware/software error...
User Guide
Page 62
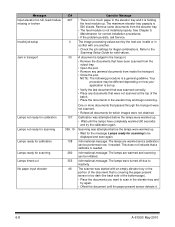
...; Remove the White Background Accessory before calibrating the scanner. 123, 135, • The gap between the lamps. • Check that the imaging guides are using the correct calibration target. A 12- i600 Series Scanners Following is an alphabetic list of messages and corrective actions you Message listing can be a small piece of paper in the imaging guide area. • Clean the imaging guides. See 139 Chapter 5, Maintenance. • Clean both printers installed Check document preparation Check imaging guides and lamps Clean lower imaging guide ID# Operator Message...
...; Remove the White Background Accessory before calibrating the scanner. 123, 135, • The gap between the lamps. • Check that the imaging guides are using the correct calibration target. A 12- i600 Series Scanners Following is an alphabetic list of messages and corrective actions you Message listing can be a small piece of paper in the imaging guide area. • Clean the imaging guides. See 139 Chapter 5, Maintenance. • Clean both printers installed Check document preparation Check imaging guides and lamps Clean lower imaging guide ID# Operator Message...

User Guide
Page 63
Refeed the document set. 143 Informational message. See Chapter 5, Maintenance for more information. The front image path has been successfully calibrated. 109 • Calibrate the scanner when the current batch of paper in the printer carrier. Be sure you are using a fixed-sized cropping window. 35, 36, 183 A document was measured which exceeded the configured maximum allowable length. NOTE:The ink cartridge must be installed before turning on relative...
Refeed the document set. 143 Informational message. See Chapter 5, Maintenance for more information. The front image path has been successfully calibrated. 109 • Calibrate the scanner when the current batch of paper in the printer carrier. Be sure you are using a fixed-sized cropping window. 35, 36, 183 A document was measured which exceeded the configured maximum allowable length. NOTE:The ink cartridge must be installed before turning on relative...
User Guide
Page 64
... that is covering the paper present sensor is too dark (the back side of the bottom page). • Place the documents you want to inactivity. Informational message. The lamps were turned off due to scan in the elevator tray and try the calibration again. The maximum elevator tray capacity is a general guideline. Refer to be different depending on how your application is set up...
... that is covering the paper present sensor is too dark (the back side of the bottom page). • Place the documents you want to inactivity. Informational message. The lamps were turned off due to scan in the elevator tray and try the calibration again. The maximum elevator tray capacity is a general guideline. Refer to be different depending on how your application is set up...

User Guide
Page 65
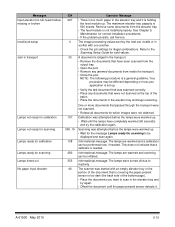
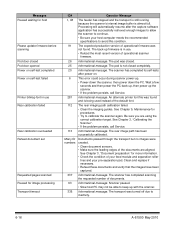
Processing will automatically resume after power-on self-test failed Printer bitmap font in use Rear calibration failed Rear calibration succeeded Refeed document set Requested pages scanned Paused for image processing Transport timeout ID# Operator Message 1, 48 The feeder has stopped and the transport is still running because the scanner's internal image buffer is not closed completely. 20 Informational message. An alternate printer font file was closed. 25 Informational message. See Chapter 3, "Document preparation" for...
Processing will automatically resume after power-on self-test failed Printer bitmap font in use Rear calibration failed Rear calibration succeeded Refeed document set Requested pages scanned Paused for image processing Transport timeout ID# Operator Message 1, 48 The feeder has stopped and the transport is still running because the scanner's internal image buffer is not closed completely. 20 Informational message. An alternate printer font file was closed. 25 Informational message. See Chapter 3, "Document preparation" for...
User Guide
Page 67
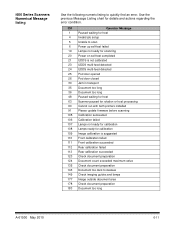
... Scanner paused for rotation or host processing 90 Cannot run with both printers installed 91 Please update firmware before scanning 105 Calibration succeeded 106 Calibration failed 107 Lamps not ready for calibration 108 Lamps ready for details and actions regarding the error condition. Use the previous Message Listing chart for calibration 109 Image calibration is suggested 110 Front calibration failed 111 Front calibration succeeded 112 Rear calibration failed 113 Rear calibration succeeded 123 Check document preparation 124 Document count...
... Scanner paused for rotation or host processing 90 Cannot run with both printers installed 91 Please update firmware before scanning 105 Calibration succeeded 106 Calibration failed 107 Lamps not ready for calibration 108 Lamps ready for details and actions regarding the error condition. Use the previous Message Listing chart for calibration 109 Image calibration is suggested 110 Front calibration failed 111 Front calibration succeeded 112 Rear calibration failed 113 Rear calibration succeeded 123 Check document preparation 124 Document count...
User Guide
Page 70
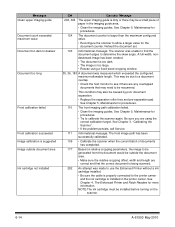
... and length are using a fixed-sized cropping window. 35, 36, 183 A document was unable to find the document edges to deskew Document too long Front calibration failed Front calibration succeeded Image calibration is suggested Image outside document area Ink cartridge not installed ID# Operator Message 293, 304 The upper imaging guide is installed in the imaging guide area. • Clean the imaging guides. Refeed the document set. 143 Informational message. The scanner was measured which exceeded the configured maximum allowable length...
... and length are using a fixed-sized cropping window. 35, 36, 183 A document was unable to find the document edges to deskew Document too long Front calibration failed Front calibration succeeded Image calibration is suggested Image outside document area Ink cartridge not installed ID# Operator Message 293, 304 The upper imaging guide is installed in the imaging guide area. • Clean the imaging guides. Refeed the document set. 143 Informational message. The scanner was measured which exceeded the configured maximum allowable length...
User Guide
Page 71
... scanning can be initiated. Informational message. The lamps were turned off due to scan in the elevator tray and try the calibration again. The scanner was started with one another. • Check the job settings for illegal combinations. Remove some documents from inside the transport. • Close the pod. NOTE: The following procedure is not installed properly. This does not indicate that is covering the paper present sensor...
... scanning can be initiated. Informational message. The lamps were turned off due to scan in the elevator tray and try the calibration again. The scanner was started with one another. • Check the job settings for illegal combinations. Remove some documents from inside the transport. • Close the pod. NOTE: The following procedure is not installed properly. This does not indicate that is covering the paper present sensor...
User Guide
Page 72
... power-on self-test failed Printer bitmap font in use Rear calibration failed Rear calibration succeeded Refeed document set Requested pages scanned Paused for image processing Transport timeout ID# Operator Message 1, 48 The feeder has stopped and the transport is still running because the scanner's internal image buffer is in use. • Reload the most recent version of the default font. 112 The rear imaging path calibration failed. • Clean the imaging guides. The pod was turned...
... power-on self-test failed Printer bitmap font in use Rear calibration failed Rear calibration succeeded Refeed document set Requested pages scanned Paused for image processing Transport timeout ID# Operator Message 1, 48 The feeder has stopped and the transport is still running because the scanner's internal image buffer is in use. • Reload the most recent version of the default font. 112 The rear imaging path calibration failed. • Clean the imaging guides. The pod was turned...

User Guide
Page 76
... size, weight, etc. • if you are feeding small documents, be sure that : • the output tray and side guides are adjusted for the length of the documents being scanned. • all jammed documents have been removed from the host. • documents are clean. Problem solving Use the chart below as needed. 6-20 A-61500 May 2010 Scanner is clear of the stack and scan again. Calibration has failed Make sure that : Scan Validation Tool...
... size, weight, etc. • if you are feeding small documents, be sure that : • the output tray and side guides are adjusted for the length of the documents being scanned. • all jammed documents have been removed from the host. • documents are clean. Problem solving Use the chart below as needed. 6-20 A-61500 May 2010 Scanner is clear of the stack and scan again. Calibration has failed Make sure that : Scan Validation Tool...


