User Guide
Page 3
... screen 3-27 Operator Log 3-28 Accessing scanner information 3-29 Count only mode 3-30 Performing a Print test 3-31 Performing a Patch test 3-32 Performing a self test 3-32 Enabling the scanner 3-33 Scanning 3-33 Using function keys when scanning 3-34 Changing image address levels 3-34 Manually pausing and resuming the scanner 3-35 Automatically pausing and resuming the scanner 3-35 Power Saver mode 3-36 Viewing messages 3-36 4 The Enhanced Printer/Patch Readers 4-1 Enhanced Printer overview 4-1 Printer specifications 4-2 Changing print...
... screen 3-27 Operator Log 3-28 Accessing scanner information 3-29 Count only mode 3-30 Performing a Print test 3-31 Performing a Patch test 3-32 Performing a self test 3-32 Enabling the scanner 3-33 Scanning 3-33 Using function keys when scanning 3-34 Changing image address levels 3-34 Manually pausing and resuming the scanner 3-35 Automatically pausing and resuming the scanner 3-35 Power Saver mode 3-36 Viewing messages 3-36 4 The Enhanced Printer/Patch Readers 4-1 Enhanced Printer overview 4-1 Printer specifications 4-2 Changing print...
User Guide
Page 4
...the Scan Validation Tool 6-2 Message listing 6-5 Numerical message listing 6-10 Contacting Service 6-11 Problem solving 6-12 Appendix A Accessories A-1 Kodak Ultralightweight Paper Feed Module A-1 Kodak White Background Accessory A-1 Kodak Manual Feeder A-1 Kodak High Resolution Printer Accessory A-1 Appendix B Specifications B-1 A-61555 March 2007 iii 5 Maintenance 5-1 Cleaning frequency chart 5-2 Cleaning tools and materials 5-2 Supplies, consumables and accessories 5-3 Ordering parts 5-3 Cleaning procedures 5-4 Cleaning the OCP touchscreen 5-4 Vacuuming the output tray...
...the Scan Validation Tool 6-2 Message listing 6-5 Numerical message listing 6-10 Contacting Service 6-11 Problem solving 6-12 Appendix A Accessories A-1 Kodak Ultralightweight Paper Feed Module A-1 Kodak White Background Accessory A-1 Kodak Manual Feeder A-1 Kodak High Resolution Printer Accessory A-1 Appendix B Specifications B-1 A-61555 March 2007 iii 5 Maintenance 5-1 Cleaning frequency chart 5-2 Cleaning tools and materials 5-2 Supplies, consumables and accessories 5-3 Ordering parts 5-3 Cleaning procedures 5-4 Cleaning the OCP touchscreen 5-4 Vacuuming the output tray...
User Guide
Page 5
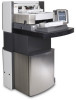
... cleaning and replacement procedures for the Kodak i1800 Series Scanners. provides a description of the specifications for clearing a document jam and a listing of internal and external scanner components. Chapter 2, Getting Started - includes an overview of error messages. 1 Introduction This User's Guide provides information and procedures for the feed module, separation roller, pre-separation pad and imaging guides. A-61555 March 2007 1-1 provides procedures for scanning, input elevator, output tray and workspace table adjustments, scanning your documents for using...
... cleaning and replacement procedures for the Kodak i1800 Series Scanners. provides a description of the specifications for clearing a document jam and a listing of internal and external scanner components. Chapter 2, Getting Started - includes an overview of error messages. 1 Introduction This User's Guide provides information and procedures for the feed module, separation roller, pre-separation pad and imaging guides. A-61555 March 2007 1-1 provides procedures for scanning, input elevator, output tray and workspace table adjustments, scanning your documents for using...

User Guide
Page 6
... • Multi-feed detection by length detection. • Automatic and manual feeding. • JPEG compression for color and grayscale images. • Image processing features include Kodak's Perfect Page technology for the Kodak i1860 Scanner only. • Includes the Brightness and Contrast Control which allows you to stand-workspace table • 500-sheet input elevator. • Energy Star compliant. • Document printing capabilities using the Enhanced Printer or High Resolution Printer accessory...
... • Multi-feed detection by length detection. • Automatic and manual feeding. • JPEG compression for color and grayscale images. • Image processing features include Kodak's Perfect Page technology for the Kodak i1860 Scanner only. • Includes the Brightness and Contrast Control which allows you to stand-workspace table • 500-sheet input elevator. • Energy Star compliant. • Document printing capabilities using the Enhanced Printer or High Resolution Printer accessory...
User Guide
Page 7
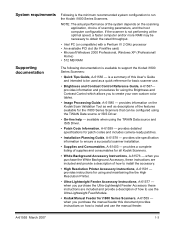
... Printer Accessory Instructions, A-61591 - available when using the TWAIN Data source or ISIS Driver. • On-line help - System requirements Following is available to support the Kodak i1800 Series Scanners: • Quick Tips Guide, A-61556 - when you purchase the Ultra-Lightweight Feeder Accessory these instructions are included and provide a description of the features available for the i1800 Series Scanners that can be necessary to install and use . • Brightness and Contrast Control...
... Printer Accessory Instructions, A-61591 - available when using the TWAIN Data source or ISIS Driver. • On-line help - System requirements Following is available to support the Kodak i1800 Series Scanners: • Quick Tips Guide, A-61556 - when you purchase the Ultra-Lightweight Feeder Accessory these instructions are included and provide a description of the features available for the i1800 Series Scanners that can be necessary to install and use . • Brightness and Contrast Control...
User Guide
Page 8
.... - If you have purchased a Service Contract. Contacting Service and Support Telephone and on the top cover of the scanner. • A brief description of the question or problem including error code numbers as part of the warranty and Service Agreement. Call the Professional Services number to if you in developing your scanner is available as displayed in the summary log file. Scanner Relocation Services are available if you...
.... - If you have purchased a Service Contract. Contacting Service and Support Telephone and on the top cover of the scanner. • A brief description of the question or problem including error code numbers as part of the warranty and Service Agreement. Call the Professional Services number to if you in developing your scanner is available as displayed in the summary log file. Scanner Relocation Services are available if you...
User Guide
Page 15
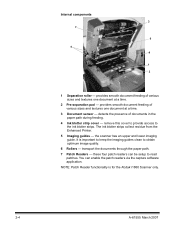
... via the capture software application. remove this cover to provide access to obtain optimum image quality. 6 Rollers - Internal components 3 7 6 5 4 1 2 1 Separation roller - You can be setup to read patches. provides smooth document feeding of various sizes and textures one document at a time. 3 Document sensor - It is for the Kodak i1860 Scanner only. 2-4 A-61555 March 2007 provides smooth document feeding of documents in the paper path during feeding. 4 Ink blotter strip cover - the scanner has an...
... via the capture software application. remove this cover to provide access to obtain optimum image quality. 6 Rollers - Internal components 3 7 6 5 4 1 2 1 Separation roller - You can be setup to read patches. provides smooth document feeding of various sizes and textures one document at a time. 3 Document sensor - It is for the Kodak i1860 Scanner only. 2-4 A-61555 March 2007 provides smooth document feeding of documents in the paper path during feeding. 4 Ink blotter strip cover - the scanner has an...
User Guide
Page 19
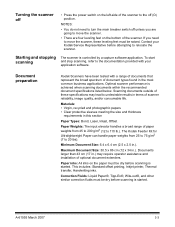
... must be raised. Turning the scanner off • Press the power switch on the left-side of the scanner to the off unless you need to move the scanner, these specifications may require operator assistance and installation of these leveling feet must be dry before scanning is started . Materials: • Virgin, recycled and photographic papers • Clear protective sleeves meeting the size and thickness requirements in...
... must be raised. Turning the scanner off • Press the power switch on the left-side of the scanner to the off unless you need to move the scanner, these specifications may require operator assistance and installation of these leveling feet must be dry before scanning is started . Materials: • Virgin, recycled and photographic papers • Clear protective sleeves meeting the size and thickness requirements in...
User Guide
Page 35
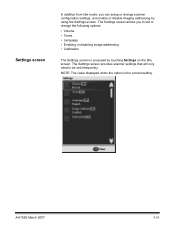
... accessed by using the Settings screen. The Settings screen allows you can setup or change the following options: • Volume • Tones • Language • Enabling or disabling image addressing • Calibration The Settings screen is the current setting. Settings screen In addition from Idle mode, you to be set or change scanner configuration settings, and enable or disable imaging addressing by touching Settings on the Idle screen. The Settings screen provides scanner settings that will only need to set infrequently.
... accessed by using the Settings screen. The Settings screen allows you can setup or change the following options: • Volume • Tones • Language • Enabling or disabling image addressing • Calibration The Settings screen is the current setting. Settings screen In addition from Idle mode, you to be set or change scanner configuration settings, and enable or disable imaging addressing by touching Settings on the Idle screen. The Settings screen provides scanner settings that will only need to set infrequently.

User Guide
Page 39
.../disabling image addressing (for more information on image addressing or the Image Processing Guide PDF located on -line help file for i1860 Scanner only) An image address is set up to a maximum of 27 characters, plus 3 delimiters). A-61555 March 2007 3-23 Touch Image Address. An Image Address template is a unique identifier assigned to each individual document and may contain up to 30 characters (up using the TWAIN Data source or ISIS Driver...
.../disabling image addressing (for more information on image addressing or the Image Processing Guide PDF located on -line help file for i1860 Scanner only) An image address is set up to a maximum of 27 characters, plus 3 delimiters). A-61555 March 2007 3-23 Touch Image Address. An Image Address template is a unique identifier assigned to each individual document and may contain up to 30 characters (up using the TWAIN Data source or ISIS Driver...

User Guide
Page 43
...; Batch count: displays the number of scanner activity and/or any operator messages. • Status field: displays the current scanner activity and messages. displays the Settings screen where you can increment the image address level by touching one of the level buttons. Settings button - Message window/Status bar - Image Address information • Level buttons - Message window/ Status bar Sequential counter Image Address information Batch count Status field Scroll arrows Function list A-61555 March...
...; Batch count: displays the number of scanner activity and/or any operator messages. • Status field: displays the current scanner activity and messages. displays the Settings screen where you can increment the image address level by touching one of the level buttons. Settings button - Message window/Status bar - Image Address information • Level buttons - Message window/ Status bar Sequential counter Image Address information Batch count Status field Scroll arrows Function list A-61555 March...

User Guide
Page 53
... can be installed prior to the printer. The capture software application controls static fields; All printer controls and functions are accessible through the ISIS Driver or TWAIN Data source. Printing must be sent to powering on both literal (static) information (i.e., information that the software allows you attempt to print on the scanner, or it could result in the Image Processing Guide and Kodak publication, A-61599, Patch Code Information. The printer is...
... can be installed prior to the printer. The capture software application controls static fields; All printer controls and functions are accessible through the ISIS Driver or TWAIN Data source. Printing must be sent to powering on both literal (static) information (i.e., information that the software allows you attempt to print on the scanner, or it could result in the Image Processing Guide and Kodak publication, A-61599, Patch Code Information. The printer is...

User Guide
Page 90
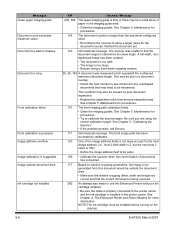
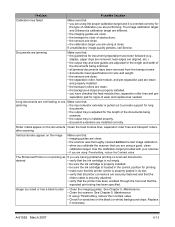
... get this message and you are installed correctly. A 12- See 139 Chapter 5, Maintenance. • Clean both printers installed Check document preparation Check imaging guides and lamps Clean lower imaging guide ID# Operator Message 381 The Background Accessory was changed while powered up Cable unplugged Calibration failed Calibration succeeded Call Service Cannot calibrate with white background Cannot run with both sides of the imaging guides and lower glass plate between your pre-separation pad. See Chapter 3, "Document preparation" for image calibration. • Calibration...
... get this message and you are installed correctly. A 12- See 139 Chapter 5, Maintenance. • Clean both printers installed Check document preparation Check imaging guides and lamps Clean lower imaging guide ID# Operator Message 381 The Background Accessory was changed while powered up Cable unplugged Calibration failed Calibration succeeded Call Service Cannot calibrate with white background Cannot run with both sides of the imaging guides and lower glass plate between your pre-separation pad. See Chapter 3, "Document preparation" for image calibration. • Calibration...
User Guide
Page 91
... problem persists, call Service. 111 Informational message. The scanner was unable to find the document edges to calibrate the scanner again. This condition may also be due to a document overlap. • Check the host monitor to see if there are using a fixed-sized cropping window. 35, 36, 183 A document was made to use the Enhanced Printer without a ink cartridge installed. • Be sure the cable is properly connected to the printer...
... problem persists, call Service. 111 Informational message. The scanner was unable to find the document edges to calibrate the scanner again. This condition may also be due to a document overlap. • Check the host monitor to see if there are using a fixed-sized cropping window. 35, 36, 183 A document was made to use the Enhanced Printer without a ink cartridge installed. • Be sure the cable is properly connected to the printer...
User Guide
Page 92
... the paper present sensor detects it is too dark (the back side of the batch. • Place the documents in the input elevator and begin scanning. The maximum input elevator capacity is a general guideline. Messages Input elevator too full, feed module missing or broken Invalid job setup Jam in transport Lamps not ready for calibration Lamps not ready for scanning Lamps ready for calibration Lamps ready for scanning Lamps...
... the paper present sensor detects it is too dark (the back side of the batch. • Place the documents in the input elevator and begin scanning. The maximum input elevator capacity is a general guideline. Messages Input elevator too full, feed module missing or broken Invalid job setup Jam in transport Lamps not ready for calibration Lamps not ready for scanning Lamps ready for calibration Lamps ready for scanning Lamps...
User Guide
Page 93
Processing will automatically resume after power-on self-test failed Printer bitmap font in use Rear calibration failed Rear calibration succeeded Refeed document set Requested pages scanned Paused for image processing Transport timeout ID# Operator Message 1, 48 The feeder has stopped and the transport is still running because the scanner's internal image buffer is not closed . 25 Informational message. See Chapter 3, "Calibrating the Scanner". • If the problem persists, call Service. 281 Informational message. The transport...
Processing will automatically resume after power-on self-test failed Printer bitmap font in use Rear calibration failed Rear calibration succeeded Refeed document set Requested pages scanned Paused for image processing Transport timeout ID# Operator Message 1, 48 The feeder has stopped and the transport is still running because the scanner's internal image buffer is not closed . 25 Informational message. See Chapter 3, "Calibrating the Scanner". • If the problem persists, call Service. 281 Informational message. The transport...
User Guide
Page 95
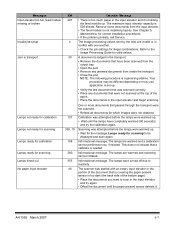
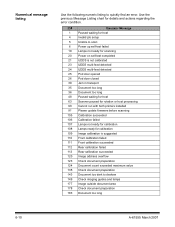
... numeric listing to deskew 149 Check imaging guides and lamps 177 Image outside document area 178 Check document preparation 183 Document too long 6-10 A-61555 March 2007 ID# Operator Message 1 Paused waiting for host 4 Invalid job setup 5 Unable to scan 6 Power up self-test failed 19 Lamps not ready for scanning 20 Power on self-test completed 21 UDDS is not calibrated 23 UDDS multi-feed detected 24 UDDS multi-feed detected 25 Pod door opened 26...
... numeric listing to deskew 149 Check imaging guides and lamps 177 Image outside document area 178 Check document preparation 183 Document too long 6-10 A-61555 March 2007 ID# Operator Message 1 Paused waiting for host 4 Invalid job setup 5 Unable to scan 6 Power up self-test failed 19 Lamps not ready for scanning 20 Power on self-test completed 21 UDDS is not calibrated 23 UDDS multi-feed detected 24 UDDS multi-feed detected 25 Pod door opened 26...
User Guide
Page 97
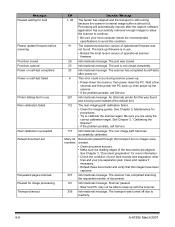
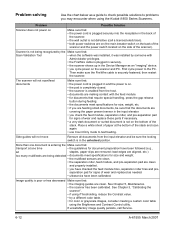
... as a guide to check possible solutions to problems you may encounter when using the Brightness and Contrast Control utility. Scanner is poor or has decreased Make sure that the documents are clean and properly installed. • you check the feed module, separation roller, and pre-separation pad for color or grayscale images, consider creating a custom color table using the Kodak i1800 Series Scanners. Place a white sheet of wear and replace these parts if necessary...
... as a guide to check possible solutions to problems you may encounter when using the Brightness and Contrast Control utility. Scanner is poor or has decreased Make sure that the documents are clean and properly installed. • you check the feed module, separation roller, and pre-separation pad for color or grayscale images, consider creating a custom color table using the Kodak i1800 Series Scanners. Place a white sheet of wear and replace these parts if necessary...
User Guide
Page 98
... roller tires and pre- The Enhanced Printer is not printing as needed. The Image calibration target and Ultrasonics calibration target are different. • the imaging guides are clean. • the transport is clear of obstructions. • the sensors are clean. • the calibration target you are using iThresholding, reduce the Contrast value. Use the calibration target provided with your scanner. • If you are using is clean. Problem Possible Solution Calibration has failed Make...
... roller tires and pre- The Enhanced Printer is not printing as needed. The Image calibration target and Ultrasonics calibration target are different. • the imaging guides are clean. • the transport is clear of obstructions. • the sensors are clean. • the calibration target you are using iThresholding, reduce the Contrast value. Use the calibration target provided with your scanner. • If you are using is clean. Problem Possible Solution Calibration has failed Make...

User Guide
Page 100
... formats Scan Area ADF Capacity Recommended Daily Volume Light Source Scanner operational voltage Scanner Dimensions Scanner Weight Host Connection Multi-feed Detection Color Touchscreen Control Ergonomic Height Adjustment Image Address Patch Readers Imprinting Operating Temperature Humidity Environmental Factors Heat Load Altitude Acoustic Noise i1840 Scanner: Duplex color scanner with an automatic document feeder including the enhanced printer, 160 pages per minute (landscape) i1860 Scanner: Duplex color scanner with ultrasonic technology; three ultrasonic sensors that can work together...
... formats Scan Area ADF Capacity Recommended Daily Volume Light Source Scanner operational voltage Scanner Dimensions Scanner Weight Host Connection Multi-feed Detection Color Touchscreen Control Ergonomic Height Adjustment Image Address Patch Readers Imprinting Operating Temperature Humidity Environmental Factors Heat Load Altitude Acoustic Noise i1840 Scanner: Duplex color scanner with an automatic document feeder including the enhanced printer, 160 pages per minute (landscape) i1860 Scanner: Duplex color scanner with ultrasonic technology; three ultrasonic sensors that can work together...


