User Guide
Page 2
..., level work surface capable of supporting at : www.kodak.com/go/msds. Remove the power cord from the electric socket, be kept short, using a hair net if needed, or tying long hair up in the User's Guide. • When using the flatbed for supplies and catalog numbers. Users and their employee practices and make compliance with these precautions a part of the job description for operation of the scanner or any...
..., level work surface capable of supporting at : www.kodak.com/go/msds. Remove the power cord from the electric socket, be kept short, using a hair net if needed, or tying long hair up in the User's Guide. • When using the flatbed for supplies and catalog numbers. Users and their employee practices and make compliance with these precautions a part of the job description for operation of the scanner or any...
User Guide
Page 3
... the default time set to 15 minutes. follow local regulations or contact Kodak locally for more information. • The product packaging is recyclable. • Kodak Truper Scanners are replaced during maintenance or service; Please contact your local Kodak representative or refer to www.kodak.com/ go /REACH for information about the presence of substances included on the collection and recovery programs available...
... the default time set to 15 minutes. follow local regulations or contact Kodak locally for more information. • The product packaging is recyclable. • Kodak Truper Scanners are replaced during maintenance or service; Please contact your local Kodak representative or refer to www.kodak.com/ go /REACH for information about the presence of substances included on the collection and recovery programs available...
User Guide
Page 7
... scanning and the desired image resolution. front page (pre-scan) imprinter prints the user-specified alphanumeric string on variables such as A3, or color scanning at a resolution of the documents you need additional memory, the Memory Upgrade Kit is available. some scanning work may require additional memory. User Utility - For use with both the Kodak Trūper User's Guide (multiple languages) - CAT No. 896 1955 Memory Upgrade Kit - ISIS/TWAIN Driver - designed to run smoothly through the scanner transport. VRS User Manual...
... scanning and the desired image resolution. front page (pre-scan) imprinter prints the user-specified alphanumeric string on variables such as A3, or color scanning at a resolution of the documents you need additional memory, the Memory Upgrade Kit is available. some scanning work may require additional memory. User Utility - For use with both the Kodak Trūper User's Guide (multiple languages) - CAT No. 896 1955 Memory Upgrade Kit - ISIS/TWAIN Driver - designed to run smoothly through the scanner transport. VRS User Manual...
User Guide
Page 9
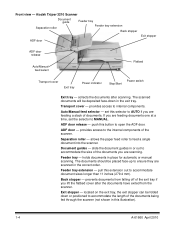
... the documents you are scanning. The scanned documents will be folded down in place for automatic or manual scanning. Auto/Manual feed selector - slide the document guides in this button to accommodate the size of the documents being fed through the scanner (not shown in or out to open the ADF door. Kodak Trūper 3210 Scanner Document guide Separation roller Feeder tray Feeder tray extension Back stopper ADF door Exit stopper ADF door release Auto/Manual feed select Flatbed Transport cover Exit tray Power indicator Power switch Stop/Start Exit tray -
... the documents you are scanning. The scanned documents will be folded down in place for automatic or manual scanning. Auto/Manual feed selector - slide the document guides in this button to accommodate the size of the documents being fed through the scanner (not shown in or out to open the ADF door. Kodak Trūper 3210 Scanner Document guide Separation roller Feeder tray Feeder tray extension Back stopper ADF door Exit stopper ADF door release Auto/Manual feed select Flatbed Transport cover Exit tray Power indicator Power switch Stop/Start Exit tray -

User Guide
Page 13
... checklist 2-1 Attaching the feeder tray 2-2 Making connections 2-2 Installing the Windows scanner driver 2-3 Installing the software 2-4 Step 1: User utility 2-4 Step 2: ISIS/TWAIN Driver 2-5 Step 3: VirtualReScan 2-5 Step 4: Applications 2-5 User Utilities 2-6 Viewing manuals 2-6 Installation checklist • After the scanner has been unpacked, it is recommended that you need them later. See Appendix E, Repacking the Scanner for your scanning or document management software application. You are now ready to the scanner. Refer to the instructions for more information...
... checklist 2-1 Attaching the feeder tray 2-2 Making connections 2-2 Installing the Windows scanner driver 2-3 Installing the software 2-4 Step 1: User utility 2-4 Step 2: ISIS/TWAIN Driver 2-5 Step 3: VirtualReScan 2-5 Step 4: Applications 2-5 User Utilities 2-6 Viewing manuals 2-6 Installation checklist • After the scanner has been unpacked, it is recommended that you need them later. See Appendix E, Repacking the Scanner for your scanning or document management software application. You are now ready to the scanner. Refer to the instructions for more information...
User Guide
Page 16
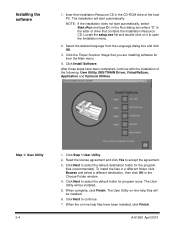
... the CD-ROM drive of the following: User Utility, ISIS/TWAIN Driver, VirtualReScan, Application and Optional Utilities. The User Utility on -line help files will be installed. 5. Select the desired language from the Main menu. 4. The User Utility will start automatically, select Start>Run and type D:\ in the Run dialog box where "D" is the letter of drive that you are installing software for the program files (recommended). Click Next to select the default folder for program icons...
... the CD-ROM drive of the following: User Utility, ISIS/TWAIN Driver, VirtualReScan, Application and Optional Utilities. The User Utility on -line help files will be installed. 5. Select the desired language from the Main menu. 4. The User Utility will start automatically, select Start>Run and type D:\ in the Run dialog box where "D" is the letter of drive that you are installing software for the program files (recommended). Click Next to select the default folder for program icons...
User Guide
Page 24
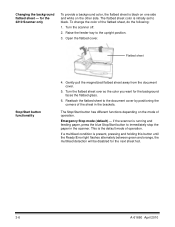
... flatbed sheet away from the document cover. 5. The Stop/Start button has different functions depending on the other side. If a multifeed condition is black on one side and white on the mode of operation. This is the default mode of operation. Turn the flatbed sheet over so the color you want for the next sheet fed. 3-6 A-61660 April 2010 Reattach the flatbed sheet to black. Emergency Stop mode (default) - for the 3210 Scanner only To provide a background color, the flatbed sheet...
... flatbed sheet away from the document cover. 5. The Stop/Start button has different functions depending on the other side. If a multifeed condition is black on one side and white on the mode of operation. This is the default mode of operation. Turn the flatbed sheet over so the color you want for the next sheet fed. 3-6 A-61660 April 2010 Reattach the flatbed sheet to black. Emergency Stop mode (default) - for the 3210 Scanner only To provide a background color, the flatbed sheet...
User Guide
Page 37
select one of paper" indication is raised and the feeder rollers are difficult to separate and may cause multifeeds. In this option is checked, the scanner will detect when a control sheet is only available in a batch and change the scanner's settings (i.e., color mode) accordingly. • Skip Control Sheet - It is placed in the Start Button and Automatic modes. • Detect Control Sheet - select On when manually feeding documents. In Automatic mode, the "out of the following...
select one of paper" indication is raised and the feeder rollers are difficult to separate and may cause multifeeds. In this option is checked, the scanner will detect when a control sheet is only available in a batch and change the scanner's settings (i.e., color mode) accordingly. • Skip Control Sheet - It is placed in the Start Button and Automatic modes. • Detect Control Sheet - select On when manually feeding documents. In Automatic mode, the "out of the following...

User Guide
Page 43
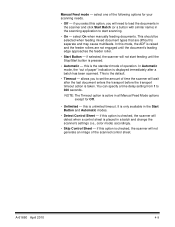
..., see the section entitled, "Installing the software" in Chapter 2. • Click the User Utility icon or click the Start>Programs>Kodak> Scanner Tools. If the Trūper 3210 and 3610 Scanners. A-61660 April 2010 5-1 5 User Utility Contents Starting the User Utility The User Utility dialog box Starting the User Utility 5-1 The User Utility dialog box 5-1 The User Utility is installed as part of the scanner's software installation. The User Utility is a software program used to maintain and troubleshoot the Kodak Trūper User Utility icon is displayed, select the...
..., see the section entitled, "Installing the software" in Chapter 2. • Click the User Utility icon or click the Start>Programs>Kodak> Scanner Tools. If the Trūper 3210 and 3610 Scanners. A-61660 April 2010 5-1 5 User Utility Contents Starting the User Utility The User Utility dialog box Starting the User Utility 5-1 The User Utility dialog box 5-1 The User Utility is installed as part of the scanner's software installation. The User Utility is a software program used to maintain and troubleshoot the Kodak Trūper User Utility icon is displayed, select the...

User Guide
Page 47
... User Utility functions and settings will then apply to the most current numbers. Click the drop-down list, browse to find a location to a log file. 1. opens the Select Scanner dialog box. updates the counter display to the selected scanner. Select Scanner(X) - Click Select Scanner(X). 2. Document scanning operations do not automatically update the counter displays. • Clear Counter buttons - Help - When the After Clean Roller number is greater than the Warning number, the rollers need to be cleaned. (The Warning number indicates how many pages...
... User Utility functions and settings will then apply to the most current numbers. Click the drop-down list, browse to find a location to a log file. 1. opens the Select Scanner dialog box. updates the counter display to the selected scanner. Select Scanner(X) - Click Select Scanner(X). 2. Document scanning operations do not automatically update the counter displays. • Clear Counter buttons - Help - When the After Clean Roller number is greater than the Warning number, the rollers need to be cleaned. (The Warning number indicates how many pages...
User Guide
Page 49
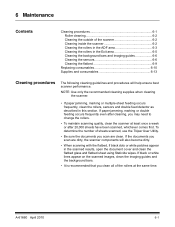
... black dots or white patches appear in this section. NOTE: Use only the recommended cleaning supplies when cleaning the scanner. • If paper jamming, marking or multiple-sheet feeding occurs frequently, clean the rollers, sensors and double feed detector as described in the scanned results, open the document cover and clean the flatbed glass and flatbed sheet using Staticide wipes. If paper jamming, marking or double feeding occurs frequently even after 20,000 sheets have been scanned, whichever comes first. 6 Maintenance Contents Cleaning procedures 6-1 Roller cleaning...
... black dots or white patches appear in this section. NOTE: Use only the recommended cleaning supplies when cleaning the scanner. • If paper jamming, marking or multiple-sheet feeding occurs frequently, clean the rollers, sensors and double feed detector as described in the scanned results, open the document cover and clean the flatbed glass and flatbed sheet using Staticide wipes. If paper jamming, marking or double feeding occurs frequently even after 20,000 sheets have been scanned, whichever comes first. 6 Maintenance Contents Cleaning procedures 6-1 Roller cleaning...

User Guide
Page 50
... Safety Data Sheet (MSDS). Clean the feeder tray and exit tray of the scanner. Use a brush to remove dirt and dust from side to side. See the Kodak website at least once a month. 1. Cleaning the outside of the scanner Clean the outside of sheets scanned, use the Trūper User Utility for cleaning inside the scanner If paper jamming, marking, or multiple-sheet feeding occurs frequently, clean the rollers, sensors and double feed detector as described in this section. Turn the scanner off . 2. Clean...
... Safety Data Sheet (MSDS). Clean the feeder tray and exit tray of the scanner. Use a brush to remove dirt and dust from side to side. See the Kodak website at least once a month. 1. Cleaning the outside of the scanner Clean the outside of sheets scanned, use the Trūper User Utility for cleaning inside the scanner If paper jamming, marking, or multiple-sheet feeding occurs frequently, clean the rollers, sensors and double feed detector as described in this section. Turn the scanner off . 2. Clean...
User Guide
Page 63
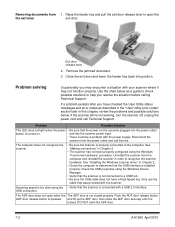
... the feeder tray back into the power outlet button is not connected to the computer. Only use the cable that the power cord is securely plugged into position. Removing documents from the power outlet and call Technical Support. See "Installing the Windows scanner driver" in Chapter 2. • The scanner has not been properly configured using the Windows Device Manager. • Verify that the USB interface is not working, turn the scanner off, unplug the power cord and call Service. Remove the jammed document. 3. Problem...
... the feeder tray back into the power outlet button is not connected to the computer. Only use the cable that the power cord is securely plugged into position. Removing documents from the power outlet and call Technical Support. See "Installing the Windows scanner driver" in Chapter 2. • The scanner has not been properly configured using the Windows Device Manager. • Verify that the USB interface is not working, turn the scanner off, unplug the power cord and call Service. Remove the jammed document. 3. Problem...

User Guide
Page 64
... original document. Image crop failures with VRS scanning. See the section entitled, "Getting your documents ready to be scanned is caused by the original printing pattern on the feeder tray, but the scanner does "Scanning documents" in the feeder tray face-up. not start scanning. • The sensor cannot detect the document because the edge of sheets in Chapter 3. (ADF) Double feeding or skewing problems occur frequently or the scanner stops feeding while scanning. • The rollers may...
... original document. Image crop failures with VRS scanning. See the section entitled, "Getting your documents ready to be scanned is caused by the original printing pattern on the feeder tray, but the scanner does "Scanning documents" in the feeder tray face-up. not start scanning. • The sensor cannot detect the document because the edge of sheets in Chapter 3. (ADF) Double feeding or skewing problems occur frequently or the scanner stops feeding while scanning. • The rollers may...
User Guide
Page 65
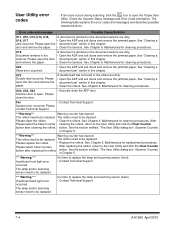
... 6, Maintenance for cleaning procedures. U23 Double feed occurred. It is jammed or the document sensors are dirty. • Open the ADF and exit doors and remove the jammed paper. See the section entitled, "The User Utility dialog box" (Scanner Counter) in the • Open the ADF and exit doors and remove the jammed paper. Fxx • Contact Technical Support. The following table explains the error codes and messages and describes possible causes/solutions. User Utility error codes If an issue occurs...
... 6, Maintenance for cleaning procedures. U23 Double feed occurred. It is jammed or the document sensors are dirty. • Open the ADF and exit doors and remove the jammed paper. See the section entitled, "The User Utility dialog box" (Scanner Counter) in the • Open the ADF and exit doors and remove the jammed paper. Fxx • Contact Technical Support. The following table explains the error codes and messages and describes possible causes/solutions. User Utility error codes If an issue occurs...

User Guide
Page 66
... problem. • The scanner model and serial number. • Computer configuration. • Software application you are using. LED Steady green Flashing green Flashing green/orange Steady orange Flashing orange Red Status Ready to be cleaned. Check the status of the LED indicates the scanner status. The rollers need to be cleaned. A-61660 April 2010 7-5 Error code and message *** Warning *** The front reference plate may need to scan or scanning is not turned on, turn the scanner...
... problem. • The scanner model and serial number. • Computer configuration. • Software application you are using. LED Steady green Flashing green Flashing green/orange Steady orange Flashing orange Red Status Ready to be cleaned. Check the status of the LED indicates the scanner status. The rollers need to be cleaned. A-61660 April 2010 7-5 Error code and message *** Warning *** The front reference plate may need to scan or scanning is not turned on, turn the scanner...

User Guide
Page 68
... contents Power Cord, USB Cable 2.0, Roller Cleaning Kit, CD-ROM (USer's Guide, VRS Professional, User Utility Software), Printed Documents (Quick Installation Checklist) Bundled software Kofax VCDemo, Kofax Scan Demo Software Imprinter options Number of characters Pre-scan, front page VCDemo, 62 characters, ISIS characters NOTE: The number of characters will vary according to run Kodak Trūper 3210 and 3610 Scanners: Minimum Requirements • Pentium 4, 1.4 GHz processor • 256 MB RAM • Hard drive with 300 MB free disk...
... contents Power Cord, USB Cable 2.0, Roller Cleaning Kit, CD-ROM (USer's Guide, VRS Professional, User Utility Software), Printed Documents (Quick Installation Checklist) Bundled software Kofax VCDemo, Kofax Scan Demo Software Imprinter options Number of characters Pre-scan, front page VCDemo, 62 characters, ISIS characters NOTE: The number of characters will vary according to run Kodak Trūper 3210 and 3610 Scanners: Minimum Requirements • Pentium 4, 1.4 GHz processor • 256 MB RAM • Hard drive with 300 MB free disk...
User Guide
Page 70
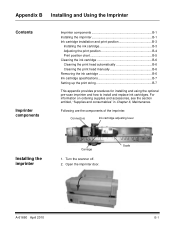
... 6, Maintenance. Turn the scanner off. 2. Connectors Ink cartridge adjusting lever Installing the imprinter Carriage 1. Appendix B Installing and Using the Imprinter Contents Imprinter components Imprinter components B-1 Installing the imprinter B-1 Ink cartridge installation and print position B-3 Installing the ink cartridge B-3 Adjusting the print position B-4 Print position chart B-5 Cleaning the ink cartridge B-6 Cleaning the print head automatically B-6 Cleaning the print head manually B-6 Removing the ink cartridge B-6 Ink cartridge specifications B-7 Setting up...
... 6, Maintenance. Turn the scanner off. 2. Connectors Ink cartridge adjusting lever Installing the imprinter Carriage 1. Appendix B Installing and Using the Imprinter Contents Imprinter components Imprinter components B-1 Installing the imprinter B-1 Ink cartridge installation and print position B-3 Installing the ink cartridge B-3 Adjusting the print position B-4 Print position chart B-5 Cleaning the ink cartridge B-6 Cleaning the print head automatically B-6 Cleaning the print head manually B-6 Removing the ink cartridge B-6 Ink cartridge specifications B-7 Setting up...
User Guide
Page 76
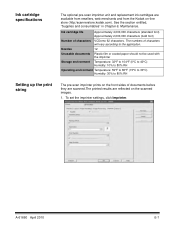
... vary according to 80% RH Setting up the print string The pre-scan imprinter prints on the front sides of documents before they are scanned.The printed results are available from resellers, web merchants and from the Kodak on the scanned images. 1. To set the imprinter settings, click Imprinter. Nozzles 12 Unusable documents Plastic film or coated paper should not be used with the imprinter Storage environment...
... vary according to 80% RH Setting up the print string The pre-scan imprinter prints on the front sides of documents before they are scanned.The printed results are available from resellers, web merchants and from the Kodak on the scanned images. 1. To set the imprinter settings, click Imprinter. Nozzles 12 Unusable documents Plastic film or coated paper should not be used with the imprinter Storage environment...
User Guide
Page 80
... documents are manually fed by the operator, rather than automatically fed into the feeder. adjustable component used in black and white mode. allows you to dropout one side of a scanner to 6 colors from a color document when scanning in the User Utility dialog box, or an indicator light on the LED status indicator. Resolution - a measurement of the ability of a document as it passes through the scanner. RGB - Simplex scanner - Single color dropout - Deskew - Double Feed...
... documents are manually fed by the operator, rather than automatically fed into the feeder. adjustable component used in black and white mode. allows you to dropout one side of a scanner to 6 colors from a color document when scanning in the User Utility dialog box, or an indicator light on the LED status indicator. Resolution - a measurement of the ability of a document as it passes through the scanner. RGB - Simplex scanner - Single color dropout - Deskew - Double Feed...


