
User Guide
Page 2
.... Failure to do so may cause damage to the operation of any mechanical device. Immediately stop the scanner and disconnect the power cord from the wall outlet before moving or relocating the scanner. • Follow the Kodak recommended cleaning procedures. This may cause electrical shock or fire. • Do not damage, knot, cut...
.... Failure to do so may cause damage to the operation of any mechanical device. Immediately stop the scanner and disconnect the power cord from the wall outlet before moving or relocating the scanner. • Follow the Kodak recommended cleaning procedures. This may cause electrical shock or fire. • Do not damage, knot, cut...
User Guide
Page 4
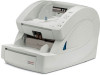
...in landscape mode. • Kodak Ngenuity 9090DB Scanner - This User's Guide provides information and procedures for companies in its class. duplex scanner that scans 90 pages per minute in black and white in support of documents than any other scanner in industries such as health..., transportation and service bureaus. The following documentation is for use operator interface and smart front panel functionality, Ngenuity Scanners are available: • Kodak Ngenuity 9090DC Scanner - With an easy-to-use with all models unless otherwise noted. The information in this guide is ...
...in landscape mode. • Kodak Ngenuity 9090DB Scanner - This User's Guide provides information and procedures for companies in its class. duplex scanner that scans 90 pages per minute in black and white in support of documents than any other scanner in industries such as health..., transportation and service bureaus. The following documentation is for use operator interface and smart front panel functionality, Ngenuity Scanners are available: • Kodak Ngenuity 9090DC Scanner - With an easy-to-use with all models unless otherwise noted. The information in this guide is ...

User Guide
Page 5
... printed results also reflected on the scanned images. Optional accessories Front/Rear Printer Kit - VRS Software - Ngenuity Operator Utility (NOU) - Kodak Ngenuity Installation Guide - CAT No. 863 4230 What's in the box • Kodak Ngenuity 9090DC, 9090DB, 9125 or 9150 Scanner • 10-foot power cord and USB cable • Camera calibration kit • Starter cleaning kit...
... printed results also reflected on the scanned images. Optional accessories Front/Rear Printer Kit - VRS Software - Ngenuity Operator Utility (NOU) - Kodak Ngenuity Installation Guide - CAT No. 863 4230 What's in the box • Kodak Ngenuity 9090DC, 9090DB, 9125 or 9150 Scanner • 10-foot power cord and USB cable • Camera calibration kit • Starter cleaning kit...
User Guide
Page 6
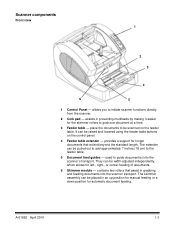
...be width-adjusted independently, which allows for automatic document feeding. The skimmer assembly can be placed in grabbing and feeding documents into the scanner's transport. Scanner components Front view 1 2 3 4 6 5 1 Control Panel - contains two rollers that extend beyond the standard length. The ...to add approximately 7 inches (18 cm) to the feeder table. 5 Document feed guides - place the documents to initiate scanner functions directly from the scanner. 2 Cork pad - A-61662 April 2010 1-3 allows you to be scanned on the control panel. 4 Feeder table extender...
...be width-adjusted independently, which allows for automatic document feeding. The skimmer assembly can be placed in grabbing and feeding documents into the scanner's transport. Scanner components Front view 1 2 3 4 6 5 1 Control Panel - contains two rollers that extend beyond the standard length. The ...to add approximately 7 inches (18 cm) to the feeder table. 5 Document feed guides - place the documents to initiate scanner functions directly from the scanner. 2 Cork pad - A-61662 April 2010 1-3 allows you to be scanned on the control panel. 4 Feeder table extender...

User Guide
Page 7
... - allows access to guide the scanned document(s) into the transport. 8 Transport cover release lever - The separator roller assists in the front of the scanner. used to the separator roller. assists in the exit tray. 1-4 A-61662 April 2010 opens in an upward position and will stay open the transport...right- Pull one or both levers towards you while standing in separating documents as they feed into a neat stack on each side of the scanner to release and open in a full-up position with the support of documents in the placement of two gas springs that are located inside...
... - allows access to guide the scanned document(s) into the transport. 8 Transport cover release lever - The separator roller assists in the front of the scanner. used to the separator roller. assists in the exit tray. 1-4 A-61662 April 2010 opens in an upward position and will stay open the transport...right- Pull one or both levers towards you while standing in separating documents as they feed into a neat stack on each side of the scanner to release and open in a full-up position with the support of documents in the placement of two gas springs that are located inside...
User Guide
Page 8
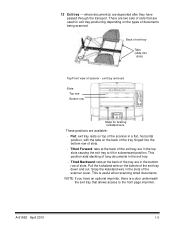
... tray are deposited after they have an optional imprinter, there is useful when scanning small documents. Tilted Backward: tabs at the back of the scanner cover. This is a door underneath the exit tray that are used for bracing kickstand wire These positions are in the top slots causing the ... down and out. 12 Exit tray - exit tray removed SlotsTop row Bottom row Stops for exit tray positioning depending on the bottom of the scanner in a downward position. where document(s) are in the bottom row of slots. - Back of exit tray Tabs (slide into the bottom row of...
... tray are deposited after they have an optional imprinter, there is useful when scanning small documents. Tilted Backward: tabs at the back of the scanner cover. This is a door underneath the exit tray that are used for bracing kickstand wire These positions are in the top slots causing the ... down and out. 12 Exit tray - exit tray removed SlotsTop row Bottom row Stops for exit tray positioning depending on the bottom of the scanner in a downward position. where document(s) are in the bottom row of slots. - Back of exit tray Tabs (slide into the bottom row of...
User Guide
Page 9
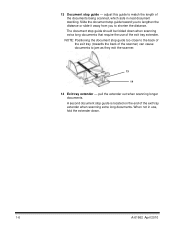
... exit tray (towards the back of the exit tray extender. When not in neat document stacking. adjust this guide to jam as they exit the scanner. 13 14 14 Exit tray extender - A second document stop guide should be folded down . 1-6 A-61662 April 2010 The document stop guide is located...end of the documents being scanned, which aids in use, fold the extender down when scanning extra long documents that require the use of the scanner) can cause documents to match the length of the exit tray extender when scanning extra long documents. 13 Document stop guide - pull the extender...
... exit tray (towards the back of the exit tray extender. When not in neat document stacking. adjust this guide to jam as they exit the scanner. 13 14 14 Exit tray extender - A second document stop guide should be folded down . 1-6 A-61662 April 2010 The document stop guide is located...end of the documents being scanned, which aids in use, fold the extender down when scanning extra long documents that require the use of the scanner) can cause documents to match the length of the exit tray extender when scanning extra long documents. 13 Document stop guide - pull the extender...
User Guide
Page 10
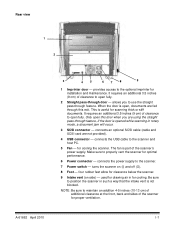
... you are fed through this door when you to use the straight pass-through door - It requires an additional 3.5 inches (9 cm) of the scanner for cooling. connects the USB cable to maintain an addition 4-5 inches (10-13 cm) of additional clearance at the front, back and sides of... clearance to position the scanner in for proper ventilation. connects the power supply to the optional imprinter for optimal performance. 6 Power connector - connects an optional SCSI cable ...
... you are fed through this door when you to use the straight pass-through door - It requires an additional 3.5 inches (9 cm) of the scanner for cooling. connects the USB cable to maintain an addition 4-5 inches (10-13 cm) of additional clearance at the front, back and sides of... clearance to position the scanner in for proper ventilation. connects the power supply to the optional imprinter for optimal performance. 6 Power connector - connects an optional SCSI cable ...
User Guide
Page 11
... of the host PC. 10. Launch the Ngenuity Operator Utility (NOU) by double-clicking the NOU icon found on the host PC. 4. Refer to check for the Kodak Ngenuity 9000 Series Scanners. Without the scanner attached, turn on the scanner. NOTE: If you are now ready to the scanner using the optional SCSI connection, refer to incorporate...
... of the host PC. 10. Launch the Ngenuity Operator Utility (NOU) by double-clicking the NOU icon found on the host PC. 4. Refer to check for the Kodak Ngenuity 9000 Series Scanners. Without the scanner attached, turn on the scanner. NOTE: If you are now ready to the scanner using the optional SCSI connection, refer to incorporate...

User Guide
Page 12
Installation: with an optional SCSI connection The Kodak Ngenuity Scanner is equipped to accommodate a SCSI connection for the initialization sequence to complete. 10. NOTE: The scanner weighs approximately 112 pounds (50.8 kg). Load the Installation CD into the CD-ROM drive and install the software ... these items must be a D68-pin SCSI-3 cable. 1. A SCSI connection kit is compatible with Ngenuity Scanners. Be sure to the scanner. 8. Without the scanner attached, turn on the host PC. 11. Kodak does not provide a SCSI card or cable with the SCSI card. 7. Install the SCSI card (...
Installation: with an optional SCSI connection The Kodak Ngenuity Scanner is equipped to accommodate a SCSI connection for the initialization sequence to complete. 10. NOTE: The scanner weighs approximately 112 pounds (50.8 kg). Load the Installation CD into the CD-ROM drive and install the software ... these items must be a D68-pin SCSI-3 cable. 1. A SCSI connection kit is compatible with Ngenuity Scanners. Be sure to the scanner. 8. Without the scanner attached, turn on the host PC. 11. Kodak does not provide a SCSI card or cable with the SCSI card. 7. Install the SCSI card (...

User Guide
Page 13
The Ngenuity Operator Utility Home Screen (default) will update when the scanner self tests have passed and communication with the scanner, refer to connect with the scanner has been established. A-61662 April 2010 2-3 NOTE: If the Ngenuity Operator Utility failed to Chapter 6, Troubleshooting for more information.
The Ngenuity Operator Utility Home Screen (default) will update when the scanner self tests have passed and communication with the scanner, refer to connect with the scanner has been established. A-61662 April 2010 2-3 NOTE: If the Ngenuity Operator Utility failed to Chapter 6, Troubleshooting for more information.
User Guide
Page 14
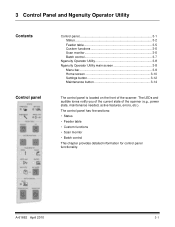
... Utility Contents Control panel Control panel 3-1 Status 3-2 Feeder table 3-5 Custom functions 3-5 Scan monitor 3-5 Batch control 3-7 Ngenuity Operator Utility 3-8 Ngenuity Operator Utility main screen 3-8 Menu bar 3-9 Home screen 3-10 Settings button 3-12 Maintenance button 3-14 The control panel is located on the front of the scanner (e.g., power state, maintenance needed, active features, errors, etc.).
... Utility Contents Control panel Control panel 3-1 Status 3-2 Feeder table 3-5 Custom functions 3-5 Scan monitor 3-5 Batch control 3-7 Ngenuity Operator Utility 3-8 Ngenuity Operator Utility main screen 3-8 Menu bar 3-9 Home screen 3-10 Settings button 3-12 Maintenance button 3-14 The control panel is located on the front of the scanner (e.g., power state, maintenance needed, active features, errors, etc.).

User Guide
Page 15
...Transition Power Mode LED Off Off Sleep>Powered up Blinking, fast Ready>Active Steady green Ready>Sleep Blinking, fast Sleep Blinking, slow When the scanner is in use. • LED On: when the straight pass-through door is open or closed. • LED not lit: when the ..., Maintenance and Manual Feed. Depending on the current Power Mode, the buttons on . Power State/Transition Power Mode LED Off Control panel and scanner are off. Power Mode - this transition. all others are not on the control panel perform different actions. Ready>Active All buttons perform their ...
...Transition Power Mode LED Off Off Sleep>Powered up Blinking, fast Ready>Active Steady green Ready>Sleep Blinking, fast Sleep Blinking, slow When the scanner is in use. • LED On: when the straight pass-through door is open or closed. • LED not lit: when the ..., Maintenance and Manual Feed. Depending on the current Power Mode, the buttons on . Power State/Transition Power Mode LED Off Control panel and scanner are off. Power Mode - this transition. all others are not on the control panel perform different actions. Ready>Active All buttons perform their ...

User Guide
Page 16
... feed mode has been changed from within the scanning software application. 3-3 This mode allows you must feed documents manually into the scanner's transport: ADF mode (default) - Scanner self-test fault detected; The Ngenuity Scanner has four feed modes for more information. this time. Maintenance LED Off (not lit) Slow blinking Fast blinking Steady on...
... feed mode has been changed from within the scanning software application. 3-3 This mode allows you must feed documents manually into the scanner's transport: ADF mode (default) - Scanner self-test fault detected; The Ngenuity Scanner has four feed modes for more information. this time. Maintenance LED Off (not lit) Slow blinking Fast blinking Steady on...
User Guide
Page 17
... connected, select Source>Properties to the up , and the Manual Feed LED will start and beep indicating it through the scanner and generate an image. Select Manual from the feeder. 9. Manually feeding documents For demonstration purposes, VRS Test Application is used in this example, VRS Test... Application) and from the rotating rollers on the skimmer. When the scanner is ready. 2. Remove any paper from the Source drop-down box. 7. Lift the skimmer to open the scanning application...
... connected, select Source>Properties to the up , and the Manual Feed LED will start and beep indicating it through the scanner and generate an image. Select Manual from the feeder. 9. Manually feeding documents For demonstration purposes, VRS Test Application is used in this example, VRS Test... Application) and from the rotating rollers on the skimmer. When the scanner is ready. 2. Remove any paper from the Source drop-down box. 7. Lift the skimmer to open the scanning application...
User Guide
Page 18
...By default, F1 is assigned to Feed Test Batch and F2 is not covered by one of the indicators (i.e., page sensor, error, scanner internal errors, etc.). See the section entitled, "Ngenuity Operator Utility" later in conjunction with the Down button when the feeder is open. Open the... scanner transport cover, remove any jammed documents and close the scanner cover. The feeder table must be assigned via the Ngenuity Operator Utility. The Scan Monitor indicates that the scanner transport cover is empty, to set the lowest position of...
...By default, F1 is assigned to Feed Test Batch and F2 is not covered by one of the indicators (i.e., page sensor, error, scanner internal errors, etc.). See the section entitled, "Ngenuity Operator Utility" later in conjunction with the Down button when the feeder is open. Open the... scanner transport cover, remove any jammed documents and close the scanner cover. The feeder table must be assigned via the Ngenuity Operator Utility. The Scan Monitor indicates that the scanner transport cover is empty, to set the lowest position of...

User Guide
Page 19
... scanning. For example: • If the multifeed mode is set to Stop, the indicator remains lit and the scanner stops when a multifeed is detected. • If the multifeed mode is on, the scanner will ignore the multifeed sensor during batch scanning, you can preempt the impending multifeed alarm without forcing a batch stop...
... scanning. For example: • If the multifeed mode is set to Stop, the indicator remains lit and the scanner stops when a multifeed is detected. • If the multifeed mode is on, the scanner will ignore the multifeed sensor during batch scanning, you can preempt the impending multifeed alarm without forcing a batch stop...
User Guide
Page 20
...to discard the multifeed image and rescan the document). documents are no errors active - Clear/Restart - You can only be done when the scanner is idle (no feeding in progress, pressing Pause/Stop stops the transport before scanning resumes). Press Clear/Restart to resume scanning (there is ...and resume scanning (e.g., paper is removed from the transport, an audible alarm on the documents in the feeder. • Manual Feed mode: the scanner is ready to scan. A-61662 April 2010 3-7 When using VRS, use Clear/Restart to indicate when the batch is paused. • If Pause...
...to discard the multifeed image and rescan the document). documents are no errors active - Clear/Restart - You can only be done when the scanner is idle (no feeding in progress, pressing Pause/Stop stops the transport before scanning resumes). Press Clear/Restart to resume scanning (there is ...and resume scanning (e.g., paper is removed from the transport, an audible alarm on the documents in the feeder. • Manual Feed mode: the scanner is ready to scan. A-61662 April 2010 3-7 When using VRS, use Clear/Restart to indicate when the batch is paused. • If Pause...

User Guide
Page 21
...the host PC's desktop, double-click the Ngenuity Operator Utility icon. The sections that communicates with the scanner to provide scanner status, configure scanner settings, and to monitor and assist with the scanner has been established and then the scanner is powered off will run through an ... that follow provide descriptions of the NOU. NOTE: The Ngenuity Operator Utility remains accessible, but not functional after connectivity with performing routine scanner maintenance. Be sure your scanner is properly connected and the scanner and host PC are on the Home screen of the...
...the host PC's desktop, double-click the Ngenuity Operator Utility icon. The sections that communicates with the scanner to provide scanner status, configure scanner settings, and to monitor and assist with the scanner has been established and then the scanner is powered off will run through an ... that follow provide descriptions of the NOU. NOTE: The Ngenuity Operator Utility remains accessible, but not functional after connectivity with performing routine scanner maintenance. Be sure your scanner is properly connected and the scanner and host PC are on the Home screen of the...
User Guide
Page 22
... contains version information for troubleshooting purposes. • Click Close to close the Scanner Details dialog box. Copy to maintain optimal scanner performance and image quality, be performed when instructed by Kodak Technical Support. closes the Ngenuity Operator Utility. Only software and firmware from Kodak is certified to save the file in another application. Menu bar...
... contains version information for troubleshooting purposes. • Click Close to close the Scanner Details dialog box. Copy to maintain optimal scanner performance and image quality, be performed when instructed by Kodak Technical Support. closes the Ngenuity Operator Utility. Only software and firmware from Kodak is certified to save the file in another application. Menu bar...


