
User Manual
Page 5
.... 1. The power cord may result in a humidified room or a dusty room. If you print in a small area. (4) Unplug the printer before you remove mis-fed media. Take great care not to touch these items when you move it may be damaged and it . Do not pull the cord when you unplug...
.... 1. The power cord may result in a humidified room or a dusty room. If you print in a small area. (4) Unplug the printer before you remove mis-fed media. Take great care not to touch these items when you move it may be damaged and it . Do not pull the cord when you unplug...

User Manual
Page 7
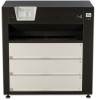
... 1. 6. 1 Papers not available to use 1. 6. 2 Keeping the paper in the custody 1. 6. 3 Treatment against environmental condition Chapter 2 Basic Operations 2. 1 Turning on the KIP C7800 2. 2 Turning off the KIP C7800 2. 3 Replacing the Roll Media 2. 4 Setting Cut Sheet Media to Bypass Feeder 2. 4. 1 Loading Small Size Sheet 2. 4. 2 Loading Large Size Sheet 2. 5 Replacing the Toner Cartridge 2. 6 Replacing the Waste Toner Box...
... 1. 6. 1 Papers not available to use 1. 6. 2 Keeping the paper in the custody 1. 6. 3 Treatment against environmental condition Chapter 2 Basic Operations 2. 1 Turning on the KIP C7800 2. 2 Turning off the KIP C7800 2. 3 Replacing the Roll Media 2. 4 Setting Cut Sheet Media to Bypass Feeder 2. 4. 1 Loading Small Size Sheet 2. 4. 2 Loading Large Size Sheet 2. 5 Replacing the Toner Cartridge 2. 6 Replacing the Waste Toner Box...

User Manual
Page 12
... resolutions produce the highest quality images controlled by an advanced KIP Image Process System. (4) Drastically reliable media transportability brought by Media Feed Belt Conveyer system allows stability of creating excellent image quality and long media feeding. (5) CMYK process systems in tandem, resulting in smaller...allows a broad selection of media type for Folor printing, such as a plain paper / bond roll media, saving consumables cost than a wide format inkjet printer. (7) Prints are available to use immediately, free from drying time and wrinkling by the KIP C7800 dry toner. (8) Easy...
... resolutions produce the highest quality images controlled by an advanced KIP Image Process System. (4) Drastically reliable media transportability brought by Media Feed Belt Conveyer system allows stability of creating excellent image quality and long media feeding. (5) CMYK process systems in tandem, resulting in smaller...allows a broad selection of media type for Folor printing, such as a plain paper / bond roll media, saving consumables cost than a wide format inkjet printer. (7) Prints are available to use immediately, free from drying time and wrinkling by the KIP C7800 dry toner. (8) Easy...

User Manual
Page 13
...cutting sound is longer than 0.05ppm (Average of media feeding system. 1. 4 Specifications Subject Model Type Printing method Color Photoconductor Print speed Exposure method Resolution Print width Print length Specification KIP C7800 Console LED Array Electro Photography CMYK Organic Photoconductive Drum... Color : 100mm / sec standard medias 60mm/sec for special medias, speed varies by media type) Mono : 120mm / second (xx ppm ...
...cutting sound is longer than 0.05ppm (Average of media feeding system. 1. 4 Specifications Subject Model Type Printing method Color Photoconductor Print speed Exposure method Resolution Print width Print length Specification KIP C7800 Console LED Array Electro Photography CMYK Organic Photoconductive Drum... Color : 100mm / sec standard medias 60mm/sec for special medias, speed varies by media type) Mono : 120mm / second (xx ppm ...

User Manual
Page 14
Toner Keep the toner cartridge away from the direct sunlight, and store it in the condition of consumables Specification Plain Paper / Bond: Color mode: 70 to 150g/m2 * For heavier media (90 to shut out the humidity. Mono mode: 70 to 75g/m2 Temperature 15 to 27 degrees centigrade Humidity 20 to 70% RH Print media Wrap the media surely to 150g/m2), use media type setting "Heavy". NOTE These specifications may be changed without notice. 1-6 Chapter 1 Before Use Subject Media Environmental condition Storage condition of 0 - 35 oC and 10 - 85% RH.
Toner Keep the toner cartridge away from the direct sunlight, and store it in the condition of consumables Specification Plain Paper / Bond: Color mode: 70 to 150g/m2 * For heavier media (90 to shut out the humidity. Mono mode: 70 to 75g/m2 Temperature 15 to 27 degrees centigrade Humidity 20 to 70% RH Print media Wrap the media surely to 150g/m2), use media type setting "Heavy". NOTE These specifications may be changed without notice. 1-6 Chapter 1 Before Use Subject Media Environmental condition Storage condition of 0 - 35 oC and 10 - 85% RH.

User Manual
Page 15
Your USB flash memory storage can be set totally. Supports cut sheet media. 20 sheets can be set at once if the media is A2 (594mmx420mm) or smaller. (24" or narrower) This is still power on /off and print controller is a Touch Screen, and many kinds of ...on . 1-7 Chapter 1 Before Use Feeds in the cut sheets loaded on Bypass Feeder. 3 roll media can be installed here. 5VDC max. Operator Call Error Service Call Error Warm sleep Cold sleep When printer is power-off the KIP C7800. Connects to the network. (Purchase a LAN Cable separately) LED indicator above the power switch...
Your USB flash memory storage can be set totally. Supports cut sheet media. 20 sheets can be set at once if the media is A2 (594mmx420mm) or smaller. (24" or narrower) This is still power on /off and print controller is a Touch Screen, and many kinds of ...on . 1-7 Chapter 1 Before Use Feeds in the cut sheets loaded on Bypass Feeder. 3 roll media can be installed here. 5VDC max. Operator Call Error Service Call Error Warm sleep Cold sleep When printer is power-off the KIP C7800. Connects to the network. (Purchase a LAN Cable separately) LED indicator above the power switch...

User Manual
Page 18
Rear Door Waste Toner Box (for Belt Unit) Name of part Rear Door Waste Toner Box (for Belt Unit) Function Can access the mis-fed media and the Waste Toner Box for Belt Unit by opening Rear Door. Collects the wasted toner. 1-10 Chapter 1 Before Use
Rear Door Waste Toner Box (for Belt Unit) Name of part Rear Door Waste Toner Box (for Belt Unit) Function Can access the mis-fed media and the Waste Toner Box for Belt Unit by opening Rear Door. Collects the wasted toner. 1-10 Chapter 1 Before Use

User Manual
Page 20
... round on the surface of the following matters. 1. Do not expose the paper to avoid the humidity. 1-12 Chapter 1 Before Use Refer to [2.3 Replacing Roll Media]. 1. 6. 2 Keeping the paper in the custody Keep the paper in mis-feed, defective image or paper creasing. (6) Tracing paper exposed to air over a long period...
... round on the surface of the following matters. 1. Do not expose the paper to avoid the humidity. 1-12 Chapter 1 Before Use Refer to [2.3 Replacing Roll Media]. 1. 6. 2 Keeping the paper in the custody Keep the paper in mis-feed, defective image or paper creasing. (6) Tracing paper exposed to air over a long period...

User Manual
Page 22
Chapter 2 Basic Operations 2. 1 Turning on the KIP C7800 2. 2 Turning off the KIP C7800 2. 3 Replacing the Roll Media 2. 4 Setting Cut Sheet Media to Bypass Feeder 2. 4. 1 Loading Small Size Sheet 2. 4. 2 Loading Large Size Sheet 2. 5 Replacing the Toner Cartridge 2. 6 Replacing the Waste Toner Box 2. 7 Initial Cut (Straighten the leading edge of roll media) 2. 8 Sleep Mode page 2- 2 2- 4 2- 6 2-11 2-12 2-14 2-16 2-20 2-24 2-26 2-1 Chapter 2 Basic Operations
Chapter 2 Basic Operations 2. 1 Turning on the KIP C7800 2. 2 Turning off the KIP C7800 2. 3 Replacing the Roll Media 2. 4 Setting Cut Sheet Media to Bypass Feeder 2. 4. 1 Loading Small Size Sheet 2. 4. 2 Loading Large Size Sheet 2. 5 Replacing the Toner Cartridge 2. 6 Replacing the Waste Toner Box 2. 7 Initial Cut (Straighten the leading edge of roll media) 2. 8 Sleep Mode page 2- 2 2- 4 2- 6 2-11 2-12 2-14 2-16 2-20 2-24 2-26 2-1 Chapter 2 Basic Operations

User Manual
Page 27
Pulling up the Roll Spool with supporting horizontally. 2-6 Chapter 2 Basic Operations Handle Roll Spool NOTE Lift up the handle to unlock the Roll Deck, and draw out the deck. 2. Remove the Roll Spool from the Roll Deck. 2. 3 Replacing the Roll Media 1.
Pulling up the Roll Spool with supporting horizontally. 2-6 Chapter 2 Basic Operations Handle Roll Spool NOTE Lift up the handle to unlock the Roll Deck, and draw out the deck. 2. Remove the Roll Spool from the Roll Deck. 2. 3 Replacing the Roll Media 1.
User Manual
Page 28
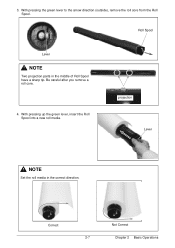
Roll Spool Lever NOTE Two projection parts in the correct direction. With pressing up the green lever, insert the Roll Spool into a new roll media. 3. Be careful after you remove a roll core. 4. projection Lever NOTE Set the roll media in the middle of Roll Spool have a sharp tip. Correct Not Correct 2-7 Chapter 2 Basic Operations With pressing the green lever to the arrow direction (outside), remove the roll core from the Roll Spool.
Roll Spool Lever NOTE Two projection parts in the correct direction. With pressing up the green lever, insert the Roll Spool into a new roll media. 3. Be careful after you remove a roll core. 4. projection Lever NOTE Set the roll media in the middle of Roll Spool have a sharp tip. Correct Not Correct 2-7 Chapter 2 Basic Operations With pressing the green lever to the arrow direction (outside), remove the roll core from the Roll Spool.

User Manual
Page 29
Size guide NOTE (1) A narrower roll media (A3, 15", 12", 11") should fit in the recess on both sides of roll media with the concerning size guide, and then release the green lever to Roll Deck 3 (the bottom drawer) only. Install the Roll Spool into the Roll Deck. Roll Deck 1 and 2 cannot recognize such roll widths. (2) The shaft ends on the side plates. 2-8 Chapter 2 Basic Operations 5. Align the edge of Roll Spool should be loaded to fix the roll media onto the Roll Spool firmly. 6.
Size guide NOTE (1) A narrower roll media (A3, 15", 12", 11") should fit in the recess on both sides of roll media with the concerning size guide, and then release the green lever to Roll Deck 3 (the bottom drawer) only. Install the Roll Spool into the Roll Deck. Roll Deck 1 and 2 cannot recognize such roll widths. (2) The shaft ends on the side plates. 2-8 Chapter 2 Basic Operations 5. Align the edge of Roll Spool should be loaded to fix the roll media onto the Roll Spool firmly. 6.

User Manual
Page 30
Draw out the concerned Roll Deck fully. It will automatically go into the roll media's standby position. (Auto Media Loading) Feeding rollers NOTE (1) Some roll media are taped at its leading edge. Before using such a roll media, cut off some amount of the leading edge using a cutter knife and discard the portion ...Feeder, Left Side Door, Rear Door or Paper Exit Door. 2-9 Chapter 2 Basic Operations Draw out fully 8. 7. This would mess or damage the media path. Insert the leading edge between the feeding rollers. Even if you remove the tape, glue may remain on the leading edge.
Draw out the concerned Roll Deck fully. It will automatically go into the roll media's standby position. (Auto Media Loading) Feeding rollers NOTE (1) Some roll media are taped at its leading edge. Before using such a roll media, cut off some amount of the leading edge using a cutter knife and discard the portion ...Feeder, Left Side Door, Rear Door or Paper Exit Door. 2-9 Chapter 2 Basic Operations Draw out fully 8. 7. This would mess or damage the media path. Insert the leading edge between the feeding rollers. Even if you remove the tape, glue may remain on the leading edge.
User Manual
Page 31
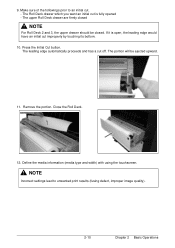
... Deck drawer are firmly closed . The portion will be closed NOTE For Roll Deck 2 and 3, the upper drawer should be ejected upward. 11. Define the media information (media type and width) with using the touchscreen. If it is fully opened - Close the Roll Deck. 12. 9. The Roll Deck drawer which you want...
... Deck drawer are firmly closed . The portion will be closed NOTE For Roll Deck 2 and 3, the upper drawer should be ejected upward. 11. Define the media information (media type and width) with using the touchscreen. If it is fully opened - Close the Roll Deck. 12. 9. The Roll Deck drawer which you want...

User Manual
Page 32
... Not available Not available Remarks Must be longer than 210mm at least. Portrait Landscape 2-11 Chapter 2 Basic Operations Must be longer than 210mm at least. Media size A B C D E Available orientation Landscape (8.5" x 11") Landscape (11" x 17") Landscape (17" x 22") Landscape (22" x 34") ... (1) Availability of multi-feeding Available Available Available Available Available Available Not available Not available Not available Remarks Must be longer than 210mm at least. Inch Media size (Length x Width) 8.5" x 11" 9" x 12" 11" x 17" 12" x 18" 17" x 22" 18" x 24" 30" wide...
... Not available Not available Remarks Must be longer than 210mm at least. Portrait Landscape 2-11 Chapter 2 Basic Operations Must be longer than 210mm at least. Media size A B C D E Available orientation Landscape (8.5" x 11") Landscape (11" x 17") Landscape (17" x 22") Landscape (22" x 34") ... (1) Availability of multi-feeding Available Available Available Available Available Available Not available Not available Not available Remarks Must be longer than 210mm at least. Inch Media size (Length x Width) 8.5" x 11" 9" x 12" 11" x 17" 12" x 18" 17" x 22" 18" x 24" 30" wide...

User Manual
Page 33
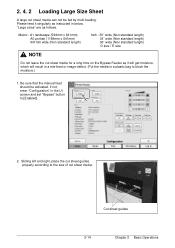
...11" / 9" x 12" 11" x 17" / 12" x 18" 17" x 22" / 18" x 24" A size / B size / C size NOTE (1) Do not attempt to make multi-feeding with cut sheet media for a sheet jutting from the Bypass Feeder. (longer than the above ones as it will get moisture, which will cause a mis-feed or duplicate feeding...2-12 Stack Tray Chapter 2 Basic Operations Be sure that the manual feed should be broken in the worst case. (2) Do not leave the cut sheet media in a small size. The internal mechanism might be activated. 2. 4. 1 Loading Small Size Sheet Multi-feeding is available in case of multi-feeding....
...11" / 9" x 12" 11" x 17" / 12" x 18" 17" x 22" / 18" x 24" A size / B size / C size NOTE (1) Do not attempt to make multi-feeding with cut sheet media for a sheet jutting from the Bypass Feeder. (longer than the above ones as it will get moisture, which will cause a mis-feed or duplicate feeding...2-12 Stack Tray Chapter 2 Basic Operations Be sure that the manual feed should be broken in the worst case. (2) Do not leave the cut sheet media in a small size. The internal mechanism might be activated. 2. 4. 1 Loading Small Size Sheet Multi-feeding is available in case of multi-feeding....

User Manual
Page 34
... down " direction as possible before printing. Sliding left and right, place the cut sheet media will cause a mis-feed, straighten the media as far as a mis-feed can be avoided. Setting of media by landscape position, and move them forward until contacted to the actual sheet(s) in a mis...-feed. Configure the correct media size setting according to feeding roller. Feeding Roller NOTE As curled cut sheet guides properly according to the size of multiple media, put them on the Bypass Feeder by "curl up ) 5. Cut sheet guides ...
... down " direction as possible before printing. Sliding left and right, place the cut sheet media will cause a mis-feed, straighten the media as far as a mis-feed can be avoided. Setting of media by landscape position, and move them forward until contacted to the actual sheet(s) in a mis...-feed. Configure the correct media size setting according to feeding roller. Feeding Roller NOTE As curled cut sheet guides properly according to the size of multiple media, put them on the Bypass Feeder by "curl up ) 5. Cut sheet guides ...
User Manual
Page 35
...) Inch : 30" wide (Non standard length) 34" wide (Non standard length) 36" wide (Non standard length) D size / E size NOTE Do not leave the cut sheet media for a long time on the Bypass Feeder as it singularly as follows. Cut sheet guides 2-14 Chapter 2 Basic Operations Please feed it will get moisture..., which will result in a mis-feed or image defect. (Put the media in below. Be sure that the manual feed should be fed by multi-feeding. 2. 4. 2 Loading Large Size Sheet A large cut sheet...
...) Inch : 30" wide (Non standard length) 34" wide (Non standard length) 36" wide (Non standard length) D size / E size NOTE Do not leave the cut sheet media for a long time on the Bypass Feeder as it singularly as follows. Cut sheet guides 2-14 Chapter 2 Basic Operations Please feed it will get moisture..., which will result in a mis-feed or image defect. (Put the media in below. Be sure that the manual feed should be fed by multi-feeding. 2. 4. 2 Loading Large Size Sheet A large cut sheet...

User Manual
Page 36
... setting according to the actual sheet(s) in a mis-feed. And also please set the media by "curl up ) 5. The feeding rollers rotate automatically to your system reference for media source information. 2-15 Chapter 2 Basic Operations Setting of arrow until contacted to result in the UI screen. ...possible before printing. Refer to place the cut sheet media will cause a mis-feed, straighten the media as far as a mis-feed can be avoided. Feeding roller 4. Put the media on the Bypass Feeder, and move it in the direction of media by "curl down ) Incorrect (curl up " ...
... setting according to the actual sheet(s) in a mis-feed. And also please set the media by "curl up ) 5. The feeding rollers rotate automatically to your system reference for media source information. 2-15 Chapter 2 Basic Operations Setting of arrow until contacted to result in the UI screen. ...possible before printing. Refer to place the cut sheet media will cause a mis-feed, straighten the media as far as a mis-feed can be avoided. Feeding roller 4. Put the media on the Bypass Feeder, and move it in the direction of media by "curl down ) Incorrect (curl up " ...

User Manual
Page 45
... the feeding rollers. Before using a cutter knife and discard the portion with glue. 1. 2. 7 Initial Cut (Straighten the leading edge of roll media) A new roll media tends to the next step. Pressing the Initial Cut Button cuts off some amount of the leading edge using such a roll... media, cut off the leading edge of the media automatically. This would mess or damage the media path. DDrraaww oouutt ffuullllyy 2. Initial Cut will easily straighten the leading edge by cutting off such...
... the feeding rollers. Before using a cutter knife and discard the portion with glue. 1. 2. 7 Initial Cut (Straighten the leading edge of roll media) A new roll media tends to the next step. Pressing the Initial Cut Button cuts off some amount of the leading edge using such a roll... media, cut off the leading edge of the media automatically. This would mess or damage the media path. DDrraaww oouutt ffuullllyy 2. Initial Cut will easily straighten the leading edge by cutting off such...

