
KIP 700 User Manual
Page 2
...EU. Please read this Hardware Operation Guide for the KIP 700m. The International ENERGY STAR ® Office Equipment Program is subject to correct the interference. This Hardware Operation Guide contains functional and operational explanations for future reference. 1. Other devices may cause undesired operation. 2. The symbol shown indicates ... apply to countries outside of People's Republic of the FCC Rules. Please keep this Hardware Operation Guide carefully before using the printer. This device complies with functions that may be effected by electrical noise during...
...EU. Please read this Hardware Operation Guide for the KIP 700m. The International ENERGY STAR ® Office Equipment Program is subject to correct the interference. This Hardware Operation Guide contains functional and operational explanations for future reference. 1. Other devices may cause undesired operation. 2. The symbol shown indicates ... apply to countries outside of People's Republic of the FCC Rules. Please keep this Hardware Operation Guide carefully before using the printer. This device complies with functions that may be effected by electrical noise during...

KIP 700 User Manual
Page 15
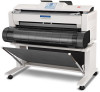
... Deck. PLEASE DO NOT use any other pointed object to tap on /off the KIP 700m. 2 Original Guides Feed the original under the Scanner Unit along the Original Guides. 3 User Interface This is a Touch Screen, and many kinds of user operation are available. 1. 5 Appearance 1. 5. 1 Front view 7 9 3 5 7 12 1 10 13 4 11 7 7 2 12 8 2 No. Consult your...
... Deck. PLEASE DO NOT use any other pointed object to tap on /off the KIP 700m. 2 Original Guides Feed the original under the Scanner Unit along the Original Guides. 3 User Interface This is a Touch Screen, and many kinds of user operation are available. 1. 5 Appearance 1. 5. 1 Front view 7 9 3 5 7 12 1 10 13 4 11 7 7 2 12 8 2 No. Consult your...

KIP 700 User Manual
Page 27
Remove both Flanges (2), lift and remove a roll media or an empty roll core (3). 2 3 1 2 2 3 2 2. 2. 3 Replacing Roll Media NOTE A media mis-feed tends to match your roll media's width. Raise the green lever (4) on Flange (2). Open Roll Deck Cover (1). Move the right Slide Guide (5) to occur just before out of a roll media. 1. The right and left Slide Guides move together. 5 5 right / left Slide Guide move together 2-5 Chapter 2 Basic Operation Holding both Flanges (2) from the roll core (3). 4 2 3 2 2 3.
Remove both Flanges (2), lift and remove a roll media or an empty roll core (3). 2 3 1 2 2 3 2 2. 2. 3 Replacing Roll Media NOTE A media mis-feed tends to match your roll media's width. Raise the green lever (4) on Flange (2). Open Roll Deck Cover (1). Move the right Slide Guide (5) to occur just before out of a roll media. 1. The right and left Slide Guides move together. 5 5 right / left Slide Guide move together 2-5 Chapter 2 Basic Operation Holding both Flanges (2) from the roll core (3). 4 2 3 2 2 3.

KIP 700 User Manual
Page 29
Lower Flanges onto Slide Guides (5) in an incorrect media feeding. 2 groove 2 groove 2-7 Chapter 2 Basic Operation Lift the roll media by holding both Flanges. 6. This direction (2) The outside rim of the roll media. Otherwise the roll media may fall in Roll Deck or result in Roll Deck. 5 5 NOTE (1) Be careful of the winding direction of Flange (2) should fit into the groove on the Slide Guide.
Lower Flanges onto Slide Guides (5) in an incorrect media feeding. 2 groove 2 groove 2-7 Chapter 2 Basic Operation Lift the roll media by holding both Flanges. 6. This direction (2) The outside rim of the roll media. Otherwise the roll media may fall in Roll Deck or result in Roll Deck. 5 5 NOTE (1) Be careful of the winding direction of Flange (2) should fit into the groove on the Slide Guide.
KIP 700 User Manual
Page 32
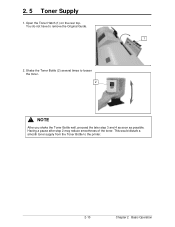
Open the Toner Hatch (1) on the rear top. Having a pause after step 2 may reduce smoothness of the toner. You do not have to loosen the toner. 2 NOTE After you shake the Toner Bottle well, proceed the later step 3 and 4 as soon as possible. Shake the Toner Bottle (2) several times to remove the Original Guide. 1 2. This would disturb a smooth toner supply from the Toner Bottle to the printer. 2-10 Chapter 2 Basic Operation 2. 5 Toner Supply 1.
Open the Toner Hatch (1) on the rear top. Having a pause after step 2 may reduce smoothness of the toner. You do not have to loosen the toner. 2 NOTE After you shake the Toner Bottle well, proceed the later step 3 and 4 as soon as possible. Shake the Toner Bottle (2) several times to remove the Original Guide. 1 2. This would disturb a smooth toner supply from the Toner Bottle to the printer. 2-10 Chapter 2 Basic Operation 2. 5 Toner Supply 1.

KIP 700 User Manual
Page 36
...14 Chapter 2 Basic Operation When the leading edge touches the original feeding roller, the machine automatically carries and sets the original at the proper position. 3. Tap on the Original Table with face up Original Guides (1) with Original Guides. Then insert it... under the Scanner Unit along with the proper markings according to the original width. 1 1 2. There are several size markings on Original Table which indicate possible feed positions. NOTE The scanner unit does not accept originals automatically during Sleep Mode. The KIP...
...14 Chapter 2 Basic Operation When the leading edge touches the original feeding roller, the machine automatically carries and sets the original at the proper position. 3. Tap on the Original Table with face up Original Guides (1) with Original Guides. Then insert it... under the Scanner Unit along with the proper markings according to the original width. 1 1 2. There are several size markings on Original Table which indicate possible feed positions. NOTE The scanner unit does not accept originals automatically during Sleep Mode. The KIP...


