
Operating Guide
Page 3
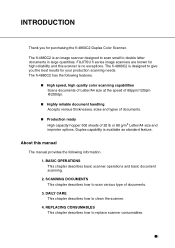
... the fi-4860C2 Duplex Color Scanner. Highly reliable document handling Accepts various thicknesses, sizes and types of 20 lb or 80 g/m2 Letter/A4 size and imprinter options. Production ready High capacity hopper 500 sheets of documents. Duplex capability is an image scanner designed to scan small to replace scanner consumables. ●i About this scanner is designed to clean the scanner. 4. FUJITSU fi series image scanners are known for high reliability and this manual The manual...
... the fi-4860C2 Duplex Color Scanner. Highly reliable document handling Accepts various thicknesses, sizes and types of 20 lb or 80 g/m2 Letter/A4 size and imprinter options. Production ready High capacity hopper 500 sheets of documents. Duplex capability is an image scanner designed to scan small to replace scanner consumables. ●i About this scanner is designed to clean the scanner. 4. FUJITSU fi series image scanners are known for high reliability and this manual The manual...

Operating Guide
Page 4
ADF DOCUMENT SPECIFICATIONS This chapter describes documents that this Scanner. SCANNER SPECIFICATIONS This chapter lists the scanner specifications. OPTIONS This chapter describes the options available for the scanner and the driver installation, please also read the Installation Guide. 1. The "Installation Guide" is useful in taking full advantage of the fi-4860C2 Duplex Color Scanner's features. ●ii INSTALLATION AND CONNECTIONS This chapter describes how to install and connect the scanner, and how to this manual is attached to install the scanner application...
ADF DOCUMENT SPECIFICATIONS This chapter describes documents that this Scanner. SCANNER SPECIFICATIONS This chapter lists the scanner specifications. OPTIONS This chapter describes the options available for the scanner and the driver installation, please also read the Installation Guide. 1. The "Installation Guide" is useful in taking full advantage of the fi-4860C2 Duplex Color Scanner's features. ●ii INSTALLATION AND CONNECTIONS This chapter describes how to install and connect the scanner, and how to this manual is attached to install the scanner application...
Operating Guide
Page 19
..., be sure to disconnect the power plug from the power outlet for a long period of time. When the scanner is heavy (99lbs/45kg). When you lift the scanner, ensure that additional personnel are used for safety. Install the scanner in the direct sunlight. This scanner is not used . ●xvii Do not install the scanner in a well-ventilated location. Doing so might cause...
..., be sure to disconnect the power plug from the power outlet for a long period of time. When the scanner is heavy (99lbs/45kg). When you lift the scanner, ensure that additional personnel are used for safety. Install the scanner in the direct sunlight. This scanner is not used . ●xvii Do not install the scanner in a well-ventilated location. Doing so might cause...

Operating Guide
Page 24
... Counter 4-3 Replacing the Pad ASSY 4-4 Replacing the Pick Roller Unit 4-9 Replacing the Brake Roller Unit 4-12 Replacing the Front-side Lamp 4-15 Replacing the Back-side Lamp 4-20 5 SOLVING COMMON PROBLEMS 5-1 Clearing Document Jams 5-2 Troubleshooting 5-8 Before Contacting a Service Provider 5-29 Labels on the Scanner 5-31 6 ADF DOCUMENT SPECIFICATIONS ...... 6-1 Document Size 6-2 Document Quality 6-3 Hole-punching Prohibited Areas 6-6 Print Prohibited Area 6-7 Background Color Areas 6-8 Job Separation Sheet 6-9 Hopper Capacity 6-10 7 OPERATOR PANEL MENUS 7-1 Setup Mode...
... Counter 4-3 Replacing the Pad ASSY 4-4 Replacing the Pick Roller Unit 4-9 Replacing the Brake Roller Unit 4-12 Replacing the Front-side Lamp 4-15 Replacing the Back-side Lamp 4-20 5 SOLVING COMMON PROBLEMS 5-1 Clearing Document Jams 5-2 Troubleshooting 5-8 Before Contacting a Service Provider 5-29 Labels on the Scanner 5-31 6 ADF DOCUMENT SPECIFICATIONS ...... 6-1 Document Size 6-2 Document Quality 6-3 Hole-punching Prohibited Areas 6-6 Print Prohibited Area 6-7 Background Color Areas 6-8 Job Separation Sheet 6-9 Hopper Capacity 6-10 7 OPERATOR PANEL MENUS 7-1 Setup Mode...
Operating Guide
Page 53
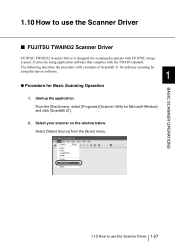
...with the TWAIN standard. Select [Select Source] from the [Scan] menu. BASIC SCANNER OPERATIONS 1.10 How to use the Scanner Driver 1-27 Select your scanner on the window below. From the [Start] menu, select [Programs]-[Scanner Utility for Basic Scanning Operation 1. 1.10 How to use the Scanner Driver ■ FUJITSU TWAIN32 Scanner Driver FUJITSU TWAIN32 Scanner Driver is designed for scanning documents with FUJITSU image scanner fi series by using application software that complies with examples of ScandAll 21 for ordinary scanning by using this driver software. 1 ●...
...with the TWAIN standard. Select [Select Source] from the [Scan] menu. BASIC SCANNER OPERATIONS 1.10 How to use the Scanner Driver 1-27 Select your scanner on the window below. From the [Start] menu, select [Programs]-[Scanner Utility for Basic Scanning Operation 1. 1.10 How to use the Scanner Driver ■ FUJITSU TWAIN32 Scanner Driver FUJITSU TWAIN32 Scanner Driver is designed for scanning documents with FUJITSU image scanner fi series by using application software that complies with examples of ScandAll 21 for ordinary scanning by using this driver software. 1 ●...
Operating Guide
Page 63
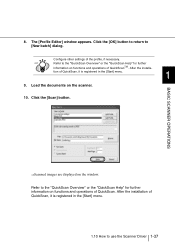
... use the Scanner Driver 1-37 After the installa- Configure other settings of QuickScanTM. Click the [Scan] button. The [Profile Editor] window appears. tion of QuickScan, it is registered in the [Start] menu. 1.10 How to the "QuickScan Overview" or the "QuickScan Help" for further information on the window. Load the documents on functions and operations of QuickScan, it is registered in the [Start] menu. 1 9. After the installation...
... use the Scanner Driver 1-37 After the installa- Configure other settings of QuickScanTM. Click the [Scan] button. The [Profile Editor] window appears. tion of QuickScan, it is registered in the [Start] menu. 1.10 How to the "QuickScan Overview" or the "QuickScan Help" for further information on the window. Load the documents on functions and operations of QuickScan, it is registered in the [Start] menu. 1 9. After the installation...
Operating Guide
Page 70
... defined with this configuration window are accidentally fed). The lamps will be turned off the lamps. Double feeds are scanned by adding margins. [Side] The settings of the documents and outputs data adjusted to use the Scanner Driver Pre-pick With this option, you can set the scanner so that the scanner will stop its operation and display error messages when any page shorter than the original documents by the differences in document lengths or thicknesses...
... defined with this configuration window are accidentally fed). The lamps will be turned off the lamps. Double feeds are scanned by adding margins. [Side] The settings of the documents and outputs data adjusted to use the Scanner Driver Pre-pick With this option, you can set the scanner so that the scanner will stop its operation and display error messages when any page shorter than the original documents by the differences in document lengths or thicknesses...
Operating Guide
Page 73
... [File] - [Create PDF] - [From Scanner...] - [Image Settings...] in the image or the background may fail. Solution: When scanning a double letter (11x17) or A3 size of Page Detection" is recommended for finishing the scan operation faster and/or for Acrobat. There are 2 ways for "Color/Grayscale" and/or "Monochrome" under "Compression" in Acrobat and scanning in TWAIN driver. Setting "Adaptive" for saving scanned images in the TWAIN driver, the scan may be used: - The benefits are : Reduced PDF data size...
... [File] - [Create PDF] - [From Scanner...] - [Image Settings...] in the image or the background may fail. Solution: When scanning a double letter (11x17) or A3 size of Page Detection" is recommended for finishing the scan operation faster and/or for Acrobat. There are 2 ways for "Color/Grayscale" and/or "Monochrome" under "Compression" in Acrobat and scanning in TWAIN driver. Setting "Adaptive" for saving scanned images in the TWAIN driver, the scan may be used: - The benefits are : Reduced PDF data size...
Operating Guide
Page 77
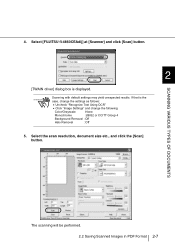
Select [FUJITSU fi-4860CEAdij] at [Scanner] and click [Scan] button. 2 [TWAIN driver] dialog box is the case, change the settings as follows: • Uncheck "Recognize Text Using OCR" • Click "Image Settings" and change the following: Color/Grayscale :None Monochrome :JBIG2 or CCITT Group 4 Background Removal :Off Halo Removal :Off 5. The scanning will be performed. 2.2 Saving Scanned Images in PDF Format 2-7 SCANNING VARIOUS TYPES OF DOCUMENTS 4. Select the scan resolution, document size etc., and click the [Scan] button. If that is...
Select [FUJITSU fi-4860CEAdij] at [Scanner] and click [Scan] button. 2 [TWAIN driver] dialog box is the case, change the settings as follows: • Uncheck "Recognize Text Using OCR" • Click "Image Settings" and change the following: Color/Grayscale :None Monochrome :JBIG2 or CCITT Group 4 Background Removal :Off Halo Removal :Off 5. The scanning will be performed. 2.2 Saving Scanned Images in PDF Format 2-7 SCANNING VARIOUS TYPES OF DOCUMENTS 4. Select the scan resolution, document size etc., and click the [Scan] button. If that is...
Operating Guide
Page 78
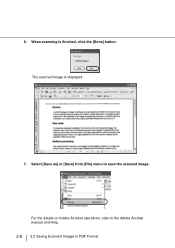
When scanning is displayed. 7. Select [Save as] or [Save] from [File] menu to the Adobe Acrobat manual and Help. 2-8 2.2 Saving Scanned Images in PDF Format 6. For the details on Adobe Acrobat operations, refer to save the scanned image. The scanned image is finished, click the [Done] button.
When scanning is displayed. 7. Select [Save as] or [Save] from [File] menu to the Adobe Acrobat manual and Help. 2-8 2.2 Saving Scanned Images in PDF Format 6. For the details on Adobe Acrobat operations, refer to save the scanned image. The scanned image is finished, click the [Done] button.

Operating Guide
Page 142
... the Guide plate back then you can install it completely. 9. Abrasion counter (Abrasion CNT) reset" on page 7-33. 4-8 4.3 Replacing the Pad ASSY Lift the Upper transport unit to release the safety lock, then lower the unit carefully and push the unit to the section "7.3 Setup Mode Details", " 9. Clear the Pad counter. Please refer to close it smoothly. 7. If not attached firmly, paper feed errors such as document jams may...
... the Guide plate back then you can install it completely. 9. Abrasion counter (Abrasion CNT) reset" on page 7-33. 4-8 4.3 Replacing the Pad ASSY Lift the Upper transport unit to release the safety lock, then lower the unit carefully and push the unit to the section "7.3 Setup Mode Details", " 9. Clear the Pad counter. Please refer to close it smoothly. 7. If not attached firmly, paper feed errors such as document jams may...

Operating Guide
Page 145
... section "7.3 Setup Mode Details", " 9. Abrasion counter (Abrasion CNT) reset " on page 7-33. 4.4 Replacing the Pick Roller Unit 4-11 Clear the Pick roller counter. Lower the ADF upper sheet guide carefully. 6. 4. Please refer to engage. 4 Incorrect installation Correct installation REPLACEMENT OF CONSUMABLES 5. HINT Engage the drive ring onto the drive shaft. Install a new Pick roller unit in the reverse order of its removal. Lift the Upper transport unit to release the safety lock, then lower the unit carefully...
... section "7.3 Setup Mode Details", " 9. Abrasion counter (Abrasion CNT) reset " on page 7-33. 4.4 Replacing the Pick Roller Unit 4-11 Clear the Pick roller counter. Lower the ADF upper sheet guide carefully. 6. 4. Please refer to engage. 4 Incorrect installation Correct installation REPLACEMENT OF CONSUMABLES 5. HINT Engage the drive ring onto the drive shaft. Install a new Pick roller unit in the reverse order of its removal. Lift the Upper transport unit to release the safety lock, then lower the unit carefully...
Operating Guide
Page 182
... method to check the number of Pick roller unit and Brake roller unit, please refer to "7.3 Setup Mode Details", "10. Check consumables life to "7.3 Setup Mode Details", "9. Setting Short document scan mode (Paper Length setup)" on page 7-36. (* 3) For the details on how to clean ADF, refer to "Chapter 3 DAILY CARE" on page 3-1. (* 4) For the details on how to replace Pas ASSY, refer to "4 REPLACEMENT OF CONSUMABLES" on page 4-1. (* 5) For the details on scanner cleaning, refer to...
... method to check the number of Pick roller unit and Brake roller unit, please refer to "7.3 Setup Mode Details", "10. Check consumables life to "7.3 Setup Mode Details", "9. Setting Short document scan mode (Paper Length setup)" on page 7-36. (* 3) For the details on how to clean ADF, refer to "Chapter 3 DAILY CARE" on page 3-1. (* 4) For the details on how to replace Pas ASSY, refer to "4 REPLACEMENT OF CONSUMABLES" on page 4-1. (* 5) For the details on scanner cleaning, refer to...

Operating Guide
Page 184
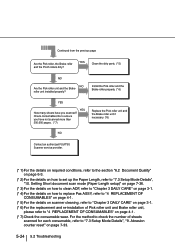
... SCSI card driver and/or updates? YES Uninstall EZ-SCSI first, then install the driver. NO Is the Check LED on next page 5-26 5.2 Troubleshooting NO YES Contact an authorized FUJITSU Scanner service provider. Install correctly the proper driver and/or updates. (* 1) YES Has there been an incomplete driver NO installation in the past? Symptom13 Scanner is not recognized by PC automatically. Continued on the operator panel lit? Is the power turned on the power...
... SCSI card driver and/or updates? YES Uninstall EZ-SCSI first, then install the driver. NO Is the Check LED on next page 5-26 5.2 Troubleshooting NO YES Contact an authorized FUJITSU Scanner service provider. Install correctly the proper driver and/or updates. (* 1) YES Has there been an incomplete driver NO installation in the past? Symptom13 Scanner is not recognized by PC automatically. Continued on the operator panel lit? Is the power turned on the power...

Operating Guide
Page 185
... the SCSI card driver and updates, refer to section 2.2 in the "fi-4860C2 Installation Guide". (* 2) For the details on how to install FUJITSU TWAIN, refer to "APPENDIX 3 MESSAGES ON THE OPERATOR PANEL" on the operator panel blinking? Installation." YES Is the Check LED on page AP-5. 5.2 Troubleshooting 5-27 Continued from the previous page Is the interface cable connected properly? NO YES Check LCD display for Microsoft Windows) User's Guide," "3. Eliminate the cause of error messages, refer to "FUJITSU TWAIN32 Scanner Driver (Scanner Utility for error. NO Connect...
... the SCSI card driver and updates, refer to section 2.2 in the "fi-4860C2 Installation Guide". (* 2) For the details on how to install FUJITSU TWAIN, refer to "APPENDIX 3 MESSAGES ON THE OPERATOR PANEL" on the operator panel blinking? Installation." YES Is the Check LED on page AP-5. 5.2 Troubleshooting 5-27 Continued from the previous page Is the interface cable connected properly? NO YES Check LCD display for Microsoft Windows) User's Guide," "3. Eliminate the cause of error messages, refer to "FUJITSU TWAIN32 Scanner Driver (Scanner Utility for error. NO Connect...

Operating Guide
Page 186
... install the correct driver. Symptom14 Windows system gets unstable. NO Is WNASPI32.DLL installed on how to install FUJITSU TWAIN, refer to "FUJITSU TWAIN32 Scanner Driver (Scanner Utility for Microsoft Windows) User's Guide", "3. Installation." NO The scanner operation is included in the FUJITSU TWAIN CD-ROM. 5-28 5.2 Troubleshooting YES Is ASPI version driver installed by mistake? Is the OS WindowsNT 4.0? Contact an authorized FUJITSU Scanner service provider. (* ) For the details on the PC? The User's Guide is normal. YES The scanner operation...
... install the correct driver. Symptom14 Windows system gets unstable. NO Is WNASPI32.DLL installed on how to install FUJITSU TWAIN, refer to "FUJITSU TWAIN32 Scanner Driver (Scanner Utility for Microsoft Windows) User's Guide", "3. Installation." NO The scanner operation is included in the FUJITSU TWAIN CD-ROM. 5-28 5.2 Troubleshooting YES Is ASPI version driver installed by mistake? Is the OS WindowsNT 4.0? Contact an authorized FUJITSU Scanner service provider. (* ) For the details on the PC? The User's Guide is normal. YES The scanner operation...
Operating Guide
Page 188
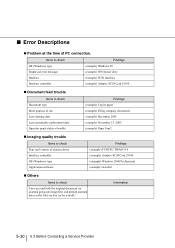
... image file) and printed scanned data (or the file) via Fax (or by e-mail)? Items to check OS (Windows) type Displayed error message Interface Interface controller Findings (example) Windows 98 (example) SF0 Sensor dirty (example) SCSI interface (example) Adaptec SCSI Card 29160 Document feed trouble Items to check Document type Main purpose of use Last cleaning date Last consumable replacement date Operator panel status at the time of scanner driver Interface controller OS (Windows) type Application software Findings (example) FUJITSU TWAIN 9.9 (example) Adaptec SCSI Card...
... image file) and printed scanned data (or the file) via Fax (or by e-mail)? Items to check OS (Windows) type Displayed error message Interface Interface controller Findings (example) Windows 98 (example) SF0 Sensor dirty (example) SCSI interface (example) Adaptec SCSI Card 29160 Document feed trouble Items to check Document type Main purpose of use Last cleaning date Last consumable replacement date Operator panel status at the time of scanner driver Interface controller OS (Windows) type Application software Findings (example) FUJITSU TWAIN 9.9 (example) Adaptec SCSI Card...

Operating Guide
Page 204
... Left arrow button in this manual. Some of the LCD screen. Displays the previous menu item without saving the change. Saves the change Referred to the upper level menu item without saving the change and then displays the next menu item - ■ Function of buttons in setup mode Button name [Next] [Previous] Function Displays the next menu item without saving the change. Moves to as Right arrow button in the...
... Left arrow button in this manual. Some of the LCD screen. Displays the previous menu item without saving the change. Saves the change Referred to the upper level menu item without saving the change and then displays the next menu item - ■ Function of buttons in setup mode Button name [Next] [Previous] Function Displays the next menu item without saving the change. Moves to as Right arrow button in the...
Operating Guide
Page 290
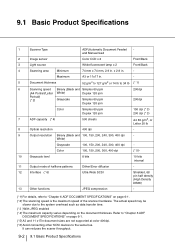
... system overhead such as data transfer time. (* 3 )With JPEG enabled (* 4) The maximum capacity varies depending on page 6-1. (* 5) A3 and 11 x17in document sizes are not supported at color 400dpi. (* 6) Avoid connecting other SCSI devices to "Chapter 6 ADF DOCUMENT SPECIFICATIONS" on the document thickness. Refer to the same bus. 9.1 Basic Product Specifications 1 Scanner Type ADF(Automatic Document Feeder) and Manual feed 2 Image sensor Color CCD x 2 Front/Back 3 Light source White fluorescent lamp x 2 Front/Back 4 Scanning area Minimum 74...
... system overhead such as data transfer time. (* 3 )With JPEG enabled (* 4) The maximum capacity varies depending on page 6-1. (* 5) A3 and 11 x17in document sizes are not supported at color 400dpi. (* 6) Avoid connecting other SCSI devices to "Chapter 6 ADF DOCUMENT SPECIFICATIONS" on the document thickness. Refer to the same bus. 9.1 Basic Product Specifications 1 Scanner Type ADF(Automatic Document Feeder) and Manual feed 2 Image sensor Color CCD x 2 Front/Back 3 Light source White fluorescent lamp x 2 Front/Back 4 Scanning area Minimum 74...
Operating Guide
Page 313
...Removable sheet guide....... 3-29 Sensors 3-35 Separation roller 3-10 SF0 sensor 3-37 SF1 sensor 3-37 SF1.5 sensor 3-39 SF2 sensor 3-39 Transport path 3-22 Cleaning materials 3-2 Cleaning sheet 3-2, 3-8 Configuration Window of FUJITSU ISIS Scanner Driver 1-38 Consumables 4-2 Abrasion counters........... 1-9, 4-3 Part No 4-2 Replacement cycle 4-2 Replacement message.......... 1-9 Correcting the skewed Documents2-15 Cumulative lamp-on time 4-19 D Daily Care 3-1 Detecting Double-Feeds 2-13 Dimensions 9-3, 9-5 Discharge brush 3-3, 3-24 Document Document quality 6-3 Document size...
...Removable sheet guide....... 3-29 Sensors 3-35 Separation roller 3-10 SF0 sensor 3-37 SF1 sensor 3-37 SF1.5 sensor 3-39 SF2 sensor 3-39 Transport path 3-22 Cleaning materials 3-2 Cleaning sheet 3-2, 3-8 Configuration Window of FUJITSU ISIS Scanner Driver 1-38 Consumables 4-2 Abrasion counters........... 1-9, 4-3 Part No 4-2 Replacement cycle 4-2 Replacement message.......... 1-9 Correcting the skewed Documents2-15 Cumulative lamp-on time 4-19 D Daily Care 3-1 Detecting Double-Feeds 2-13 Dimensions 9-3, 9-5 Discharge brush 3-3, 3-24 Document Document quality 6-3 Document size...


