Operation Guide
Page 4
...need more information on product features, dialog boxes/windows, operating environment and functions. Select [Start] menu J [All Programs] J [ScanSnap Organizer] J [Manual]. ABBYY FineReader for ScanSnap User's Guide Select [Start] menu J [All Programs] J [ABBYY FineReader for such troubles. It explains about connecting the mobile device and the computer, ScanSnap Connect Application operations on the mobile device, settings and receiving files. z Double-click the [Troubleshooting (installation)] icon in the [ScanSnap Setup] dialog box that appears when you insert the Setup DVD-ROM...
...need more information on product features, dialog boxes/windows, operating environment and functions. Select [Start] menu J [All Programs] J [ScanSnap Organizer] J [Manual]. ABBYY FineReader for ScanSnap User's Guide Select [Start] menu J [All Programs] J [ABBYY FineReader for such troubles. It explains about connecting the mobile device and the computer, ScanSnap Connect Application operations on the mobile device, settings and receiving files. z Double-click the [Troubleshooting (installation)] icon in the [ScanSnap Setup] dialog box that appears when you insert the Setup DVD-ROM...
Operation Guide
Page 6
... for resolving troubles such as other various scanner functions. Daily Care This chapter explains about settings that differ by the scanning method, and the ScanSnap installation specifications. Appendix This appendix explains how to update ScanSnap Manager, how to uninstall the software, about the cleaning materials and how to perform a scan, change or save scan settings, add, change or delete profiles, as well as removing jammed documents. Using the ScanSnap (for Windows Users)/Using the ScanSnap (for a better...
... for resolving troubles such as other various scanner functions. Daily Care This chapter explains about settings that differ by the scanning method, and the ScanSnap installation specifications. Appendix This appendix explains how to update ScanSnap Manager, how to uninstall the software, about the cleaning materials and how to perform a scan, change or save scan settings, add, change or delete profiles, as well as removing jammed documents. Using the ScanSnap (for Windows Users)/Using the ScanSnap (for a better...
Operation Guide
Page 13
... ■ Long Page Scanning 255 ■ Saving Scanned Images in Multiple PDF Files 257 ■ Creating Searchable PDF Files 259 ■ Automatically Setting Keywords for PDF Files 262 ■ Setting Document Open Passwords for PDF Files 267 Using the ScanSnap (for Mac OS Users 271 ScanSnap Manager Icon and Operations 272 ■ ScanSnap Manager Menu 273 ■ Profile Menu 275 How to Perform a Scan 276 ■ Preparation 276 ■ Using the Quick Menu 277 ■ Without Using the Quick Menu 282 ■ Stopping the Scan 285 ■ Finishing ScanSnap Operation 286 13
... ■ Long Page Scanning 255 ■ Saving Scanned Images in Multiple PDF Files 257 ■ Creating Searchable PDF Files 259 ■ Automatically Setting Keywords for PDF Files 262 ■ Setting Document Open Passwords for PDF Files 267 Using the ScanSnap (for Mac OS Users 271 ScanSnap Manager Icon and Operations 272 ■ ScanSnap Manager Menu 273 ■ Profile Menu 275 How to Perform a Scan 276 ■ Preparation 276 ■ Using the Quick Menu 277 ■ Without Using the Quick Menu 282 ■ Stopping the Scan 285 ■ Finishing ScanSnap Operation 286 13

Operation Guide
Page 46
ATTENTION If the installation is not successfully completed, select [Manuals] J [Troubleshooting (installation)] in Windows 11.Read the explanation, and then click the [Next] button. Installing in the [ScanSnap Setup] dialog box, and refer to Troubleshooting (installation). 46 D The "Install Complete" screen appears. 12.Click the [Finish] button. 13.Remove the Setup DVD-ROM from the DVD-ROM drive.
ATTENTION If the installation is not successfully completed, select [Manuals] J [Troubleshooting (installation)] in Windows 11.Read the explanation, and then click the [Next] button. Installing in the [ScanSnap Setup] dialog box, and refer to Troubleshooting (installation). 46 D The "Install Complete" screen appears. 12.Click the [Finish] button. 13.Remove the Setup DVD-ROM from the DVD-ROM drive.

Operation Guide
Page 56
... [Install Product] button. Remove the Setup DVD-ROM from the DVD-ROM drive. Click the [Finish] button when the installation complete notification is displayed. 8. D Installation starts. 6. D The setup dialog box of the software, refer to the software manual. Follow the instructions on the screen to open the manual. 56 HINT For details about how to use trial versions of the trial software appears (e.g. [Rack2-Filer Setup]). 5. Click the [Manuals] button in Windows 4. Installing in the setup dialog box...
... [Install Product] button. Remove the Setup DVD-ROM from the DVD-ROM drive. Click the [Finish] button when the installation complete notification is displayed. 8. D Installation starts. 6. D The setup dialog box of the software, refer to the software manual. Follow the instructions on the screen to open the manual. 56 HINT For details about how to use trial versions of the trial software appears (e.g. [Rack2-Filer Setup]). 5. Click the [Manuals] button in Windows 4. Installing in the setup dialog box...
Operation Guide
Page 78
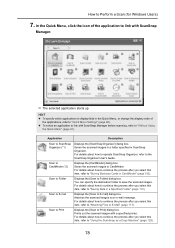
..." (page 152). Scan to save the scanned images. You can specify the destination folder to CardMinder (*2) Displays the [CardMinder] dialog box. In the Quick Menu, click the icon of the applications, refer to "Saving Data in ScanSnap Organizer. Prints out the scanned images with ScanSnap Manager. z To select an application to link with ScanSnap Manager before scanning, refer to an e-mail message. Attaches the scanned images to "Without Using the Quick Menu" (page 81). Saves the scanned images to Print] dialog box. Scan...
..." (page 152). Scan to save the scanned images. You can specify the destination folder to CardMinder (*2) Displays the [CardMinder] dialog box. In the Quick Menu, click the icon of the applications, refer to "Saving Data in ScanSnap Organizer. Prints out the scanned images with ScanSnap Manager. z To select an application to link with ScanSnap Manager before scanning, refer to an e-mail message. Attaches the scanned images to "Without Using the Quick Menu" (page 81). Saves the scanned images to Print] dialog box. Scan...
Operation Guide
Page 83
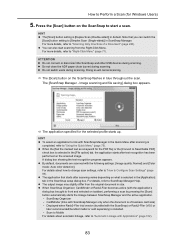
... Menu" (page 71). ATTENTION z Do not connect or disconnect the ScanSnap and other USB devices during scanning. D The [Scan] button on the ScanSnap to "Automatic Linkage with the ScanSnap) or Rack2-Filer (V5.0 or later recommended/bundled model or sold separately) is [Duplex Scan (Double-sided)] in the ScanSnap setup dialog box. D The application specified for Windows Users) 5. z When the [Set the marked text as a keyword for the PDF file] or the [Convert to Configure Scan Settings" (page 89). ScanSnap...
... Menu" (page 71). ATTENTION z Do not connect or disconnect the ScanSnap and other USB devices during scanning. D The [Scan] button on the ScanSnap to "Automatic Linkage with the ScanSnap) or Rack2-Filer (V5.0 or later recommended/bundled model or sold separately) is [Duplex Scan (Double-sided)] in the ScanSnap setup dialog box. D The application specified for Windows Users) 5. z When the [Set the marked text as a keyword for the PDF file] or the [Convert to Configure Scan Settings" (page 89). ScanSnap...
Operation Guide
Page 138
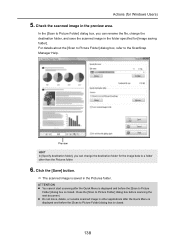
... Folder] dialog box, you can rename the file, change the destination folder for the image data to Picture Folder] dialog box is closed . Check the scanned image in the Pictures folder. D The scanned image is displayed and before the [Scan to Picture Folder] dialog box before the [Scan to a folder other applications after the Quick Menu is saved in the preview area. Click the [Save] button. In the [Scan to the ScanSnap Manager Help. Close the [Scan to Picture Folder] dialog box...
... Folder] dialog box, you can rename the file, change the destination folder for the image data to Picture Folder] dialog box is closed . Check the scanned image in the Pictures folder. D The scanned image is displayed and before the [Scan to Picture Folder] dialog box before the [Scan to a folder other applications after the Quick Menu is saved in the preview area. Click the [Save] button. In the [Scan to the ScanSnap Manager Help. Close the [Scan to Picture Folder] dialog box...
Operation Guide
Page 140
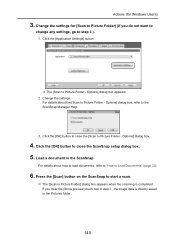
... [Scan] button on the ScanSnap to the ScanSnap Manager Help. 3. Options] dialog box appears. 2. D The [Scan to close the ScanSnap setup dialog box. 5. Actions (for [Scan to Picture Folder - D The [Scan to Picture Folder] (If you clear the [Show preview] check box in step 3., the image data is completed. Click the [OK] button to Picture Folder] dialog box appears when the scanning is directly saved in the ScanSnap. Click the [Application Settings] button. If you do not want to change...
... [Scan] button on the ScanSnap to the ScanSnap Manager Help. 3. Options] dialog box appears. 2. D The [Scan to close the ScanSnap setup dialog box. 5. Actions (for [Scan to Picture Folder - D The [Scan to Picture Folder] (If you clear the [Show preview] check box in step 3., the image data is completed. Click the [OK] button to Picture Folder] dialog box appears when the scanning is directly saved in the ScanSnap. Click the [Application Settings] button. If you do not want to change...
Operation Guide
Page 237
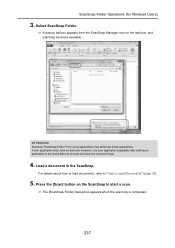
... to start a scan. D The [ScanSnap Folder] dialog box appears when the scanning is completed. 237 If your application separately after starting an application in the ScanSnap. ScanSnap Folder Operations (for Windows Users) 3. Load a document in the Quick Menu to process and save the scanned image. 4. D A pop-up balloon appears from some applications may terminate those applications. Press the [Scan] button on the task bar, and scanning becomes available. ATTENTION Selecting "ScanSnap Folder" from the ScanSnap Manager...
... to start a scan. D The [ScanSnap Folder] dialog box appears when the scanning is completed. 237 If your application separately after starting an application in the ScanSnap. ScanSnap Folder Operations (for Windows Users) 3. Load a document in the Quick Menu to process and save the scanned image. 4. D A pop-up balloon appears from some applications may terminate those applications. Press the [Scan] button on the task bar, and scanning becomes available. ATTENTION Selecting "ScanSnap Folder" from the ScanSnap Manager...
Operation Guide
Page 262
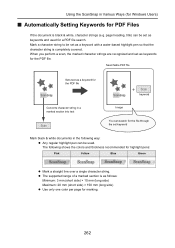
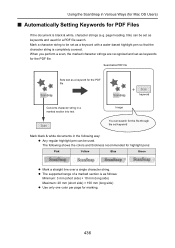
... for the file through the set as keywords and used . When you perform a scan, the marked character strings are recognized and set keyword Mark black & white documents in Various Ways (for Windows Users) ■ Automatically Setting Keywords for PDF Files If the document is black & white, character strings (e.g. z The supported range of a marked section is completely covered. page heading, title) can be set as keywords for the PDF file. Using the ScanSnap in...
... for the file through the set as keywords and used . When you perform a scan, the marked character strings are recognized and set keyword Mark black & white documents in Various Ways (for Windows Users) ■ Automatically Setting Keywords for PDF Files If the document is black & white, character strings (e.g. z The supported range of a marked section is completely covered. page heading, title) can be set as keywords for the PDF file. Using the ScanSnap in...

Operation Guide
Page 279
How to start scanning from the ScanSnap Manager menu. Press the [Scan] button on the ScanSnap flashes in default. ATTENTION z Do not connect or disconnect the ScanSnap and other USB devices during scanning. z Do not switch users during scanning. D The Quick Menu appears when the scanning is [Duplex Scan (Double-sided)] in blue throughout the scan. Note that you can also start a scan. For more details, refer to link with ScanSnap Manager before scanning, refer to [Simplex Scan (Single-sided)] in the Quick Menu, or change the...
How to start scanning from the ScanSnap Manager menu. Press the [Scan] button on the ScanSnap flashes in default. ATTENTION z Do not connect or disconnect the ScanSnap and other USB devices during scanning. z Do not switch users during scanning. D The Quick Menu appears when the scanning is [Duplex Scan (Double-sided)] in blue throughout the scan. Note that you can also start a scan. For more details, refer to link with ScanSnap Manager before scanning, refer to [Simplex Scan (Single-sided)] in the Quick Menu, or change the...
Operation Guide
Page 417
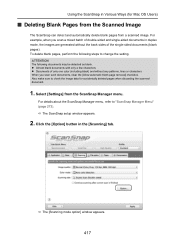
...-sided documents in duplex mode, the images are generated without the back sides of the single-sided documents (blank pages). Using the ScanSnap in Various Ways (for accidentally deleted pages when discarding the scanned document. 1. Click the [Option] button in the [Scanning] tab. To delete blank pages, perform the following documents may be detected as blank. Select [Settings] from a scanned image. For details about the ScanSnap Manager menu, refer to change the setting. Also make sure to check the image data for Mac OS Users...
...-sided documents in duplex mode, the images are generated without the back sides of the single-sided documents (blank pages). Using the ScanSnap in Various Ways (for accidentally deleted pages when discarding the scanned document. 1. Click the [Option] button in the [Scanning] tab. To delete blank pages, perform the following documents may be detected as blank. Select [Settings] from a scanned image. For details about the ScanSnap Manager menu, refer to change the setting. Also make sure to check the image data for Mac OS Users...
Operation Guide
Page 431
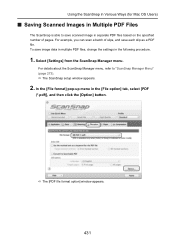
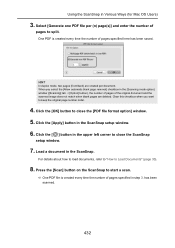
... number of slips, and save image data in multiple PDF files, change the settings in the [File option] tab, select [PDF (*.pdf)], and then click the [Option] button. D The ScanSnap setup window appears. 2. For example, you can scan a batch of pages. In the [File format] pop-up menu in the following procedure. 1. D The [PDF file format option] window appears. 431 To save each slip as a PDF file. Select [Settings] from the ScanSnap Manager menu. Using the ScanSnap in Various Ways (for Mac OS Users...
... number of slips, and save image data in multiple PDF files, change the settings in the [File option] tab, select [PDF (*.pdf)], and then click the [Option] button. D The ScanSnap setup window appears. 2. For example, you can scan a batch of pages. In the [File format] pop-up menu in the following procedure. 1. D The [PDF file format option] window appears. 431 To save each slip as a PDF file. Select [Settings] from the ScanSnap Manager menu. Using the ScanSnap in Various Ways (for Mac OS Users...
Operation Guide
Page 432
... ScanSnap setup window. 7. Click the [OK] button to Load Documents" (page 33). 8. Load a document in the ScanSnap setup window. 6. Press the [Scan] button on the ScanSnap to close the [PDF file format option] window. 5. When you want to split. has been scanned. 432 Click the [ ] button in the [Scanning mode option] window ([Scanning] tab J [Option] button), the number of pages of the original document and the scanned image does not match when blank pages are created per (n) page(s)] and enter the number...
... ScanSnap setup window. 7. Click the [OK] button to Load Documents" (page 33). 8. Load a document in the ScanSnap setup window. 6. Press the [Scan] button on the ScanSnap to close the [PDF file format option] window. 5. When you want to split. has been scanned. 432 Click the [ ] button in the [Scanning mode option] window ([Scanning] tab J [Option] button), the number of pages of the original document and the scanned image does not match when blank pages are created per (n) page(s)] and enter the number...
Operation Guide
Page 436
... Mark black & white documents in Various Ways (for Mac OS Users) ■ Automatically Setting Keywords for PDF Files If the document is completely covered. z The supported range of a marked section is as keywords for the PDF file. The following way: z Any regular highlight pen can be used for a PDF file search. Searchable PDF file Scan Sets text as a keyword for the PDF file Scan Scan keyword Converts character string in a marked section into text Scan Image...
... Mark black & white documents in Various Ways (for Mac OS Users) ■ Automatically Setting Keywords for PDF Files If the document is completely covered. z The supported range of a marked section is as keywords for the PDF file. The following way: z Any regular highlight pen can be used for a PDF file search. Searchable PDF file Scan Sets text as a keyword for the PDF file Scan Scan keyword Converts character string in a marked section into text Scan Image...
Operation Guide
Page 446
... driver information] dialog box, and then see [Total page count]. HINT Check the number of small children. Select [Help] J [About ScanSnap Manager] J [Detail] button in the following procedure. pad assy, pick roller) anywhere within reach of sheets scanned in the ScanSnap Manager menu to display the [ScanSnap Manager - z The glasses inside of the ScanSnap should be careful not to get your hand or the cloth caught on the types of documents you must turn...
... driver information] dialog box, and then see [Total page count]. HINT Check the number of small children. Select [Help] J [About ScanSnap Manager] J [Detail] button in the following procedure. pad assy, pick roller) anywhere within reach of sheets scanned in the ScanSnap Manager menu to display the [ScanSnap Manager - z The glasses inside of the ScanSnap should be careful not to get your hand or the cloth caught on the types of documents you must turn...
Operation Guide
Page 472
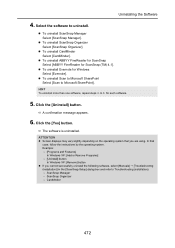
... [Manuals] J [Troubleshooting (installation)] in the [ScanSnap Setup] dialog box and refer to uninstall. z To uninstall ABBYY FineReader for ScanSnap Select [ABBYY FineReader for Windows Select [Evernote]. Click the [Uninstall] button. z To uninstall ScanSnap Manager Select [ScanSnap Manager]. z To uninstall Evernote for ScanSnap (TM) 4.1]. HINT To uninstall more than one software, repeat steps 4. for each software. 5. D The software is uninstalled. ATTENTION z Screen displays may vary slightly depending on the operating...
... [Manuals] J [Troubleshooting (installation)] in the [ScanSnap Setup] dialog box and refer to uninstall. z To uninstall ABBYY FineReader for ScanSnap Select [ABBYY FineReader for Windows Select [Evernote]. Click the [Uninstall] button. z To uninstall ScanSnap Manager Select [ScanSnap Manager]. z To uninstall Evernote for ScanSnap (TM) 4.1]. HINT To uninstall more than one software, repeat steps 4. for each software. 5. D The software is uninstalled. ATTENTION z Screen displays may vary slightly depending on the operating...
Getting Started Guide
Page 2
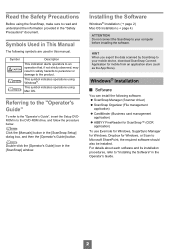
... the Software" in this manual. This symbol indicates operations using Windows®. HINT When you export the data scanned by ScanSnap to Microsoft SharePoint, the required software should also be installed. Symbols Used in the "Safety Precautions" document. Installing the Software Windows® Installation (J page 2) Mac OS Installation (J page 4) ATTENTION Do not connect the ScanSnap to your mobile device, download ScanSnap Connect Application for Windows, or Scan to your computer before installing the software. z ScanSnap Manager (Scanner driver) z ScanSnap Organizer (File...
... the Software" in this manual. This symbol indicates operations using Windows®. HINT When you export the data scanned by ScanSnap to Microsoft SharePoint, the required software should also be installed. Symbols Used in the "Safety Precautions" document. Installing the Software Windows® Installation (J page 2) Mac OS Installation (J page 4) ATTENTION Do not connect the ScanSnap to your mobile device, download ScanSnap Connect Application for Windows, or Scan to your computer before installing the software. z ScanSnap Manager (Scanner driver) z ScanSnap Organizer (File...
Getting Started Guide
Page 3
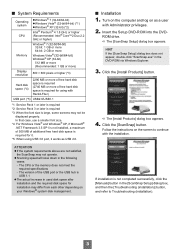
... your Windows® system disk management. ■ Installation 1. D The [Install Products] dialog box appears. 4. The CPU or the memory does not meet the required specifications - Click the [ScanSnap] button. D The [ScanSnap Setup] dialog box appears. Turn on the computer and log on the screen to Troubleshooting (installation). 3 ROM drive. HINT If the [ScanSnap Setup] dialog box does not appear, double-click "ScanSnap.exe" in the following cases: - In that case, use a smaller font size. *4: For Windows...
... your Windows® system disk management. ■ Installation 1. D The [Install Products] dialog box appears. 4. The CPU or the memory does not meet the required specifications - Click the [ScanSnap] button. D The [ScanSnap Setup] dialog box appears. Turn on the computer and log on the screen to Troubleshooting (installation). 3 ROM drive. HINT If the [ScanSnap Setup] dialog box does not appear, double-click "ScanSnap.exe" in the following cases: - In that case, use a smaller font size. *4: For Windows...


