
EFI Pro 16h Operations Guide
Page 5
...Front 29 3.1.7 Vacuum Media Belt 30 3.1.8 Cyclonic Vacuum System 33 3.1.9 Ink Supply and Pump Compartment 35 3.2 Printer Rear Components 36 EFI Inkjet Solutions v Table of Contents Revision History iv 1.0 Introduction ...9 1.1 About This Guide 9 1.2 Objectives ... 19 2.8.8 High Voltage Dangers and Precautions 19 3.0 EFI Pro 16h Printer Overview ...20 3.1 Front Printer Components 20 3.1.1 Carriage Home Compartment 21 3.1.2 Carriage Assembly 24 Front Carriage Assembly 24 Rear Carriage Assembly 25 3.1.3 EFI Pro 16h UV Lamps 26 3.1.4 Computer Compartment 27 3.1.5 Operator Station...
...Front 29 3.1.7 Vacuum Media Belt 30 3.1.8 Cyclonic Vacuum System 33 3.1.9 Ink Supply and Pump Compartment 35 3.2 Printer Rear Components 36 EFI Inkjet Solutions v Table of Contents Revision History iv 1.0 Introduction ...9 1.1 About This Guide 9 1.2 Objectives ... 19 2.8.8 High Voltage Dangers and Precautions 19 3.0 EFI Pro 16h Printer Overview ...20 3.1 Front Printer Components 20 3.1.1 Carriage Home Compartment 21 3.1.2 Carriage Assembly 24 Front Carriage Assembly 24 Rear Carriage Assembly 25 3.1.3 EFI Pro 16h UV Lamps 26 3.1.4 Computer Compartment 27 3.1.5 Operator Station...

EFI Pro 16h Operations Guide
Page 6
... 61 Page Settings Tab 62 Offset Tab 63 Head Voltage Tab 64 Head Temperatures Tab 65 4.3.10 EFI PLC Control Window 66 4.3.11 Printer Status Messages 67 4.3.12 EFI Pro 16h Control Window "Asleep 68 5.0 EFI Pro 16h Printer Setup ...69 5.1 Full Printer Startup From Power Down 69 5.2 Printer Startup from Sleep Mode 70 5.3 Loading Rolled Media 71 5.3.1 Media Alignment 72...
... 61 Page Settings Tab 62 Offset Tab 63 Head Voltage Tab 64 Head Temperatures Tab 65 4.3.10 EFI PLC Control Window 66 4.3.11 Printer Status Messages 67 4.3.12 EFI Pro 16h Control Window "Asleep 68 5.0 EFI Pro 16h Printer Setup ...69 5.1 Full Printer Startup From Power Down 69 5.2 Printer Startup from Sleep Mode 70 5.3 Loading Rolled Media 71 5.3.1 Media Alignment 72...

EFI Pro 16h Operations Guide
Page 7
... Margins 75 5.6 Setting Media Vacuum Chamber Controls 76 5.7 Set the Print Gap 77 6.0 Printing on the EFI Pro 16h ...78 6.1 Standard Printing Procedure 78 6.1.1 Start Up Printer 78 6.1.2 Verify Lamp Settings 79 6.1.3 Set the Carriage Gap 80 6.1.4 Scan the Media Width 81 6.1.5 ...Print File Margins Setup 1 97 Print File Margins Setup 2 97 7.0 Procedures for Replenishing Ink ...98 7.1 Use Remainder Ink 99 8.0 EFI Pro 16h Maintenance and Print Head Care 100 8.1 Maintenance Documentation 100 8.1.1 Maintenance Guide 100 8.1.2 Maintenance Log 100 8.2 Print Head Care 101 8.2.1 Bleeding...
... Margins 75 5.6 Setting Media Vacuum Chamber Controls 76 5.7 Set the Print Gap 77 6.0 Printing on the EFI Pro 16h ...78 6.1 Standard Printing Procedure 78 6.1.1 Start Up Printer 78 6.1.2 Verify Lamp Settings 79 6.1.3 Set the Carriage Gap 80 6.1.4 Scan the Media Width 81 6.1.5 ...Print File Margins Setup 1 97 Print File Margins Setup 2 97 7.0 Procedures for Replenishing Ink ...98 7.1 Use Remainder Ink 99 8.0 EFI Pro 16h Maintenance and Print Head Care 100 8.1 Maintenance Documentation 100 8.1.1 Maintenance Guide 100 8.1.2 Maintenance Log 100 8.2 Print Head Care 101 8.2.1 Bleeding...
EFI Pro 16h Operations Guide
Page 8
9.0 EFI Pro 16h Sleep Mode/Shutdown Procedures 106 9.1 Overnight Sleep Mode 106 9.2 Short-Term Printer Shutdown 108 9.3 Long-Term Printer Shutdown 109 Negative Pressure 109 Print Heads 109 Coroplast 109 Waste Container 109 9.4 E-Stop Conditions 110 9.4.1 Activating E-Stop 110 9.4.2 Restarting After E-Stop 110 9.5 Power Outages 111 9.5.1 Power Outage During Printing 111 9.5.2 Power Outage While Printer is Idle and Attended 111 9.5.3 Power Outage While Printer is Idle and Unattended 111 EFI Inkjet Solutions vii
9.0 EFI Pro 16h Sleep Mode/Shutdown Procedures 106 9.1 Overnight Sleep Mode 106 9.2 Short-Term Printer Shutdown 108 9.3 Long-Term Printer Shutdown 109 Negative Pressure 109 Print Heads 109 Coroplast 109 Waste Container 109 9.4 E-Stop Conditions 110 9.4.1 Activating E-Stop 110 9.4.2 Restarting After E-Stop 110 9.5 Power Outages 111 9.5.1 Power Outage During Printing 111 9.5.2 Power Outage While Printer is Idle and Attended 111 9.5.3 Power Outage While Printer is Idle and Unattended 111 EFI Inkjet Solutions vii

EFI Pro 16h Operations Guide
Page 9
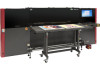
... learn basic printing procedures, including loading media, importing files, setting print options and print- 1.0 Introduction The EFI Pro 16h Operations Guide provides an overview of the features and functions of EFI's Pro 16h Wide Format Hybrid printer, an advanced digital printer designed to ensure higher volume production and improved resolution over traditional silkscreen printing. The maximum allowable thickness...
... learn basic printing procedures, including loading media, importing files, setting print options and print- 1.0 Introduction The EFI Pro 16h Operations Guide provides an overview of the features and functions of EFI's Pro 16h Wide Format Hybrid printer, an advanced digital printer designed to ensure higher volume production and improved resolution over traditional silkscreen printing. The maximum allowable thickness...

EFI Pro 16h Operations Guide
Page 10
...: OMM-00135 Revision A 10 1.3 Customer Resources EFI Inkjet Solutions provides additional resources to safe printer operation for contact information. The Printer Safety Guide contains information critical to help personnel operate and maintain printer. • Customer Support Web Site - Contains ...and Maintenance Guides, technical supplements, advisory bulletins, and resources such as software updates and drivers. • Printer Safety Guide - EFI Inkjet Solutions provides an educational support system assisting new and experienced operators to develop and maintain skills. 1.4...
...: OMM-00135 Revision A 10 1.3 Customer Resources EFI Inkjet Solutions provides additional resources to safe printer operation for contact information. The Printer Safety Guide contains information critical to help personnel operate and maintain printer. • Customer Support Web Site - Contains ...and Maintenance Guides, technical supplements, advisory bulletins, and resources such as software updates and drivers. • Printer Safety Guide - EFI Inkjet Solutions provides an educational support system assisting new and experienced operators to develop and maintain skills. 1.4...
EFI Pro 16h Operations Guide
Page 11
... the EFI Pro 16h printer. Never use your EFI Pro 16h printer, including the access panels, shields, and warning labels, as well as an alternative to powering down the printer. The emergency stop buttons as how to properly handle printer inks and fluids. Before operating the printer, all personnel must: • Be a certified EFI Pro 16h operator. • Read and understand the EFI Inkjet Printer Safety...
... the EFI Pro 16h printer. Never use your EFI Pro 16h printer, including the access panels, shields, and warning labels, as well as an alternative to powering down the printer. The emergency stop buttons as how to properly handle printer inks and fluids. Before operating the printer, all personnel must: • Be a certified EFI Pro 16h operator. • Read and understand the EFI Inkjet Printer Safety...

EFI Pro 16h Operations Guide
Page 12
2.2 Safety Interlock Override Key (Service Key) The safety interlock override key (or "Service Key") is not to be used by qualifed service personnel when servicing or troubleshooting the printer. Figure 2-2: Service Key Location and Detail Document ID: OMM-00135 Revision A 12 This key is located under the operator keyboard tray. The key should ALWAYS be used for normal printer operation. Warning: The Safety Access Panels and Shields should only be closed during normal printer operations.
2.2 Safety Interlock Override Key (Service Key) The safety interlock override key (or "Service Key") is not to be used by qualifed service personnel when servicing or troubleshooting the printer. Figure 2-2: Service Key Location and Detail Document ID: OMM-00135 Revision A 12 This key is located under the operator keyboard tray. The key should ALWAYS be used for normal printer operation. Warning: The Safety Access Panels and Shields should only be closed during normal printer operations.

EFI Pro 16h Operations Guide
Page 13
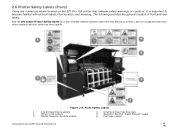
2.3 Front Access Panels and Shields This section illustrates the access panels and shields located on the front of the printer. 1 2 3 4 5 Figure 2-3: Printer Front Access Panels and Shields Caution! Keep all safety interlocks, covers, and guards in place and in working order. Do not operate the printer with covers or guards removed or malfunctioning interlocks. 1 Access to Carriage "Home" Compartment 2 Front Printing Shield 3 Access to Ink Supply System Compartment 4 Access to Main Vacuum Motors 5 Access to Computer Compartment Document ID: OMM-00135 Revision A 13
2.3 Front Access Panels and Shields This section illustrates the access panels and shields located on the front of the printer. 1 2 3 4 5 Figure 2-3: Printer Front Access Panels and Shields Caution! Keep all safety interlocks, covers, and guards in place and in working order. Do not operate the printer with covers or guards removed or malfunctioning interlocks. 1 Access to Carriage "Home" Compartment 2 Front Printing Shield 3 Access to Ink Supply System Compartment 4 Access to Main Vacuum Motors 5 Access to Computer Compartment Document ID: OMM-00135 Revision A 13

EFI Pro 16h Operations Guide
Page 14
Keep all safety interlocks, covers, and guards in place and functional. Never operate printer with covers, doors, or guards removed or with malfunctioning interlocks. 1 Access to Carriage X-Axis Drive System* 2 Access to Computer Compartment 3 Access to Electronic Compartment * 4 Access ... Document ID: OMM-00135 Revision A 14 2.4 Rear Access Panels and Shields This section illustrates the access panels and shields located on the rear of the printer. 8 7 1 6 2 5 3 4 Figure 2-4: Printer Rear Access Panels and Shields Caution!
Keep all safety interlocks, covers, and guards in place and functional. Never operate printer with covers, doors, or guards removed or with malfunctioning interlocks. 1 Access to Carriage X-Axis Drive System* 2 Access to Computer Compartment 3 Access to Electronic Compartment * 4 Access ... Document ID: OMM-00135 Revision A 14 2.4 Rear Access Panels and Shields This section illustrates the access panels and shields located on the rear of the printer. 8 7 1 6 2 5 3 4 Figure 2-4: Printer Rear Access Panels and Shields Caution!

EFI Pro 16h Operations Guide
Page 15
...shields open position, the cylinder on the left side of the shield locks in the illustration below, while carefully lowering the printer shield with a support system comprised of the cylinder must be depressed to unlock the cylinder before attempting to Unlock Before ...and dangerous when shields are equipped with your other hand. 1 2 Figure 2-5: Printer Shields Cylinder Lock 1 Cylinder Locking Mechanism 2 Depress to close the shield. 2.5 Printer Shield Support System and Locking Mechanism The printer shields are opened. • Unlock the support cylinder as shown in place. ...
...shields open position, the cylinder on the left side of the shield locks in the illustration below, while carefully lowering the printer shield with a support system comprised of the cylinder must be depressed to unlock the cylinder before attempting to Unlock Before ...and dangerous when shields are equipped with your other hand. 1 2 Figure 2-5: Printer Shields Cylinder Lock 1 Cylinder Locking Mechanism 2 Depress to close the shield. 2.5 Printer Shield Support System and Locking Mechanism The printer shields are opened. • Unlock the support cylinder as shown in place. ...
EFI Pro 16h Operations Guide
Page 16
... become familiar with all such labels, their location, and meaning. It is important to printer. See the EFI Inkjet Printer Safety Guide for a list of front and rear labels. 2.6 Printer Safety Labels (Front) There are numerous labels located on the EFI Pro 16h printer that they signify. 1 6 5 I 2 4 33 Figure 2-6: Front Safety Labels 1 Ink Compartment Labels 2 Wheel Lock Labels...
... become familiar with all such labels, their location, and meaning. It is important to printer. See the EFI Inkjet Printer Safety Guide for a list of front and rear labels. 2.6 Printer Safety Labels (Front) There are numerous labels located on the EFI Pro 16h printer that they signify. 1 6 5 I 2 4 33 Figure 2-6: Front Safety Labels 1 Ink Compartment Labels 2 Wheel Lock Labels...

EFI Pro 16h Operations Guide
Page 17
2.7 Printer Safety Labels (Rear) The following provides the general location of the rear labels. 1 2 3 4 5 6 7 Figure 2-7: Rear Safety Labels 1 Do Not Remove Panel 2 Do Not Place Objects 3 Ventilation Warning 4 Electrical Hazard Warning 5 Wheel Lock Labels 6 Crush Hazard and Falling Loads 7 Eye Safety Cautions Document ID: OMM-00135 Revision A 17
2.7 Printer Safety Labels (Rear) The following provides the general location of the rear labels. 1 2 3 4 5 6 7 Figure 2-7: Rear Safety Labels 1 Do Not Remove Panel 2 Do Not Place Objects 3 Ventilation Warning 4 Electrical Hazard Warning 5 Wheel Lock Labels 6 Crush Hazard and Falling Loads 7 Eye Safety Cautions Document ID: OMM-00135 Revision A 17

EFI Pro 16h Operations Guide
Page 18
...Precautions Other Hazards and Precautions are outlined in the following paragraphs. 2.8.1 UV Ink and Solvent Precautions Observe the following precautions regarding the printer, ink, and related solvents. • Uncured UV inks and cleaning solvents are flammable. • Uncured UV inks and cleaning ...solvents can cause severe eye damage. • Operator should not wear contact lenses when operating the printer with insufficient ventilation. • Operator should wear safety glasses or a face shield. • Operator should wear Nitrile gloves when ...
...Precautions Other Hazards and Precautions are outlined in the following paragraphs. 2.8.1 UV Ink and Solvent Precautions Observe the following precautions regarding the printer, ink, and related solvents. • Uncured UV inks and cleaning solvents are flammable. • Uncured UV inks and cleaning ...solvents can cause severe eye damage. • Operator should not wear contact lenses when operating the printer with insufficient ventilation. • Operator should wear safety glasses or a face shield. • Operator should wear Nitrile gloves when ...
EFI Pro 16h Operations Guide
Page 19
...and Precautions Open flame, heat energy, or sparks around the printer can trigger a fire or an explosion when excessive fumes are exposed. The EFI Pro 16h carries high voltages that could cause serious injury or death from the printer work area. • Dispose of waste materials in accordance...Use proper heavy-duty handling equipment if available. 2.8.8 High Voltage Dangers and Precautions The EFI Pro 16h is safe to operate in or near the printer area. 2.8.7 Printing Media Handling and Precautions The EFI Pro 16h printer is capable of using a wide variety of rigid media as well as roll-to...
...and Precautions Open flame, heat energy, or sparks around the printer can trigger a fire or an explosion when excessive fumes are exposed. The EFI Pro 16h carries high voltages that could cause serious injury or death from the printer work area. • Dispose of waste materials in accordance...Use proper heavy-duty handling equipment if available. 2.8.8 High Voltage Dangers and Precautions The EFI Pro 16h is safe to operate in or near the printer area. 2.8.7 Printing Media Handling and Precautions The EFI Pro 16h printer is capable of using a wide variety of rigid media as well as roll-to...

EFI Pro 16h Operations Guide
Page 20
... This section illustrates the major components located on the front of the EFI Pro 16h Wide Format printer, to familiarize you with the computer, where the media comes out after printing. 1 2 34 5 6 7 14 1 Carriage Home Compartment 4 Keyboard and Mouse Tray 7 Access to Cyclonic ... E-Stop Button 14 Computer Compartment 3 Operator Station Monitor 6 Ink Supply Compartment 9 Front Rolled Media Handling Sys 12 USB Ports Document ID: OMM-00135 Revision A 20 3.0 EFI Pro 16h Printer Overview In this chapter we describe the major assemblies and sub-assemblies of the...
... This section illustrates the major components located on the front of the EFI Pro 16h Wide Format printer, to familiarize you with the computer, where the media comes out after printing. 1 2 34 5 6 7 14 1 Carriage Home Compartment 4 Keyboard and Mouse Tray 7 Access to Cyclonic ... E-Stop Button 14 Computer Compartment 3 Operator Station Monitor 6 Ink Supply Compartment 9 Front Rolled Media Handling Sys 12 USB Ports Document ID: OMM-00135 Revision A 20 3.0 EFI Pro 16h Printer Overview In this chapter we describe the major assemblies and sub-assemblies of the...

EFI Pro 16h Operations Guide
Page 28
... keyboard, and a two-button wheel-mouse (Not Shown). 2. In addition, this section. The Keyboard Tray is used to support the keyboard and mouse used for printer operation.
... keyboard, and a two-button wheel-mouse (Not Shown). 2. In addition, this section. The Keyboard Tray is used to support the keyboard and mouse used for printer operation.

EFI Pro 16h Operations Guide
Page 29
Media direction is controlled by the switch and light on the front of the printer holds the rolled media after it is loaded onto this take-up roll until printing operations are completed. Front 1 Media Roll 2 Media Chucks 3 Dancer 4 Motor and Direction Controls Document ID: OMM-00135 Revision A 3 4 29 The media is printed. 3.1.6 Media Handling System - Front The media handling system on the motor (as described in section Media Direction. 1 2 Figure 3-10: Media Handling System -
Media direction is controlled by the switch and light on the front of the printer holds the rolled media after it is loaded onto this take-up roll until printing operations are completed. Front 1 Media Roll 2 Media Chucks 3 Dancer 4 Motor and Direction Controls Document ID: OMM-00135 Revision A 3 4 29 The media is printed. 3.1.6 Media Handling System - Front The media handling system on the motor (as described in section Media Direction. 1 2 Figure 3-10: Media Handling System -

EFI Pro 16h Operations Guide
Page 31
A detail of printer Vacuum chambers and related control valves are numbered 1 through 4 and are identified in Figure 3-13, below. Document ID: OMM-00135 Revision A 31 1 2 3 Figure 3-12: Vacuum Media Belt and Platen Vacuum Chamber Layout (Top View) 1 Chambers 2 Valves 3 Front of the control valve layout is provided in Figure 3-12,above.
A detail of printer Vacuum chambers and related control valves are numbered 1 through 4 and are identified in Figure 3-13, below. Document ID: OMM-00135 Revision A 31 1 2 3 Figure 3-12: Vacuum Media Belt and Platen Vacuum Chamber Layout (Top View) 1 Chambers 2 Valves 3 Front of the control valve layout is provided in Figure 3-12,above.

EFI Pro 16h Operations Guide
Page 33
...). This system operates so that the cyclonic vacuum container can then be emptied into the ink waste container by means of the ink from the printer. The waste container can be removed from the ink compartment and emptied. 2 1 3 Figure 3-14: Waste Compartment (Cyclonic Vacuum System, Vacuum Canister and Ink Waste Container...
...). This system operates so that the cyclonic vacuum container can then be emptied into the ink waste container by means of the ink from the printer. The waste container can be removed from the ink compartment and emptied. 2 1 3 Figure 3-14: Waste Compartment (Cyclonic Vacuum System, Vacuum Canister and Ink Waste Container...

