EFI Pro 16h Operations Guide
Page 9
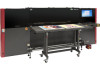
...Manual. • Perform daily maintenance - tenance, and general printer maintenance and care. ing BCO files using roll-to-roll media as well as rigid and flexible media types, including but not limited to 65" [165 cm] with an image width up /shut down, and operating the printer software. The EFI Pro 16h... uses environmentally-friendly UV-curable inks to complete actions using the EFI Pro 16h Control window. • Printing BCO File - 1.0 Introduction The EFI Pro 16h Operations Guide provides an overview of the features and ...
...Manual. • Perform daily maintenance - tenance, and general printer maintenance and care. ing BCO files using roll-to-roll media as well as rigid and flexible media types, including but not limited to 65" [165 cm] with an image width up /shut down, and operating the printer software. The EFI Pro 16h... uses environmentally-friendly UV-curable inks to complete actions using the EFI Pro 16h Control window. • Printing BCO File - 1.0 Introduction The EFI Pro 16h Operations Guide provides an overview of the features and ...
EFI Pro 16h Operations Guide
Page 16
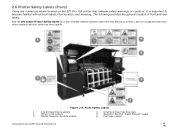
... and rear labels. 2.6 Printer Safety Labels (Front) There are numerous labels located on the EFI Pro 16h printer that they signify. 1 6 5 I 2 4 33 Figure 2-6: Front Safety Labels 1 Ink Compartment Labels 2 Wheel Lock Labels 3 Media Take-Up System Labels 4 Interlock Override Key-lock 5 Operator Station "Read Manual" Label 6 Carriage Labels Document ID: OMM-00135 Revision A 16
... and rear labels. 2.6 Printer Safety Labels (Front) There are numerous labels located on the EFI Pro 16h printer that they signify. 1 6 5 I 2 4 33 Figure 2-6: Front Safety Labels 1 Ink Compartment Labels 2 Wheel Lock Labels 3 Media Take-Up System Labels 4 Interlock Override Key-lock 5 Operator Station "Read Manual" Label 6 Carriage Labels Document ID: OMM-00135 Revision A 16

EFI Pro 16h Operations Guide
Page 22
Pressing this button drains the contents of the cyclonic vacuum system into the waste container Document ID: OMM-00135 Revision A 22 The Liquid Separator button controls the cyclonic vacuum pump. The left purge button controls the CYMK color ink manual purging. 2. The Ink Purge control panel provides the following manual purge functions: 1 2 3 Figure 3-3: Ink Purge Panel 1. The right purge button controls the manual purge for white. 3.
Pressing this button drains the contents of the cyclonic vacuum system into the waste container Document ID: OMM-00135 Revision A 22 The Liquid Separator button controls the cyclonic vacuum pump. The left purge button controls the CYMK color ink manual purging. 2. The Ink Purge control panel provides the following manual purge functions: 1 2 3 Figure 3-3: Ink Purge Panel 1. The right purge button controls the manual purge for white. 3.

EFI Pro 16h Operations Guide
Page 23
... operations. Document ID: OMM-00135 Revision A 23 tainer. 3. The sweep tray collects all ink drops that accumulate during the sweep cycle either automatically via the EFI Pro 16h Control window or manually via the sweep button on the purge button panel.
... operations. Document ID: OMM-00135 Revision A 23 tainer. 3. The sweep tray collects all ink drops that accumulate during the sweep cycle either automatically via the EFI Pro 16h Control window or manually via the sweep button on the purge button panel.
EFI Pro 16h Operations Guide
Page 55
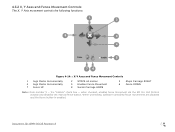
Document ID: OMM-00135 Revision A 55 the "Enable" check box -- when checked, enables fence movement via the EFI Pro 16h Control window and disables the manual fence button. 4.3.2 X, Y Axes and Fence Movement Controls The X, Y Axis movement controls the following functions: 1 2 8 3 4 5 76 Figure 4-14: : X-Y Axes and Fence Movement Controls 1 Jogs Media Incrementally 4 ...
Document ID: OMM-00135 Revision A 55 the "Enable" check box -- when checked, enables fence movement via the EFI Pro 16h Control window and disables the manual fence button. 4.3.2 X, Y Axes and Fence Movement Controls The X, Y Axis movement controls the following functions: 1 2 8 3 4 5 76 Figure 4-14: : X-Y Axes and Fence Movement Controls 1 Jogs Media Incrementally 4 ...

EFI Pro 16h Operations Guide
Page 73
...8226; Up - Put the switch in the up/automatic position. • Middle - Manual. Stopped/Off. The light toggles on the media feed and take-up . • Down - Use the switch's manual position to run media through the machine. When printer operation begins, the switch should be... is changed. 1 1 2 2 Rear Feed Motor Front Take-Up Motor Figure 5-5: Media Directional Switches 1 Media Direction Button/Light 2 Auto/Stop/Manual Switch Document ID: OMM-00135 Revision A 73 5.3.2 Media Direction The buttons and lights on or off when the media direction is rolling, toward the...
...8226; Up - Put the switch in the up/automatic position. • Middle - Manual. Stopped/Off. The light toggles on the media feed and take-up . • Down - Use the switch's manual position to run media through the machine. When printer operation begins, the switch should be... is changed. 1 1 2 2 Rear Feed Motor Front Take-Up Motor Figure 5-5: Media Directional Switches 1 Media Direction Button/Light 2 Auto/Stop/Manual Switch Document ID: OMM-00135 Revision A 73 5.3.2 Media Direction The buttons and lights on or off when the media direction is rolling, toward the...

EFI Pro 16h Operations Guide
Page 77
C. On the EFI Pro 16h Control screen's Parameters tab: A. to the middle of the belt). 2. Press Adjust. B. On the Page Setting tab, press the Calibrate button. Physically check the gap ... Gap 1 Media on all four corners of 0.060" [1.5mm], return the carriage to be reset again unless there is the amount needed + or - On the EFI Pro 16h Control screen: A. 5.7 Set the Print Gap Manually lift the carriage using the Z-Axis lift knob or automatically by using the Carriage Movement Controls on the...
C. On the EFI Pro 16h Control screen's Parameters tab: A. to the middle of the belt). 2. Press Adjust. B. On the Page Setting tab, press the Calibrate button. Physically check the gap ... Gap 1 Media on all four corners of 0.060" [1.5mm], return the carriage to be reset again unless there is the amount needed + or - On the EFI Pro 16h Control screen: A. 5.7 Set the Print Gap Manually lift the carriage using the Z-Axis lift knob or automatically by using the Carriage Movement Controls on the...

EFI Pro 16h Operations Guide
Page 82
... a head sweep. 1 2 3 Figure 6-7: Purge and Sweep Icons on EFI Pro 16h Control Screen 1 Purges white (or other non-CYMK) ink. (Label changes for non-white ink printers.) 82 Use the manual Ink Purge buttons located in one of operation. 6.1.5 Purge and Sweep Print ...the carriage HOME compartment (See Figure 6-8). Then follow up with a head sweep performed from the EFI Pro 16h Control screen. 1 Purges CYMK ink Document ID: OMM-00135 Revision A 1 2 3 Figure 6-8: Manual Ink Purge Buttons 2 Liquid Separator: empties 3 the cyclonic vacuum system Purges white (or other non...
... a head sweep. 1 2 3 Figure 6-7: Purge and Sweep Icons on EFI Pro 16h Control Screen 1 Purges white (or other non-CYMK) ink. (Label changes for non-white ink printers.) 82 Use the manual Ink Purge buttons located in one of operation. 6.1.5 Purge and Sweep Print ...the carriage HOME compartment (See Figure 6-8). Then follow up with a head sweep performed from the EFI Pro 16h Control screen. 1 Purges CYMK ink Document ID: OMM-00135 Revision A 1 2 3 Figure 6-8: Manual Ink Purge Buttons 2 Liquid Separator: empties 3 the cyclonic vacuum system Purges white (or other non...

EFI Pro 16h Operations Guide
Page 101
8.2 Print Head Care Print head care for the EFI Pro 16h printer is complete. The print heads should then operate properly. 1 3 2 1 Figure 8-1: Typical Print Head Configuration 1 Ink Bleed Valves 2 Typical Print Head 3 Secondary Filter and Ink ... print heads only as needed. 1. Print heads should function properly at the carriage home station or automatically using the printer software. 5. Purge the print heads manually at all times if they are kept clean and properly bled of colors to temperature. 3. Raise carriage, wipe carriage plate. 2. Note: If printer has not...
8.2 Print Head Care Print head care for the EFI Pro 16h printer is complete. The print heads should then operate properly. 1 3 2 1 Figure 8-1: Typical Print Head Configuration 1 Ink Bleed Valves 2 Typical Print Head 3 Secondary Filter and Ink ... print heads only as needed. 1. Print heads should function properly at the carriage home station or automatically using the printer software. 5. Purge the print heads manually at all times if they are kept clean and properly bled of colors to temperature. 3. Raise carriage, wipe carriage plate. 2. Note: If printer has not...

EFI Pro 16h Operations Guide
Page 103
... this up with a head sweep. Use the manual Ink Purge buttons located in one of two ways: 1. Sweeps heads. Then follow up with a head sweep. 1 2 3 Figure 8-4: Purge and Sweep Icons on EFI Pro 16h Control Screen 1 Purges white ink. The system ...automatically follows this up with a head sweep performed from the EFI Pro 16h Control screen. 1 Purges CYMK ink. Sweeps heads. 1 2 3 Figure 8-5: Manual Ink Purge Buttons 2 Empties the cyclonic vacuum system ...
... this up with a head sweep. Use the manual Ink Purge buttons located in one of two ways: 1. Sweeps heads. Then follow up with a head sweep. 1 2 3 Figure 8-4: Purge and Sweep Icons on EFI Pro 16h Control Screen 1 Purges white ink. The system ...automatically follows this up with a head sweep performed from the EFI Pro 16h Control screen. 1 Purges CYMK ink. Sweeps heads. 1 2 3 Figure 8-5: Manual Ink Purge Buttons 2 Empties the cyclonic vacuum system ...

EFI Pro 16h Operations Guide
Page 109
...OMM-00135 Revision A 109 Open the ink protect tank LUER fitting covers to raise the 1 carriage. Ensure that the waste bottle is empty. Use the EFI Pro 16h Control screen to release the negative pressure. 4. Allow the ink to drain completely from the secondary ink tanks. Cut a piece of coroplast to the size... of coroplast with flush and lint free wipes. (See 8.2.3 for longer periods of time when it won't be in use the manual knob to lower the carriage so the carriage contacts the wipes at least 4 deep and soak with flush. 9. Place this piece under the carriage ...
...OMM-00135 Revision A 109 Open the ink protect tank LUER fitting covers to raise the 1 carriage. Ensure that the waste bottle is empty. Use the EFI Pro 16h Control screen to release the negative pressure. 4. Allow the ink to drain completely from the secondary ink tanks. Cut a piece of coroplast to the size... of coroplast with flush and lint free wipes. (See 8.2.3 for longer periods of time when it won't be in use the manual knob to lower the carriage so the carriage contacts the wipes at least 4 deep and soak with flush. 9. Place this piece under the carriage ...

EFI Pro 16h Operations Guide
Page 110
... an emergency condition. Release the downward pressure and let the red knob spring up) 5. Manually return the carriage to the "Home" position. 3. Move carriage to the "Home" position if it is no one in the way of the EFI Pro 16h printer. Ensure the condition that there is engaged. 6. 9.4 E-Stop Conditions Emergency stops are...
... an emergency condition. Release the downward pressure and let the red knob spring up) 5. Manually return the carriage to the "Home" position. 3. Move carriage to the "Home" position if it is no one in the way of the EFI Pro 16h printer. Ensure the condition that there is engaged. 6. 9.4 E-Stop Conditions Emergency stops are...

