
DR1600MKII User manual
Page 3
.... A diagonal line indicates a prohibited course of safety warnings. This symbol indicates you observe all of the precautions appear in each section of this device, all operators should take precaution. Please read and follow the instructions in this manual. This symbol warns against dismantling the device. To achieve optimum utility of this manual. KM_Ver.01E_C 2 Note Some parts of the...
.... A diagonal line indicates a prohibited course of safety warnings. This symbol indicates you observe all of the precautions appear in each section of this device, all operators should take precaution. Please read and follow the instructions in this manual. This symbol warns against dismantling the device. To achieve optimum utility of this manual. KM_Ver.01E_C 2 Note Some parts of the...
DR1600MKII User manual
Page 8
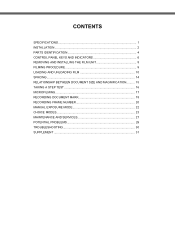
CONTENTS SPECIFICATIONS 1 INSTALLATION ...2 PARTS IDENTIFICATION 4 CONTROL PANEL KEYS AND INDICATORS 6 REMOVING AND INSTALLING THE FILM UNIT 8 FILMING PROCEDURE 9 LOADING AND UNLOADING FILM 10 SPACING...14 RELATIONSHIP BETWEEN DOCUMENT SIZE AND MAGNIFICATION.......... 15 TAKING A STEP TEST 16 MICROFILMING 17 RECORDING DOCUMENT MARK 18 RECORDING FRAME NUMBER 20 MANUAL EXPOSURE MODE 22 CHOICE MODES 23 MAINTENANCE AND SERVICES 27 POTENTIAL PROBLEMS 29 TROUBLESHOOTING 30 SUPPLEMENT 31
CONTENTS SPECIFICATIONS 1 INSTALLATION ...2 PARTS IDENTIFICATION 4 CONTROL PANEL KEYS AND INDICATORS 6 REMOVING AND INSTALLING THE FILM UNIT 8 FILMING PROCEDURE 9 LOADING AND UNLOADING FILM 10 SPACING...14 RELATIONSHIP BETWEEN DOCUMENT SIZE AND MAGNIFICATION.......... 15 TAKING A STEP TEST 16 MICROFILMING 17 RECORDING DOCUMENT MARK 18 RECORDING FRAME NUMBER 20 MANUAL EXPOSURE MODE 22 CHOICE MODES 23 MAINTENANCE AND SERVICES 27 POTENTIAL PROBLEMS 29 TROUBLESHOOTING 30 SUPPLEMENT 31

DR1600MKII User manual
Page 9
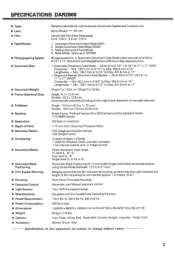
..." (H) : 41 kg or 90 lbs : Foot Pedal, Black Board, Resettable Counter (6-digit), RS232C Interface Kit : Blower Brush, Reel CAUTION Use a shielded cable for the block, batch, and item numbers. • Can also be adjusted by using choice Mode (between 1.21 to change without notice. . 1 SPECIFICATIONS ■ Type: ■ Lens: ■ Film: ■ Document Size: ■ Frame (Aperture) Size: ■ Pulldown: ■ Spacing: ■ Resolution: ■...
..." (H) : 41 kg or 90 lbs : Foot Pedal, Black Board, Resettable Counter (6-digit), RS232C Interface Kit : Blower Brush, Reel CAUTION Use a shielded cable for the block, batch, and item numbers. • Can also be adjusted by using choice Mode (between 1.21 to change without notice. . 1 SPECIFICATIONS ■ Type: ■ Lens: ■ Film: ■ Document Size: ■ Frame (Aperture) Size: ■ Pulldown: ■ Spacing: ■ Resolution: ■...

DR1600MKII User manual
Page 12
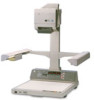
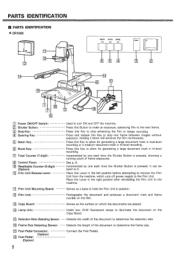
... Film Unit. Photographs the document and produces a document mark and frame number on which cuts off power supply to stop advancing the film or beeps sounding. PARTS IDENTIFICATION ■ PARTS IDENTIFICATION 1 Power ON/OFF Switch: 2 Shutter Button: 3 Stop Key: 4 Spacing Key: 5 Batch Key: 6 Block Key: 7 Total Counter (7-digit): 8 Control Panel: 9 Resettable Counter (6-digit) [Option] : 10 Film Unit Release Lever: 11 Film Unit Mounting Board: 12 Film Unit: 13 Copy Board: 14 Lamp Unit: 15 Reduction Ratio Detecting Sensor: 16 Frame Size Detecting Sensor...
... Film Unit. Photographs the document and produces a document mark and frame number on which cuts off power supply to stop advancing the film or beeps sounding. PARTS IDENTIFICATION ■ PARTS IDENTIFICATION 1 Power ON/OFF Switch: 2 Shutter Button: 3 Stop Key: 4 Spacing Key: 5 Batch Key: 6 Block Key: 7 Total Counter (7-digit): 8 Control Panel: 9 Resettable Counter (6-digit) [Option] : 10 Film Unit Release Lever: 11 Film Unit Mounting Board: 12 Film Unit: 13 Copy Board: 14 Lamp Unit: 15 Reduction Ratio Detecting Sensor: 16 Frame Size Detecting Sensor...

DR1600MKII User manual
Page 13
... can control up to the film being advanced during microfilming or with the Film Unit removed, the machine memory is unable to keep track of usable, unexposed film left in the Film Unit in the window move while the film is loaded in machine memory the last frame number used . 5 Switch 1 Switch 2 1 2 3 4 ON ON OFF OFF OFF ON ON OFF NOTE If the Memory Switch positions are changed during filming. Allow...
... can control up to the film being advanced during microfilming or with the Film Unit removed, the machine memory is unable to keep track of usable, unexposed film left in the Film Unit in the window move while the film is loaded in machine memory the last frame number used . 5 Switch 1 Switch 2 1 2 3 4 ON ON OFF OFF OFF ON ON OFF NOTE If the Memory Switch positions are changed during filming. Allow...
DR1600MKII User manual
Page 14
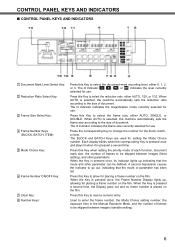
..., either AUTO, SINGLE, or DOUBLE. CONTROL PANEL KEYS AND INDICATORS ■ CONTROL PANEL KEYS AND INDICATORS 1 Document Mark Level Select Key: 2 Reduction Ratio Select Key: 3 Frame Size Select Key: 4 Frame Number Keys (BLOCK, BATCH, ITEM): 5 Mode Choice Key: 6 Frame Number ON/OFF Key: 7 Clear Key: 8 Number Keys: Press this Key to allow for placing a frame number on the film. Used to enter the frame number, the Mode Choice setting number...
..., either AUTO, SINGLE, or DOUBLE. CONTROL PANEL KEYS AND INDICATORS ■ CONTROL PANEL KEYS AND INDICATORS 1 Document Mark Level Select Key: 2 Reduction Ratio Select Key: 3 Frame Size Select Key: 4 Frame Number Keys (BLOCK, BATCH, ITEM): 5 Mode Choice Key: 6 Frame Number ON/OFF Key: 7 Clear Key: 8 Number Keys: Press this Key to allow for placing a frame number on the film. Used to enter the frame number, the Mode Choice setting number...

DR1600MKII User manual
Page 15
... Mode (for setting, see page 26). This Indicator blinks red with beeps sounding as the set in the Auto Exposure Mode and to be advanced between images at any desired number using a Number Key or Keys. When the Key is pressed, the set number of unexpose frames and the old data reappears on the BLOCK display. 9 Leader/Trailer Key (Variable Setting): 10 Leader/Trailer Key (Fixed Setting): 11 Manual...
... Mode (for setting, see page 26). This Indicator blinks red with beeps sounding as the set in the Auto Exposure Mode and to be advanced between images at any desired number using a Number Key or Keys. When the Key is pressed, the set number of unexpose frames and the old data reappears on the BLOCK display. 9 Leader/Trailer Key (Variable Setting): 10 Leader/Trailer Key (Fixed Setting): 11 Manual...

DR1600MKII User manual
Page 23
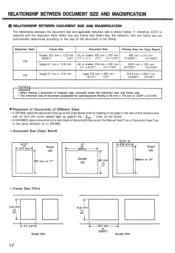
If, therefore, AUTO is selected with the Reduction Ratio Select Key and Frame Size Select Key, the reduction ratio and frame size are automatically determined according to be filmed. Reduction Ratio 1/25 1/32 Frame Size Double 18.2 mm x 12.6 mm (23/32") (1/2") Single 9.7 mm x 12.6 mm Single 9.7 mm x 12.6 mm Document Size Filming Area (on Copy Board) A3 or smaller 432 mm...
If, therefore, AUTO is selected with the Reduction Ratio Select Key and Frame Size Select Key, the reduction ratio and frame size are automatically determined according to be filmed. Reduction Ratio 1/25 1/32 Frame Size Double 18.2 mm x 12.6 mm (23/32") (1/2") Single 9.7 mm x 12.6 mm Single 9.7 mm x 12.6 mm Document Size Filming Area (on Copy Board) A3 or smaller 432 mm...
DR1600MKII User manual
Page 37
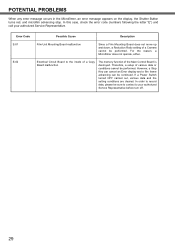
... cannot be performed. POTENTIAL PROBLEMS When any error message occurs in the Microfilmer, an error message appears on the display, the Shutter Button turns red, and microfilm advancing stop. However, a Stop Key can cancel an Error display and a film frame advancing can be performed. If a Power Switch turned OFF carried out, various data and the setting conditions are cleared. Error Code E-01 E-02 Possible Cause Description Film Unit Mounting Board malfunction Since...
... cannot be performed. POTENTIAL PROBLEMS When any error message occurs in the Microfilmer, an error message appears on the display, the Shutter Button turns red, and microfilm advancing stop. However, a Stop Key can cancel an Error display and a film frame advancing can be performed. If a Power Switch turned OFF carried out, various data and the setting conditions are cleared. Error Code E-01 E-02 Possible Cause Description Film Unit Mounting Board malfunction Since...

DR1600MKII User manual
Page 38
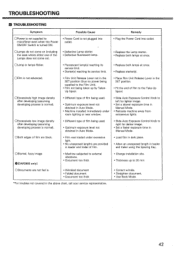
... its • Replace both lamps at once. service limit. ❍ Film is not advanced. • Film Unit Release Lever not in the SET position (thus no power being supplied to the Film Unit). • Film not being taken up to 20 mm * For troubles not covered in leader and trailer using the Spacing Key. ❍ Blurred, fuzzy image • Machine subjected to microfilmer • Power Cord is not...
... its • Replace both lamps at once. service limit. ❍ Film is not advanced. • Film Unit Release Lever not in the SET position (thus no power being supplied to the Film Unit). • Film not being taken up to 20 mm * For troubles not covered in leader and trailer using the Spacing Key. ❍ Blurred, fuzzy image • Machine subjected to microfilmer • Power Cord is not...
DR1600/DAR2800 Operator Manual
Page 3
CONTENTS Specifications (DR1600) 1 (DAR2800) 2 Installation 3 Parts Identification 5 Control Panel Keys and Indicators 8 Removing and Installing the Film Unit 10 Filming Procedure 11 Loading and Unloding Film 12 Spacing 16 Relationship Between Document Size and Magnification 17 Taking a Step Test 18 Microfilming 19 Recording Document Mark 23 Recording Frame Number 27 Manual Exposure Mode 29 Choice Modes 30 Using the Imprinter (DAR2800) 34 Removing Documents Misfed (DAR2800) 38 Maintenance and Services 40 Troubleshooting 42 For Key Operators Use
CONTENTS Specifications (DR1600) 1 (DAR2800) 2 Installation 3 Parts Identification 5 Control Panel Keys and Indicators 8 Removing and Installing the Film Unit 10 Filming Procedure 11 Loading and Unloding Film 12 Spacing 16 Relationship Between Document Size and Magnification 17 Taking a Step Test 18 Microfilming 19 Recording Document Mark 23 Recording Frame Number 27 Manual Exposure Mode 29 Choice Modes 30 Using the Imprinter (DAR2800) 34 Removing Documents Misfed (DAR2800) 38 Maintenance and Services 40 Troubleshooting 42 For Key Operators Use
DR1600/DAR2800 Operator Manual
Page 5
... 5-1/2" to 9999 frames) : 150 lines or more/mm : +10 mm from Document Pressure Glass : 1/25 (Single and Double Frames) 1/32 (Single Frame) : 12 digits (4 digits x 3 fields) • Used for use reaches approx. 1.5 meters. (5 ft.) : Auto Focus (Two-step focusing) : Automatic and Manual exposure control : Two 15-W fluorescent lamps : Equipped with Automatic Document Feeder and Turnover Unit : Micro-Rokkor f= 28 mm : 16-mm Roll Film (Non-Perforated) 5 mil -100...
... 5-1/2" to 9999 frames) : 150 lines or more/mm : +10 mm from Document Pressure Glass : 1/25 (Single and Double Frames) 1/32 (Single Frame) : 12 digits (4 digits x 3 fields) • Used for use reaches approx. 1.5 meters. (5 ft.) : Auto Focus (Two-step focusing) : Automatic and Manual exposure control : Two 15-W fluorescent lamps : Equipped with Automatic Document Feeder and Turnover Unit : Micro-Rokkor f= 28 mm : 16-mm Roll Film (Non-Perforated) 5 mil -100...
DR1600/DAR2800 Operator Manual
Page 8
... be reset to turn ON and OFF the machine. PARTS IDENTIFICATION ■ PARTS IDENTIFICATION ■ DR1600 LIM 10 12 14 f 15 BLOCK BATCH SPACE, STOP 5 3 8 17 IT 7 13 191 O Power ON/OFF Switch: Shutter Button: 3 Stop Key: A Spacing Key: Batch Key: a Block Key: L7J Total Counter (7-digit): 8 Control Panel: Resettable Counter (6-digit) [Option]: 10 Film Unit Release Lever: 11 Film Unit Mounting Board: 2 Film Unit: n Copy Board: Lamp Unit: n Reduction Ratio Detecting Sensor: [1] Frame Size Detecting Sensor: n Foot...
... be reset to turn ON and OFF the machine. PARTS IDENTIFICATION ■ PARTS IDENTIFICATION ■ DR1600 LIM 10 12 14 f 15 BLOCK BATCH SPACE, STOP 5 3 8 17 IT 7 13 191 O Power ON/OFF Switch: Shutter Button: 3 Stop Key: A Spacing Key: Batch Key: a Block Key: L7J Total Counter (7-digit): 8 Control Panel: Resettable Counter (6-digit) [Option]: 10 Film Unit Release Lever: 11 Film Unit Mounting Board: 2 Film Unit: n Copy Board: Lamp Unit: n Reduction Ratio Detecting Sensor: [1] Frame Size Detecting Sensor: n Foot...

DR1600/DAR2800 Operator Manual
Page 10
... make the switch settings when a fresh film is unable to four different Film Units. Each DR1600 or DAR2800 machine can control up to keep track of usable, unexposed film left in the Film Unit in meters or feet. Switch 1 Switch 2 12 3 4 ON ON OFF OFF OFF ON ON OFF - The stripes in machine memory the last frame number used . 7 NOTE If the Memory Switch positions are changed during filming. n FILM UNIT 1 2.5 5 4 2 3 El Film Supply Indicator...
... make the switch settings when a fresh film is unable to four different Film Units. Each DR1600 or DAR2800 machine can control up to keep track of usable, unexposed film left in the Film Unit in meters or feet. Switch 1 Switch 2 12 3 4 ON ON OFF OFF OFF ON ON OFF - The stripes in machine memory the last frame number used . 7 NOTE If the Memory Switch positions are changed during filming. n FILM UNIT 1 2.5 5 4 2 3 El Film Supply Indicator...

DR1600/DAR2800 Operator Manual
Page 12
El Clear Key: El Number Keys: El Leader/Trailer Key (Variable Setting): Press this Key to select the Feed Mode, either the Automatic Document Feed (ADF), Single Document Feed (SADF), or Manual Document Feed Mode. LlIA Leader/Trailer Key (Fixed Setting): n Manual Exposure Select Key: Liz Auto Exposure Control Knob: n Auto Exposure Select Key: 1141 Film Empty Indicator: 15 Imprint Select Key (DAR2800): 1161 Auto Document Feed Select Key (DAR2800): 1171 Document Select Key (DAR2800): RN Document Misfeed...
El Clear Key: El Number Keys: El Leader/Trailer Key (Variable Setting): Press this Key to select the Feed Mode, either the Automatic Document Feed (ADF), Single Document Feed (SADF), or Manual Document Feed Mode. LlIA Leader/Trailer Key (Fixed Setting): n Manual Exposure Select Key: Liz Auto Exposure Control Knob: n Auto Exposure Select Key: 1141 Film Empty Indicator: 15 Imprint Select Key (DAR2800): 1161 Auto Document Feed Select Key (DAR2800): 1171 Document Select Key (DAR2800): RN Document Misfeed...
DR1600/DAR2800 Operator Manual
Page 13
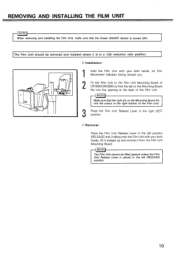
... you. 71 cao 2 Fit the Film Unit to the Film Unit Mounting Board of DR1600/DAR2800 so that the Power ON/OFF Switch is in the left (RELEASE) position. 10 The Film Unit should be lifted upward unless the Film Unit Release Lever is placed in the right (SET) position. REMOVING AND INSTALLING THE FILM UNIT NOTE When removing and installing the Film Unit, make sure that the tab on the...
... you. 71 cao 2 Fit the Film Unit to the Film Unit Mounting Board of DR1600/DAR2800 so that the Power ON/OFF Switch is in the left (RELEASE) position. 10 The Film Unit should be lifted upward unless the Film Unit Release Lever is placed in the right (SET) position. REMOVING AND INSTALLING THE FILM UNIT NOTE When removing and installing the Film Unit, make sure that the tab on the...
DR1600/DAR2800 Operator Manual
Page 20
... (23/32") Double Size If, therefore, AUTO is selected with its heading or top edge in DR1600. Reduction Ratio 1/25 Frame Size Document Size Filming Area (on the Manual Feed Tray or Document Feed Tray in the same direction as in the rear of the machine and with the Reduction Ratio Select Key and Frame Size Select Key, the reduction ratio and frame size are automatically determined according...
... (23/32") Double Size If, therefore, AUTO is selected with its heading or top edge in DR1600. Reduction Ratio 1/25 Frame Size Document Size Filming Area (on the Manual Feed Tray or Document Feed Tray in the same direction as in the rear of the machine and with the Reduction Ratio Select Key and Frame Size Select Key, the reduction ratio and frame size are automatically determined according...

DR1600/DAR2800 Operator Manual
Page 37
... on the Control Panel. 1. Ribbon Release Lever: Press to produce a number. Printer Head: Presses against the ribbon to open the !Ribbon Cover when replacing the ribbon. Printer Head Ribbon Cartridge 34 To use this capability, press the Imprint Select Key on the filmed document. Ribbon Cover Switch 0000 0000 0000 0000 0000 0000 Document (1st-side) C.) C, Gj Ribbon Cover Switch: Actuated to shift the print position. n O. USING THE IMPRINTER...
... on the Control Panel. 1. Ribbon Release Lever: Press to produce a number. Printer Head: Presses against the ribbon to open the !Ribbon Cover when replacing the ribbon. Printer Head Ribbon Cartridge 34 To use this capability, press the Imprint Select Key on the filmed document. Ribbon Cover Switch 0000 0000 0000 0000 0000 0000 Document (1st-side) C.) C, Gj Ribbon Cover Switch: Actuated to shift the print position. n O. USING THE IMPRINTER...

DR1600/DAR2800 Operator Manual
Page 42
... dirty documents, therefore, feed sheets of the documents. Procedure: 1 Turn OFF the IMPRINTER key and remove the Film Unit from DAR2800. 2 Place the Film Unit Release Lever in the SET position. 3 Place some ten sheets of paper one after after through the machine in the ADF Mode, press the Shutter Button to remove the dirt off the Platen Roller. IN MAINTENANCE OF THE IMPRINTER As the Imprinter is used to print...
... dirty documents, therefore, feed sheets of the documents. Procedure: 1 Turn OFF the IMPRINTER key and remove the Film Unit from DAR2800. 2 Place the Film Unit Release Lever in the SET position. 3 Place some ten sheets of paper one after after through the machine in the ADF Mode, press the Shutter Button to remove the dirt off the Platen Roller. IN MAINTENANCE OF THE IMPRINTER As the Imprinter is used to print...
DR1600/DAR2800 Operator Manual
Page 45
...; Straighten document. • Use Book Mode. 42 OBlurred, fuzzy image 0[DAR2800 only] • Fluorescent lamp(s) reaching its service limit. • Starter(s) reaching its service limit. • Replace both lamps at once. • Replace starter(s). • Film Unit Release Lever not in the SET position (thus no power being supplied to the Film Unit). • Film not being taken up by TakenUp Spool. • Place Film Unit Release Lever in the SET position...
...; Straighten document. • Use Book Mode. 42 OBlurred, fuzzy image 0[DAR2800 only] • Fluorescent lamp(s) reaching its service limit. • Starter(s) reaching its service limit. • Replace both lamps at once. • Replace starter(s). • Film Unit Release Lever not in the SET position (thus no power being supplied to the Film Unit). • Film not being taken up by TakenUp Spool. • Place Film Unit Release Lever in the SET position...


