
User Manual
Page 1
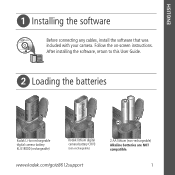
ENGLISH ᕡ Installing the software Before connecting any cables, install the software that was included with your camera. Follow the on-screen instructions. After installing the software, return to this User Guide. ᕢ Loading the batteries Kodak Li-Ion rechargeable digital camera battery KLIC-8000 (rechargeable) Kodak lithium digital camera battery CRV3 (non-rechargeable) www.kodak.com/go/z8612support 2 AA lithium (non-rechargeable) Alkaline batteries are NOT compatible. 1
ENGLISH ᕡ Installing the software Before connecting any cables, install the software that was included with your camera. Follow the on-screen instructions. After installing the software, return to this User Guide. ᕢ Loading the batteries Kodak Li-Ion rechargeable digital camera battery KLIC-8000 (rechargeable) Kodak lithium digital camera battery CRV3 (non-rechargeable) www.kodak.com/go/z8612support 2 AA lithium (non-rechargeable) Alkaline batteries are NOT compatible. 1
User Manual
Page 2
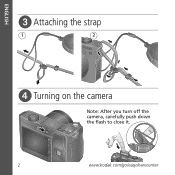
ENGLISH ᕣ Attaching the strap 1 2 ᕤ Turning on the camera Note: After you turn off the camera, carefully push down the flash to close it. 2 www.kodak.com/go/easysharecenter
ENGLISH ᕣ Attaching the strap 1 2 ᕤ Turning on the camera Note: After you turn off the camera, carefully push down the flash to close it. 2 www.kodak.com/go/easysharecenter
User Manual
Page 5
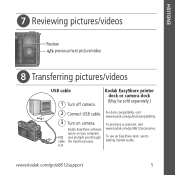
... cable the transfer process. U-8 For dock compatibility, visit www.kodak.com/go /z8612support 5 www.kodak.com/go /dockcompatibility. ENGLISH ᕧ Reviewing pictures/videos Review previous/next picture/video ᕨ Transferring pictures/videos USB cable 1 Turn off camera. Kodak EasyShare software opens on camera. To use an EasyShare dock, see its Getting Started Guide. To purchase accessories, visit...
... cable the transfer process. U-8 For dock compatibility, visit www.kodak.com/go /z8612support 5 www.kodak.com/go /dockcompatibility. ENGLISH ᕧ Reviewing pictures/videos Review previous/next picture/video ᕨ Transferring pictures/videos USB cable 1 Turn off camera. Kodak EasyShare software opens on camera. To use an EasyShare dock, see its Getting Started Guide. To purchase accessories, visit...

User Manual
Page 6
Finish reading this book, so you can take and share your computer Keep learning! Visit www.kodak.com/go/z8612support and www.kodak.com/go/easysharecenter for: • the extended user guide • interactive troubleshooting and repairs • interactive tutorials... • FAQs • downloads • accessories • printing information • product registration 6 www.kodak.com/go/easysharecenter You have: • set up your camera • taken pictures • transferred pictures to your best pictures! ENGLISH ᕩ Keep learning about your...
Finish reading this book, so you can take and share your computer Keep learning! Visit www.kodak.com/go/z8612support and www.kodak.com/go/easysharecenter for: • the extended user guide • interactive troubleshooting and repairs • interactive tutorials... • FAQs • downloads • accessories • printing information • product registration 6 www.kodak.com/go/easysharecenter You have: • set up your camera • taken pictures • transferred pictures to your best pictures! ENGLISH ᕩ Keep learning about your...
User Manual
Page 9
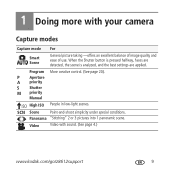
1 Doing more with sound. (See page 4.) www.kodak.com/go/z8612support 9 P Aperture A priority S Shutter M priority Manual ISO High ISO People in low-light scenes. Video Video with your camera Capture modes Capture mode For Smart Scene General picture taking -offers an excellent balance of image quality and ease of use. When the Shutter...
1 Doing more with sound. (See page 4.) www.kodak.com/go/z8612support 9 P Aperture A priority S Shutter M priority Manual ISO High ISO People in low-light scenes. Video Video with your camera Capture modes Capture mode For Smart Scene General picture taking -offers an excellent balance of image quality and ease of use. When the Shutter...

User Manual
Page 10
Doing more with your camera Using optical zoom Use optical zoom to get up to 5X beyond optical zoom while taking pictures/videos. 1 Use the LCD to frame your subject. Optical Digital zoom zoom ■ As you zoom in, move away from your subject. 2 Press Telephoto (T) or Wide (W)... to zoom in . (12-60 cm) @ wide 2-4.3 ft (0.6-1.3m) @ telephoto Use digital zoom to your subject before taking pictures.You may notice decreased image quality when using digital zoom. 10 www.kodak.com/go/easysharecenter Focus distance W TD Auto 24 in. (60 cm)-infinity @ wide 3.9 ft (1.2m)-...
Doing more with your camera Using optical zoom Use optical zoom to get up to 5X beyond optical zoom while taking pictures/videos. 1 Use the LCD to frame your subject. Optical Digital zoom zoom ■ As you zoom in, move away from your subject. 2 Press Telephoto (T) or Wide (W)... to zoom in . (12-60 cm) @ wide 2-4.3 ft (0.6-1.3m) @ telephoto Use digital zoom to your subject before taking pictures.You may notice decreased image quality when using digital zoom. 10 www.kodak.com/go/easysharecenter Focus distance W TD Auto 24 in. (60 cm)-infinity @ wide 3.9 ft (1.2m)-...

User Manual
Page 11
... become accustomed to -subject distance in shadow or is "backlit" (when the light is behind the subject). In low light, hold the camera steady or use a tripod. taken. Press the Flash button repeatedly to scroll through flash modes. (See flash modes below.) Flash-to the ... 1.6-25.6 ft (0.5-7.8m) Telephoto 3.9-14.4 ft (1.2-4.4 m) Flash modes Auto Off Flash fires When the lighting conditions require it. Doing more with your camera Taking flash pictures Use the flash when you take a picture, regardless of the lighting conditions. If Red-eye Pre-flash is turned off If Red...
... become accustomed to -subject distance in shadow or is "backlit" (when the light is behind the subject). In low light, hold the camera steady or use a tripod. taken. Press the Flash button repeatedly to scroll through flash modes. (See flash modes below.) Flash-to the ... 1.6-25.6 ft (0.5-7.8m) Telephoto 3.9-14.4 ft (1.2-4.4 m) Flash modes Auto Off Flash fires When the lighting conditions require it. Doing more with your camera Taking flash pictures Use the flash when you take a picture, regardless of the lighting conditions. If Red-eye Pre-flash is turned off If Red...
User Manual
Page 12
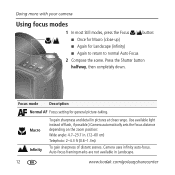
...-up) ■ Again for Landscape (infinity) ■ Again to return to normal Auto Focus 2 Compose the scene. Doing more with your camera Using focus modes 1 In most Still modes, press the Focus button: ■ Once for Macro (close range. Press the Shutter button halfway..., then completely down. Macro Infinity To gain sharpness and detail in Landscape. 12 www.kodak.com/go/easysharecenter Camera uses infinity auto-focus. Use available light instead of flash, if possible.) Camera automatically sets the focus distance depending on the zoom position: Wide angle: 4.7-23.7 in...
...-up) ■ Again for Landscape (infinity) ■ Again to return to normal Auto Focus 2 Compose the scene. Doing more with your camera Using focus modes 1 In most Still modes, press the Focus button: ■ Once for Macro (close range. Press the Shutter button halfway..., then completely down. Macro Infinity To gain sharpness and detail in Landscape. 12 www.kodak.com/go/easysharecenter Camera uses infinity auto-focus. Use available light instead of flash, if possible.) Camera automatically sets the focus distance depending on the zoom position: Wide angle: 4.7-23.7 in...
User Manual
Page 13
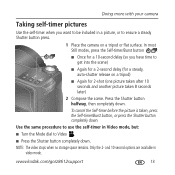
..., but: ■ Turn the Mode dial to ensure a steady Shutter button press. 1 Place the camera on a tripod) ■ Again for a steady, auto-shutter release on a tripod or flat surface. www.kodak.com/go/z8612support 13 Only the 2- To cancel the Self-timer before the picture is taken, press... . and 10-second options are available in a picture, or to Video . ■ Press the Shutter button completely down. Doing more with your camera Taking self-timer pictures Use the self-timer when you have time to get into the scene) ■ Again for a 2-second delay (for 2-shot...
..., but: ■ Turn the Mode dial to ensure a steady Shutter button press. 1 Place the camera on a tripod) ■ Again for a steady, auto-shutter release on a tripod or flat surface. www.kodak.com/go/z8612support 13 Only the 2- To cancel the Self-timer before the picture is taken, press... . and 10-second options are available in a picture, or to Video . ■ Press the Shutter button completely down. Doing more with your camera Taking self-timer pictures Use the self-timer when you have time to get into the scene) ■ Again for a 2-second delay (for 2-shot...
User Manual
Page 14
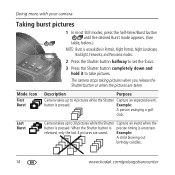
... A child blowing out birthday candles. 14 www.kodak.com/go/easysharecenter button is uncertain. released, only the last 4 pictures are taken. When the Shutter button is precise timing is pressed. Example: A person swinging a golf club. Doing more with your camera Taking burst pictures 1 In most Still modes, press... to 30 pictures while the Shutter Capture an event when the button is pressed. Mode Icon First Burst Description Purpose Camera takes up to take pictures. The camera stops taking pictures when you release the Shutter button or when the pictures are saved.
... A child blowing out birthday candles. 14 www.kodak.com/go/easysharecenter button is uncertain. released, only the last 4 pictures are taken. When the Shutter button is precise timing is pressed. Example: A person swinging a golf club. Doing more with your camera Taking burst pictures 1 In most Still modes, press... to 30 pictures while the Shutter Capture an event when the button is pressed. Mode Icon First Burst Description Purpose Camera takes up to take pictures. The camera stops taking pictures when you release the Shutter button or when the pictures are saved.
User Manual
Page 15
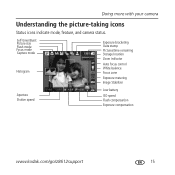
Doing more with your camera Understanding the picture-taking icons Status icons indicate mode, feature, and camera status. Self-timer/Burst Picture size Flash mode Focus mode Capture mode Histogram Exposure bracketing Date stamp Pictures/time remaining Storage location Zoom indicator Auto focus control White balance Focus zone Exposure metering Image Stabilizer Aperture Shutter speed Low battery ISO speed Flash compensation Exposure compensation www.kodak.com/go/z8612support 15
Doing more with your camera Understanding the picture-taking icons Status icons indicate mode, feature, and camera status. Self-timer/Burst Picture size Flash mode Focus mode Capture mode Histogram Exposure bracketing Date stamp Pictures/time remaining Storage location Zoom indicator Auto focus control White balance Focus zone Exposure metering Image Stabilizer Aperture Shutter speed Low battery ISO speed Flash compensation Exposure compensation www.kodak.com/go/z8612support 15
User Manual
Page 17
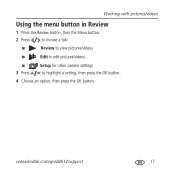
Working with pictures/videos Using the menu button in Review 1 Press the Review button, then the Menu button. 2 Press to choose a tab: ■ Review to view pictures/videos ■ Edit to edit pictures/videos ■ 3 Press Setup for other camera settings to highlight a setting, then press the OK button. 4 Choose an option, then press the OK button. www.kodak.com/go/z8612support 17
Working with pictures/videos Using the menu button in Review 1 Press the Review button, then the Menu button. 2 Press to choose a tab: ■ Review to view pictures/videos ■ Edit to edit pictures/videos ■ 3 Press Setup for other camera settings to highlight a setting, then press the OK button. 4 Choose an option, then press the OK button. www.kodak.com/go/z8612support 17

User Manual
Page 19
... for the most common picture-taking settings. ■ Capture + for other camera settings. 3 Press to highlight a setting, then press the OK button. 4 Choose an option, then press the OK button. www.kodak.com/go/z8612support 19 Some capture modes offer limited settings. Available only in PASM... and Panorama modes. ■ Setup for information about camera settings and options. NOTE: Press the Info button for other picture-taking...
... for the most common picture-taking settings. ■ Capture + for other camera settings. 3 Press to highlight a setting, then press the OK button. 4 Choose an option, then press the OK button. www.kodak.com/go/z8612support 19 Some capture modes offer limited settings. Available only in PASM... and Panorama modes. ■ Setup for information about camera settings and options. NOTE: Press the Info button for other picture-taking...
User Manual
Page 20
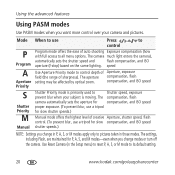
..., and ISO speed S Shutter Priority M Manual Shutter Priority mode is primarily used to its default setting. 20 www.kodak.com/go/easysharecenter The compensation, flash camera automatically sets the aperture for compensation, and ISO speed proper exposure. (To prevent blur, use a tripod for slow shutter... Using PASM modes Use PASM modes when you want more control over your subject is moving. Use Reset Camera (in those modes. The camera much light enters the camera), automatically sets the shutter speed and flash compensation, and ISO aperture (f-stop) based on the scene lighting...
..., and ISO speed S Shutter Priority M Manual Shutter Priority mode is primarily used to its default setting. 20 www.kodak.com/go/easysharecenter The compensation, flash camera automatically sets the aperture for compensation, and ISO speed proper exposure. (To prevent blur, use a tripod for slow shutter... Using PASM modes Use PASM modes when you want more control over your subject is moving. Use Reset Camera (in those modes. The camera much light enters the camera), automatically sets the shutter speed and flash compensation, and ISO aperture (f-stop) based on the scene lighting...
User Manual
Page 21
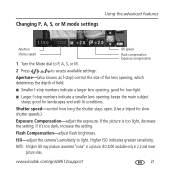
...; Smaller f-stop numbers indicate a smaller lens opening ; good for slow shutter speeds.) Exposure Compensation-adjust the exposure. ISO-adjust the camera's sensitivity to P, A, S, or M. Higher ISO indicates greater sensitivity. www.kodak.com/go/z8612support 21 Shutter speed-control how long the shutter stays open. (Use a tripod for landscapes and well-lit conditions...
...; Smaller f-stop numbers indicate a smaller lens opening ; good for slow shutter speeds.) Exposure Compensation-adjust the exposure. ISO-adjust the camera's sensitivity to P, A, S, or M. Higher ISO indicates greater sensitivity. www.kodak.com/go/z8612support 21 Shutter speed-control how long the shutter stays open. (Use a tripod for landscapes and well-lit conditions...
User Manual
Page 22
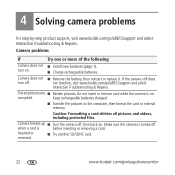
... before inserting or removing a card. corrupted. inserted or removed. ■ Try another SD/SDHC card. 22 www.kodak.com/go /z8612support and select Interactive Troubleshooting & Repairs. Make sure the camera is turned off when a card is on . ■ Charge rechargeable batteries. turn off , then back on. Caution: Formatting a card deletes all pictures...
... before inserting or removing a card. corrupted. inserted or removed. ■ Try another SD/SDHC card. 22 www.kodak.com/go /z8612support and select Interactive Troubleshooting & Repairs. Make sure the camera is turned off when a card is on . ■ Charge rechargeable batteries. turn off , then back on. Caution: Formatting a card deletes all pictures...
User Manual
Page 25
... accessories elsewhere defined to provide reasonable protection against harmful interference in accordance with the limits for additional suggestions. Regulatory compliance FCC compliance and advisory Kodak EasyShare Z8612/ZD8612 IS digital camera This equipment has been tested and found to comply with the instructions, may be used in a residential installation. Appendix Outside the United States and...
... accessories elsewhere defined to provide reasonable protection against harmful interference in accordance with the limits for additional suggestions. Regulatory compliance FCC compliance and advisory Kodak EasyShare Z8612/ZD8612 IS digital camera This equipment has been tested and found to comply with the instructions, may be used in a residential installation. Appendix Outside the United States and...
Extended user guide
Page 1
Kodak EasyShare Z81612/ZD8612 IS digital camera Extended user guide www.kodak.com For interactive tutorials, visit www.kodak.com/go/howto For help with your camera, visit www.kodak.com/go/z8612support
Kodak EasyShare Z81612/ZD8612 IS digital camera Extended user guide www.kodak.com For interactive tutorials, visit www.kodak.com/go/howto For help with your camera, visit www.kodak.com/go/z8612support
Extended user guide
Page 5
... the strap 1 Loading the battery 1 Turning on the camera 2 Setting the language, date/time 2 Storing pictures on an optional SD or SDHC card 3 2 Taking pictures/videos 4 Taking a picture 4 Capture modes 6 Using optical zoom 8 Taking .../videos 15 Reviewing pictures/videos 15 Deleting pictures/videos 17 Using the menu button in Review 18 Adding sound tags 19 Cropping pictures 20 Using Kodak Perfect Touch technology 20 Editing videos 21 Running a slide show 23 Viewing pictures/videos in different ways 26 Selecting multiple pictures/videos 27 Copying pictures...
... the strap 1 Loading the battery 1 Turning on the camera 2 Setting the language, date/time 2 Storing pictures on an optional SD or SDHC card 3 2 Taking pictures/videos 4 Taking a picture 4 Capture modes 6 Using optical zoom 8 Taking .../videos 15 Reviewing pictures/videos 15 Deleting pictures/videos 17 Using the menu button in Review 18 Adding sound tags 19 Cropping pictures 20 Using Kodak Perfect Touch technology 20 Editing videos 21 Running a slide show 23 Viewing pictures/videos in different ways 26 Selecting multiple pictures/videos 27 Copying pictures...
Extended user guide
Page 6
Table of contents 4 Doing more with your camera 29 Using the Menu button to change settings 29 Using the framing grid to compose a picture 35 Using PASM modes 35 Using exposure compensation to ... pictures 42 Installing the software 42 Transferring pictures with the USB cable 43 Printing pictures 44 Dock compatibility for your camera 46 6 Troubleshooting 47 7 Getting help 52 Helpful links 52 8 Appendix 54 Camera specifications 54 Storage capacities 57 Upgrading your software and firmware 57 Important safety instructions 57 Battery life 58 Care...
Table of contents 4 Doing more with your camera 29 Using the Menu button to change settings 29 Using the framing grid to compose a picture 35 Using PASM modes 35 Using exposure compensation to ... pictures 42 Installing the software 42 Transferring pictures with the USB cable 43 Printing pictures 44 Dock compatibility for your camera 46 6 Troubleshooting 47 7 Getting help 52 Helpful links 52 8 Appendix 54 Camera specifications 54 Storage capacities 57 Upgrading your software and firmware 57 Important safety instructions 57 Battery life 58 Care...


