User Manual
Page 1
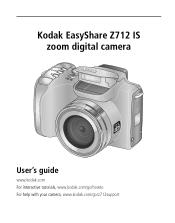
Kodak EasyShare Z712 IS zoom digital camera User's guide www.kodak.com For interactive tutorials, www.kodak.com/go/howto For help with your camera, www.kodak.com/go/z712support
Kodak EasyShare Z712 IS zoom digital camera User's guide www.kodak.com For interactive tutorials, www.kodak.com/go/howto For help with your camera, www.kodak.com/go/z712support
User Manual
Page 5
...5 Taking a picture 5 Using optical zoom 8 Using the Flash button 9 Using the Focus button 10 Using the Drive button 11 Using the camera Help button 13 Using the Info button 14 3 Working with pictures/videos 16 Reviewing pictures and videos 16 Deleting pictures and videos 17 Cropping pictures... 18 Using Kodak Perfect Touch technology 18 Editing videos 19 Using the histogram to view picture exposure 20 Running a slide show 21 Viewing pictures/videos...
...5 Taking a picture 5 Using optical zoom 8 Using the Flash button 9 Using the Focus button 10 Using the Drive button 11 Using the camera Help button 13 Using the Info button 14 3 Working with pictures/videos 16 Reviewing pictures and videos 16 Deleting pictures and videos 17 Cropping pictures... 18 Using Kodak Perfect Touch technology 18 Editing videos 19 Using the histogram to view picture exposure 20 Running a slide show 21 Viewing pictures/videos...
User Manual
Page 6
...pictures 37 5 Transferring and printing pictures 43 Installing the software 43 Transferring pictures 44 Printing pictures 45 Accessories for your camera 47 6 Troubleshooting 48 Camera problems 48 Computer/connectivity problems 50 Picture quality problems 50 Direct printing (PictBridge) problems 51 7 Getting help 52 ...Helpful links 52 8 Appendix 54 Camera specifications 54 Care and maintenance 56 Storage capacities 57 Important safety instructions 57 Battery life 58 Upgrading your software and...
...pictures 37 5 Transferring and printing pictures 43 Installing the software 43 Transferring pictures 44 Printing pictures 45 Accessories for your camera 47 6 Troubleshooting 48 Camera problems 48 Computer/connectivity problems 50 Picture quality problems 50 Direct printing (PictBridge) problems 51 7 Getting help 52 ...Helpful links 52 8 Appendix 54 Camera specifications 54 Care and maintenance 56 Storage capacities 57 Important safety instructions 57 Battery life 58 Upgrading your software and...
User Manual
Page 7
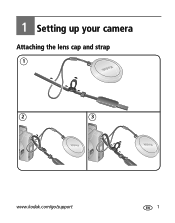
1 Setting up your camera Attaching the lens cap and strap 1 2 3 www.kodak.com/go/support 1
1 Setting up your camera Attaching the lens cap and strap 1 2 3 www.kodak.com/go/support 1
User Manual
Page 8
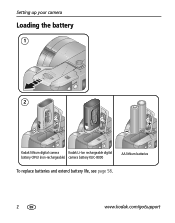
Setting up your camera Loading the battery 1 2 Kodak lithium digital camera Kodak Li-Ion rechargeable digital battery CRV3 (non-rechargeable) camera battery KLIC-8000 AA lithium batteries To replace batteries and extend battery life, see page 58. 2 www.kodak.com/go/support
Setting up your camera Loading the battery 1 2 Kodak lithium digital camera Kodak Li-Ion rechargeable digital battery CRV3 (non-rechargeable) camera battery KLIC-8000 AA lithium batteries To replace batteries and extend battery life, see page 58. 2 www.kodak.com/go/support
User Manual
Page 9
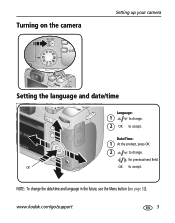
for previous/next field. Date/Time: 1 At the prompt, press OK. 2 to accept. OK OK to change. www.kodak.com/go/support 3 Turning on the camera Setting up your camera Setting the language and date/time Language: 1 to change the date/time and language in the future, use the Menu button (see page 32). NOTE: To change . 2 OK to accept.
for previous/next field. Date/Time: 1 At the prompt, press OK. 2 to accept. OK OK to change. www.kodak.com/go/support 3 Turning on the camera Setting up your camera Setting the language and date/time Language: 1 to change the date/time and language in the future, use the Menu button (see page 32). NOTE: To change . 2 OK to accept.
User Manual
Page 10
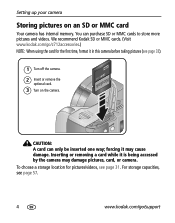
...or removing a card while it in this camera before taking pictures (see page 33). 1 Turn off the camera. 2 Insert or remove the optional card. 3 Turn on an SD or MMC card Your camera has internal memory. We recommend Kodak SD or MMC cards. (Visit www.kodak.com/go/z712accessories.) NOTE: When using the... card for pictures/videos, see page 57. 4 www.kodak.com/go/support CAUTION: A card can purchase SD or MMC ...
...or removing a card while it in this camera before taking pictures (see page 33). 1 Turn off the camera. 2 Insert or remove the optional card. 3 Turn on an SD or MMC card Your camera has internal memory. We recommend Kodak SD or MMC cards. (Visit www.kodak.com/go/z712accessories.) NOTE: When using the... card for pictures/videos, see page 57. 4 www.kodak.com/go/support CAUTION: A card can purchase SD or MMC ...
User Manual
Page 12
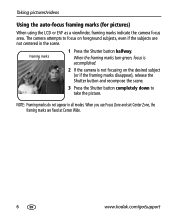
...set Center Zone, the framing marks are not centered in all modes. When the framing marks turn green, focus is accomplished. 2 If the camera is not focusing on the desired subject (or if the framing marks disappear), release the Shutter button and recompose the scene. 3 Press the ...Shutter button completely down to focus on foreground subjects, even if the subjects are fixed at Center Wide. 6 www.kodak.com/go/support Framing marks 1 Press the Shutter button halfway. Taking pictures/videos Using the auto-focus framing marks (for pictures) When using ...
...set Center Zone, the framing marks are not centered in all modes. When the framing marks turn green, focus is accomplished. 2 If the camera is not focusing on the desired subject (or if the framing marks disappear), release the Shutter button and recompose the scene. 3 Press the ...Shutter button completely down to focus on foreground subjects, even if the subjects are fixed at Center Wide. 6 www.kodak.com/go/support Framing marks 1 Press the Shutter button halfway. Taking pictures/videos Using the auto-focus framing marks (for pictures) When using ...

User Manual
Page 15
... of the lighting conditions. Use when the subject is in shadow or is "backlit" (when light is taken. In low light, hold the camera steady or use a tripod. The current flash mode appears in the LCD/EVF status area. Mode Icon Auto Flash Off The flash fires When the... lighting conditions require it. Zoom position Wide angle Telephoto Flash distance 1.6-25.6 ft (0.5-7.8 m) 4-14.4 ft (1.2-4.4 m) www.kodak.com/go/support 9 Taking pictures/videos Using the Flash button Use the flash when you take pictures at night, indoors, or outdoors in heavy shadows...
... of the lighting conditions. Use when the subject is in shadow or is "backlit" (when light is taken. In low light, hold the camera steady or use a tripod. The current flash mode appears in the LCD/EVF status area. Mode Icon Auto Flash Off The flash fires When the... lighting conditions require it. Zoom position Wide angle Telephoto Flash distance 1.6-25.6 ft (0.5-7.8 m) 4-14.4 ft (1.2-4.4 m) www.kodak.com/go/support 9 Taking pictures/videos Using the Flash button Use the flash when you take pictures at night, indoors, or outdoors in heavy shadows...
User Manual
Page 16
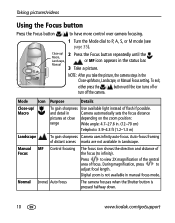
.... and detail in Camera automatically sets the focus distance pictures at close depending on the zoom position: range Wide angle: 4.7-27.6 in manual focus mode. Press to infinity). Mode Icon Purpose Details Close-up /Macro, Landscape, or Manual Focus setting. Digital zoom is pressed halfway down. 10 www.kodak.com/go/support Manual...
.... and detail in Camera automatically sets the focus distance pictures at close depending on the zoom position: range Wide angle: 4.7-27.6 in manual focus mode. Press to infinity). Mode Icon Purpose Details Close-up /Macro, Landscape, or Manual Focus setting. Digital zoom is pressed halfway down. 10 www.kodak.com/go/support Manual...
User Manual
Page 17
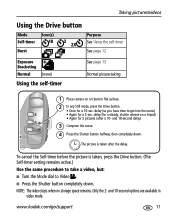
..., but: ■ Turn the Mode dial to get into the scene) • Again for a 2-sec. and 10-second options are available in video mode. www.kodak.com/go/support 11 NOTE: The video stops when no storage space remains. Taking pictures/videos Using the Drive button Mode Self-timer Burst Icon... 2 2X Purpose See Using the self-timer See page 12 Exposure Bracketing Normal (none) Using the self-timer See page 13 Normal picture-taking 1 Place camera on a tripod) • Again for 2 pictures (after the delay.
..., but: ■ Turn the Mode dial to get into the scene) • Again for a 2-sec. and 10-second options are available in video mode. www.kodak.com/go/support 11 NOTE: The video stops when no storage space remains. Taking pictures/videos Using the Drive button Mode Self-timer Burst Icon... 2 2X Purpose See Using the self-timer See page 12 Exposure Bracketing Normal (none) Using the self-timer See page 13 Normal picture-taking 1 Place camera on a tripod) • Again for 2 pictures (after the delay.
User Manual
Page 18
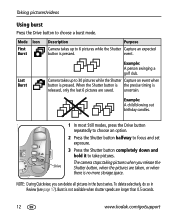
... the Drive button to 30 pictures while the Shutter Capture an event when button is pressed. To delete selectively, do so in the burst series. Camera takes up to take pictures. When the Shutter button is the precise timing is released, only the last 6 pictures are taken, or when there is... down and hold it to 6 pictures while the Shutter Capture an expected button is not available when shutter speeds are longer than 0.5 seconds. 12 www.kodak.com/go/support Last Burst Example: A person swinging a golf club. event.
... the Drive button to 30 pictures while the Shutter Capture an event when button is pressed. To delete selectively, do so in the burst series. Camera takes up to take pictures. When the Shutter button is the precise timing is released, only the last 6 pictures are taken, or when there is... down and hold it to 6 pictures while the Shutter Capture an expected button is not available when shutter speeds are longer than 0.5 seconds. 12 www.kodak.com/go/support Last Burst Example: A person swinging a golf club. event.
User Manual
Page 19
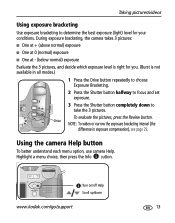
During exposure bracketing, the camera takes 3 pictures: ■ One at + (above normal) exposure ■ One at 0 (normal) exposure ■ One at - (below normal) exposure Evaluate the 3 pictures, and decide which ... focus and set exposure. 3 Press the Shutter button completely down www.kodak.com/go/support 13 Taking pictures/videos Using exposure bracketing Use exposure bracketing to take the 3 pictures. Using the camera Help button To better understand each menu option, use camera Help. Highlight a menu choice, then press the Info button. Turn on...
During exposure bracketing, the camera takes 3 pictures: ■ One at + (above normal) exposure ■ One at 0 (normal) exposure ■ One at - (below normal) exposure Evaluate the 3 pictures, and decide which ... focus and set exposure. 3 Press the Shutter button completely down www.kodak.com/go/support 13 Taking pictures/videos Using exposure bracketing Use exposure bracketing to take the 3 pictures. Using the camera Help button To better understand each menu option, use camera Help. Highlight a menu choice, then press the Info button. Turn on...

User Manual
Page 24
...video. ■ Press the Menu button to exit the menu. 18 www.kodak.com/go/support Press picture. Enhanced pictures cannot be cropped again on the camera. A cropped picture cannot be enhanced again on the camera. Press the Menu button to view other parts of the 4 Press OK....picture is copied, then cropped. to exit the menu. Follow the screen prompts to replace the original picture or to zoom in a split screen. Kodak Perfect Touch technology can only be used with pictures/videos Cropping pictures 1 Press Review. 2 View previous/next. 3 Press Menu, highlight Crop, then...
...video. ■ Press the Menu button to exit the menu. 18 www.kodak.com/go/support Press picture. Enhanced pictures cannot be cropped again on the camera. A cropped picture cannot be enhanced again on the camera. Press the Menu button to view other parts of the 4 Press OK....picture is copied, then cropped. to exit the menu. Follow the screen prompts to replace the original picture or to zoom in a split screen. Kodak Perfect Touch technology can only be used with pictures/videos Cropping pictures 1 Press Review. 2 View previous/next. 3 Press Menu, highlight Crop, then...
User Manual
Page 26
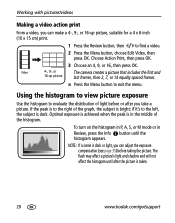
...page 35) before or after the picture is bright; Choose Action Print, then press OK. 3 Choose an 4, 9, or 16, then press OK. Video 4-, 9-, or The camera creates a picture that includes the first and 16-up picture, suitable for a 4 x 6-inch (10 x 15 cm) print. 1 Press the Review button, then to the..., the subject is dark or light, you take a picture. if it's to evaluate the distribution of the graph, the subject is taken. 20 www.kodak.com/go/support To turn on the histogram in P, A, S, or M mode or in the middle of the histogram. Optimal exposure is achieved when the...
...page 35) before or after the picture is bright; Choose Action Print, then press OK. 3 Choose an 4, 9, or 16, then press OK. Video 4-, 9-, or The camera creates a picture that includes the first and 16-up picture, suitable for a 4 x 6-inch (10 x 15 cm) print. 1 Press the Review button, then to the..., the subject is dark or light, you take a picture. if it's to evaluate the distribution of the graph, the subject is taken. 20 www.kodak.com/go/support To turn on the histogram in P, A, S, or M mode or in the middle of the histogram. Optimal exposure is achieved when the...

User Manual
Page 27
...highlight Interval, then press OK. 2 Select a display interval. 3 To scroll through the seconds quickly, press and hold . 4 Press OK. www.kodak.com/go /z712accessories.) Starting the slide show loop When you change it . To run a slide show display interval The default interval setting displays each... picture for 5 seconds. To interrupt the Slide Show, press OK. The interval setting remains until you turn on the camera. The Loop feature remains until battery power is continuously repeated. 1 On the Slide Show menu, press to highlight Loop, then press OK...
...highlight Interval, then press OK. 2 Select a display interval. 3 To scroll through the seconds quickly, press and hold . 4 Press OK. www.kodak.com/go /z712accessories.) Starting the slide show loop When you change it . To run a slide show display interval The default interval setting displays each... picture for 5 seconds. To interrupt the Slide Show, press OK. The interval setting remains until you turn on the camera. The Loop feature remains until battery power is continuously repeated. 1 On the Slide Show menu, press to highlight Loop, then press OK...

User Manual
Page 28
... return to single-picture view. ■ To select multiple pictures/videos, see page 32). Working with a video input. To connect the camera to a television, use an optional A/V cable (visit www.kodak.com/go /support The slide show stops if you connect or disconnect the cable while the slide show is correct (see...
... return to single-picture view. ■ To select multiple pictures/videos, see page 32). Working with a video input. To connect the camera to a television, use an optional A/V cable (visit www.kodak.com/go /support The slide show stops if you connect or disconnect the cable while the slide show is correct (see...
User Manual
Page 30
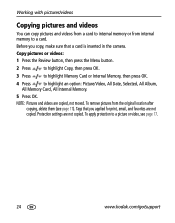
... can copy pictures and videos from a card to internal memory or from the original location after copying, delete them (see page 17. 24 www.kodak.com/go/support Protection settings are copied, not moved. Copy pictures or videos: 1 Press the Review button, then press the Menu button. 2...from internal memory to a card. NOTE: Pictures and videos are not copied. Tags that you copy, make sure that a card is inserted in the camera. To apply protection to highlight an option: Picture/Video, All Date, Selected, All Album, All Memory Card, All Internal Memory. 5 Press OK. Before...
... can copy pictures and videos from a card to internal memory or from the original location after copying, delete them (see page 17. 24 www.kodak.com/go/support Protection settings are copied, not moved. Copy pictures or videos: 1 Press the Review button, then press the Menu button. 2...from internal memory to a card. NOTE: Pictures and videos are not copied. Tags that you copy, make sure that a card is inserted in the camera. To apply protection to highlight an option: Picture/Video, All Date, Selected, All Album, All Memory Card, All Internal Memory. 5 Press OK. Before...

User Manual
Page 32
...-settings are in low-light scenes. Viewing favorite pictures. (See page 39.) Favorites Video with your camera Capture modes Choose the mode that are Multi-Pattern Exposure Metering, Multi-Zone focus. 26 www.kodak.com/go/support ISO High-ISO Sport Subjects that best suits your subjects and surroundings. P, A, S, M More creative control...
...-settings are in low-light scenes. Viewing favorite pictures. (See page 39.) Favorites Video with your camera Capture modes Choose the mode that are Multi-Pattern Exposure Metering, Multi-Zone focus. 26 www.kodak.com/go/support ISO High-ISO Sport Subjects that best suits your subjects and surroundings. P, A, S, M More creative control...

User Manual
Page 33
...fire. Fireworks. Quiet occasions, like a wedding or lecture. To return to Smart Scene mode, turn the mode dial to exaggerate background blur. Position your camera SCN (Scene) modes 1 Turn the Mode dial to . 2 Press to choose the SCN mode. Distant scenery at least 6 ft (2 m) away and...Full-frame portraits of flowers or other small subjects in Landscape. NOTE: To avoid blur, place the camera on a tripod. Documents. NOTE: To avoid blur, place the camera on a tripod. www.kodak.com/go/support 27 Flash does not fire. Close-ups of people. Doing more with a head...
...fire. Fireworks. Quiet occasions, like a wedding or lecture. To return to Smart Scene mode, turn the mode dial to exaggerate background blur. Position your camera SCN (Scene) modes 1 Turn the Mode dial to . 2 Press to choose the SCN mode. Distant scenery at least 6 ft (2 m) away and...Full-frame portraits of flowers or other small subjects in Landscape. NOTE: To avoid blur, place the camera on a tripod. Documents. NOTE: To avoid blur, place the camera on a tripod. www.kodak.com/go/support 27 Flash does not fire. Close-ups of people. Doing more with a head...


