
User Manual
Page 1
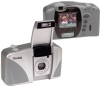
Unfold the front and back flaps of this manual to view the camera's parts. ENGLISH/ESPAÑOL/FRANÇAIS CAMERA IDENTIFICATION 1 1 Shutter button 2 2 Lens cover/flash 3 Print-format button 4 Auto-focus sensors 3 5 Viewfinder 6 Red-eye-reduction/ self-timer lamp 7 Lens 8 Light sensor 9 Strap post 4 5 9 6 7 8 Unfold the front and back flaps of this manual to view the camera's parts. Consumer Imaging EASTMAN KODAK COMPANY Rochester, NY 14650 Kodak Preview Camera © Eastman Kodak Company, 2000 Pt. No. 919 4911a Printed in U.S.A.
Unfold the front and back flaps of this manual to view the camera's parts. ENGLISH/ESPAÑOL/FRANÇAIS CAMERA IDENTIFICATION 1 1 Shutter button 2 2 Lens cover/flash 3 Print-format button 4 Auto-focus sensors 3 5 Viewfinder 6 Red-eye-reduction/ self-timer lamp 7 Lens 8 Light sensor 9 Strap post 4 5 9 6 7 8 Unfold the front and back flaps of this manual to view the camera's parts. Consumer Imaging EASTMAN KODAK COMPANY Rochester, NY 14650 Kodak Preview Camera © Eastman Kodak Company, 2000 Pt. No. 919 4911a Printed in U.S.A.

User Manual
Page 2
... 43 Date/time display There is subject to the following : - Changes or modifications not approved by turning the camera off indicator 38 Auto-flash symbol 39 Fill-flash symbol 40 ISO film- Camera Identification 26 25 24 10 Viewfinder eyepiece 10 11 12 13 11 Flash/cameraready lamp 12 Preview screen 13 Zoom dial 14 PREVIEW 14 15 SELECT 16 ENTER 15 17 Film-door lever 16 18 MODE...
... 43 Date/time display There is subject to the following : - Changes or modifications not approved by turning the camera off indicator 38 Auto-flash symbol 39 Fill-flash symbol 40 ISO film- Camera Identification 26 25 24 10 Viewfinder eyepiece 10 11 12 13 11 Flash/cameraready lamp 12 Preview screen 13 Zoom dial 14 PREVIEW 14 15 SELECT 16 ENTER 15 17 Film-door lever 16 18 MODE...
User Manual
Page 4
...-BUTTON ACTUATOR 9 OTHER BATTERY INFORMATION 9 Low-batteries indicator 9 Battery tips 10 Power shut-off 21 Selecting the flash modes 21 SPECIAL OPTION MODES 22 Infinity focus 22 Center-spot focus 22 Portrait 22 Nightview 22 Selecting the special option modes .. 23 USING THE SELF-TIMER 24 TITLE IMPRINTING 25 TITLE-SELECT LIST 25 UNLOADING THE FILM 26 Automatic rewind 26 Mid-roll change (MRC 27 CARING FOR YOUR CAMERA 27 TROUBLESHOOTING 28 SPECIFICATIONS...
...-BUTTON ACTUATOR 9 OTHER BATTERY INFORMATION 9 Low-batteries indicator 9 Battery tips 10 Power shut-off 21 Selecting the flash modes 21 SPECIAL OPTION MODES 22 Infinity focus 22 Center-spot focus 22 Portrait 22 Nightview 22 Selecting the special option modes .. 23 USING THE SELF-TIMER 24 TITLE IMPRINTING 25 TITLE-SELECT LIST 25 UNLOADING THE FILM 26 Automatic rewind 26 Mid-roll change (MRC 27 CARING FOR YOUR CAMERA 27 TROUBLESHOOTING 28 SPECIFICATIONS...

User Manual
Page 5
... three different size pictures: Classic (C), Group/HDTV (H), or Panoramic (P). Flip flash moves the flash away from the lens to 9, with the red-eye-reduction mode. 3 The magnetic Information Exchange (IX) technology records the ordering information on the film, so the selected number of a button on the camera back. You can also see how your picture on the Preview Screen. If not, you can take a new picture. Provides softer light for...
... three different size pictures: Classic (C), Group/HDTV (H), or Panoramic (P). Flip flash moves the flash away from the lens to 9, with the red-eye-reduction mode. 3 The magnetic Information Exchange (IX) technology records the ordering information on the film, so the selected number of a button on the camera back. You can also see how your picture on the Preview Screen. If not, you can take a new picture. Provides softer light for...

User Manual
Page 6
... organize by dedicating individual film rolls to specific subjects. . 4 Picture Quality Information Exchange (PQix) • This camera records vital scene data on the film's magnetic information strip and communicates that information to the photo lab to match scene requirements, and - The camera uses KODAK ADVANTIX Film. switch film speeds in which makes it and continue taking pictures. Date, Time, and Title Imprinting • The date, time, and cassette ID number are printed on...
... organize by dedicating individual film rolls to specific subjects. . 4 Picture Quality Information Exchange (PQix) • This camera records vital scene data on the film's magnetic information strip and communicates that information to the photo lab to match scene requirements, and - The camera uses KODAK ADVANTIX Film. switch film speeds in which makes it and continue taking pictures. Date, Time, and Title Imprinting • The date, time, and cassette ID number are printed on...
User Manual
Page 7
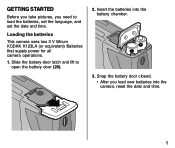
Slide the battery-door latch and lift to load the batteries, set the language, and set the date and time. Insert the batteries into the camera, reset the date and time. 5 Snap the battery door closed. • After you need to open the battery door (20). 2. GETTING STARTED Before you take pictures, you load new batteries into the battery chamber. 3. Loading the batteries This camera uses two 3 V lithium KODAK K123LA (or equivalent) Batteries that supply power for all camera operations. 1.
Slide the battery-door latch and lift to load the batteries, set the language, and set the date and time. Insert the batteries into the camera, reset the date and time. 5 Snap the battery door closed. • After you need to open the battery door (20). 2. GETTING STARTED Before you take pictures, you load new batteries into the battery chamber. 3. Loading the batteries This camera uses two 3 V lithium KODAK K123LA (or equivalent) Batteries that supply power for all camera operations. 1.
User Manual
Page 9
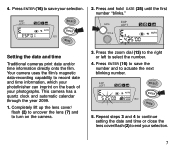
... next blinking number. Your camera uses the film's magnetic data-recording capability to turn on the back of your selection. Press and hold DATE (25) until the first number "blinks." 4. This camera has a quartz clock and automatic calendar through the year 2099. 1. Completely lift up the lens cover/ flash (2) to uncover the lens (7) and to record date and time information, which your selection. 7 EXP LEFT AUTO ISO SELECT ENTER MODE 5. Press...
... next blinking number. Your camera uses the film's magnetic data-recording capability to turn on the back of your selection. Press and hold DATE (25) until the first number "blinks." 4. This camera has a quartz clock and automatic calendar through the year 2099. 1. Completely lift up the lens cover/ flash (2) to uncover the lens (7) and to record date and time information, which your selection. 7 EXP LEFT AUTO ISO SELECT ENTER MODE 5. Press...
User Manual
Page 11
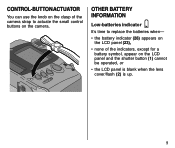
OTHER BATTERY INFORMATION Low-batteries indicator It's time to actuate the small control buttons on the LCD panel and the shutter button (1) cannot be operated, or • the LCD panel is blank when the lens cover/flash (2) is up. 9 CONTROL-BUTTON ACTUATOR You can use the knob on the clasp of the camera strap to replace the batteries when- • the battery indicator (28) appears on the LCD panel (23), • none of the indicators, except for a battery symbol, appear on the camera.
OTHER BATTERY INFORMATION Low-batteries indicator It's time to actuate the small control buttons on the LCD panel and the shutter button (1) cannot be operated, or • the LCD panel is blank when the lens cover/flash (2) is up. 9 CONTROL-BUTTON ACTUATOR You can use the knob on the clasp of the camera strap to replace the batteries when- • the battery indicator (28) appears on the LCD panel (23), • none of the indicators, except for a battery symbol, appear on the camera.

User Manual
Page 12
... going to be used for an extended time, close the lens cover/flash to completely turn off To conserve battery power, the camera automatically goes into a sleep mode if it to awaken the camera. Customers outside the U.S. can press any of time. • Replace all warnings and instructions supplied by the battery manufacturer. • Keep batteries away from the camera when the camera is not operated for an extended...
... going to be used for an extended time, close the lens cover/flash to completely turn off To conserve battery power, the camera automatically goes into a sleep mode if it to awaken the camera. Customers outside the U.S. can press any of time. • Replace all warnings and instructions supplied by the battery manufacturer. • Keep batteries away from the camera when the camera is not operated for an extended...

User Manual
Page 14
... film cassette is at q(#1 position) for a new cassette or at (#2 position) for CD interface capabilities. Close the film door to turn on the same film cassette. While previewing the picture, you took. You can view in color on the Preview Screen the last picture you can take Classic (C), Group/HDTV (H)*, and Panoramic (P) pictures on the camera. • Do not force the film cassette into the film...
... film cassette is at q(#1 position) for a new cassette or at (#2 position) for CD interface capabilities. Close the film door to turn on the same film cassette. While previewing the picture, you took. You can view in color on the Preview Screen the last picture you can take Classic (C), Group/HDTV (H)*, and Panoramic (P) pictures on the camera. • Do not force the film cassette into the film...

User Manual
Page 17
... it focused. AUTO ISO 2. If you are happy with the picture, you can be difficult to tell if your estimate to take a new picture. The camera exposes one frame of prints, from 0-9, that you will use this information: 1. To use more film. Compare your picture is far, then you order for every picture that you want to the green icon shown below the preview screen...
... it focused. AUTO ISO 2. If you are happy with the picture, you can be difficult to tell if your estimate to take a new picture. The camera exposes one frame of prints, from 0-9, that you will use this information: 1. To use more film. Compare your picture is far, then you order for every picture that you want to the green icon shown below the preview screen...

User Manual
Page 18
... indoor or outdoor settings. 1. Completely lift up the lens cover/ flash (2) to uncover the lens (7) and to turn on the Preview Screen and change the format of the picture on the Preview Screen for indoor viewing. 2. Change the print format You can control the brightness of the picture to C, H, or P. Press the print-format button (3) to change the format to the one that looks the best. 1. CH P Brightness...
... indoor or outdoor settings. 1. Completely lift up the lens cover/ flash (2) to uncover the lens (7) and to turn on the Preview Screen and change the format of the picture on the Preview Screen for indoor viewing. 2. Change the print format You can control the brightness of the picture to C, H, or P. Press the print-format button (3) to change the format to the one that looks the best. 1. CH P Brightness...
User Manual
Page 19
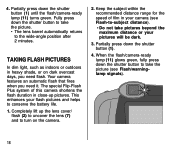
... children and pets. • Hold your pictures. • Turn on the camera. 2. Look through the viewfinder eyepiece (10). 3. This provides the best subject illumination. • Stand at an angle to shiny surfaces like windows or mirrors to avoid flash reflection and bright spots in flash pictures. Completely lift up the lens cover/ flash (2) to uncover the lens (7) and to reduce red eyes in...
... children and pets. • Hold your pictures. • Turn on the camera. 2. Look through the viewfinder eyepiece (10). 3. This provides the best subject illumination. • Stand at an angle to shiny surfaces like windows or mirrors to avoid flash reflection and bright spots in flash pictures. Completely lift up the lens cover/ flash (2) to uncover the lens (7) and to reduce red eyes in...
User Manual
Page 20
... shutter button to conserve the battery life. 1. Partially press down the shutter button (1). 4. Partially press down the shutter button (1) until the flash/camera-ready lamp (11) turns green. 4. Your camera features an automatic flash that fires when you need it. This enhances your pictures will be dark. 3. Keep the subject within the recommended distance range for the speed of this camera shortens the flash duration in close-up the lens cover/ flash...
... shutter button to conserve the battery life. 1. Partially press down the shutter button (1). 4. Partially press down the shutter button (1) until the flash/camera-ready lamp (11) turns green. 4. Your camera features an automatic flash that fires when you need it. This enhances your pictures will be dark. 3. Keep the subject within the recommended distance range for the speed of this camera shortens the flash duration in close-up the lens cover/ flash...
User Manual
Page 23
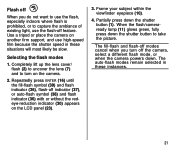
... lift up the lens cover/ flash (2) to uncover the lens (7) and to take the picture. The auto-flash modes remain selected in these instances. 21 Repeatedly press ENTER (16) until the fill-flash symbol (39) and flash indicator (36), flash-off feature. Partially press down the shutter button to turn off the camera, select a different flash mode, or when the camera powers down. Frame your subject within the viewfinder eyepiece (10...
... lift up the lens cover/ flash (2) to uncover the lens (7) and to take the picture. The auto-flash modes remain selected in these instances. 21 Repeatedly press ENTER (16) until the fill-flash symbol (39) and flash indicator (36), flash-off feature. Partially press down the shutter button to turn off the camera, select a different flash mode, or when the camera powers down. Frame your subject within the viewfinder eyepiece (10...

User Manual
Page 24
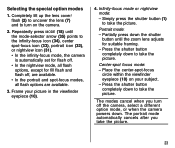
... support, and use high-speed KODAK ADVANTIX Film because the shutter speed at night. Center-spot focus Ideal for extremely precise focus control of the picture. SPECIAL OPTION MODES The special option modes let you consider the most likely be slow. 22 Nightview Use this mode, to provide optimal camera settings for portraits. The camera automatically zooms to scroll through windows. Repeatedly press MODE (18) to provide suitable framing for infinity-focus...
... support, and use high-speed KODAK ADVANTIX Film because the shutter speed at night. Center-spot focus Ideal for extremely precise focus control of the picture. SPECIAL OPTION MODES The special option modes let you consider the most likely be slow. 22 Nightview Use this mode, to provide optimal camera settings for portraits. The camera automatically zooms to scroll through windows. Repeatedly press MODE (18) to provide suitable framing for infinity-focus...
User Manual
Page 25
... automatically set for flash off. • In the nightview mode, all flash options are available. 3. Press the shutter button completely down . Repeatedly press MODE (18) until the zoom lens adjusts for fill flash and flash off the camera, select a different option mode, or when the camera powers down to take the picture. Frame your subject. - Simply press the shutter button (1) to take the picture. Place the center-spot-focus circle within the viewfinder...
... automatically set for flash off. • In the nightview mode, all flash options are available. 3. Press the shutter button completely down . Repeatedly press MODE (18) until the zoom lens adjusts for fill flash and flash off the camera, select a different option mode, or when the camera powers down to take the picture. Frame your subject. - Simply press the shutter button (1) to take the picture. Place the center-spot-focus circle within the viewfinder...
User Manual
Page 26
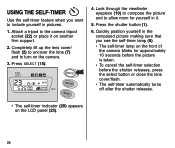
... shutter releases, press the select button or close the lens cover/flash. • The self-timer automatically turns off after the shutter releases. • The self-timer indicator (29) appears on the camera. 3. USING THE SELF-TIMER Use the self-timer feature when you see the self-timer lamp (6). • The self-timer lamp on the front of the camera blinks for yourself in it on another firm support. 2. Look through the viewfinder eyepiece (10) to compose the picture...
... shutter releases, press the select button or close the lens cover/flash. • The self-timer automatically turns off after the shutter releases. • The self-timer indicator (29) appears on the camera. 3. USING THE SELF-TIMER Use the self-timer feature when you see the self-timer lamp (6). • The self-timer lamp on the front of the camera blinks for yourself in it on another firm support. 2. Look through the viewfinder eyepiece (10) to compose the picture...

User Manual
Page 29
... you store the camera for cleaning camera lenses. The camera automatically rewinds the film and sets the FSI to " (#3 position) when the last picture is set to continue taking pictures. CAUTION: Use solvents or solutions designed for an extended time. Film can remove your photofinisher for processing. Do not use solvents or harsh or abrasive cleaners on the camera body. • If the lens appears dirty, breathe on...
... you store the camera for cleaning camera lenses. The camera automatically rewinds the film and sets the FSI to " (#3 position) when the last picture is set to continue taking pictures. CAUTION: Use solvents or solutions designed for an extended time. Film can remove your photofinisher for processing. Do not use solvents or harsh or abrasive cleaners on the camera body. • If the lens appears dirty, breathe on...
User Manual
Page 30
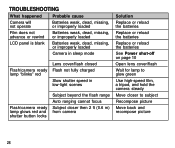
... loaded Film does not Batteries weak, dead, missing, advance or rewind or improperly loaded LCD panel is blank Batteries weak, dead, missing, or improperly loaded Camera in sleep mode Flash/camera ready lamp "blinks" red Lens cover/flash closed Flash not fully charged Slow shutter speed in low-light scenes Flash/camera ready lamp glows red and shutter button locks Subject beyond the flash range Auto ranging cannot focus Subject closer then 2 ft (0.6 m) from camera Solution Replace or reload the batteries Replace...
... loaded Film does not Batteries weak, dead, missing, advance or rewind or improperly loaded LCD panel is blank Batteries weak, dead, missing, or improperly loaded Camera in sleep mode Flash/camera ready lamp "blinks" red Lens cover/flash closed Flash not fully charged Slow shutter speed in low-light scenes Flash/camera ready lamp glows red and shutter button locks Subject beyond the flash range Auto ranging cannot focus Subject closer then 2 ft (0.6 m) from camera Solution Replace or reload the batteries Replace...


