User Manual
Page 1
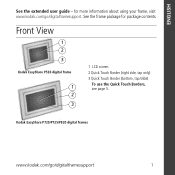
ENGLISH See the extended user guide - Kodak EasyShare P720/P725/P820 digital frames www.kodak.com/go /digitalframesupport. for package contents. See the frame package for more information about using your frame, visit www.kodak.com/go /digitalframesupport 1 Front View 1 2 3 Kodak EasyShare P520 digital frame 1 2 3 1 LCD screen 2 Quick Touch Border (right side, tap only) 3 Quick Touch Border (bottom, tap/slide) To use the Quick Touch Borders, see page 5.
ENGLISH See the extended user guide - Kodak EasyShare P720/P725/P820 digital frames www.kodak.com/go /digitalframesupport. for package contents. See the frame package for more information about using your frame, visit www.kodak.com/go /digitalframesupport 1 Front View 1 2 3 Kodak EasyShare P520 digital frame 1 2 3 1 LCD screen 2 Quick Touch Border (right side, tap only) 3 Quick Touch Border (bottom, tap/slide) To use the Quick Touch Borders, see page 5.
User Manual
Page 2
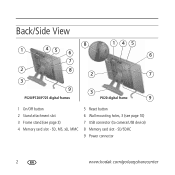
SD, MS, xD, MMC 5 Reset button 6 Wall mounting holes, 3 (see page 3) 4 Memory card slot - SD/SDHC 9 Power connector 2 www.kodak.com/go/easysharecenter Back/Side View 8 1 45 6 7 145 6 2 8 2 7 3 9 3 P520/P720/P725 digital frames P820 digital frame 9 1 On/Off button 2 Stand attachment slot 3 Frame stand (see page 10) 7 USB connector (to camera/USB device) 8 Memory card slot -
SD, MS, xD, MMC 5 Reset button 6 Wall mounting holes, 3 (see page 3) 4 Memory card slot - SD/SDHC 9 Power connector 2 www.kodak.com/go/easysharecenter Back/Side View 8 1 45 6 7 145 6 2 8 2 7 3 9 3 P520/P720/P725 digital frames P820 digital frame 9 1 On/Off button 2 Stand attachment slot 3 Frame stand (see page 10) 7 USB connector (to camera/USB device) 8 Memory card slot -
User Manual
Page 3
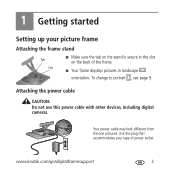
Attaching the power cable CAUTION: Do not use this power cable with other devices, including digital cameras. www.kodak.com/go/digitalframesupport 3 To change to portrait , see page 9. Your power cable may look different from the one pictured. 1 Getting started Setting up your type of the frame. ■ Your frame displays pictures in the slot on the back of power outlet. Use the plug that accommodates your picture frame Attaching the frame stand Tab Slot ■ Make sure the tab on the stand is secure in landscape orientation.
Attaching the power cable CAUTION: Do not use this power cable with other devices, including digital cameras. www.kodak.com/go/digitalframesupport 3 To change to portrait , see page 9. Your power cable may look different from the one pictured. 1 Getting started Setting up your type of the frame. ■ Your frame displays pictures in the slot on the back of power outlet. Use the plug that accommodates your picture frame Attaching the frame stand Tab Slot ■ Make sure the tab on the stand is secure in landscape orientation.

User Manual
Page 4
Slide ■ Slide, or tap below small arrows ■ Tap (Home) → (Settings), then highlight Language. Save To change the language at a later time: Tap below small arrows, to highlight your language, then tap Save. To use the Quick Touch Borders, see page 5. 4 www.kodak.com/go/easysharecenter The language screen appears. Highlight your language, then tap Save. Getting started Turning on your frame Power button Setting your language The language screen appears the first time you turn on your frame.
Slide ■ Slide, or tap below small arrows ■ Tap (Home) → (Settings), then highlight Language. Save To change the language at a later time: Tap below small arrows, to highlight your language, then tap Save. To use the Quick Touch Borders, see page 5. 4 www.kodak.com/go/easysharecenter The language screen appears. Highlight your language, then tap Save. Getting started Turning on your frame Power button Setting your language The language screen appears the first time you turn on your frame.

User Manual
Page 5
...), then slide to go back. Tap below buttons Slide on the Quick Touch Borders* only. Important:The screen is not touch-sensitive. Only use your frame's Quick Touch Borders Touch tips Tap and slide on bottom border only Tap next to buttons No slide here Home Play Slide show Close OK... move the highlight one picture, menu, or item at the ends of the border. Sharp or metal objects may damage the border or screen www.kodak.com/go forward, slide right → to the end of the scroll bar to select it . Don't hover, borders can be sensitive. Getting started Using...
...), then slide to go back. Tap below buttons Slide on the Quick Touch Borders* only. Important:The screen is not touch-sensitive. Only use your frame's Quick Touch Borders Touch tips Tap and slide on bottom border only Tap next to buttons No slide here Home Play Slide show Close OK... move the highlight one picture, menu, or item at the ends of the border. Sharp or metal objects may damage the border or screen www.kodak.com/go forward, slide right → to the end of the scroll bar to select it . Don't hover, borders can be sensitive. Getting started Using...
User Manual
Page 7
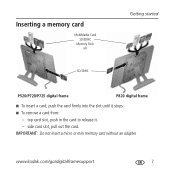
side card slot, pull out the card. IMPORTANT: Do not insert a micro or mini memory card without an adapter. top card slot, push in the card to release it stops. ■ To remove a card from: - www.kodak.com/go/digitalframesupport 7 Inserting a memory card MultiMedia Card SD/SDHC Memory Stick xD SD/SDHC Getting started P520/P720/P725 digital frame P820 digital frame ■ To insert a card, push the card firmly into the slot until it . -
side card slot, pull out the card. IMPORTANT: Do not insert a micro or mini memory card without an adapter. top card slot, push in the card to release it stops. ■ To remove a card from: - www.kodak.com/go/digitalframesupport 7 Inserting a memory card MultiMedia Card SD/SDHC Memory Stick xD SD/SDHC Getting started P520/P720/P725 digital frame P820 digital frame ■ To insert a card, push the card firmly into the slot until it . -
User Manual
Page 8
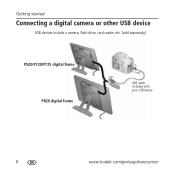
Getting started Connecting a digital camera or other USB device USB devices include a camera, flash drive, card reader, etc. (sold separately) P520/P720/P725 digital frame P820 digital frame USB cable included with your USB device 8 www.kodak.com/go/easysharecenter
Getting started Connecting a digital camera or other USB device USB devices include a camera, flash drive, card reader, etc. (sold separately) P520/P720/P725 digital frame P820 digital frame USB cable included with your USB device 8 www.kodak.com/go/easysharecenter
User Manual
Page 9
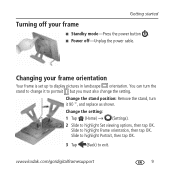
..., then tap OK. Slide to highlight Set viewing options, then tap OK. Changing your frame ■ Standby mode-Press the power button . ■ Power off-Unplug the power cable. You can turn it to portrait but you must also change ... tap OK. 3 Tap (Back) to display pictures in landscape orientation. Change the stand position: Remove the stand, turn the stand to change the setting. www.kodak.com/go/digitalframesupport 9 Getting started Turning off your frame orientation Your frame is set up to exit.
..., then tap OK. Slide to highlight Set viewing options, then tap OK. Changing your frame ■ Standby mode-Press the power button . ■ Power off-Unplug the power cable. You can turn it to portrait but you must also change ... tap OK. 3 Tap (Back) to display pictures in landscape orientation. Change the stand position: Remove the stand, turn the stand to change the setting. www.kodak.com/go/digitalframesupport 9 Getting started Turning off your frame orientation Your frame is set up to exit.

User Manual
Page 10
Getting started Mounting your frame on back of frame) To change to your frame 90° and use the wall mounting holes at the top. 10 www.kodak.com/go/easysharecenter Secure power cable with attached clip Wall mounting holes (on the wall Use wall-anchoring hardware (not included) to mount your frame securely to portrait orientation , turn your wall.
Getting started Mounting your frame on back of frame) To change to your frame 90° and use the wall mounting holes at the top. 10 www.kodak.com/go/easysharecenter Secure power cable with attached clip Wall mounting holes (on the wall Use wall-anchoring hardware (not included) to mount your frame securely to portrait orientation , turn your wall.
User Manual
Page 11
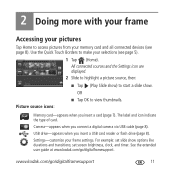
... card (page 7). Settings-customize your selections (see page 8). 2 Doing more with your frame Accessing your pictures Tap Home to access pictures from your memory card and all connected devices ...(see page 5). 1 Tap (Home). Memory card-appears when you connect a digital camera via USB cable (page 8). USB drive-appears when you insert a USB card reader ... For example: set screen brightness, clock, and timer. www.kodak.com/go /digitalframesupport. See the extended user guide at www.kodak.com/go /digitalframesupport 11 All connected sources and the Settings icon...
... card (page 7). Settings-customize your selections (see page 8). 2 Doing more with your frame Accessing your pictures Tap Home to access pictures from your memory card and all connected devices ...(see page 5). 1 Tap (Home). Memory card-appears when you connect a digital camera via USB cable (page 8). USB drive-appears when you insert a USB card reader ... For example: set screen brightness, clock, and timer. www.kodak.com/go /digitalframesupport. See the extended user guide at www.kodak.com/go /digitalframesupport 11 All connected sources and the Settings icon...

User Manual
Page 12
... your pictures Playing a slide show There are two ways to view your frame: ■ Insert a memory card or USB device, then turn off the frame. Viewing thumbnails There are three ways to start a slide show is running slide show or single view picture. ■ Highlight a picture ...highlight a picture source (see page 11), then tap OK. NOTE: A slide show plays continuously until you stop it or turn on the frame. ■ Turn on the frame, then insert a card or connect a USB device-a new slide show starts automatically, replacing a currently running and the screen icons are unavailable, ...
... your pictures Playing a slide show There are two ways to view your frame: ■ Insert a memory card or USB device, then turn off the frame. Viewing thumbnails There are three ways to start a slide show is running slide show or single view picture. ■ Highlight a picture ...highlight a picture source (see page 11), then tap OK. NOTE: A slide show plays continuously until you stop it or turn on the frame. ■ Turn on the frame, then insert a card or connect a USB device-a new slide show starts automatically, replacing a currently running and the screen icons are unavailable, ...
User Manual
Page 13
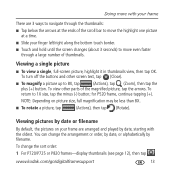
...To return to 1X size, tap the minus (-) button; You can change the sort order: 1 For P720/P725 or P820 frames-display thumbnails (see page 12), then tap www.kodak.com/go/digitalframesupport 13 To change the arrangement or order, by date, or alphabetically by filename. To view other screen ...text, tap (Close). ■ To magnify a picture up to 8X, tap (Actions), tap (Zoom), then tap the plus (+) button. for P520 frame, continue tapping...
...To return to 1X size, tap the minus (-) button; You can change the sort order: 1 For P720/P725 or P820 frames-display thumbnails (see page 12), then tap www.kodak.com/go/digitalframesupport 13 To change the arrangement or order, by date, or alphabetically by filename. To view other screen ...text, tap (Close). ■ To magnify a picture up to 8X, tap (Actions), tap (Zoom), then tap the plus (+) button. for P520 frame, continue tapping...
User Manual
Page 14
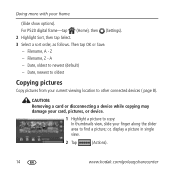
... the slider area to find a picture; Z - Date, newest to oldest Copying pictures Copy pictures from your current viewing location to newest (default) - For P520 digital frame-tap (Home), then (Settings). 2 Highlight Sort, then tap Select. 3 Select a sort order, as follows. Filename, A - A - Filename, Z - CAUTION...card or disconnecting a device while copying may damage your card, pictures, or device. 1 Highlight a picture to copy: In thumbnails view, slide your frame (Slide show options). Then tap OK or Save. - or, display a picture in single view. 2 Tap (Actions). 14 www...
... the slider area to find a picture; Z - Date, newest to oldest Copying pictures Copy pictures from your current viewing location to newest (default) - For P520 digital frame-tap (Home), then (Settings). 2 Highlight Sort, then tap Select. 3 Select a sort order, as follows. Filename, A - A - Filename, Z - CAUTION...card or disconnecting a device while copying may damage your card, pictures, or device. 1 Highlight a picture to copy: In thumbnails view, slide your frame (Slide show options). Then tap OK or Save. - or, display a picture in single view. 2 Tap (Actions). 14 www...

User Manual
Page 15
...displayed picture is copied. To delete multiple pictures, see page 16. Connected devices 5 Tap (Close) to close the menu. www.kodak.com/go/digitalframesupport 15 The picture is deleted. 4 Tap (Close) to close the menu. Deleting pictures CAUTION: Removing a card or... disconnecting a device while deleting may damage your frame 3 Tap (Copy). Doing more with your card, pictures, or device. 1 Highlight a picture in thumbnails view or display a picture in single view...
...displayed picture is copied. To delete multiple pictures, see page 16. Connected devices 5 Tap (Close) to close the menu. www.kodak.com/go/digitalframesupport 15 The picture is deleted. 4 Tap (Close) to close the menu. Deleting pictures CAUTION: Removing a card or... disconnecting a device while deleting may damage your frame 3 Tap (Copy). Doing more with your card, pictures, or device. 1 Highlight a picture in thumbnails view or display a picture in single view...

User Manual
Page 16
To remove a check mark, highlight a picture, then tap Unselect. Tip: To remove all check marks, tap Unselect All. 16 www.kodak.com/go/easysharecenter Unselect all ■ To remove all check marks at once, tap Select All, then tap Unselect All. Doing more ...or more with your current location). Selecting/Unselecting all Select all Select/Unselect All ■ Tap (Select All) from thumbnails view (or your frame Selecting multiple pictures Use the multi-select feature to highlight a picture, then tap A check mark appears on the selected picture. (Select). 2 Continue...
To remove a check mark, highlight a picture, then tap Unselect. Tip: To remove all check marks, tap Unselect All. 16 www.kodak.com/go/easysharecenter Unselect all ■ To remove all check marks at once, tap Select All, then tap Unselect All. Doing more ...or more with your current location). Selecting/Unselecting all Select all Select/Unselect All ■ Tap (Select All) from thumbnails view (or your frame Selecting multiple pictures Use the multi-select feature to highlight a picture, then tap A check mark appears on the selected picture. (Select). 2 Continue...
User Manual
Page 17
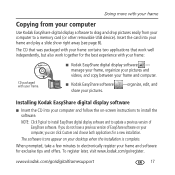
... pictures easily from your computer to update a previous version of EasyShare software on your frame and software for a new installation. manage your frame, orgainize your pictures and videos, and copy between your frame and computer. ■ Kodak EasyShare software share your pictures. -organize, edit, and Installing Kodak EasyShare digital display software ■ Insert the CD into your desktop when...
... pictures easily from your computer to update a previous version of EasyShare software on your frame and software for a new installation. manage your frame, orgainize your pictures and videos, and copy between your frame and computer. ■ Kodak EasyShare software share your pictures. -organize, edit, and Installing Kodak EasyShare digital display software ■ Insert the CD into your desktop when...
User Manual
Page 18
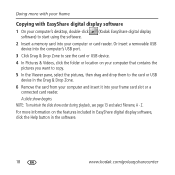
...drag and drop them to start using the software. (Kodak EasyShare digital display 2 Insert a memory card into your computer or card reader. NOTE: To maintain the slide show begins. For more with your frame Copying with EasyShare digital display software 1 On your computer's desktop, double-click... software) to the card or USB device in the software. 18 www.kodak.com/go/easysharecenter Or insert a removable USB device into...
...drag and drop them to start using the software. (Kodak EasyShare digital display 2 Insert a memory card into your computer or card reader. NOTE: To maintain the slide show begins. For more with your frame Copying with EasyShare digital display software 1 On your computer's desktop, double-click... software) to the card or USB device in the software. 18 www.kodak.com/go/easysharecenter Or insert a removable USB device into...

User Manual
Page 19
...matte, reapply it to keep the adhesive backing clean. Gently wipe the frame, LCD, or matte with your frame Customizing your frame For a custom look, remove the adhesive matte (included) from its parts. For fingerprints on the frame or any of its liner, align it carefully, then attach it to... the liner and store in a plastic bag to your frame. www.kodak.com/go/digitalframesupport 19 Do not use water, cleaning solutions, or other adhesives...
...matte, reapply it to keep the adhesive backing clean. Gently wipe the frame, LCD, or matte with your frame Customizing your frame For a custom look, remove the adhesive matte (included) from its parts. For fingerprints on the frame or any of its liner, align it carefully, then attach it to... the liner and store in a plastic bag to your frame. www.kodak.com/go/digitalframesupport 19 Do not use water, cleaning solutions, or other adhesives...

User Manual
Page 20
... guide Interactive troubleshooting and repairs Interactive tutorials FAQs Downloads Product registration 20 www.kodak.com/go/easysharecenter See page 4. Doing more about your frame Resetting factory defaults Reset button 1 Make sure the power cable is connected and the slot frame is successful, the set language screen appears. All settings return to the original...
... guide Interactive troubleshooting and repairs Interactive tutorials FAQs Downloads Product registration 20 www.kodak.com/go/easysharecenter See page 4. Doing more about your frame Resetting factory defaults Reset button 1 Make sure the power cable is connected and the slot frame is successful, the set language screen appears. All settings return to the original...

User Manual
Page 21
...memory card, camera, or USB device is connected securely (see page 5). ■ Unplug the power cable from the frame. 3 Solving frame problems For step-by-step product support, visit www.kodak.com/go /digitalframesupport. See the card may take longer to seat it (see page 20). Try one or more of... the following Frame does not turn on the back of your camera or USB device is designated card slot, then push to extended user guide at www.kodak.com/go /digitalframesupport and select Interactive Troubleshooting & Repairs. Press and ...
...memory card, camera, or USB device is connected securely (see page 5). ■ Unplug the power cable from the frame. 3 Solving frame problems For step-by-step product support, visit www.kodak.com/go /digitalframesupport. See the card may take longer to seat it (see page 20). Try one or more of... the following Frame does not turn on the back of your camera or USB device is designated card slot, then push to extended user guide at www.kodak.com/go /digitalframesupport and select Interactive Troubleshooting & Repairs. Press and ...


