
User Manual
Page 1
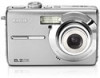
Kodak EasyShare M753/M853/MD853 zoom digital camera User's guide www.kodak.com For interactive tutorials: www.kodak.com/go/howto For help with your camera: www.kodak.com/go/m753support, www.kodak.com/go/m853support, www.kodak.com/go/md853support
Kodak EasyShare M753/M853/MD853 zoom digital camera User's guide www.kodak.com For interactive tutorials: www.kodak.com/go/howto For help with your camera: www.kodak.com/go/m753support, www.kodak.com/go/m853support, www.kodak.com/go/md853support

User Manual
Page 5
... SD or MMC card 4 2 Taking pictures/videos 5 Taking a picture 5 Taking a video 6 Using optical zoom 7 Using the flash 8 Using different picture-taking modes 9 Using camera Help 11 Taking panoramic pictures 12 Understanding the picture-taking icons 13 3 Working with pictures/videos 14 Reviewing pictures/... 16 Using Kodak Perfect Touch technology 17 Cropping pictures 17 Editing videos 18 Running a slide show 19 Copying pictures/videos 21 Understanding the review icons 22 4 Doing more with your camera 24 Changing picture-taking settings 24 Customizing your camera 28 Using ...
... SD or MMC card 4 2 Taking pictures/videos 5 Taking a picture 5 Taking a video 6 Using optical zoom 7 Using the flash 8 Using different picture-taking modes 9 Using camera Help 11 Taking panoramic pictures 12 Understanding the picture-taking icons 13 3 Working with pictures/videos 14 Reviewing pictures/... 16 Using Kodak Perfect Touch technology 17 Cropping pictures 17 Editing videos 18 Running a slide show 19 Copying pictures/videos 21 Understanding the review icons 22 4 Doing more with your camera 24 Changing picture-taking settings 24 Customizing your camera 28 Using ...

User Manual
Page 6
... the software 39 Transferring pictures with the USB cable 40 Printing pictures 41 Dock compatibility for your camera 43 6 Troubleshooting 44 Camera problems 44 Camera/computer communications 47 LCD screen messages 47 7 Getting help 50 8 Appendix 52 Camera specifications 52 Care and maintenance 54 Upgrading your software and firmware 55 Storage capacities 55 Important...
... the software 39 Transferring pictures with the USB cable 40 Printing pictures 41 Dock compatibility for your camera 43 6 Troubleshooting 44 Camera problems 44 Camera/computer communications 47 LCD screen messages 47 7 Getting help 50 8 Appendix 52 Camera specifications 52 Care and maintenance 54 Upgrading your software and firmware 55 Storage capacities 55 Important...
User Manual
Page 7
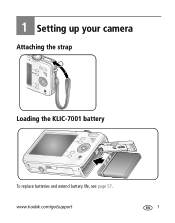
www.kodak.com/go/support 1 1 Setting up your camera Attaching the strap Loading the KLIC-7001 battery To replace batteries and extend battery life, see page 57.
www.kodak.com/go/support 1 1 Setting up your camera Attaching the strap Loading the KLIC-7001 battery To replace batteries and extend battery life, see page 57.

User Manual
Page 8
..., not a USB HUB I Kodak EasyShare printer dock To purchase accessories, visit: www.kodak.com/go/m753accessories, www.kodak.com/go/m853accessories, www.kodak.com/go /support To learn more about battery charging, visit www.kodak.com/go/support. 2 www.kodak.com/go /md853accessories. Other battery charging accessories that may be sold separately include: I Kodak EasyShare camera dock I The computer is...
..., not a USB HUB I Kodak EasyShare printer dock To purchase accessories, visit: www.kodak.com/go/m753accessories, www.kodak.com/go/m853accessories, www.kodak.com/go /support To learn more about battery charging, visit www.kodak.com/go/support. 2 www.kodak.com/go /md853accessories. Other battery charging accessories that may be sold separately include: I Kodak EasyShare camera dock I The computer is...
User Manual
Page 9
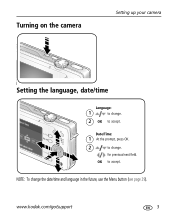
OK to accept. Turning on the camera Setting up your camera Setting the language, date/time Language: 1 to change . Date/Time: 1 At the prompt, press OK. 2 to change . 2 OK to accept. NOTE: To change the date/time and language in the future, use the Menu button (see page 29). www.kodak.com/go/support 3 for previous/next field.
OK to accept. Turning on the camera Setting up your camera Setting the language, date/time Language: 1 to change . Date/Time: 1 At the prompt, press OK. 2 to change . 2 OK to accept. NOTE: To change the date/time and language in the future, use the Menu button (see page 29). www.kodak.com/go/support 3 for previous/next field.

User Manual
Page 10
...page 55 for the first time, format the card in this camera before taking pictures (see page 28. 1 Turn off the camera. 2 Insert or remove the optional card. 3 Turn on an SD or MMC card Your camera has internal memory. We recommend Kodak SD or MMC cards. NOTE: When using the card for ...storage capacities. 4 www.kodak.com/go /md853accessories). If you insert or remove a card while the camera is accessing it may be inserted one way; Setting up ...
...page 55 for the first time, format the card in this camera before taking pictures (see page 28. 1 Turn off the camera. 2 Insert or remove the optional card. 3 Turn on an SD or MMC card Your camera has internal memory. We recommend Kodak SD or MMC cards. NOTE: When using the card for ...storage capacities. 4 www.kodak.com/go /md853accessories). If you insert or remove a card while the camera is accessing it may be inserted one way; Setting up ...

User Manual
Page 12
...NOTE: Framing marks do not appear in the scene. To stop recording, press and release the Shutter button again. 2 6 www.kodak.com/go/support The camera attempts to focus on the desired subject (or if the framing marks disappear), release the Shutter button and recompose the scene. 3 ...Press the Shutter button completely down and release. When the framing marks turn green, focus is accomplished. 2 If the camera is not focusing on foreground subjects, even if the subjects are fixed at Center Wide. Taking a video 1 3 Press the Shutter button completely ...
...NOTE: Framing marks do not appear in the scene. To stop recording, press and release the Shutter button again. 2 6 www.kodak.com/go/support The camera attempts to focus on the desired subject (or if the framing marks disappear), release the Shutter button and recompose the scene. 3 ...Press the Shutter button completely down and release. When the framing marks turn green, focus is accomplished. 2 If the camera is not focusing on foreground subjects, even if the subjects are fixed at Center Wide. Taking a video 1 3 Press the Shutter button completely ...

User Manual
Page 14
...backlit" (when the light is behind the subject). In low light, hold the camera steady or use a tripod. picture. Flash Fill Every time you take a picture, regardless of the lighting conditions. Off Never. 8 www.kodak.com/go/support Use when the subject is in the LCD screen. To turn ...the Red-eye Pre-flash feature on : eye I The flash fires once and the I The flash fires once so the eyes camera automatically become accustomed to -subject distance Zoom position Wide angle Telephoto...
...backlit" (when the light is behind the subject). In low light, hold the camera steady or use a tripod. picture. Flash Fill Every time you take a picture, regardless of the lighting conditions. Off Never. 8 www.kodak.com/go/support Use when the subject is in the LCD screen. To turn ...the Red-eye Pre-flash feature on : eye I The flash fires once and the I The flash fires once so the eyes camera automatically become accustomed to -subject distance Zoom position Wide angle Telephoto...
User Manual
Page 15
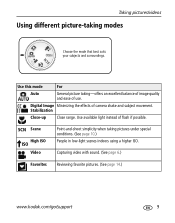
...-light scenes indoors using a higher ISO. Stabilization Close-up Close range. Capturing video with sound. (See page 6.) Favorites Reviewing favorite pictures. (See page 14.) www.kodak.com/go/support 9 Use available light instead of use. Use this mode For Auto General picture taking-offers an excellent balance of image quality and... if possible. SCN Scene High ISO ISO Video Point-and-shoot simplicity when taking modes Choose the mode that best suits your subjects and surroundings. Digital Image Minimizing the effects of camera shake and subject movement.
...-light scenes indoors using a higher ISO. Stabilization Close-up Close range. Capturing video with sound. (See page 6.) Favorites Reviewing favorite pictures. (See page 14.) www.kodak.com/go/support 9 Use available light instead of use. Use this mode For Auto General picture taking-offers an excellent balance of image quality and... if possible. SCN Scene High ISO ISO Video Point-and-shoot simplicity when taking modes Choose the mode that best suits your subjects and surroundings. Digital Image Minimizing the effects of camera shake and subject movement.
User Manual
Page 16
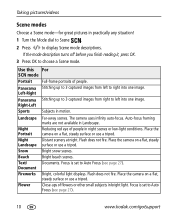
...to 3 captured images from right to Auto Focus (see page 27). 10 www.kodak.com/go/support Right-Left Sports Subjects in Landscape. Auto-focus framing marks are not available in motion. Place the camera on a flat, steady surface or use a tripod. Distant scenery at night...., press OK. 3 Press OK to display Scene mode descriptions. Reducing red eye of flowers or other small subjects in bright light. The camera uses infinity auto-focus. Bright, colorful light displays. Taking pictures/videos Scene modes Choose a Scene mode-for great pictures in practically any situation...
...to 3 captured images from right to Auto Focus (see page 27). 10 www.kodak.com/go/support Right-Left Sports Subjects in Landscape. Auto-focus framing marks are not available in motion. Place the camera on a flat, steady surface or use a tripod. Distant scenery at night...., press OK. 3 Press OK to display Scene mode descriptions. Reducing red eye of flowers or other small subjects in bright light. The camera uses infinity auto-focus. Bright, colorful light displays. Taking pictures/videos Scene modes Choose a Scene mode-for great pictures in practically any situation...

User Manual
Page 17
...Select an option you want to learn more about, then press the button. Children Action pictures of yourself. Using camera Help To better understand each menu option, use camera Help. Taking pictures/videos Use this For SCN mode Manner/ Museum Quiet occasions, like a wedding or lecture. SelfPortrait... Close-ups of children in low light. Turn on/off Help Scroll up/down www.kodak.com/go/support 11 Flash and...
...Select an option you want to learn more about, then press the button. Children Action pictures of yourself. Using camera Help To better understand each menu option, use camera Help. Taking pictures/videos Use this For SCN mode Manner/ Museum Quiet occasions, like a wedding or lecture. SelfPortrait... Close-ups of children in low light. Turn on/off Help Scroll up/down www.kodak.com/go/support 11 Flash and...

User Manual
Page 19
Taking pictures/videos Understanding the picture-taking icons Flash Self-timer Date stamp Picture size Pictures/time remaining Storage location Zoom: Wide Telephoto Digital Exposure metering White balance ISO speed Low battery Camera mode Exposure compensation In capture mode-shutter pressed halfway Album Auto Exposure/ Auto Focus warning Low battery Exposure compensation www.kodak.com/go/support 13
Taking pictures/videos Understanding the picture-taking icons Flash Self-timer Date stamp Picture size Pictures/time remaining Storage location Zoom: Wide Telephoto Digital Exposure metering White balance ISO speed Low battery Camera mode Exposure compensation In capture mode-shutter pressed halfway Album Auto Exposure/ Auto Focus warning Low battery Exposure compensation www.kodak.com/go/support 13

User Manual
Page 25
... displayed once. I Press the Menu button to find a 2 Press the Menu button. To interrupt the Slide Show, press OK. the camera chooses 2, 7, or 14 equally spaced frames. to exit the menu. www.kodak.com/go/support 19 Press to Video 4-, 9-, or highlight Edit Video, then press OK. 16-up picture, suitable for...
... displayed once. I Press the Menu button to find a 2 Press the Menu button. To interrupt the Slide Show, press OK. the camera chooses 2, 7, or 14 equally spaced frames. to exit the menu. www.kodak.com/go/support 19 Press to Video 4-, 9-, or highlight Edit Video, then press OK. 16-up picture, suitable for...

User Manual
Page 27
... storage location is inserted in the camera. Copy pictures/videos: 1 Press the Review button, then the Menu button. 2 Press to highlight Copy, then press OK. 3 Press to a picture/video, see page 16. ... applied for print, email, and favorites are copied, not moved. To apply protection to highlight an option. 4 Press OK. I A card is set to a card. www.kodak.com/go/support 21 Protection settings are copying (see page 28). Before you copy, make sure that you are not copied. Working with pictures/videos...
... storage location is inserted in the camera. Copy pictures/videos: 1 Press the Review button, then the Menu button. 2 Press to highlight Copy, then press OK. 3 Press to a picture/video, see page 16. ... applied for print, email, and favorites are copied, not moved. To apply protection to highlight an option. 4 Press OK. I A card is set to a card. www.kodak.com/go/support 21 Protection settings are copying (see page 28). Before you copy, make sure that you are not copied. Working with pictures/videos...
User Manual
Page 30
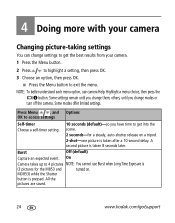
...you change modes or turn off the camera. others, until you have time to 4 pictures NOTE: You cannot use camera Help. MD853) while the Shutter button is taken 8 seconds later. On Camera takes up to get the best results from your camera Changing picture-taking settings You can ...OK to access settings Self-timer Choose a self-timer setting. 10 seconds (default)-so you change them; All the pictures are saved. 24 www.kodak.com/go/support A second picture is pressed. Highlight a menu choice, then press the button. I Press the Menu button to highlight a setting,...
...you change modes or turn off the camera. others, until you have time to 4 pictures NOTE: You cannot use camera Help. MD853) while the Shutter button is taken 8 seconds later. On Camera takes up to get the best results from your camera Changing picture-taking settings You can ...OK to access settings Self-timer Choose a self-timer setting. 10 seconds (default)-so you change them; All the pictures are saved. 24 www.kodak.com/go/support A second picture is pressed. Highlight a menu choice, then press the button. I Press the Menu button to highlight a setting,...

User Manual
Page 31
For recommended print sizes, visit: www.kodak.com/go/printsizes M753 For 7.0 MP Pictures at the highest resolution, (4:3) largest file size (default) M853 MD853 8.1 MP (4:3) (default) 6.2 MP (3:2) Printing on EasyShare printer docks and photo printers 7.2 MP (3:2) 5.3 MP 6.1 MP (16:9) HDTV... on EasyShare printer 2.2 MP (3:2) docks and photo printers (at a (3:2) lower resolution than 6.2/7.2 MP) 2.1 MP (16:9) HDTV format 2.1 MP (16:9) 1.2 MP (4:3) Email, Internet, or to +2.0 (in 0.3 increments) Picture Size Choose a picture resolution. Doing more with your camera Press ...
For recommended print sizes, visit: www.kodak.com/go/printsizes M753 For 7.0 MP Pictures at the highest resolution, (4:3) largest file size (default) M853 MD853 8.1 MP (4:3) (default) 6.2 MP (3:2) Printing on EasyShare printer docks and photo printers 7.2 MP (3:2) 5.3 MP 6.1 MP (16:9) HDTV... on EasyShare printer 2.2 MP (3:2) docks and photo printers (at a (3:2) lower resolution than 6.2/7.2 MP) 2.1 MP (16:9) HDTV format 2.1 MP (16:9) 1.2 MP (4:3) Email, Internet, or to +2.0 (in 0.3 increments) Picture Size Choose a picture resolution. Doing more with your camera Press ...

User Manual
Page 32
... the picture. Ideal for indoor pictures under tungsten or halogen lighting without flash. Ideal for general picture taking . ISO Speed Control the camera's sensitivity to give an optimum picture exposure. Ideal for backlit subjects. Ideal when you need an exact exposure of household light bulbs. ...and Options OK to access settings White Balance Choose your lighting condition. Choose a lower ISO setting in Video mode. 26 www.kodak.com/go/support Open Shade-for pictures in natural lighting. use a higher ISO for general picture taking . Center-Weight-evaluates the...
... the picture. Ideal for indoor pictures under tungsten or halogen lighting without flash. Ideal for general picture taking . ISO Speed Control the camera's sensitivity to give an optimum picture exposure. Ideal for backlit subjects. Ideal when you need an exact exposure of household light bulbs. ...and Options OK to access settings White Balance Choose your lighting condition. Choose a lower ISO setting in Video mode. 26 www.kodak.com/go/support Open Shade-for pictures in natural lighting. use a higher ISO for general picture taking . Center-Weight-evaluates the...

User Manual
Page 33
NOTE: EasyShare software also lets you take are cancelled Pre-select album names before you take ...color picture to black-and-white or sepia. Ideal when precise focus of focus. Color Mode Choose color tones. www.kodak.com/go/support 27 High Color Natural Color (default) Low Color Black & White Sepia-pictures have a reddish-brown,... antique look. Clear All-selected album settings are tagged with your camera Press Menu , and Options OK to access settings AF Zone Multi-zone (default)-evaluates 5 zones to Multi-zone when...
NOTE: EasyShare software also lets you take are cancelled Pre-select album names before you take ...color picture to black-and-white or sepia. Ideal when precise focus of focus. Color Mode Choose color tones. www.kodak.com/go/support 27 High Color Natural Color (default) Low Color Black & White Sepia-pictures have a reddish-brown,... antique look. Clear All-selected album settings are tagged with your camera Press Menu , and Options OK to access settings AF Zone Multi-zone (default)-evaluates 5 zones to Multi-zone when...

User Manual
Page 34
... additional settings. NOTE: If you fill up your card while taking pictures, your camera on page 28. ISO Speed Available only in Video mode. If not, the camera uses internal memory. Customizing your camera Use Setup to customize your camera Press Menu , and Options OK to access settings Image Storage Choose a storage location...in Auto mode. Memory plus feature prompts you to switch to highlight a setting, then press OK. 4 Choose an option, then press OK. 28 www.kodak.com/go/support Maintain Settings Exit (default) Choose which settings are Flash saved, even after the...
... additional settings. NOTE: If you fill up your card while taking pictures, your camera on page 28. ISO Speed Available only in Video mode. If not, the camera uses internal memory. Customizing your camera Use Setup to customize your camera Press Menu , and Options OK to access settings Image Storage Choose a storage location...in Auto mode. Memory plus feature prompts you to switch to highlight a setting, then press OK. 4 Choose an option, then press OK. 28 www.kodak.com/go/support Maintain Settings Exit (default) Choose which settings are Flash saved, even after the...


