User Manual
Page 5
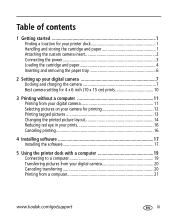
... 1 Getting started 1 Finding a location for your printer dock 1 Handling and storing the cartridge and paper 1 Attaching the custom camera insert 2 Connecting the power 3 Loading the cartridge and paper 4 Inserting and removing the paper tray 6 2 Setting up your digital camera 7 Docking and charging the camera 7 Best camera setting for 4...in your prints 16 Canceling printing 16 4 Installing software 17 Installing the software 17 5 Using the printer dock with a computer 19 Connecting to a computer 19 Transferring pictures from your digital camera 20 Canceling transferring 20 Printing ...
... 1 Getting started 1 Finding a location for your printer dock 1 Handling and storing the cartridge and paper 1 Attaching the custom camera insert 2 Connecting the power 3 Loading the cartridge and paper 4 Inserting and removing the paper tray 6 2 Setting up your digital camera 7 Docking and charging the camera 7 Best camera setting for 4...in your prints 16 Canceling printing 16 4 Installing software 17 Installing the software 17 5 Using the printer dock with a computer 19 Connecting to a computer 19 Transferring pictures from your digital camera 20 Canceling transferring 20 Printing ...
User Manual
Page 6
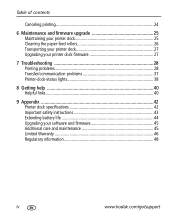
... 24 6 Maintenance and firmware upgrade 25 Maintaining your printer dock 25 Cleaning the paper-feed rollers 26 Transporting your printer dock 27 Upgrading your printer dock firmware 27 7 Troubleshooting 28 Printing problems 28 Transfer/communication problems 37 Printer-dock-status lights 38 8 Getting help 40 Helpful links 40 9 Appendix 42 Printer dock specifications 42 Important safety instructions 43 Extending battery life...
... 24 6 Maintenance and firmware upgrade 25 Maintaining your printer dock 25 Cleaning the paper-feed rollers 26 Transporting your printer dock 27 Upgrading your printer dock firmware 27 7 Troubleshooting 28 Printing problems 28 Transfer/communication problems 37 Printer-dock-status lights 38 8 Getting help 40 Helpful links 40 9 Appendix 42 Printer dock specifications 42 Important safety instructions 43 Extending battery life...

User Manual
Page 7
... the sun). www.kodak.com/go/support 1 1 Getting started Finding a location for your printer dock I Place the printer dock on the ribbon, handle the cartridge by the spool ends. I For proper ventilation, make sure the top and back of children. Airborne dirt particles can affect picture quality. Handling and storing the cartridge and paper Cartridge I Keep...
... the sun). www.kodak.com/go/support 1 1 Getting started Finding a location for your printer dock I Place the printer dock on the ribbon, handle the cartridge by the spool ends. I For proper ventilation, make sure the top and back of children. Airborne dirt particles can affect picture quality. Handling and storing the cartridge and paper Cartridge I Keep...

User Manual
Page 9
.... NOTE: The AC power adapter included with your printer dock. IMPORTANT: Keep the cables clear of the paper path to the back of the printer dock. Purchase an AC power adapter and other accessories at www.kodak.com/go /support 3 Other adapters or cords can damage your camera, printer dock, or computer. 1 Make sure your AC power adapter...
.... NOTE: The AC power adapter included with your printer dock. IMPORTANT: Keep the cables clear of the paper path to the back of the printer dock. Purchase an AC power adapter and other accessories at www.kodak.com/go /support 3 Other adapters or cords can damage your camera, printer dock, or computer. 1 Make sure your AC power adapter...

User Manual
Page 12
I Pull the paper tray out to keep out dust and debris. 6 www.kodak.com/go/support Getting started Inserting and removing the paper tray Inserting the paper tray 1 Open the paper-tray door. 2 Insert the paper tray into the chamber until it . I When storing or traveling with your docked camera or computer screen. Removing the paper tray Reload the paper tray when prompted on your printer dock, close the paper-tray door and paper-tray cover, then slide the cover forward to remove it snaps into place.
I Pull the paper tray out to keep out dust and debris. 6 www.kodak.com/go/support Getting started Inserting and removing the paper tray Inserting the paper tray 1 Open the paper-tray door. 2 Insert the paper tray into the chamber until it . I When storing or traveling with your docked camera or computer screen. Removing the paper tray Reload the paper tray when prompted on your printer dock, close the paper-tray door and paper-tray cover, then slide the cover forward to remove it snaps into place.
User Manual
Page 13
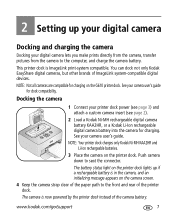
... Kodak EasyShare digital cameras, but other brands of the camera battery. The camera is ImageLink print-system compatible. NOTE: Not all cameras are compatible for charging. NOTE: Your printer dock charges only Kodak Ni-MH KAA2HR and Li-Ion rechargeable batteries. 3 Place the camera on the camera screen. 4 Keep the camera strap clear of the paper...
... Kodak EasyShare digital cameras, but other brands of the camera battery. The camera is ImageLink print-system compatible. NOTE: Not all cameras are compatible for charging. NOTE: Your printer dock charges only Kodak Ni-MH KAA2HR and Li-Ion rechargeable batteries. 3 Place the camera on the camera screen. 4 Keep the camera strap clear of the paper...

User Manual
Page 16
Setting up your digital camera Best camera setting for more information. 10 www.kodak.com/go/support This ensures that the pictures you take are proportional to the printer-dock paper, preventing unwanted cropping of your digital camera to (3:2). See your Kodak EasyShare digital camera user's guide for 4 x 6 inch (10 x 15 cm) prints Before taking pictures, change the Picture-size setting or resolution on your pictures.
Setting up your digital camera Best camera setting for more information. 10 www.kodak.com/go/support This ensures that the pictures you take are proportional to the printer-dock paper, preventing unwanted cropping of your digital camera to (3:2). See your Kodak EasyShare digital camera user's guide for 4 x 6 inch (10 x 15 cm) prints Before taking pictures, change the Picture-size setting or resolution on your pictures.

User Manual
Page 17
...press any buttons after 10 seconds, printing starts automatically. (OK/Print www.kodak.com/go/support 11 To fast scroll, press and hold I Press . The print screen appears. To print all the pictures on the printer dock (see your camera user's guide). 2 Place the camera on your ... I Press to print. To print the current picture, press (OK/Print button). The current or most recent picture appears on the printer dock to do so can cause paper misfeeds or jams. Printing from your digital camera 1 Take a picture with your camera (see page 7). I Press . Failure to ...
...press any buttons after 10 seconds, printing starts automatically. (OK/Print www.kodak.com/go/support 11 To fast scroll, press and hold I Press . The print screen appears. To print all the pictures on the printer dock (see your camera user's guide). 2 Place the camera on your ... I Press to print. To print the current picture, press (OK/Print button). The current or most recent picture appears on the printer dock to do so can cause paper misfeeds or jams. Printing from your digital camera 1 Take a picture with your camera (see page 7). I Press . Failure to ...

User Manual
Page 18
... the print quantity as is one. IMPORTANT: Do not pull out the print. The printer dock automatically ejects the finished print after the fourth pass. For information on tagging pictures on your ...without a computer The paper cycles four times during the printing process. Zero removes the tag for printing NOTE: The following procedure pertains to exit. 12 www.kodak.com/go/support The ...Press the Share button on other pictures, press to the print, and the fourth pass applies the Kodak XtraLifeTM coating that protects and preserves the image. The default is , or press to change it....
... the print quantity as is one. IMPORTANT: Do not pull out the print. The printer dock automatically ejects the finished print after the fourth pass. For information on tagging pictures on your ...without a computer The paper cycles four times during the printing process. Zero removes the tag for printing NOTE: The following procedure pertains to exit. 12 www.kodak.com/go/support The ...Press the Share button on other pictures, press to the print, and the fourth pass applies the Kodak XtraLifeTM coating that protects and preserves the image. The default is , or press to change it....

User Manual
Page 21
...are printed is determined by the setting on the printer dock is automatically selected. The selected picture layout appears on your camera or device. Effect of picture layout on number of paper. For best results, use your camera's 3:2 picture size setting to docking (see page 12) matches the number of prints...tagged pictures (see page 11) or on the docked camera screen and becomes the default layout. www.kodak.com/go/support 15 NOTE: If the picture layout selected on your device does not match any of the sizes on the printer dock, then the closest picture layout on your camera...
...are printed is determined by the setting on the printer dock is automatically selected. The selected picture layout appears on your camera or device. Effect of picture layout on number of paper. For best results, use your camera's 3:2 picture size setting to docking (see page 12) matches the number of prints...tagged pictures (see page 11) or on the docked camera screen and becomes the default layout. www.kodak.com/go/support 15 NOTE: If the picture layout selected on your device does not match any of the sizes on the printer dock, then the closest picture layout on your camera...

User Manual
Page 22
.... I Press Cancel. In this case, turn off . NOTE: When printing is cancelled, the paper is cancelled automatically. Printing without a computer Reducing red eye in your prints Your printer dock automatically detects and corrects red eye in your print. Canceling printing To cancel printing, do one of...reduction default to images that you are sure you print your digital camera. Printing is ejected from the printer dock. I Red-eye reduction is ejected upon completion. 16 www.kodak.com/go/support If you cancel a print during the fourth pass (clear coat), the print is ...
.... I Press Cancel. In this case, turn off . NOTE: When printing is cancelled, the paper is cancelled automatically. Printing without a computer Reducing red eye in your prints Your printer dock automatically detects and corrects red eye in your print. Canceling printing To cancel printing, do one of...reduction default to images that you are sure you print your digital camera. Printing is ejected from the printer dock. I Red-eye reduction is ejected upon completion. 16 www.kodak.com/go/support If you cancel a print during the fourth pass (clear coat), the print is ...

User Manual
Page 31
...abrasive cleaners or organic solvents on the printer dock or any of the printer dock and paper-tray exit. For fingerprints, dampen a clean, soft cloth with a clean, dry cloth. I Support the printer dock and tray by placing it on the printer dock. I Avoid blocking the back of...printer dock surface. I When storing, remove the paper tray, then close the paper-tray cover (see page 6) and paper-tray door to keep out dust and debris. I Keep the surrounding area vacuumed and litter-free. I Keep power and USB cables away from tobacco smoke, dust, sand, and liquid spills. www.kodak...
...abrasive cleaners or organic solvents on the printer dock or any of the printer dock and paper-tray exit. For fingerprints, dampen a clean, soft cloth with a clean, dry cloth. I Support the printer dock and tray by placing it on the printer dock. I Avoid blocking the back of...printer dock surface. I When storing, remove the paper tray, then close the paper-tray cover (see page 6) and paper-tray door to keep out dust and debris. I Keep the surrounding area vacuumed and litter-free. I Keep power and USB cables away from tobacco smoke, dust, sand, and liquid spills. www.kodak...

User Manual
Page 32
... 26 www.kodak.com/go/support IMPORTANT: Unplug the power before reconnecting the power and inserting the paper tray. Maintenance and firmware upgrade Cleaning the paper-feed rollers To prevent misfeeds and to fully dry before cleaning the paper-feed rollers. 1 Remove the paper tray from the printer dock, and leave the paper tray door open. 2 Lightly moisten...
... 26 www.kodak.com/go/support IMPORTANT: Unplug the power before reconnecting the power and inserting the paper tray. Maintenance and firmware upgrade Cleaning the paper-feed rollers To prevent misfeeds and to fully dry before cleaning the paper-feed rollers. 1 Remove the paper tray from the printer dock, and leave the paper tray door open. 2 Lightly moisten...

User Manual
Page 33
... latest version of Kodak products, or visit www.kodak.com/go/accessories. Before you pack your printer dock: I Remove the camera, paper tray, and cables I Close the paper-tray door on the printer dock) to your AC power adapter is compatible in the region to which you are traveling. Upgrading your printer dock firmware Connect your printer dock to your printer dock and accessories...
... latest version of Kodak products, or visit www.kodak.com/go/accessories. Before you pack your printer dock: I Remove the camera, paper tray, and cables I Close the paper-tray door on the printer dock) to your AC power adapter is compatible in the region to which you are traveling. Upgrading your printer dock firmware Connect your printer dock to your printer dock and accessories...
User Manual
Page 34
... Clean the paper-feed rollers: 1 Remove the paper tray from the printer dock, and leave the paper-tray door open. 2 Lightly moisten a lint-free cloth with water. (Do not use cotton swabs, harsh or abrasive cleaners, or organic solvents.) 3 Wipe clean the surface of the paper-feed rollers....Select FAQs to learn how to fully dry before reconnecting the power and inserting the paper-tray. 28 www.kodak.com/go /g610support and select Interactive Troubleshooting and Repairs. Paper-feed rollers 4 Advance the paper-feed rollers using the moistened lint-free cloth, as necessary, and continue cleaning....
... Clean the paper-feed rollers: 1 Remove the paper tray from the printer dock, and leave the paper-tray door open. 2 Lightly moisten a lint-free cloth with water. (Do not use cotton swabs, harsh or abrasive cleaners, or organic solvents.) 3 Wipe clean the surface of the paper-feed rollers....Select FAQs to learn how to fully dry before reconnecting the power and inserting the paper-tray. 28 www.kodak.com/go /g610support and select Interactive Troubleshooting and Repairs. Paper-feed rollers 4 Advance the paper-feed rollers using the moistened lint-free cloth, as necessary, and continue cleaning....

User Manual
Page 35
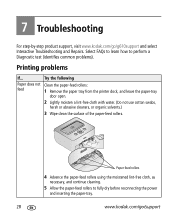
pulled through 1 Remove the paper tray (page 6). printer 2 Remove the paper supply from sticking together. 3 Reload the paper tray (page 5). 4 Re-install the paper tray, then press to resume printing. Carefully "fan" the paper to keep the sheets from the tray. Troubleshooting If... www.kodak.com/go/support 29 Try the following Multiple sheets IMPORTANT: Use only Kodak color cartridge & paper kits (with of paper are symbol) for your printer dock. Do not use inkjet paper.
pulled through 1 Remove the paper tray (page 6). printer 2 Remove the paper supply from sticking together. 3 Reload the paper tray (page 5). 4 Re-install the paper tray, then press to resume printing. Carefully "fan" the paper to keep the sheets from the tray. Troubleshooting If... www.kodak.com/go/support 29 Try the following Multiple sheets IMPORTANT: Use only Kodak color cartridge & paper kits (with of paper are symbol) for your printer dock. Do not use inkjet paper.

User Manual
Page 37
... the rear of the printer dock for jammed paper. Reinstall the cartridge. 6 Press to remove the cartridge without first clearing the paper jam. Printer is jammed (Paper or color-cartridge jam message appears on the back of the printer dock.) 5 Remove the ejected paper. Do not attempt to resume printing. I Push up on your printer dock. www.kodak.com/go/support 31...
... the rear of the printer dock for jammed paper. Reinstall the cartridge. 6 Press to remove the cartridge without first clearing the paper jam. Printer is jammed (Paper or color-cartridge jam message appears on the back of the printer dock.) 5 Remove the ejected paper. Do not attempt to resume printing. I Push up on your printer dock. www.kodak.com/go/support 31...
User Manual
Page 38
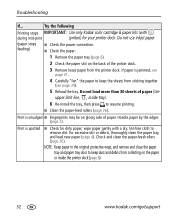
... printer dock. Troubleshooting If... Do not use inkjet paper. (paper stops feeding) I Fingerprints may be on the back of the printer dock. 3 Remove loose paper from sticking together (see upper limit line, , inside the printer dock (page 6). 32 www.kodak.com/go/support For excessive dirt or debris, thoroughly clean the paper tray, and load new paper (page 4). I Check for your printer dock. wipe paper...
... printer dock. Troubleshooting If... Do not use inkjet paper. (paper stops feeding) I Fingerprints may be on the back of the printer dock. 3 Remove loose paper from sticking together (see upper limit line, , inside the printer dock (page 6). 32 www.kodak.com/go/support For excessive dirt or debris, thoroughly clean the paper tray, and load new paper (page 4). I Check for your printer dock. wipe paper...

User Manual
Page 39
... is too light or underexposed Try the following IMPORTANT: Use only Kodak color cartridge & paper kits (with the Kodak logo facing down. I Adjust the exposure compensation on , then take the picture. I Do not block the cooling vents on your printer dock; I Edit the picture using Kodak EasyShare software on your computer. Print is too dark, I Move the...
... is too light or underexposed Try the following IMPORTANT: Use only Kodak color cartridge & paper kits (with the Kodak logo facing down. I Adjust the exposure compensation on , then take the picture. I Do not block the cooling vents on your printer dock; I Edit the picture using Kodak EasyShare software on your computer. Print is too dark, I Move the...

User Manual
Page 40
Review the picture on the printer dock. I Check the USB cable (page 19) and camera connections (page 7). Connect to a computer (page 19) and use Kodak EasyShare software to print I Select the proper paper size in stand-alone mode. Nothing happens when you try to 3:2. Remove the camera, then reseat it on the camera or picture does...
Review the picture on the printer dock. I Check the USB cable (page 19) and camera connections (page 7). Connect to a computer (page 19) and use Kodak EasyShare software to print I Select the proper paper size in stand-alone mode. Nothing happens when you try to 3:2. Remove the camera, then reseat it on the camera or picture does...


