
User's Guide
Page 1
KODAK EASYSHARE DX4900 Zoom Digital Camera User's Guide Visit Kodak on the World Wide Web at www.kodak.com
KODAK EASYSHARE DX4900 Zoom Digital Camera User's Guide Visit Kodak on the World Wide Web at www.kodak.com

User's Guide
Page 4
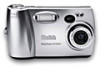
Top/Back View Product Overview 1 23 12 11 10 EasyShare 9 8 1 Viewfinder 2 Status display 3 Buttons: Flash Close-up / Distant Self Timer 4 Mode dial (see below) 5 Card access light 4 5 6 7 6 Wrist strap post 7 COMPACTFLASH card door 8 Menu button 9 Select button 10 Four-way arrow button / Zoom button (W and T) 11 LCD screen 12 Viewfinder light Mode Dial Turn the Mode dial to select: Capture-take pictures Review-display pictures on the LCD screen Setup-customize settings ii
Top/Back View Product Overview 1 23 12 11 10 EasyShare 9 8 1 Viewfinder 2 Status display 3 Buttons: Flash Close-up / Distant Self Timer 4 Mode dial (see below) 5 Card access light 4 5 6 7 6 Wrist strap post 7 COMPACTFLASH card door 8 Menu button 9 Select button 10 Four-way arrow button / Zoom button (W and T) 11 LCD screen 12 Viewfinder light Mode Dial Turn the Mode dial to select: Capture-take pictures Review-display pictures on the LCD screen Setup-customize settings ii

User's Guide
Page 7
Table of Contents 1 Getting Started 1 What Can I Do With My KODAK EASYSHARE DX4900 Zoom Digital Camera 1 What Can I Do With My Digital Pictures 1 Camera Package Contents 2 Attaching the Wrist Strap 2 Loading the Batteries 3 Inserting a COMPACTFLASH Card 4 Turning the Camera On and Off 5 Checking the Batteries 6 Automatic Powerdown Saves Batteries 6 Setting the Clock 7 Mode Dial-Settings and... Picture 14 Previewing Your Picture 15 Shooting a Burst Series of Pictures 16 Shooting Distant and Close-Up Pictures 17 Using Zoom 18 Using the Flash 19 Putting Yourself in the Picture 20 v
Table of Contents 1 Getting Started 1 What Can I Do With My KODAK EASYSHARE DX4900 Zoom Digital Camera 1 What Can I Do With My Digital Pictures 1 Camera Package Contents 2 Attaching the Wrist Strap 2 Loading the Batteries 3 Inserting a COMPACTFLASH Card 4 Turning the Camera On and Off 5 Checking the Batteries 6 Automatic Powerdown Saves Batteries 6 Setting the Clock 7 Mode Dial-Settings and... Picture 14 Previewing Your Picture 15 Shooting a Burst Series of Pictures 16 Shooting Distant and Close-Up Pictures 17 Using Zoom 18 Using the Flash 19 Putting Yourself in the Picture 20 v
User's Guide
Page 9
... Selecting a Power Save Setting 43 Setting Digital Zoom Behavior 44 Adjusting the Camera Sounds 45 Setting Video Out 46 Selecting a Language 46 Formatting a COMPACTFLASH Card 47 Resetting User Settings 48 Viewing Camera Information 48 7 Using Pictures on Your Computer 49 Before You ...Manually 52 Printing Your Pictures 53 8 Using the KODAK EASYSHARE Camera Dock ..... 55 Camera Dock Package Contents 55 Installing the Dock Insert 56 Connecting the Camera Dock 56 Installing the Battery Pack in the Camera 57 Docking the Camera 57 Charging the Battery Pack 58 Transferring Pictures ...
... Selecting a Power Save Setting 43 Setting Digital Zoom Behavior 44 Adjusting the Camera Sounds 45 Setting Video Out 46 Selecting a Language 46 Formatting a COMPACTFLASH Card 47 Resetting User Settings 48 Viewing Camera Information 48 7 Using Pictures on Your Computer 49 Before You ...Manually 52 Printing Your Pictures 53 8 Using the KODAK EASYSHARE Camera Dock ..... 55 Camera Dock Package Contents 55 Installing the Dock Insert 56 Connecting the Camera Dock 56 Installing the Battery Pack in the Camera 57 Docking the Camera 57 Charging the Battery Pack 58 Transferring Pictures ...

User's Guide
Page 11
..., see the note on page 40 before installing the KODAK Software. 1 or take your COMPACTFLASH Card to your pictures to your home printer; 1 Getting Started What Can I Do With My Digital Pictures? Take great pictures with 4.0 Megapixel resolution -in...KODAK Picture Maker; Review -in Setup mode, customize your pictures, fix red-eye, crop, rotate, and much more . Install the software that is included on the LCD screen. Have fun!-add special effects to your computer. Print-print to your camera settings. What Can I Do With My KODAK EASYSHARE DX4900 Zoom Digital Camera...
..., see the note on page 40 before installing the KODAK Software. 1 or take your COMPACTFLASH Card to your pictures to your home printer; 1 Getting Started What Can I Do With My Digital Pictures? Take great pictures with 4.0 Megapixel resolution -in...KODAK Picture Maker; Review -in Setup mode, customize your pictures, fix red-eye, crop, rotate, and much more . Install the software that is included on the LCD screen. Have fun!-add special effects to your computer. Print-print to your camera settings. What Can I Do With My KODAK EASYSHARE DX4900 Zoom Digital Camera...

User's Guide
Page 20
Menu Power Save (page 43) Digital Zoom (page 44) Camera Sounds (page 45) Menu Language (page 46) Format Card (page 47) Reset User Setting (page 48) Date/Time Set (page 7) About this Camera (page 48) Video Out (page 46) 10 Chapter 1 Setup Menus To access the Setup mode menus: 1 Turn the Mode dial to scroll through the menus and submenus. 3 Press the Select button. The Setup menu screen is displayed on the LCD. 2 Use the arrow buttons to Setup .
Menu Power Save (page 43) Digital Zoom (page 44) Camera Sounds (page 45) Menu Language (page 46) Format Card (page 47) Reset User Setting (page 48) Date/Time Set (page 7) About this Camera (page 48) Video Out (page 46) 10 Chapter 1 Setup Menus To access the Setup mode menus: 1 Turn the Mode dial to scroll through the menus and submenus. 3 Press the Select button. The Setup menu screen is displayed on the LCD. 2 Use the arrow buttons to Setup .

User's Guide
Page 25
W T 3 Press the Shutter button half-way to frame your picture. SELECT The current aperture value and shutter EasyShare MENU speed are using digital zooming (page 18). 1 Press the Select button. Chapter 2 Previewing Your Picture If you want to see what a picture looks like... displayed. 4 Press the Shutter button completely down to take slightly longer to charge when you can preview a live image and icons digital zoom for the activated camera settings. 2 Center the subject on the LCD screen. aperture shutter speed The LCD displays a live image on the LCD. IMPORTANT:...
W T 3 Press the Shutter button half-way to frame your picture. SELECT The current aperture value and shutter EasyShare MENU speed are using digital zooming (page 18). 1 Press the Select button. Chapter 2 Previewing Your Picture If you want to see what a picture looks like... displayed. 4 Press the Shutter button completely down to take slightly longer to charge when you can preview a live image and icons digital zoom for the activated camera settings. 2 Center the subject on the LCD screen. aperture shutter speed The LCD displays a live image on the LCD. IMPORTANT:...

User's Guide
Page 27
Close-Up Pictures Use the Close-Up setting to gain sharpness and detail in the Status Display on the zoom position: Zoom position Wide Angle Telephoto Close-Up focus distance 2.8 to 27.6 inches (70 to 700 mm) 9.8 to 27.6 inches (250 to 700 mm) Distant Pictures Use ... the camera. 3 Press the Shutter button half-way to lock the auto-focus and exposure. 4 Press the Shutter button all the way down to take pictures of scenes that are either very close range. Chapter 2 Shooting Distant and Close-Up Pictures Use the Close-Up/Distant button to take the picture. EasyShare...
Close-Up Pictures Use the Close-Up setting to gain sharpness and detail in the Status Display on the zoom position: Zoom position Wide Angle Telephoto Close-Up focus distance 2.8 to 27.6 inches (70 to 700 mm) 9.8 to 27.6 inches (250 to 700 mm) Distant Pictures Use ... the camera. 3 Press the Shutter button half-way to lock the auto-focus and exposure. 4 Press the Shutter button all the way down to take pictures of scenes that are either very close range. Chapter 2 Shooting Distant and Close-Up Pictures Use the Close-Up/Distant button to take the picture. EasyShare...

User's Guide
Page 28
...on Preview. 2 Push T (Telephoto) on the camera, the lens extends toward the W position. buttons 2 Activate optical zoom. Using Digital Zoom To get closer to take the picture. Release ...zoom, the camera lens extends or retracts as it again towards T. Preview is accomplished with camera image processing; NOTE: You may notice a decrease in printed image quality when using digital zoom. Chapter 2 Using Zoom Your camera offers optical and digital zoom features. Use optical zoom to get up to two times closer (2X) to Capture . Digital zoom is required for different digital zoom...
...on Preview. 2 Push T (Telephoto) on the camera, the lens extends toward the W position. buttons 2 Activate optical zoom. Using Digital Zoom To get closer to take the picture. Release ...zoom, the camera lens extends or retracts as it again towards T. Preview is accomplished with camera image processing; NOTE: You may notice a decrease in printed image quality when using digital zoom. Chapter 2 Using Zoom Your camera offers optical and digital zoom features. Use optical zoom to get up to two times closer (2X) to Capture . Digital zoom is required for different digital zoom...

User's Guide
Page 29
...m The flash icon that is displayed in low-light conditions with the flash turned off, the camera uses slow shutter speeds. NOTE: When you are shooting in the Status Display is taken. Zoom position (at ISO 140) Effective flash-distance from subject Wide Angle 1.6 to 10.5 feet (0.5 ...to 3.2 m) Telephoto 1.6 to 7.5 feet (0.5 to 2.3 m) m Press the Flash button repeatedly to avoid camera shake. m The flash setting remains unless Reset User...
...m The flash icon that is displayed in low-light conditions with the flash turned off, the camera uses slow shutter speeds. NOTE: When you are shooting in the Status Display is taken. Zoom position (at ISO 140) Effective flash-distance from subject Wide Angle 1.6 to 10.5 feet (0.5 ...to 3.2 m) Telephoto 1.6 to 7.5 feet (0.5 to 2.3 m) m Press the Flash button repeatedly to avoid camera shake. m The flash setting remains unless Reset User...
User's Guide
Page 43
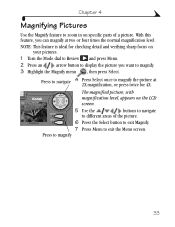
.... 3 Highlight the Magnify menu , then press Select. Chapter 4 Magnifying Pictures Use the Magnify feature to exit the Menu screen. EasyShare MENU 6 Press the Select button to exit Magnify. 7 Press Menu to zoom in on your pictures. 1 Turn the Mode dial to Review and press Menu. 2 Press an arrow button to display the...
.... 3 Highlight the Magnify menu , then press Select. Chapter 4 Magnifying Pictures Use the Magnify feature to exit the Menu screen. EasyShare MENU 6 Press the Select button to exit Magnify. 7 Press Menu to zoom in on your pictures. 1 Turn the Mode dial to Review and press Menu. 2 Press an arrow button to display the...

User's Guide
Page 54
... of digital zoom. To use . Chapter 6 Setting Digital Zoom Behavior Digital zoom provides three times (3X) magnification beyond the limit of optical zoom. NONE-disables digital zoom. Release the button, then press it . 44 Ideal for how to use digital zoom. 1 Turn the Mode dial to digital zoom. CONTINUOUS-zooms directly from optical to Setup . 2 Highlight the Digital Zoom menu , then press Select. 3 Highlight the Digital Zoom setting...
... of digital zoom. To use . Chapter 6 Setting Digital Zoom Behavior Digital zoom provides three times (3X) magnification beyond the limit of optical zoom. NONE-disables digital zoom. Release the button, then press it . 44 Ideal for how to use digital zoom. 1 Turn the Mode dial to digital zoom. CONTINUOUS-zooms directly from optical to Setup . 2 Highlight the Digital Zoom menu , then press Select. 3 Highlight the Digital Zoom setting...

User's Guide
Page 71
...site at http://www.kodak.com/go/4900support. certified. Insert a card. inserted or removed. No card is available in camera. Additional technical information ...KODAK Picture Software CD. be Reformat the card corrupt. (page 47). The card may be COMPACTFLASH card COMPACTFLASH (page 4). Camera freezes up Camera detects an Turn the camera off, then back when a card is off when or removed. inserting or removing a card. 61 9 Troubleshooting Problems There may not Purchase a certified recognize your KODAK EASYSHARE DX4900 Zoom Digital Camera or KODAK EASYSHARE Camera...
...site at http://www.kodak.com/go/4900support. certified. Insert a card. inserted or removed. No card is available in camera. Additional technical information ...KODAK Picture Software CD. be Reformat the card corrupt. (page 47). The card may be COMPACTFLASH card COMPACTFLASH (page 4). Camera freezes up Camera detects an Turn the camera off, then back when a card is off when or removed. inserting or removing a card. 61 9 Troubleshooting Problems There may not Purchase a certified recognize your KODAK EASYSHARE DX4900 Zoom Digital Camera or KODAK EASYSHARE Camera...

User's Guide
Page 81
and Canada m Europe 1-800-508-1531 44-0-131-458-6962 71 World Wide Web http://www.kodak.com/go/4900support Kodak Fax Support m U.S. 10 Getting Help If you need help with your KODAK EASYSHARE DX4900 Zoom Digital Camera or KODAK EASYSHARE Camera Dock, it is available from a number of resources: m Troubleshooting Problems, page 61 m Place of purchase m Software application online help m World...
and Canada m Europe 1-800-508-1531 44-0-131-458-6962 71 World Wide Web http://www.kodak.com/go/4900support Kodak Fax Support m U.S. 10 Getting Help If you need help with your KODAK EASYSHARE DX4900 Zoom Digital Camera or KODAK EASYSHARE Camera Dock, it is available from a number of resources: m Troubleshooting Problems, page 61 m Place of purchase m Software application online help m World...

User's Guide
Page 85
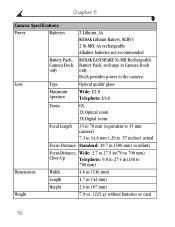
Camera Specifications Camera Specifications Pixel Resolution 4.0 MP 2448 x 1632 (High Compression also) (by Quality setting) 3.1 MP 2.2 MP 2136 x 1440 1800 x 1200 1.0 MP 1224 x 816 1.0 MP (Burst) 1224 x 816 (... Operating Temperature NTSC or PAL 32 to 104° F (0 to 40° C) 75 11 Appendix This appendix serves as a resource for technical information about your KODAK EASYSHARE DX4900 Zoom Digital Camera, KODAK EASYSHARE Camera Dock, COMPACTFLASH Cards, batteries, and available accessories.
Camera Specifications Camera Specifications Pixel Resolution 4.0 MP 2448 x 1632 (High Compression also) (by Quality setting) 3.1 MP 2.2 MP 2136 x 1440 1800 x 1200 1.0 MP 1224 x 816 1.0 MP (Burst) 1224 x 816 (... Operating Temperature NTSC or PAL 32 to 104° F (0 to 40° C) 75 11 Appendix This appendix serves as a resource for technical information about your KODAK EASYSHARE DX4900 Zoom Digital Camera, KODAK EASYSHARE Camera Dock, COMPACTFLASH Cards, batteries, and available accessories.
User's Guide
Page 86
Lens Type Optical quality glass Maximum Aperture Wide: f/2.8 Telephoto: f/4.0 Zoom 6X: 2X Optical zoom 3X Digital zoom Focal Length 35 to 70 mm (equivalent to 35 mm camera) 7.3 to 14.6 mm (.29 to .57 inches) actual Focus Distance Standard: 19.7 in (500 mm) to...) Close-Up Telephoto: 9.8 to 27.5 in(250 to the camera. Chapter 11 Camera Specifications Power Batteries 2 Lithium, AA KODAK Lithium Battery, KCRV3 2 Ni-MH, AA rechargeable Alkaline batteries not recommended Battery Pack, Camera Dock only KODAK EASYSHARE Ni-MH Rechargeable Battery Pack, recharge in (67 mm) Weight ...
Lens Type Optical quality glass Maximum Aperture Wide: f/2.8 Telephoto: f/4.0 Zoom 6X: 2X Optical zoom 3X Digital zoom Focal Length 35 to 70 mm (equivalent to 35 mm camera) 7.3 to 14.6 mm (.29 to .57 inches) actual Focus Distance Standard: 19.7 in (500 mm) to...) Close-Up Telephoto: 9.8 to 27.5 in(250 to the camera. Chapter 11 Camera Specifications Power Batteries 2 Lithium, AA KODAK Lithium Battery, KCRV3 2 Ni-MH, AA rechargeable Alkaline batteries not recommended Battery Pack, Camera Dock only KODAK EASYSHARE Ni-MH Rechargeable Battery Pack, recharge in (67 mm) Weight ...

User's Guide
Page 87
... Dimensions (without insert) Width/Depth/ Height Weight Dimensions (with insert) Width/Depth/ Height Weight Indicator light Input voltage Power DC input Cable included with KODAK EASYSHARE Cameras 5.9 in. /4.4 in. /1.5 in. (150 mm/112.5 mm/38.5 mm) 5.5 oz. (155 g) 5.9 in. /4.4 in. /1.7 in... charging 7 ±0.7 V DC AC adapter included with Camera Dock Original Factory Settings-Camera Your camera is set to the following defaults at the factory: Feature Camera Sounds Color Mode Date/Time Digital Zoom Exposure Compensation Exposure Metering Factory Setting Selected on Color 2000/...
... Dimensions (without insert) Width/Depth/ Height Weight Dimensions (with insert) Width/Depth/ Height Weight Indicator light Input voltage Power DC input Cable included with KODAK EASYSHARE Cameras 5.9 in. /4.4 in. /1.5 in. (150 mm/112.5 mm/38.5 mm) 5.5 oz. (155 g) 5.9 in. /4.4 in. /1.7 in... charging 7 ±0.7 V DC AC adapter included with Camera Dock Original Factory Settings-Camera Your camera is set to the following defaults at the factory: Feature Camera Sounds Color Mode Date/Time Digital Zoom Exposure Compensation Exposure Metering Factory Setting Selected on Color 2000/...

User's Guide
Page 91
... fits perfectly in your picture taking Premium Picture Print photo-quality pictures on your KODAK EASYSHARE DX4900 Zoom Digital Camera by adding just the right accessories. Chapter 11 Camera Accessories Get the most from your computer. Convenient for flexibility and versatility in your camera KCRV3 and offers superior battery life COMPACTFLASH Removable memory, many sizes available, including: Cards...
... fits perfectly in your picture taking Premium Picture Print photo-quality pictures on your KODAK EASYSHARE DX4900 Zoom Digital Camera by adding just the right accessories. Chapter 11 Camera Accessories Get the most from your computer. Convenient for flexibility and versatility in your camera KCRV3 and offers superior battery life COMPACTFLASH Removable memory, many sizes available, including: Cards...

User's Guide
Page 93
... 11 MISC folder-contains the Print Order file created when you use the card in a camera other than the KODAK EASYSHARE DX4900 Zoom Digital Camera, and that camera manufacturer adheres to this file structure standard, the \DCIM folder contains a folder named by the camera, or the highest existing picture number in the folder. DCIM folder-root level folder, contains...
... 11 MISC folder-contains the Print Order file created when you use the card in a camera other than the KODAK EASYSHARE DX4900 Zoom Digital Camera, and that camera manufacturer adheres to this file structure standard, the \DCIM folder contains a folder named by the camera, or the highest existing picture number in the folder. DCIM folder-root level folder, contains...

User's Guide
Page 99
...to 49, 50, 52 using pictures on 49 connect camera with Camera Dock 50 with USB cable 49 connect Camera Dock 56 continuous digital zoom 44 copy pictures to computer 49, 50, 52, 60 cover, lens 5 customer support numbers 72 customizing settings camera setup 43 for picture taking 21 review 31 D date... deleting from card 34 last picture 14 protecting pictures from 35 digital pictures, using 1, 49 digital zoom 18 setting 44 display problems 63 displaying pictures on LCD screen 31 slide show 36 distant scenes 17 dock insert 2, 56 docking camera 57 downloading pictures 49, 50, 52, 60 E editing pictures...
...to 49, 50, 52 using pictures on 49 connect camera with Camera Dock 50 with USB cable 49 connect Camera Dock 56 continuous digital zoom 44 copy pictures to computer 49, 50, 52, 60 cover, lens 5 customer support numbers 72 customizing settings camera setup 43 for picture taking 21 review 31 D date... deleting from card 34 last picture 14 protecting pictures from 35 digital pictures, using 1, 49 digital zoom 18 setting 44 display problems 63 displaying pictures on LCD screen 31 slide show 36 distant scenes 17 dock insert 2, 56 docking camera 57 downloading pictures 49, 50, 52, 60 E editing pictures...


