
User's Guide
Page 11
9 Using the Optional EASYSHARE Camera Dock II . 61 Camera Dock Package Contents 61 Installing the Camera Insert 62 Connecting the Camera Dock 63 Installing the Battery Pack in the Camera 64 Docking the Camera 65 Charging the Battery Pack 66 Transferring Pictures and Videos 67 Caution When Using a Tripod 67 Earlier Camera Dock Model 68 10 Troubleshooting 69 Troubleshooting-Camera 69 Troubleshooting-Camera Dock II 81 11 Getting Help 85 Helpful Web Links 85 Help in this Manual 85 Software Help 85 Telephone Customer Support 86 ix
9 Using the Optional EASYSHARE Camera Dock II . 61 Camera Dock Package Contents 61 Installing the Camera Insert 62 Connecting the Camera Dock 63 Installing the Battery Pack in the Camera 64 Docking the Camera 65 Charging the Battery Pack 66 Transferring Pictures and Videos 67 Caution When Using a Tripod 67 Earlier Camera Dock Model 68 10 Troubleshooting 69 Troubleshooting-Camera 69 Troubleshooting-Camera Dock II 81 11 Getting Help 85 Helpful Web Links 85 Help in this Manual 85 Software Help 85 Telephone Customer Support 86 ix

User's Guide
Page 15
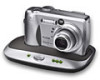
... a KODAK EASYSHARE Camera Dock II, a KODAK EASYSHARE Ni-MH Rechargeable Battery Pack and AC power adapter are included. Do not discard. For details, see page 66. 3 A KODAK EASYSHARE Camera Dock II may be purchased at your Kodak retail dealer or on our Web site at http://www.kodak.com/go/accessories. (This camera and dock insert also operate with the original KODAK EASYSHARE Camera Dock...
... a KODAK EASYSHARE Camera Dock II, a KODAK EASYSHARE Ni-MH Rechargeable Battery Pack and AC power adapter are included. Do not discard. For details, see page 66. 3 A KODAK EASYSHARE Camera Dock II may be purchased at your Kodak retail dealer or on our Web site at http://www.kodak.com/go/accessories. (This camera and dock insert also operate with the original KODAK EASYSHARE Camera Dock...

User's Guide
Page 17
...: For information on installing the KODAK EASYSHARE Ni-MH Rechargeable Battery Pack. 5 See page 95 for details on the optional KODAK Digital Camera AC Adapter, 3-Volt, see page 96. * If you purchased the KODAK EASYSHARE Camera Dock II, see page 64 for acceptable battery types. Chapter 1 Loading the Battery 1 Turn off the camera. 2 Open the battery door. 3 Orient the battery* as shown. 4 Close the...
...: For information on installing the KODAK EASYSHARE Ni-MH Rechargeable Battery Pack. 5 See page 95 for details on the optional KODAK Digital Camera AC Adapter, 3-Volt, see page 96. * If you purchased the KODAK EASYSHARE Camera Dock II, see page 64 for acceptable battery types. Chapter 1 Loading the Battery 1 Turn off the camera. 2 Open the battery door. 3 Orient the battery* as shown. 4 Close the...

User's Guide
Page 20
... may allow your computer to adjust the date and time. See the KODAK EASYSHARE Software Help for more than 10 minutes. DELETE 3 Press to highlight Setup Menu, then press the OK button. Menu OK 4 Press Press to automatically update the camera clock when you change it. Chapter 1 Setting the Date and Time The... Date & Time screen is displayed the first time you turn on the camera or if the battery is YYYY/MM/DD. To set the date and time after that: 1 Turn on , go to exit the menu. The time is the first...
... may allow your computer to adjust the date and time. See the KODAK EASYSHARE Software Help for more than 10 minutes. DELETE 3 Press to highlight Setup Menu, then press the OK button. Menu OK 4 Press Press to automatically update the camera clock when you change it. Chapter 1 Setting the Date and Time The... Date & Time screen is displayed the first time you turn on the camera or if the battery is YYYY/MM/DD. To set the date and time after that: 1 Turn on , go to exit the menu. The time is the first...

User's Guide
Page 30
... dial Share 1 Turn the Mode dial to capture close subjects (3 feet or less), keep the subject below the parallax marks. To conserve battery power, turn off Liveview, press the OK button. To interrupt the description, press . Using the Viewfinder Parallax marks Auto focus zone When using...see page 51. To change the Liveview setting so that it is on whenever the camera is on Liveview. 3 Frame your subject in the LCD. 4 Press the Shutter button half-way to set MENU EasyShare REVIEW the exposure and focus, then continue pressing completely down to frame your subject....
... dial Share 1 Turn the Mode dial to capture close subjects (3 feet or less), keep the subject below the parallax marks. To conserve battery power, turn off Liveview, press the OK button. To interrupt the description, press . Using the Viewfinder Parallax marks Auto focus zone When using...see page 51. To change the Liveview setting so that it is on whenever the camera is on Liveview. 3 Frame your subject in the LCD. 4 Press the Shutter button half-way to set MENU EasyShare REVIEW the exposure and focus, then continue pressing completely down to frame your subject....

User's Guide
Page 31
... picture and are displayed. Chapter 2 Quickview-Reviewing the Picture Just Taken After you can turn off the Quickview feature. (See page 50.) 19 MENU EasyShare REVIEW To save battery power, you can : Delete DELETE m Review it: If you take no action, the picture Share is displayed, you take a picture, the LCD displays...
... picture and are displayed. Chapter 2 Quickview-Reviewing the Picture Just Taken After you can turn off the Quickview feature. (See page 50.) 19 MENU EasyShare REVIEW To save battery power, you can : Delete DELETE m Review it: If you take no action, the picture Share is displayed, you take a picture, the LCD displays...
User's Guide
Page 44
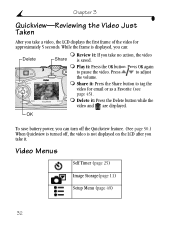
m Play it : Press the Share button to tag the video for approximately 5 seconds. m Share it : Press the OK button. Press to pause the video. EasyShare REVIEW m Delete it . Video Menus Self Timer (page 25) Image Storage(page 11) Setup Menu (page 49) 32 Press OK again Share to adjust the ...volume. OK To save battery power, you can : Delete DELETE MENU m Review it: If you take no action, the video Share is not displayed on the LCD after you take...
m Play it : Press the Share button to tag the video for approximately 5 seconds. m Share it : Press the OK button. Press to pause the video. EasyShare REVIEW m Delete it . Video Menus Self Timer (page 25) Image Storage(page 11) Setup Menu (page 49) 32 Press OK again Share to adjust the ...volume. OK To save battery power, you can : Delete DELETE MENU m Review it: If you take no action, the video Share is not displayed on the LCD after you take...

User's Guide
Page 47
DELETE MENU EasyShare REVIEW Review 1 Press the Review button. The LCD displays the last picture or video taken or reviewed and the Review icon. 2 Press the Review button ... memory or on a card. Picture and Video Icons Email Favorite 02 Print # of copies Protect 072 Picture/video number Internal Picture Location Card Low battery Exhausted battery 35 Remember, press the Shutter button to Capture mode. 4 Reviewing Pictures and Videos Press the Review button to view and work with pictures and videos...
DELETE MENU EasyShare REVIEW Review 1 Press the Review button. The LCD displays the last picture or video taken or reviewed and the Review icon. 2 Press the Review button ... memory or on a card. Picture and Video Icons Email Favorite 02 Print # of copies Protect 072 Picture/video number Internal Picture Location Card Low battery Exhausted battery 35 Remember, press the Shutter button to Capture mode. 4 Reviewing Pictures and Videos Press the Review button to view and work with pictures and videos...

User's Guide
Page 71
... is available for connecting with a Camera Dock. NOTE: You can transfer pictures and videos from the KODAK EASYSHARE Software CD before connecting the camera or dock to the computer. Connecting to the Computer You can also use a KODAK Multi-Card Reader or KODAK SD Multimedia Card Reader-Writer to load...labeled USB port on the camera. it saves battery power when transferring pictures (see page 96). Failure to do so may cause the software to transfer your camera; See page 61 for your pictures. See your KODAK retail dealer or visit http://www.kodak.com/go/accessories. 59...
... is available for connecting with a Camera Dock. NOTE: You can transfer pictures and videos from the KODAK EASYSHARE Software CD before connecting the camera or dock to the computer. Connecting to the Computer You can also use a KODAK Multi-Card Reader or KODAK SD Multimedia Card Reader-Writer to load...labeled USB port on the camera. it saves battery power when transferring pictures (see page 96). Failure to do so may cause the software to transfer your camera; See page 61 for your pictures. See your KODAK retail dealer or visit http://www.kodak.com/go/accessories. 59...

User's Guide
Page 73
... different from the KODAK EASYSHARE Software CD before connecting the camera or dock to the computer. The Camera Dock is also a rapid battery charger for the included KODAK EASYSHARE Ni-MH Rechargeable Battery Pack, and supplies power to the camera. (Only the Battery Pack can purchase the KODAK EASYSHARE Camera Dock II at a dealer of KODAK products or at http://www.kodak.com/go/accessories...
... different from the KODAK EASYSHARE Software CD before connecting the camera or dock to the computer. The Camera Dock is also a rapid battery charger for the included KODAK EASYSHARE Ni-MH Rechargeable Battery Pack, and supplies power to the camera. (Only the Battery Pack can purchase the KODAK EASYSHARE Camera Dock II at a dealer of KODAK products or at http://www.kodak.com/go/accessories...

User's Guide
Page 75
...the 7V AC adapter into a power outlet. See your computer User's Guide for charging the Battery Pack. You need: m The USB cable included with your camera m The AC power adapter, 7V included with the Camera Dock. Use the plug that accommodates DC IN 3V your type of power outlet. IMPORTANT:...Your AC adapter may be different from the one pictured or may cause damage to your camera, Camera Dock, or computer. 63 Chapter 9 Connecting the Camera Dock After the KODAK EASYSHARE Software is NOT in the Camera Dock when you are connecting to power and the computer. 1 Plug the labeled end of...
...the 7V AC adapter into a power outlet. See your computer User's Guide for charging the Battery Pack. You need: m The USB cable included with your camera m The AC power adapter, 7V included with the Camera Dock. Use the plug that accommodates DC IN 3V your type of power outlet. IMPORTANT:...Your AC adapter may be different from the one pictured or may cause damage to your camera, Camera Dock, or computer. 63 Chapter 9 Connecting the Camera Dock After the KODAK EASYSHARE Software is NOT in the Camera Dock when you are connecting to power and the computer. 1 Plug the labeled end of...

User's Guide
Page 77
NOTE: If a KODAK EASYSHARE Ni-MH Rechargeable Battery Pack is installed in the Camera Dock and push down to charge the Battery Pack: 1 Turn off the camera. 2 On the camera bottom, slide the connector cover open. The camera is properly seated. Chapter 9 Docking the Camera To transfer pictures and videos from the camera to the computer, or to seat the connector...
NOTE: If a KODAK EASYSHARE Ni-MH Rechargeable Battery Pack is installed in the Camera Dock and push down to charge the Battery Pack: 1 Turn off the camera. 2 On the camera bottom, slide the connector cover open. The camera is properly seated. Chapter 9 Docking the Camera To transfer pictures and videos from the camera to the computer, or to seat the connector...

User's Guide
Page 78
... charging takes place. m Charging stops if you place the camera in the Camera Dock with the power on Dock II battery low battery partially charged battery fully charged m Full charging takes about 2.5 hours. m Charging begins immediately. NOTE: The Camera Dock only charges the provided KODAK EASYSHARE Ni-MH Rechargeable Battery Pack. m The three green charging lights monitor the charging...
... charging takes place. m Charging stops if you place the camera in the Camera Dock with the power on Dock II battery low battery partially charged battery fully charged m Full charging takes about 2.5 hours. m Charging begins immediately. NOTE: The Camera Dock only charges the provided KODAK EASYSHARE Ni-MH Rechargeable Battery Pack. m The three green charging lights monitor the charging...

User's Guide
Page 79
...9 Transferring Pictures and Videos To transfer pictures and videos from the Camera Dock and connect the tripod directly to the camera. 67 Remove the camera from your computer: 1 Place the camera in the Camera Dock. The Power/Transfer light blinks green while the pictures are ...tripod to your camera to the Camera Dock. The camera can be on printing and emailing, see the Quick Start Guide or the KODAK EASYSHARE Software Help. NOTE: After transferring pictures and videos, leave the camera in the Camera Dock. If the Battery Pack is complete, the Camera Dock resumes charging...
...9 Transferring Pictures and Videos To transfer pictures and videos from the Camera Dock and connect the tripod directly to the camera. 67 Remove the camera from your computer: 1 Place the camera in the Camera Dock. The Power/Transfer light blinks green while the pictures are ...tripod to your camera to the Camera Dock. The camera can be on printing and emailing, see the Quick Start Guide or the KODAK EASYSHARE Software Help. NOTE: After transferring pictures and videos, leave the camera in the Camera Dock. If the Battery Pack is complete, the Camera Dock resumes charging...

User's Guide
Page 80
... If you have the KODAK EASYSHARE Camera Dock, not the Camera Dock II, the functionality is charging. IMPORTANT: When using the earlier Camera Dock, several discharge/recharge cycles may be necessary so that the earlier Camera Dock has one indicator light. Steady red-Battery Pack is exactly the same as described in the Camera Dock. pictures and videos...
... If you have the KODAK EASYSHARE Camera Dock, not the Camera Dock II, the functionality is charging. IMPORTANT: When using the earlier Camera Dock, several discharge/recharge cycles may be necessary so that the earlier Camera Dock has one indicator light. Steady red-Battery Pack is exactly the same as described in the Camera Dock. pictures and videos...

User's Guide
Page 81
... to Troubleshooting information, see http://www.kodak.com/go/dx4330support. Battery is not properly Remove and reinstall the turn on the KODAK EASYSHARE Software CD. Remove the lens cap. taking decrease after decrease the number. Replace (page 5) or recharge the batteries (page 66). Troubleshooting-Camera Camera Problems Camera Problem Cause Solution Camera does not Battery is not charged. Continue taking...
... to Troubleshooting information, see http://www.kodak.com/go/dx4330support. Battery is not properly Remove and reinstall the turn on the KODAK EASYSHARE Software CD. Remove the lens cap. taking decrease after decrease the number. Replace (page 5) or recharge the batteries (page 66). Troubleshooting-Camera Camera Problems Camera Problem Cause Solution Camera does not Battery is not charged. Continue taking...

User's Guide
Page 86
... off . The Add New Hardware Wizard cannot locate drivers. Install KODAK EASYSHARE Software (page 55). 74 Software is not installed on the camera (page 7). Cannot transfer pictures to disable this feature. Battery is not securely Connect cable to save battery life. Replace (page 5) or recharge the batteries (page 66). Install the software (page 55). cannot communicate...
... off . The Add New Hardware Wizard cannot locate drivers. Install KODAK EASYSHARE Software (page 55). 74 Software is not installed on the camera (page 7). Cannot transfer pictures to disable this feature. Battery is not securely Connect cable to save battery life. Replace (page 5) or recharge the batteries (page 66). Install the software (page 55). cannot communicate...

User's Guide
Page 94
... (page 65). One green light Battery is properly seated in camera is turned on. Battery in The camera and Camera the Camera Dock. Camera is not a KODAK EASYSHARE Ni-MH Rechargeable Battery Pack. Camera Dock Charging Lights Light Status Cause No lights Charging has not started. Comment The camera is charging. 82 The camera is not seated in Camera Dock. transferred to begin charging...
... (page 65). One green light Battery is properly seated in camera is turned on. Battery in The camera and Camera the Camera Dock. Camera is not a KODAK EASYSHARE Ni-MH Rechargeable Battery Pack. Camera Dock Charging Lights Light Status Cause No lights Charging has not started. Comment The camera is charging. 82 The camera is not seated in Camera Dock. transferred to begin charging...

User's Guide
Page 101
... 12 12 Appendix Camera Specifications KODAK EASYSHARE DX4330 Zoom Digital Camera Color 24-bit, millions of colors Communication USB with computer Via USB cable or camera dock Dimensions Width Depth Height 4.3 in. (110.5 mm) 1.5 in. (39.0 mm) 2.6 in. (66.0 mm) Weight 7.4 oz (210 g) with battery and card Exposure...Range Wide: 2.0 to 11.2 ft (0.6 to 3.4 m) Tele: 2.0 to 6.6 ft (0.6 to 2.0 m) Charging Time < 7 seconds with charged battery ISO Automatic (120 to 200) LCD Transmissive reflective with anti-glare coating 1.8 in. (45.7 mm), color, 72,000 pixels Preview rate: 26 fps 89
... 12 12 Appendix Camera Specifications KODAK EASYSHARE DX4330 Zoom Digital Camera Color 24-bit, millions of colors Communication USB with computer Via USB cable or camera dock Dimensions Width Depth Height 4.3 in. (110.5 mm) 1.5 in. (39.0 mm) 2.6 in. (66.0 mm) Weight 7.4 oz (210 g) with battery and card Exposure...Range Wide: 2.0 to 11.2 ft (0.6 to 3.4 m) Tele: 2.0 to 6.6 ft (0.6 to 2.0 m) Charging Time < 7 seconds with charged battery ISO Automatic (120 to 200) LCD Transmissive reflective with anti-glare coating 1.8 in. (45.7 mm), color, 72,000 pixels Preview rate: 26 fps 89

User's Guide
Page 102
...pixels Better: 1800 x 1200 (2.16 M) pixels Good: 1080 x 720 (778 K) pixels Video resolution 309 x 206 pixels, 15 fps Power Battery (1) CRV3 (included) (2) AA lithium (optional) (2) AA NiMH rechargeable (optional) AC adapter 3V DC (optional) Self Timer 10 seconds Tripod...in . (7 to 40° C) File format Still JPEG/EXIF v2.2 Video QUICKTIME movie Picture storage 16 MB internal; Chapter 12 KODAK EASYSHARE DX4330 Zoom Digital Camera Lens Type Optical quality glass, 6 groups/7 elements (2 aspherical lenses) Maximum Aperture f/2.8 - f/5.1 Focal Length 38 - 114 mm ...
...pixels Better: 1800 x 1200 (2.16 M) pixels Good: 1080 x 720 (778 K) pixels Video resolution 309 x 206 pixels, 15 fps Power Battery (1) CRV3 (included) (2) AA lithium (optional) (2) AA NiMH rechargeable (optional) AC adapter 3V DC (optional) Self Timer 10 seconds Tripod...in . (7 to 40° C) File format Still JPEG/EXIF v2.2 Video QUICKTIME movie Picture storage 16 MB internal; Chapter 12 KODAK EASYSHARE DX4330 Zoom Digital Camera Lens Type Optical quality glass, 6 groups/7 elements (2 aspherical lenses) Maximum Aperture f/2.8 - f/5.1 Focal Length 38 - 114 mm ...


