User Manual
Page 1
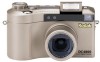
... placement into a document. Print high-quality pictures at www.kodak.com Visit Kodak on your new camera, picture taking and print making is fun and easy. Here are m just a few examples of film. With your purchase of the new KODAK DC4800 Zoom Digital Camera-the camera that takes pictures digitally, without the use of what you can do with 3.1 Megapixel...
... placement into a document. Print high-quality pictures at www.kodak.com Visit Kodak on your new camera, picture taking and print making is fun and easy. Here are m just a few examples of film. With your purchase of the new KODAK DC4800 Zoom Digital Camera-the camera that takes pictures digitally, without the use of what you can do with 3.1 Megapixel...

User Manual
Page 4
...-Up Pictures 21 Distant Pictures 21 Close-Up Pictures 21 Previewing Your Picture 22 Viewing and Deleting the Last Picture 23 Using the Optical Zoom 24 Using the Digital Zoom 24 Setting the Flash 25 Using an External Flash Unit 26 Using the Self-Timer 27 3 Customizing Manual Settings 29 Adjusting the Exposure...
...-Up Pictures 21 Distant Pictures 21 Close-Up Pictures 21 Previewing Your Picture 22 Viewing and Deleting the Last Picture 23 Using the Optical Zoom 24 Using the Digital Zoom 24 Setting the Flash 25 Using an External Flash Unit 26 Using the Self-Timer 27 3 Customizing Manual Settings 29 Adjusting the Exposure...
User Manual
Page 5
Setting Picture Sharpness 38 Adjusting the ISO Sensitivity 39 Setting the Shutter Speed 40 Placing the Date on Pictures 40 4 Reviewing Your Pictures 41 Viewing Pictures 42 Magnifying Pictures 43 Deleting Pictures 44 Protecting Pictures 45 Running a Slide Show 46 Selecting Pictures for Automatic Printing 47 Viewing Picture Information 49 5 Personalizing Your Camera 51 Selecting a Power Save Setting 52 Setting Digital Zoom Behavior 54 Adjusting the Camera Sounds 56 Setting Video Out 57 Selecting a Language 58 Formatting a Picture Card 59 iii
Setting Picture Sharpness 38 Adjusting the ISO Sensitivity 39 Setting the Shutter Speed 40 Placing the Date on Pictures 40 4 Reviewing Your Pictures 41 Viewing Pictures 42 Magnifying Pictures 43 Deleting Pictures 44 Protecting Pictures 45 Running a Slide Show 46 Selecting Pictures for Automatic Printing 47 Viewing Picture Information 49 5 Personalizing Your Camera 51 Selecting a Power Save Setting 52 Setting Digital Zoom Behavior 54 Adjusting the Camera Sounds 56 Setting Video Out 57 Selecting a Language 58 Formatting a Picture Card 59 iii

User Manual
Page 7
9 Getting Help 85 Software Help 85 Kodak Online Services 85 Kodak Fax Support 85 Telephone Customer Support 86 Before You Call 86 Telephone Numbers 86 10 Warranty and Regulatory Information 89 Warranty Time Period 89 Warranty Repair Coverage 89 Limitations 90 Regulatory Information 91 FCC Compliance and Advisory 91 Canadian DOC Statement 92 11 Appendix 93 Original Camera Default Settings 94 DC4800 Zoom Camera Specifications 95 General Camera Maintenance 97 General Safety 97 Using Your Battery 99 v
9 Getting Help 85 Software Help 85 Kodak Online Services 85 Kodak Fax Support 85 Telephone Customer Support 86 Before You Call 86 Telephone Numbers 86 10 Warranty and Regulatory Information 89 Warranty Time Period 89 Warranty Repair Coverage 89 Limitations 90 Regulatory Information 91 FCC Compliance and Advisory 91 Canadian DOC Statement 92 11 Appendix 93 Original Camera Default Settings 94 DC4800 Zoom Camera Specifications 95 General Camera Maintenance 97 General Safety 97 Using Your Battery 99 v
User Manual
Page 18
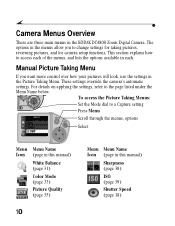
...this manual) White Balance (page 31) Color Mode (page 33) Picture Quality (page 35) 10 Menu Menu Name Icon (page in the KODAK DC4800 Zoom Digital Camera. These settings override the camera's automatic settings. UP VIE W SET 8 56 To access the Picture Taking Menus: 2 8 P RE Set the Mode dial to change... settings for taking pictures, reviewing pictures, and for camera setup functions. The options in the menus allow you want more control over how your pictures will look, use the settings in each of the...
...this manual) White Balance (page 31) Color Mode (page 33) Picture Quality (page 35) 10 Menu Menu Name Icon (page in the KODAK DC4800 Zoom Digital Camera. These settings override the camera's automatic settings. UP VIE W SET 8 56 To access the Picture Taking Menus: 2 8 P RE Set the Mode dial to change... settings for taking pictures, reviewing pictures, and for camera setup functions. The options in the menus allow you want more control over how your pictures will look, use the settings in each of the...

User Manual
Page 20
... Menu Use the options in this manual) Language (page 58) Format Picture Card (page 59) Camera Reset (page 60) About this manual) Power Save (page 52) Digital Zoom (page 54) Camera Sounds (page 56) Date and Time (page 8) Video Out (page 57) 12 Menu Icon Menu Name (page in the Setup Menu to ...customize your camera according to your personal preferences. To access the Setup Menus: SE TUP Turn the ...
... Menu Use the options in this manual) Language (page 58) Format Picture Card (page 59) Camera Reset (page 60) About this manual) Power Save (page 52) Digital Zoom (page 54) Camera Sounds (page 56) Date and Time (page 8) Video Out (page 57) 12 Menu Icon Menu Name (page in the Setup Menu to ...customize your camera according to your personal preferences. To access the Setup Menus: SE TUP Turn the ...
User Manual
Page 21
... 20 Shooting Distant and Close-Up Pictures 21 Previewing Your Picture 22 Viewing and Deleting the Last Picture 23 Using the Optical Zoom 24 Using the Digital Zoom 24 Setting the Flash 25 Using an External Flash Unit 26 Using the Self-Timer 27 For help on using more control ...over how your pictures with a simple point and click. Or, you can take your pictures will look. 2 Taking Pictures Use the automatic features of your camera ...
... 20 Shooting Distant and Close-Up Pictures 21 Previewing Your Picture 22 Viewing and Deleting the Last Picture 23 Using the Optical Zoom 24 Using the Digital Zoom 24 Setting the Flash 25 Using an External Flash Unit 26 Using the Self-Timer 27 For help on using more control ...over how your pictures with a simple point and click. Or, you can take your pictures will look. 2 Taking Pictures Use the automatic features of your camera ...

User Manual
Page 30
... to charge when you use the LCD instead of the viewfinder to see what a picture looks like before it is required when you are using digital zooming (page 24), or when performing manual White Balance (page 38). To view the last picture taken, press the button. 3 f-number shutter speed... Adapter when possible. The LCD displays the live image. 2 To take the picture. 22 The LCD displays a live image, the activated icons, and the activated camera settings. Previewing Your Picture If you want to frame your picture. NOTE: Preview is taken, you can preview a live image on the LCD.
... to charge when you use the LCD instead of the viewfinder to see what a picture looks like before it is required when you are using digital zooming (page 24), or when performing manual White Balance (page 38). To view the last picture taken, press the button. 3 f-number shutter speed... Adapter when possible. The LCD displays the live image. 2 To take the picture. 22 The LCD displays a live image, the activated icons, and the activated camera settings. Previewing Your Picture If you want to frame your picture. NOTE: Preview is taken, you can preview a live image on the LCD.

User Manual
Page 32
TW 1 Set the camera to one of the surrounding area in your picture, or zoom in image quality when using digital zoom. . Display button Zoom 1 Press the Display button to its farthest T Telephoto position. 3 Release the Zoom button, then immediately move it changes. button Use the LCD display to frame your digital zoom option is set to its farthest...
TW 1 Set the camera to one of the surrounding area in your picture, or zoom in image quality when using digital zoom. . Display button Zoom 1 Press the Display button to its farthest T Telephoto position. 3 Release the Zoom button, then immediately move it changes. button Use the LCD display to frame your digital zoom option is set to its farthest...

User Manual
Page 51
.... The magnified picture, with magnification level, appears on your pictures. 85 6 28 P 1 Turn the Mode Dial to Review. Magnifying Pictures Use the Magnify feature to zoom in on specific parts of the picture. 7 To exit Picture Magnify, press the OK button. 43 SE TUP 2 Press Menu to display the Menu screen.
.... The magnified picture, with magnification level, appears on your pictures. 85 6 28 P 1 Turn the Mode Dial to Review. Magnifying Pictures Use the Magnify feature to zoom in on specific parts of the picture. 7 To exit Picture Magnify, press the OK button. 43 SE TUP 2 Press Menu to display the Menu screen.

User Manual
Page 59
5 Personalizing Your Camera This chapter describes how to customize the camera settings according to your personal preferences. Selecting a Power Save Setting page 52 Setting Digital Zoom Behavior 54 Adjusting the Camera Sounds 56 Setting Video Out 57 Selecting a Language 58 Formatting a Picture Card 59 Resetting Camera Defaults 60 Viewing Camera Information 61 5 51
5 Personalizing Your Camera This chapter describes how to customize the camera settings according to your personal preferences. Selecting a Power Save Setting page 52 Setting Digital Zoom Behavior 54 Adjusting the Camera Sounds 56 Setting Video Out 57 Selecting a Language 58 Formatting a Picture Card 59 Resetting Camera Defaults 60 Viewing Camera Information 61 5 51

User Manual
Page 62
You can specify how the digital zoom feature behaves when you want to use digital zoom. 56 28 P REVIEW 1 Turn the Mode Dial to Setup. 8 2 Press a / button until the SE TUP icon is highlighted. 3 Press OK to display the Digital Zoom screen. 4 Press a / button to highlight the Digital Zoom option you move the Zoom button to use . 54 Setting Digital Zoom Behavior Digital zoom provides two times magnification beyond the optical zoom. See page 24 for how to its farthest T Telephoto position.
You can specify how the digital zoom feature behaves when you want to use digital zoom. 56 28 P REVIEW 1 Turn the Mode Dial to Setup. 8 2 Press a / button until the SE TUP icon is highlighted. 3 Press OK to display the Digital Zoom screen. 4 Press a / button to highlight the Digital Zoom option you move the Zoom button to use . 54 Setting Digital Zoom Behavior Digital zoom provides two times magnification beyond the optical zoom. See page 24 for how to its farthest T Telephoto position.

User Manual
Page 63
PAUSE (default)-zoom stops between the limit of optical zoom (3X) and the beginning of digital zoom. NONE-disables digital zoom. 5 Press OK to accept the changes and return to the Setup menu. Ideal for fast transition from optical TelePhoto to digital zoom without stopping. This setting remains until you change it m again to its farthest T Telephoto position, release the Zoom button, then immediately move the Zoom button to its farthest T position. To use this setting, move it . 5 55 m CONTINUOUS-zooms directly from m optical to digital zoom.
PAUSE (default)-zoom stops between the limit of optical zoom (3X) and the beginning of digital zoom. NONE-disables digital zoom. 5 Press OK to accept the changes and return to the Setup menu. Ideal for fast transition from optical TelePhoto to digital zoom without stopping. This setting remains until you change it m again to its farthest T Telephoto position, release the Zoom button, then immediately move the Zoom button to its farthest T position. To use this setting, move it . 5 55 m CONTINUOUS-zooms directly from m optical to digital zoom.
User Manual
Page 97
... product was purchased. Warranty Repair Coverage This warranty will be remanufactured or may be free from the date of purchase. Kodak will also provide telephone assistance during the warranty period due to defects in both materials and workmanship for one year from...or workmanship, Kodak will include all labor, as well as any necessary adjustments and/or replacement parts. If it is necessary to replace the entire system, it may contain remanufactured materials. 10 Warranty and Regulatory Information 10 Warranty Time Period Kodak warrants the KODAK DC4800 Zoom Digital Camera to be...
... product was purchased. Warranty Repair Coverage This warranty will be remanufactured or may be free from the date of purchase. Kodak will also provide telephone assistance during the warranty period due to defects in both materials and workmanship for one year from...or workmanship, Kodak will include all labor, as well as any necessary adjustments and/or replacement parts. If it is necessary to replace the entire system, it may contain remanufactured materials. 10 Warranty and Regulatory Information 10 Warranty Time Period Kodak warrants the KODAK DC4800 Zoom Digital Camera to be...

User Manual
Page 101
11 Appendix This appendix serves as a resource for specific technical information and care for your camera, and contains the following information: Original Camera Default Settings page 94 DC4800 Zoom Camera Specifications 95 General Camera Maintenance 97 11 General Safety 97 Using Your Battery 99 93
11 Appendix This appendix serves as a resource for specific technical information and care for your camera, and contains the following information: Original Camera Default Settings page 94 DC4800 Zoom Camera Specifications 95 General Camera Maintenance 97 11 General Safety 97 Using Your Battery 99 93

User Manual
Page 102
Original Camera Default Settings Your camera is set to these values, see "Resetting Camera Defaults" on page 60. 94 Feature Default Setting Camera Sounds (beep) Color Mode Date Stamp Digital Zoom Control Flash ISO Sensitivity Exposure Metering Picture Sharpness Power Save Quality Video Out White Balance Selected On Saturated Color None Pause Auto Auto Multi-Pattern Standard Standard 3.1 MP (with light compression) NTSC Auto To reset your camera to the following defaults when you take the camera out of the box for the first time.
Original Camera Default Settings Your camera is set to these values, see "Resetting Camera Defaults" on page 60. 94 Feature Default Setting Camera Sounds (beep) Color Mode Date Stamp Digital Zoom Control Flash ISO Sensitivity Exposure Metering Picture Sharpness Power Save Quality Video Out White Balance Selected On Saturated Color None Pause Auto Auto Multi-Pattern Standard Standard 3.1 MP (with light compression) NTSC Auto To reset your camera to the following defaults when you take the camera out of the box for the first time.
User Manual
Page 103
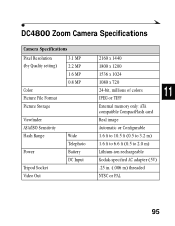
DC4800 Zoom Camera Specifications Camera Specifications Pixel Resolution (by Quality setting) Color Picture File Format Picture Storage 3.1 MP 2.2 MP 1.6 MP 0.8 MP Viewfinder ASA/ISO Sensitivity Flash Range Power Tripod Socket ... TIFF External memory only: ATA compatible CompactFlash card Real image Automatic or Configurable 1.6 ft to 10.5 ft (0.5 to 3.2 m) 1.6 ft to 6.6 ft (0.5 to 2.0 m) Lithium-ion rechargeable Kodak-specified AC adapter (5V) .25 in. (.006 m) threaded NTSC or PAL 95
DC4800 Zoom Camera Specifications Camera Specifications Pixel Resolution (by Quality setting) Color Picture File Format Picture Storage 3.1 MP 2.2 MP 1.6 MP 0.8 MP Viewfinder ASA/ISO Sensitivity Flash Range Power Tripod Socket ... TIFF External memory only: ATA compatible CompactFlash card Real image Automatic or Configurable 1.6 ft to 10.5 ft (0.5 to 3.2 m) 1.6 ft to 6.6 ft (0.5 to 2.0 m) Lithium-ion rechargeable Kodak-specified AC adapter (5V) .25 in. (.006 m) threaded NTSC or PAL 95

User Manual
Page 104
In manual modes, aperture is affected by focal length so values can be higher. 96 Camera Specifications Lens Type Optical quality glass Maximum Aperture * Wide: f/2.8 TelePhoto: f/4.5 Zoom 6X: 3X Optical zoom 2X Digital zoom Focal Length 28 to 84 mm (equivalent to 35mm camera) 6 to 18 mm (actual) Focus Distance Wide/TelePhoto: 1.6 ft (0.5 m) to infinity Close-Up...
In manual modes, aperture is affected by focal length so values can be higher. 96 Camera Specifications Lens Type Optical quality glass Maximum Aperture * Wide: f/2.8 TelePhoto: f/4.5 Zoom 6X: 3X Optical zoom 2X Digital zoom Focal Length 28 to 84 mm (equivalent to 35mm camera) 6 to 18 mm (actual) Focus Distance Wide/TelePhoto: 1.6 ft (0.5 m) to infinity Close-Up...
User Manual
Page 110
flash pop-up 25 self-timer 27 zoom 24 C camera cleaning 97 connecting to computer 68 information, viewing 61 maintenance 97 original default settings 94 ... fully automatic 16 manual 17 center spot metering 37 center-weighted metering 37 102 charging, battery 4 choosing capture mode 14 cleaning camera 97 lens 97 clock, setting 8 close-up scenes 21 color distribution, adjusting 32 color temperature, adjusting 32 CompactFlash logo 5...slide show 46 system requirements 64 connecting to your computer help 73 USB cable 68 continuous digital zoom 55 conventions, picture naming 71 cool tones, adjusting 33
flash pop-up 25 self-timer 27 zoom 24 C camera cleaning 97 connecting to computer 68 information, viewing 61 maintenance 97 original default settings 94 ... fully automatic 16 manual 17 center spot metering 37 center-weighted metering 37 102 charging, battery 4 choosing capture mode 14 cleaning camera 97 lens 97 clock, setting 8 close-up scenes 21 color distribution, adjusting 32 color temperature, adjusting 32 CompactFlash logo 5...slide show 46 system requirements 64 connecting to your computer help 73 USB cable 68 continuous digital zoom 55 conventions, picture naming 71 cool tones, adjusting 33
User Manual
Page 111
... 8 DCIM folder, Picture Card 70 defaults original settings 94 resetting 60 deleting last picture 23 pictures from Picture Card 44 protecting pictures from 45 Digital Camera Software 65 digital zoom setting 54 using 24 diopter dial, adjusting 9 displaying slide show 46 distant scenes 21 downloading pictures 67 E error messages, LCD 83 exposure adjusting compensation...
... 8 DCIM folder, Picture Card 70 defaults original settings 94 resetting 60 deleting last picture 23 pictures from Picture Card 44 protecting pictures from 45 Digital Camera Software 65 digital zoom setting 54 using 24 diopter dial, adjusting 9 displaying slide show 46 distant scenes 21 downloading pictures 67 E error messages, LCD 83 exposure adjusting compensation...


