
User Manual
Page 5
...Camera Default Settings 75 Setting a Border Default 75 Setting a Flash Default 77 Setting a White Balance Default 78 Setting an Exposure Compensation Default 80 Setting an Effect Default 82 Setting an Auto ISO Default 84 Windows-Based System Requirements 88 Macintosh System Requirements 88 KODAK... Software for Windows-Based Computers 89 Software Overview 90 KODAK Software for Macintosh Computers 91 Software Overview 92 Installing the Software 93 Using a Serial Cable Connection 96 Connecting to a Windows-Based ...
...Camera Default Settings 75 Setting a Border Default 75 Setting a Flash Default 77 Setting a White Balance Default 78 Setting an Exposure Compensation Default 80 Setting an Effect Default 82 Setting an Auto ISO Default 84 Windows-Based System Requirements 88 Macintosh System Requirements 88 KODAK... Software for Windows-Based Computers 89 Software Overview 90 KODAK Software for Macintosh Computers 91 Software Overview 92 Installing the Software 93 Using a Serial Cable Connection 96 Connecting to a Windows-Based ...

User Manual
Page 67
... using a Kodak-specified AC adapter, the slide show ends after all the pictures have been shown; MENU 2 Slide the POWER switch to the right to turn on the CAMERA SETUP LCD. 59 Running a Slide Show on Your Television View your pictures on the camera LCD, or connect your camera to a television 4 using a video cable and...
... using a Kodak-specified AC adapter, the slide show ends after all the pictures have been shown; MENU 2 Slide the POWER switch to the right to turn on the CAMERA SETUP LCD. 59 Running a Slide Show on Your Television View your pictures on the camera LCD, or connect your camera to a television 4 using a video cable and...

User Manual
Page 68
..., press the DO-IT to start and stop the slide show. 7 Insert the video cable into the video-out port on the side of your camera, and connect the other end of seconds you want the pictures to NTSC or PAL television signals.... See page 73 for details. 9 Press the DO-IT button to the video-in port on the television. 8 Turn on the television. DC ... Slide Show Interval screen appears. 6 Use the / buttons to select the number of the video cable to start and stop the slide show.
..., press the DO-IT to start and stop the slide show. 7 Insert the video cable into the video-out port on the side of your camera, and connect the other end of seconds you want the pictures to NTSC or PAL television signals.... See page 73 for details. 9 Press the DO-IT button to the video-in port on the television. 8 Turn on the television. DC ... Slide Show Interval screen appears. 6 Use the / buttons to select the number of the video cable to start and stop the slide show.
User Manual
Page 103
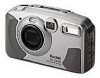
... available accessories, ask a dealer of the following: RS-232 serial cable connection for Windows-based computers. Serial cable or adapter plug for Macintosh computers. Universal Serial Bus (USB) cable connection for information on each software application supplied with your KODAK DC3400 Digital Camera, you can communicate with your computer. If you do not have...
... available accessories, ask a dealer of the following: RS-232 serial cable connection for Windows-based computers. Serial cable or adapter plug for Macintosh computers. Universal Serial Bus (USB) cable connection for information on each software application supplied with your KODAK DC3400 Digital Camera, you can communicate with your computer. If you do not have...

User Manual
Page 104
When connecting the camera, it is by serial cable. Using a Serial Cable Connection The traditional means of the serial CAPTURE REVIEW CONNECT CAMERA SETUP cable into an available 9-pin serial port on the computer. 96 MENU 2 Plug the appropriate end of connecting the camera to your camera to a Windows-based computer. 1 Set the Mode dial to conserve battery power. Connecting to a Windows-Based Computer An RS-232 serial cable is provided so you can connect your computer is a good idea to use a KODAK-specified AC adapter (see page 5) to Connect.
When connecting the camera, it is by serial cable. Using a Serial Cable Connection The traditional means of the serial CAPTURE REVIEW CONNECT CAMERA SETUP cable into an available 9-pin serial port on the computer. 96 MENU 2 Plug the appropriate end of connecting the camera to your camera to a Windows-based computer. 1 Set the Mode dial to conserve battery power. Connecting to a Windows-Based Computer An RS-232 serial cable is provided so you can connect your computer is a good idea to use a KODAK-specified AC adapter (see page 5) to Connect.

User Manual
Page 105
... the external ports. 3 Open the serial/USB port door on the side of the camera. 4 Plug the other end of the serial cable into the camera serial port. 5 Slide the POWER switch to the right to turn on the camera. If your computer has a 25-pin port, you are usually labeled COM1 and COM2... for troubleshooting information. 97 If the ports are not labeled, see your local computer store) and attach it to the port before attaching the serial cable to the computer.
... the external ports. 3 Open the serial/USB port door on the side of the camera. 4 Plug the other end of the serial cable into the camera serial port. 5 Slide the POWER switch to the right to turn on the camera. If your computer has a 25-pin port, you are usually labeled COM1 and COM2... for troubleshooting information. 97 If the ports are not labeled, see your local computer store) and attach it to the port before attaching the serial cable to the computer.

User Manual
Page 106
CAPTURE REVIEW CONNECT 3 Plug the adapter end of the serial cable CAMERA SETUP into the 9-pin end of the computer. 98 Connecting to Connect. MENU 2 Connect the serial port adapter plug into an available serial port on a Macintosh computer. 1 Set the Mode dial to a Macintosh Computer Either a serial cable for a Macintosh computer or adapter plug for use with the RS-232 serial cable is provided so that you can connect your camera through a serial port on the back of the serial cable.
CAPTURE REVIEW CONNECT 3 Plug the adapter end of the serial cable CAMERA SETUP into the 9-pin end of the computer. 98 Connecting to Connect. MENU 2 Connect the serial port adapter plug into an available serial port on a Macintosh computer. 1 Set the Mode dial to a Macintosh Computer Either a serial cable for a Macintosh computer or adapter plug for use with the RS-232 serial cable is provided so that you can connect your camera through a serial port on the back of the serial cable.

User Manual
Page 107
... computer stating that illustrates all of the external ports. 4 Open the serial/USB port door on the side of the camera. 5 Plug the other end of the serial cable into the available serial port on Macintosh computers are usually referred to the Connect.PDF document installed with the software, or..., refer to as modem or printer ports. Serial ports on the back of the serial 7 cable labelled MAC into the camera serial port. 6 Slide the POWER switch to the right to turn on the camera. If your computer User's Guide for troubleshooting information. 99 If the ports are not labeled, ...
... computer stating that illustrates all of the external ports. 4 Open the serial/USB port door on the side of the camera. 5 Plug the other end of the serial cable into the available serial port on Macintosh computers are usually referred to the Connect.PDF document installed with the software, or..., refer to as modem or printer ports. Serial ports on the back of the serial 7 cable labelled MAC into the camera serial port. 6 Slide the POWER switch to the right to turn on the camera. If your computer User's Guide for troubleshooting information. 99 If the ports are not labeled, ...

User Manual
Page 108
... recommends and supports using a USB connection. MENU 2 Plug the appropriate end of the USB cable into the port on page 88. CAMERA SETUP If the port is a good idea to use a KODAK-specified AC adapter (see your computer stating that illustrates all of the external ports. 3 Open the serial/USB ...port door on the side of the camera. 4 Plug the other end of the USB cable CAPTURE REVIEW CONNECT into the camera serial/USB port. 5 Slide the ...
... recommends and supports using a USB connection. MENU 2 Plug the appropriate end of the USB cable into the port on page 88. CAMERA SETUP If the port is a good idea to use a KODAK-specified AC adapter (see your computer stating that illustrates all of the external ports. 3 Open the serial/USB ...port door on the side of the camera. 4 Plug the other end of the USB cable CAPTURE REVIEW CONNECT into the camera serial/USB port. 5 Slide the ...

User Manual
Page 119
...Management utilities on laptops turn off . Camera is not Connect serial or USB connected to serial or cable to save battery life. page 95. The Mode dial is computer port. See the Power Management section of your laptop manual to Connect. Conflict with the camera. See the online help , or ...be set to disable this feature. the incorrect COM Search or to the online help . 111 Connect. Cause Solution 8 Camera power is off ports to camera and USB cable, or cable is not Set the Mode dial to set to settings to the serial serial device, such as communication or a modem ...
...Management utilities on laptops turn off . Camera is not Connect serial or USB connected to serial or cable to save battery life. page 95. The Mode dial is computer port. See the Power Management section of your laptop manual to Connect. Conflict with the camera. See the online help , or ...be set to disable this feature. the incorrect COM Search or to the online help . 111 Connect. Cause Solution 8 Camera power is off ports to camera and USB cable, or cable is not Set the Mode dial to set to settings to the serial serial device, such as communication or a modem ...

User Manual
Page 132
... UNAUTHORIZED SERVICE, MISUSE, ABUSE, USE WITH INCOMPATIBLE ACCESSORIES OR ATTACHMENTS, FAILURE TO FOLLOW KODAK'S OPERATION, MAINTENANCE OR REPACKING INSTRUCTIONS, OR FAILURE TO USE ITEMS SUPPLIED BY KODAK (SUCH AS ADAPTERS AND CABLES), OR CLAIMS MADE AFTER THE DURATION OF THIS WARRANTY. In the event that the ... substitute equipment, facilities or services, or claims of your records.) This warranty doesn't apply to the battery(s) used in the Kodak DC3400 camera User's Guide. Limitations Requests for Warranty service will not be accepted without proof of date of purchase, such as a copy of ...
... UNAUTHORIZED SERVICE, MISUSE, ABUSE, USE WITH INCOMPATIBLE ACCESSORIES OR ATTACHMENTS, FAILURE TO FOLLOW KODAK'S OPERATION, MAINTENANCE OR REPACKING INSTRUCTIONS, OR FAILURE TO USE ITEMS SUPPLIED BY KODAK (SUCH AS ADAPTERS AND CABLES), OR CLAIMS MADE AFTER THE DURATION OF THIS WARRANTY. In the event that the ... substitute equipment, facilities or services, or claims of your records.) This warranty doesn't apply to the battery(s) used in the Kodak DC3400 camera User's Guide. Limitations Requests for Warranty service will not be accepted without proof of date of purchase, such as a copy of ...

User Manual
Page 134
Where shielded interface cables have been provided with the product or specified additional ...the separation between the equipment and the receiver; 3) connect the equipment to an outlet on a circuit different from digital apparatus set out in the radio interference regulations of the Canadian Department of the product, they must be used in...the receiver is no guarantee that to radio communications. Canadian DOC Statement DOC Class B Compliance-This digital apparatus does not exceed the Class B limits for additional suggestions. This equipment generates, uses, and can be ...
Where shielded interface cables have been provided with the product or specified additional ...the separation between the equipment and the receiver; 3) connect the equipment to an outlet on a circuit different from digital apparatus set out in the radio interference regulations of the Canadian Department of the product, they must be used in...the receiver is no guarantee that to radio communications. Canadian DOC Statement DOC Class B Compliance-This digital apparatus does not exceed the Class B limits for additional suggestions. This equipment generates, uses, and can be ...
User Manual
Page 148
... 55 140 capturing a picture 14 card, camera memory formatting 71 inserting and removing 6 logo 7 care, camera 133 center-weighted metering 40 checking batteries 4 clock, setting 8 close-up 22 CompactFlash card formatting 71 inserting and removing 6 logo 6 compliance, FCC 125 connecting help 108 serial cable, Macintosh 98 serial cable, Windows 96 USB, Macintosh 100 USB...
... 55 140 capturing a picture 14 card, camera memory formatting 71 inserting and removing 6 logo 7 care, camera 133 center-weighted metering 40 checking batteries 4 clock, setting 8 close-up 22 CompactFlash card formatting 71 inserting and removing 6 logo 6 compliance, FCC 125 connecting help 108 serial cable, Macintosh 98 serial cable, Windows 96 USB, Macintosh 100 USB...

User Manual
Page 152
... Q quality 34 quickview 18 R red-eye reduction 19 regulatory information 125 repair coverage 121 resolution 36 response beep 64 reviewing pictures 50 RS-232 serial cable 96 S safeguarding pictures 56 safety 133 save power 66 self-timer 23
... Q quality 34 quickview 18 R red-eye reduction 19 regulatory information 125 repair coverage 121 resolution 36 response beep 64 reviewing pictures 50 RS-232 serial cable 96 S safeguarding pictures 56 safety 133 save power 66 self-timer 23
User Manual
Page 153
sepia tone as default 82 pictures 32 serial cable, connecting help 108 Macintosh 98 Windows-based computer 96 service numbers 120 setting border 30 border default 75 clock 8 close-up 22 date stamp 24 digital zoom 15 effect default 82 effects 32 exposure compensation 28 exposure default 80 exposure lock 46 flash ... 15 video out 73 white balance 38 white balance default 78 sharpening pictures 44 shutter button 14 slide show 59 softening pictures 44 software, KODAK installing 93 starting 101 Windows 89 software,KODAK help 119 Macintosh computers 91 sound, response 64 specifications, camera 131 145
sepia tone as default 82 pictures 32 serial cable, connecting help 108 Macintosh 98 Windows-based computer 96 service numbers 120 setting border 30 border default 75 clock 8 close-up 22 date stamp 24 digital zoom 15 effect default 82 effects 32 exposure compensation 28 exposure default 80 exposure lock 46 flash ... 15 video out 73 white balance 38 white balance default 78 sharpening pictures 44 shutter button 14 slide show 59 softening pictures 44 software, KODAK installing 93 starting 101 Windows 89 software,KODAK help 119 Macintosh computers 91 sound, response 64 specifications, camera 131 145


