

User Manual
Page 1
KODAK DC215 Zoom Digital Camera User's Guide Visit Kodak on the World Wide Web at www.kodak.com
KODAK DC215 Zoom Digital Camera User's Guide Visit Kodak on the World Wide Web at www.kodak.com
User Manual
Page 3
Table of Contents 1 Getting Started 1 Preparing to Take Pictures 2 Loading Batteries 2 Turning the Camera On and Off 2 Checking Batteries 3 Inserting a Camera Memory Card 4 Removing a Camera Memory Card 4 Setting the Clock on Your Camera 5 Adjusting the LCD Brightness 6 2 Taking Pictures 7 Previewing a Picture Before it is Taken 8 ...Putting Yourself in the Picture 11 Viewing and Deleting the Picture Just Taken 12 Setting the Flash 13 Adjusting the Camera Exposure 14 Locking in an Exposure Setting 15 Deleting the Picture Just Taken 16 3 Customizing Your Pictures 17 Understanding...
Table of Contents 1 Getting Started 1 Preparing to Take Pictures 2 Loading Batteries 2 Turning the Camera On and Off 2 Checking Batteries 3 Inserting a Camera Memory Card 4 Removing a Camera Memory Card 4 Setting the Clock on Your Camera 5 Adjusting the LCD Brightness 6 2 Taking Pictures 7 Previewing a Picture Before it is Taken 8 ...Putting Yourself in the Picture 11 Viewing and Deleting the Picture Just Taken 12 Setting the Flash 13 Adjusting the Camera Exposure 14 Locking in an Exposure Setting 15 Deleting the Picture Just Taken 16 3 Customizing Your Pictures 17 Understanding...

User Manual
Page 4
... for Windows-Based Computers 44 Opening Mounter Software 44 Opening Digital Access TWAIN Acquire Software 44 Opening Camera Controls Software 44 Starting the Kodak Software for Macintosh Computers 45 Opening Picture Transfer Application 45 Opening Digital Access Plug-In Acquire 45 Copying Digital Access Files to the PlugIn Folder 45 Navigating to Your Pictures 46...
... for Windows-Based Computers 44 Opening Mounter Software 44 Opening Digital Access TWAIN Acquire Software 44 Opening Camera Controls Software 44 Starting the Kodak Software for Macintosh Computers 45 Opening Picture Transfer Application 45 Opening Digital Access Plug-In Acquire 45 Copying Digital Access Files to the PlugIn Folder 45 Navigating to Your Pictures 46...

User Manual
Page 5
7 Tips and Troubleshooting 47 Connecting with Your Camera 47 Communicating with the Computer 47 Adjusting Your Monitor for Better Viewing 47 Getting Better Results from Your Printer 48 Troubleshooting 49 8 Where to Get ... 60 Application Support 61 How to Obtain Service 61 Regulatory Information 62 FCC Compliance and Advisory 62 Canadian DOC Statement 62 10 Appendix 63 Original Camera Default Settings 63 Camera Specifications 64 General Maintenance and Safety 65 Using Your Batteries 66 Create Your Own Templates 68 iii
7 Tips and Troubleshooting 47 Connecting with Your Camera 47 Communicating with the Computer 47 Adjusting Your Monitor for Better Viewing 47 Getting Better Results from Your Printer 48 Troubleshooting 49 8 Where to Get ... 60 Application Support 61 How to Obtain Service 61 Regulatory Information 62 FCC Compliance and Advisory 62 Canadian DOC Statement 62 10 Appendix 63 Original Camera Default Settings 63 Camera Specifications 64 General Maintenance and Safety 65 Using Your Batteries 66 Create Your Own Templates 68 iii
User Manual
Page 7
q E-mail your pictures in minutes to a large audience on your purchase of a new KODAK DC215 Zoom Digital Camera-the camera that takes pictures digitally, without the use of a button. q Display your camera: q Take digital pictures in the world. q Transfer your pictures to a KODAK Picture Maker System and create photo-quality enlargements with your pictures to friends, family, and business associates...
q E-mail your pictures in minutes to a large audience on your purchase of a new KODAK DC215 Zoom Digital Camera-the camera that takes pictures digitally, without the use of a button. q Display your camera: q Take digital pictures in the world. q Transfer your pictures to a KODAK Picture Maker System and create photo-quality enlargements with your pictures to friends, family, and business associates...

User Manual
Page 8
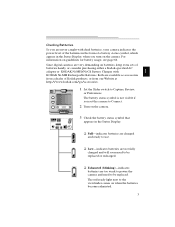
...ready light next to the viewfinder, and the Status Display on top of the camera. E 3 Insert the batteries as an accessory from our Website at http://www.kodak.com/go/accessories Loading Batteries Your camera comes with four AA batteries so you first need to install the batteries or ... out of the camera turn the camera on and off the camera, slide the Power switch again to the right. 2 q To turn on the camera, slide the Power switch to the right. For information on guidelines for power, and insert a KODAK Picture Card (camera memory card) into the camera until it locks ...
...ready light next to the viewfinder, and the Status Display on top of the camera. E 3 Insert the batteries as an accessory from our Website at http://www.kodak.com/go/accessories Loading Batteries Your camera comes with four AA batteries so you first need to install the batteries or ... out of the camera turn the camera on and off the camera, slide the Power switch again to the right. 2 q To turn on the camera, slide the Power switch to the right. For information on guidelines for power, and insert a KODAK Picture Card (camera memory card) into the camera until it locks ...
User Manual
Page 9
... Both are available as accessories from a dealer of batteries handy, or consider purchasing either a Kodak-specified AC adapter or KODAK Ni-MH/Ni-Cd Battery Charger with dead batteries, your camera indicates the power level of the batteries in the form of a battery status symbol, which ...visible if you turn on the camera. q Exhausted (blinking)-indicates batteries are too weak to power the camera and need to be replaced. Since digital cameras are very demanding on batteries, keep extra sets of Kodak products, or from our Website at http://www.kodak.com/go/accessories. POWER Review...
... Both are available as accessories from a dealer of batteries handy, or consider purchasing either a Kodak-specified AC adapter or KODAK Ni-MH/Ni-Cd Battery Charger with dead batteries, your camera indicates the power level of the batteries in the form of a battery status symbol, which ...visible if you turn on the camera. q Exhausted (blinking)-indicates batteries are too weak to power the camera and need to be replaced. Since digital cameras are very demanding on batteries, keep extra sets of Kodak products, or from our Website at http://www.kodak.com/go/accessories. POWER Review...

User Manual
Page 10
... inserted one way into the camera. Removing a Camera Memory Card POWER WT Review Capture Connect Preferences 1 Open the camera memory card door on the camera. Use only certified camera memory cards that is blinking. Inserting a Camera Memory Card Your camera comes with a KODAK Picture Card (camera memory card), that carry the CompactFlash logo. 4 The camera memory card, also referred to...
... inserted one way into the camera. Removing a Camera Memory Card POWER WT Review Capture Connect Preferences 1 Open the camera memory card door on the camera. Use only certified camera memory cards that is blinking. Inserting a Camera Memory Card Your camera comes with a KODAK Picture Card (camera memory card), that carry the CompactFlash logo. 4 The camera memory card, also referred to...

User Manual
Page 11
... an extended period of time, or the batteries become exhausted, you plan to use the Date Stamp feature, which imprints the date on Your Camera Your camera has a built-in clock that maintains the date and time in a 24-hour format. Setting the Clock on your picture. The Date/Time.../01/1997. 4 Use the / / buttons to the Preferences screen. For information on using the Date Stamp feature, see page 22. 1 With the camera on, set if you may need to Preferences. 1 The Preferences screen appears. The camera clock needs to be set the Slider switch POWER to reset the clock. 5
... an extended period of time, or the batteries become exhausted, you plan to use the Date Stamp feature, which imprints the date on Your Camera Your camera has a built-in clock that maintains the date and time in a 24-hour format. Setting the Clock on your picture. The Date/Time.../01/1997. 4 Use the / / buttons to the Preferences screen. For information on using the Date Stamp feature, see page 22. 1 With the camera on, set if you may need to Preferences. 1 The Preferences screen appears. The camera clock needs to be set the Slider switch POWER to reset the clock. 5

User Manual
Page 12
... the icon is too dark, increase (+) the brightness number. The brightness the of the color LCD to suit your particular needs. 1 With the camera on, set the Slider switch POWER to the Preferences screen. 6 Adjusting the LCD Brightness You can adjust the brightness level of LCD changes as you... adjust the setting. q If the LCD is too light, decrease (-) the brightness number. 5 Press the DO-IT button. The camera accepts the setting and returns to Preferences. The LCD Brightness screen appears. 4 Press a / button to change the LCD brightness level. The Preferences screen appears...
... the icon is too dark, increase (+) the brightness number. The brightness the of the color LCD to suit your particular needs. 1 With the camera on, set the Slider switch POWER to the Preferences screen. 6 Adjusting the LCD Brightness You can adjust the brightness level of LCD changes as you... adjust the setting. q If the LCD is too light, decrease (-) the brightness number. 5 Press the DO-IT button. The camera accepts the setting and returns to Preferences. The LCD Brightness screen appears. 4 Press a / button to change the LCD brightness level. The Preferences screen appears...

User Manual
Page 13
... and you can get into the picture. q Lock the exposure for a consistent look in up pictures. With the DC215 camera you are too light or too dark. Just set the camera to give you can : q Preview the picture before it is right at your subject. q Adjust the exposure for... specific conditions. 2 Taking Pictures Your DC215 camera makes taking pictures fun. q Zoom in all your way to two times closer on your pictures. q Delete unwanted pictures right away. 7 q Set...
... and you can get into the picture. q Lock the exposure for a consistent look in up pictures. With the DC215 camera you are too light or too dark. Just set the camera to give you can : q Preview the picture before it is right at your subject. q Adjust the exposure for... specific conditions. 2 Taking Pictures Your DC215 camera makes taking pictures fun. q Zoom in all your way to two times closer on your pictures. q Delete unwanted pictures right away. 7 q Set...

User Manual
Page 14
...q Date Stamp-appears in the LCD if you turned on the back of activated camera features. q Exposure Compensation-icon appears in the LCD if you adjusted the camera exposure. POWER Review Capture Connect Preferences 1 With the camera on, set the Slider switch to see what a picture looks like before you ... if you locked the exposure. These icons also appear in the LCD if you use the Preview feature, batteries are drained faster, so use a Kodak-specified AC adapter when possible. See page 24 for details. See page 21 for details. 3 To turn off Preview, press the DO-IT button...
...q Date Stamp-appears in the LCD if you turned on the back of activated camera features. q Exposure Compensation-icon appears in the LCD if you adjusted the camera exposure. POWER Review Capture Connect Preferences 1 With the camera on, set the Slider switch to see what a picture looks like before you ... if you locked the exposure. These icons also appear in the LCD if you use the Preview feature, batteries are drained faster, so use a Kodak-specified AC adapter when possible. See page 24 for details. See page 21 for details. 3 To turn off Preview, press the DO-IT button...

User Manual
Page 15
...can take a picture as close as you more of the surrounding area in the viewfinder, or turn on , set the Slider switch to frame your DC215 camera. When you look through the viewfinder, the subject appears closer as you press the T Zoom button, and farther away as 1.6 ft (0.5 m) ...in wide angle or 3.3 ft (1.0 m) in telephoto. 1 With the camera on Review Capture Connect Preferences Preview (page 8) and use the LCD to Capture. 2 Press the Zoom control. The Pictures Remaining icon on , set the Slider...
...can take a picture as close as you more of the surrounding area in the viewfinder, or turn on , set the Slider switch to frame your DC215 camera. When you look through the viewfinder, the subject appears closer as you press the T Zoom button, and farther away as 1.6 ft (0.5 m) ...in wide angle or 3.3 ft (1.0 m) in telephoto. 1 With the camera on Review Capture Connect Preferences Preview (page 8) and use the LCD to Capture. 2 Press the Zoom control. The Pictures Remaining icon on , set the Slider...

User Manual
Page 16
... The Close-Up icon appears in Close-Up, the Preview option is automatically activated. For information on Preview, see page 8. 1 With the camera on the camera are disabled. 3 Frame your subject using the LCD and press the Shutter button to take the picture. 4 To turn off Close-Up, ...flowers or artwork, use the Close-Up feature, the zoom capabilities on , set the Slider switch to ensure detail and clarity. When selected, the camera automatically sets the focus distance to 8 in. (0.2 m) and sets the flash to Capture. 2 Press the Close-Up button. Photographing Close-Ups...
... The Close-Up icon appears in Close-Up, the Preview option is automatically activated. For information on Preview, see page 8. 1 With the camera on the camera are disabled. 3 Frame your subject using the LCD and press the Shutter button to take the picture. 4 To turn off Close-Up, ...flowers or artwork, use the Close-Up feature, the zoom capabilities on , set the Slider switch to ensure detail and clarity. When selected, the camera automatically sets the focus distance to 8 in. (0.2 m) and sets the flash to Capture. 2 Press the Close-Up button. Photographing Close-Ups...

User Manual
Page 17
The red Self-Timer light, located on the front of the camera, turns on and stays lit for 8 seconds, then flashes for 2 additional seconds just before the CRapevtuierew CPornenfeercetnces picture is taken, press the Self-Timer button ... times when you press the Shutter button and the time the picture is taken. 1 With the camera on, set the Slider switch to be in the picture. The Self-Timer turns off the camera. 3 Place the camera on a flat, steady surface or tripod. 4 Frame your subject in the 2 T W Status Display. For these occasions...
The red Self-Timer light, located on the front of the camera, turns on and stays lit for 8 seconds, then flashes for 2 additional seconds just before the CRapevtuierew CPornenfeercetnces picture is taken, press the Self-Timer button ... times when you press the Shutter button and the time the picture is taken. 1 With the camera on, set the Slider switch to be in the picture. The Self-Timer turns off the camera. 3 Place the camera on a flat, steady surface or tripod. 4 Frame your subject in the 2 T W Status Display. For these occasions...

User Manual
Page 18
... the DO-IT button. The LCD displays the Delete Picture screen. 5 Press a / button until YES is permanently deleted from the camera memory card. 12 POWER Review Capture Connect Preferences 1 With the camera on, set the Slider switch to Capture. 2 Press the Shutter button to keep it or delete it is a convenient way... the LCD for several seconds with a touch of a button. This is taken with the delete icon above the button. 4 To delete the picture on the camera memory card.
... the DO-IT button. The LCD displays the Delete Picture screen. 5 Press a / button until YES is permanently deleted from the camera memory card. 12 POWER Review Capture Connect Preferences 1 With the camera on, set the Slider switch to Capture. 2 Press the Shutter button to keep it or delete it is a convenient way... the LCD for several seconds with a touch of a button. This is taken with the delete icon above the button. 4 To delete the picture on the camera memory card.

User Manual
Page 19
... time you take a picture. POWER T W 2 Press the Flash button to accommodate most picture-taking pictures where flash is taken. Ideal for taking situations. 1 With the camera on, set the Slider switch to the Auto setting, press the Flash button, or turn off the... camera. 13 Ideal for everyday picturetaking. q Off-flash does not fire. Your camera has five different flash options with a range of 10 ft (3.0 m) to scroll though the flash options. q Fill Red-Eye-combines both Fill and...
... time you take a picture. POWER T W 2 Press the Flash button to accommodate most picture-taking pictures where flash is taken. Ideal for taking situations. 1 With the camera on, set the Slider switch to the Auto setting, press the Flash button, or turn off the... camera. 13 Ideal for everyday picturetaking. q Off-flash does not fire. Your camera has five different flash options with a range of 10 ft (3.0 m) to scroll though the flash options. q Fill Red-Eye-combines both Fill and...

User Manual
Page 20
... screen appears. 3 Press a / button to Capture. 2 Press the button. An increase of 1.0 doubles the amount of light allowed into the camera by half. 4 Press the DO-IT button to accept the exposure change the exposure number. q If your pictures are too light, decrease (-) ...the exposure number. A decrease of 1.0 reduces the amount of light allowed into the camera so your pictures are called Exposure Compensation. 1 With the camera on, set the Slider switch POWER to change . These adjustments in lighting are properly exposed. The Exposure Compensation ...
... screen appears. 3 Press a / button to Capture. 2 Press the button. An increase of 1.0 doubles the amount of light allowed into the camera by half. 4 Press the DO-IT button to accept the exposure change the exposure number. q If your pictures are too light, decrease (-) ...the exposure number. A decrease of 1.0 reduces the amount of light allowed into the camera so your pictures are called Exposure Compensation. 1 With the camera on, set the Slider switch POWER to change . These adjustments in lighting are properly exposed. The Exposure Compensation ...

User Manual
Page 21
... of pictures, like a mountain range, and creating a mural with the prints. POWER Review Capture Connect Preferences POWER Review Capture Connect Preferences 1 With the camera on in the viewfinder. 6 Press the Shutter button to Capture. 2 Press the button two times. The Exposure Lock icon appears in the exposure setting....activated. 7 To cancel Exposure Lock, press a / button until ON is highlighted, then press the DO-IT button, or turn off the camera. 15 Locking in an Exposure Setting If you want to lock the exposure on , set the Slider switch to lock in the LCD if Preview...
... of pictures, like a mountain range, and creating a mural with the prints. POWER Review Capture Connect Preferences POWER Review Capture Connect Preferences 1 With the camera on in the viewfinder. 6 Press the Shutter button to Capture. 2 Press the button two times. The Exposure Lock icon appears in the exposure setting....activated. 7 To cancel Exposure Lock, press a / button until ON is highlighted, then press the DO-IT button, or turn off the camera. 15 Locking in an Exposure Setting If you want to lock the exposure on , set the Slider switch to lock in the LCD if Preview...

User Manual
Page 22
...card. For the Quick Delete feature to be activated. The Delete Picture screen appears. 5 Press a / button until YES is permanently removed from the camera memory card. Deleting the Picture Just Taken If you decide that you do not like a picture, you delete the picture, it is taken. POWER Review... Capture Connect Preferences 1 With the camera on, set the Slider switch to Capture. 2 Turn on the LCD, so Quickview needs to work, the picture must be displayed on Quickview (page 24...
...card. For the Quick Delete feature to be activated. The Delete Picture screen appears. 5 Press a / button until YES is permanently removed from the camera memory card. Deleting the Picture Just Taken If you decide that you do not like a picture, you delete the picture, it is taken. POWER Review... Capture Connect Preferences 1 With the camera on, set the Slider switch to Capture. 2 Turn on the LCD, so Quickview needs to work, the picture must be displayed on Quickview (page 24...


