

User Manual
Page 6
Table of contents Changing frame settings 29 Settings menus 29 Upgrading your firmware (recommended 32 Maintaining your frame 33 Learning more about your frame 33 5 Troubleshooting and support 34 Picture frame problems 34 Screen messages 37 6 Appendix 39 Digital frame specifications 39 Important safety instructions 40 Upgrading your software and firmware 40 Additional care and maintenance 41 Limited warranty 41 Regulatory compliance and advisory 43 iv www.kodak.com/go/support
Table of contents Changing frame settings 29 Settings menus 29 Upgrading your firmware (recommended 32 Maintaining your frame 33 Learning more about your frame 33 5 Troubleshooting and support 34 Picture frame problems 34 Screen messages 37 6 Appendix 39 Digital frame specifications 39 Important safety instructions 40 Upgrading your software and firmware 40 Additional care and maintenance 41 Limited warranty 41 Regulatory compliance and advisory 43 iv www.kodak.com/go/support
User Manual
Page 7
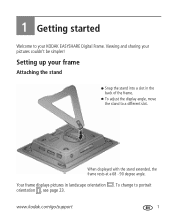
www.kodak.com/go/support 1 To adjust the display angle, move the stand to portrait orientation , see page 23. Your frame displays pictures in the back of the frame. Viewing and sharing your frame Attaching the stand Snap the stand into a slot in landscape orientation . Setting up your pictures couldn't be simpler! To change to a different slot. When displayed with the stand extended, the frame rests at a 68 - 90 degree angle. 1 Getting started Welcome to your KODAK EASYSHARE Digital Frame.
www.kodak.com/go/support 1 To adjust the display angle, move the stand to portrait orientation , see page 23. Your frame displays pictures in the back of the frame. Viewing and sharing your frame Attaching the stand Snap the stand into a slot in landscape orientation . Setting up your pictures couldn't be simpler! To change to a different slot. When displayed with the stand extended, the frame rests at a 68 - 90 degree angle. 1 Getting started Welcome to your KODAK EASYSHARE Digital Frame.

User Manual
Page 15
See Adding a new standard picture frame, page 24. www.kodak.com/go/support 9 Attaching the included faceplate Getting started To attach To remove You can also personalize your KODAK EASYSHARE Digital Frame by putting a standard picture frame over the digital frame's panel.
See Adding a new standard picture frame, page 24. www.kodak.com/go/support 9 Attaching the included faceplate Getting started To attach To remove You can also personalize your KODAK EASYSHARE Digital Frame by putting a standard picture frame over the digital frame's panel.

User Manual
Page 18
... source play one at a time (see page 13). Mode button Single picture (default) Collage (6 pictures) Calendar/picture Clock/picture Viewing Modes Pictures (default)-the pictures in your current picture source play on one side of the screen, while the pictures in your frame: Pictures & Videos, Collage, Clock, and Calendar. Clock-a clock with today's date highlighted is displayed on the screen (see page 11). Changing viewing modes Press the Mode button for quick access to the next mode. Viewing pictures ■ You can change modes. See Changing frame settings, page...
... source play one at a time (see page 13). Mode button Single picture (default) Collage (6 pictures) Calendar/picture Clock/picture Viewing Modes Pictures (default)-the pictures in your current picture source play on one side of the screen, while the pictures in your frame: Pictures & Videos, Collage, Clock, and Calendar. Clock-a clock with today's date highlighted is displayed on the screen (see page 11). Changing viewing modes Press the Mode button for quick access to the next mode. Viewing pictures ■ You can change modes. See Changing frame settings, page...
User Manual
Page 25
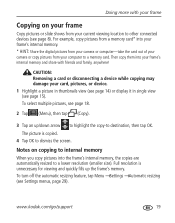
...: Share the digital pictures from your camera or computer-take the card out of your camera or copy pictures from your frame's internal memory and share with your frame Copying on copying to internal memory When you copy pictures into your current viewing location to other connected devices (see page 15). The picture is unnecessary for viewing and quickly fills up /down arrow to highlight the copy-to a memory card. To turn off the automatic resizing feature, tap Menu →Settings...
...: Share the digital pictures from your camera or computer-take the card out of your camera or copy pictures from your frame's internal memory and share with your frame Copying on copying to internal memory When you copy pictures into your current viewing location to other connected devices (see page 15). The picture is unnecessary for viewing and quickly fills up /down arrow to highlight the copy-to a memory card. To turn off the automatic resizing feature, tap Menu →Settings...

User Manual
Page 27
... www.kodak.com/go /support 21 www.kodak.com/go /register. Download EASYSHARE Digital Display Software Download and install the latest version of a multimedia slide show (if included) do not support audio or video playback. NOTE: D830/D1030 Digital Frames do not play on your frame. Then copy the slide show to create a multimedia slide show (WINDOWS OS only). Doing more with your frame Creating and playing a multimedia slide show Use KODAK EASYSHARE Digital Display Software on your...
... www.kodak.com/go /support 21 www.kodak.com/go /register. Download EASYSHARE Digital Display Software Download and install the latest version of a multimedia slide show (if included) do not support audio or video playback. NOTE: D830/D1030 Digital Frames do not play on your frame. Then copy the slide show to create a multimedia slide show (WINDOWS OS only). Doing more with your frame Creating and playing a multimedia slide show Use KODAK EASYSHARE Digital Display Software on your...
User Manual
Page 30
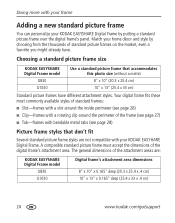
... KODAK EASYSHARE Digital Frame by choosing from the thousands of standard picture frames on the market, even a favorite you might already have different attachment styles. Choosing a standard picture frame size KODAK EASYSHARE Digital Frame model D830 D1030 Use a standard picture frame that don't fit Several standard picture frame styles are : KODAK EASYSHARE Digital Frame model D830 D1030 Digital frame's attachment area dimensions 8" x 10" x 0.165" deep (20.3 x 25.4 x .4 cm) 10" x 13" x 0.165" deep (25.4 x 33 x .4 cm) 24 www.kodak.com/go/support A compatible...
... KODAK EASYSHARE Digital Frame by choosing from the thousands of standard picture frames on the market, even a favorite you might already have different attachment styles. Choosing a standard picture frame size KODAK EASYSHARE Digital Frame model D830 D1030 Use a standard picture frame that don't fit Several standard picture frame styles are : KODAK EASYSHARE Digital Frame model D830 D1030 Digital frame's attachment area dimensions 8" x 10" x 0.165" deep (20.3 x 25.4 x .4 cm) 10" x 13" x 0.165" deep (25.4 x 33 x .4 cm) 24 www.kodak.com/go/support A compatible...
User Manual
Page 31
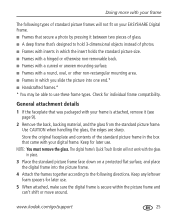
www.kodak.com/go/support 25 Doing more with your frame The following directions. Keep for later use. 5 When attached, make sure the digital frame is attached, remove it (see page 9). 2 Remove the back, backing material, and the glass from the standard picture frame. Keep any leftover foam spacers for later use these frame types. The digital frame's Quick Touch Border will not fit on a protected flat surface...
www.kodak.com/go/support 25 Doing more with your frame The following directions. Keep for later use. 5 When attached, make sure the digital frame is attached, remove it (see page 9). 2 Remove the back, backing material, and the glass from the standard picture frame. Keep any leftover foam spacers for later use these frame types. The digital frame's Quick Touch Border will not fit on a protected flat surface...
User Manual
Page 32
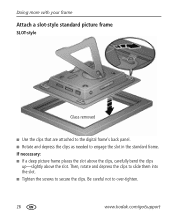
Then, rotate and depress the clips to slide them into the slot. ■ Tighten the screws to over-tighten. 26 www.kodak.com/go/support Be careful not to secure the clips. Doing more with your frame Attach a slot-style standard picture frame SLOT-style Glass removed ■ Use the clips that are attached to the digital frame's back panel. ■ Rotate and depress the clips as needed to engage the slot in the standard frame. If necessary: ■ If a deep picture frame places the slot above the clips, carefully bend the clips up-slightly above the slot.
Then, rotate and depress the clips to slide them into the slot. ■ Tighten the screws to over-tighten. 26 www.kodak.com/go/support Be careful not to secure the clips. Doing more with your frame Attach a slot-style standard picture frame SLOT-style Glass removed ■ Use the clips that are attached to the digital frame's back panel. ■ Rotate and depress the clips as needed to engage the slot in the standard frame. If necessary: ■ If a deep picture frame places the slot above the clips, carefully bend the clips up-slightly above the slot.
User Manual
Page 33
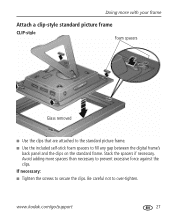
If necessary: ■ Tighten the screws to over-tighten. Be careful not to secure the clips. Avoid adding more with your frame Attach a clip-style standard picture frame CLIP-style Foam spacers Glass removed ■ Use the clips that are attached to the standard picture frame. ■ Use the included self-stick foam spacers to prevent excessive force against the clips. www.kodak.com/go/support 27 Stack the spacers if necessary. Doing more spacers than necessary to fill any gap between the digital frame's back panel and the clips on the standard frame.
If necessary: ■ Tighten the screws to over-tighten. Be careful not to secure the clips. Avoid adding more with your frame Attach a clip-style standard picture frame CLIP-style Foam spacers Glass removed ■ Use the clips that are attached to the standard picture frame. ■ Use the included self-stick foam spacers to prevent excessive force against the clips. www.kodak.com/go/support 27 Stack the spacers if necessary. Doing more spacers than necessary to fill any gap between the digital frame's back panel and the clips on the standard frame.
User Manual
Page 34
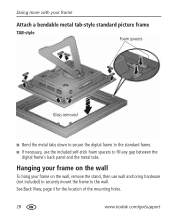
... www.kodak.com/go/support Doing more with your frame on the wall, remove the stand, then use the included self-stick foam spacers to the wall. Hanging your frame on the wall To hang your frame Attach a bendable metal tab-style standard picture frame TAB-style Foam spacers Glass removed ■ Bend the metal tabs down to secure the digital frame to...
... www.kodak.com/go/support Doing more with your frame on the wall, remove the stand, then use the included self-stick foam spacers to the wall. Hanging your frame on the wall To hang your frame Attach a bendable metal tab-style standard picture frame TAB-style Foam spacers Glass removed ■ Bend the metal tabs down to secure the digital frame to...
User Manual
Page 35
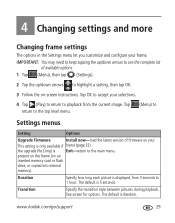
...-screen instructions. IMPORTANT: You may need to keep tapping the up/down arrows to see the complete list of available options. 1 Tap (Menu), then tap (Settings). 2 Tap the up/down arrows to Settings menus Setting Options Upgrade Firmware Install now-load the latest version of firmware on an inserted memory card or flash drive, or copied into internal memory). present on the frame (on your frame. Duration Specify how long each picture...
...-screen instructions. IMPORTANT: You may need to keep tapping the up/down arrows to see the complete list of available options. 1 Tap (Menu), then tap (Settings). 2 Tap the up/down arrows to Settings menus Setting Options Upgrade Firmware Install now-load the latest version of firmware on an inserted memory card or flash drive, or copied into internal memory). present on the frame (on your frame. Duration Specify how long each picture...

User Manual
Page 37
Display Picture Order By Old to old-start play with the oldest file date. Specify the order in random order, regardless of this frame Check your pictures-by date or A - file name. Fit-show the whole picture. play alphabetically from A to A. Z-start play in which to New to new (default)-start play your frame model, serial number, and firmware version. NOTE: If Shuffle is On, pictures play alphabetically from Z to Z. Clock & Date See Setting the clock, date, and...
Display Picture Order By Old to old-start play with the oldest file date. Specify the order in random order, regardless of this frame Check your pictures-by date or A - file name. Fit-show the whole picture. play alphabetically from A to A. Z-start play in which to New to new (default)-start play your frame model, serial number, and firmware version. NOTE: If Shuffle is On, pictures play alphabetically from Z to Z. Clock & Date See Setting the clock, date, and...
User Manual
Page 42
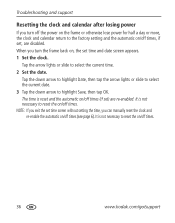
... Save, then tap OK. It is not necessary to reset the on/off times. 36 www.kodak.com/go/support It is reset and the automatic on/off times, if set, are re-enabled. The time is not necessary to the factory setting and the automatic on/off times (if set time and date screen appears. 1 Set the clock. Troubleshooting and support Resetting the clock and calendar after losing power If you can manually reset...
... Save, then tap OK. It is not necessary to reset the on/off times. 36 www.kodak.com/go/support It is reset and the automatic on/off times, if set, are re-enabled. The time is not necessary to the factory setting and the automatic on/off times (if set time and date screen appears. 1 Set the clock. Troubleshooting and support Resetting the clock and calendar after losing power If you can manually reset...

User Manual
Page 45
... AC 50/60 Hz. MS (MEMORY STICK); 6 Appendix Digital frame specifications For more specifications, visit www.kodak.com/go /support 39 Output: 5V DC 2.0 Amp Communication with USB devices USB High Speed Type A Other features Picture formats JPEG, EXIF 2.2 Memory cards see page 8 Temperature Top card slot: SD/SDHC (SECURE DIGITAL/SECURE DIGITAL High Capacity); XD Bottom card slot: MS (MEMORY STICK) Pro/Pro Duo Operating: 32 to 122°...
... AC 50/60 Hz. MS (MEMORY STICK); 6 Appendix Digital frame specifications For more specifications, visit www.kodak.com/go /support 39 Output: 5V DC 2.0 Amp Communication with USB devices USB High Speed Type A Other features Picture formats JPEG, EXIF 2.2 Memory cards see page 8 Temperature Top card slot: SD/SDHC (SECURE DIGITAL/SECURE DIGITAL High Capacity); XD Bottom card slot: MS (MEMORY STICK) Pro/Pro Duo Operating: 32 to 122°...

User Manual
Page 46
... service personnel. there are intended for upgrading firmware. 40 www.kodak.com/go/support Use of the KODAK EASYSHARE Software and the frame firmware- Upgrading your warranties. ■ When displayed with your frame. Refer servicing to the latest versions of other than those specified herein may result in .) Weight D830: 843 gm (1.9 lb.) includes frame, stand, and AC adapter (w/o faceplate) D1030: 1227 gm (2.6 lb.) includes frame, stand, and AC adapter Important safety instructions...
... service personnel. there are intended for upgrading firmware. 40 www.kodak.com/go/support Use of the KODAK EASYSHARE Software and the frame firmware- Upgrading your warranties. ■ When displayed with your frame. Refer servicing to the latest versions of other than those specified herein may result in .) Weight D830: 843 gm (1.9 lb.) includes frame, stand, and AC adapter (w/o faceplate) D1030: 1227 gm (2.6 lb.) includes frame, stand, and AC adapter Important safety instructions...
User Manual
Page 47
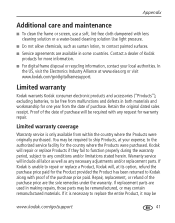
... the purchase price are used in making repairs, those parts may be remanufactured, or may be free from malfunctions and defects in some countries. Kodak will include all labor as well as suntan lotion, to any necessary adjustments and/or replacement parts. Appendix Additional care and maintenance ■ To clean the frame or screen, use a soft, lint-free cloth dampened with lens...
... the purchase price are used in making repairs, those parts may be remanufactured, or may be free from malfunctions and defects in some countries. Kodak will include all labor as well as suntan lotion, to any necessary adjustments and/or replacement parts. Appendix Additional care and maintenance ■ To clean the frame or screen, use a soft, lint-free cloth dampened with lens...
User Manual
Page 53
... mode, 13 www.kodak.com/go/support 1 copying automatic resizing, 19, 30 from computer, camera, 19 to frame's internal memory, 19 D default play location, saving, 15 delete pictures, 20 display picture order by, 31 display pictures, fit/fill, 31 disposal, recycling, 41 download, EASYSHARE Digital Display Software, 21 duration, picture display, 29 E EASYSHARE Digital Display Software create slide show, 21 download, install, 21 error messages, 37 F faceplate, attaching, 9 file formats, pictures, 39 firmware, upgrading, 29, 32, 40 fit or fill display, 31 flash drive, connecting, 8 format cards...
... mode, 13 www.kodak.com/go/support 1 copying automatic resizing, 19, 30 from computer, camera, 19 to frame's internal memory, 19 D default play location, saving, 15 delete pictures, 20 display picture order by, 31 display pictures, fit/fill, 31 disposal, recycling, 41 download, EASYSHARE Digital Display Software, 21 duration, picture display, 29 E EASYSHARE Digital Display Software create slide show, 21 download, install, 21 error messages, 37 F faceplate, attaching, 9 file formats, pictures, 39 firmware, upgrading, 29, 32, 40 fit or fill display, 31 flash drive, connecting, 8 format cards...
User Manual
Page 54
... deleting, 20 display order, 11 location, viewing, 11 selecting more than one, 18 thumbnails, 14 viewing single, 15 pictures menu, 11, 16 play location, default, 15 portrait, set orientation, 23 www.kodak.com/go -to play location, 15 H help frame, 34 support URLs, 33 troubleshooting and support, 34 I installing EASYSHARE Digital Display Software, 21 included faceplate, 9 memory cards, 8 standard picture frame, 24 internal memory capacity, 39 copying to, 19 K KODAK PERFECT TOUCH Technology, 31 L landscape, set orientation, 23 language, setting, 6 locked screen, reset...
... deleting, 20 display order, 11 location, viewing, 11 selecting more than one, 18 thumbnails, 14 viewing single, 15 pictures menu, 11, 16 play location, default, 15 portrait, set orientation, 23 www.kodak.com/go -to play location, 15 H help frame, 34 support URLs, 33 troubleshooting and support, 34 I installing EASYSHARE Digital Display Software, 21 included faceplate, 9 memory cards, 8 standard picture frame, 24 internal memory capacity, 39 copying to, 19 K KODAK PERFECT TOUCH Technology, 31 L landscape, set orientation, 23 language, setting, 6 locked screen, reset...

User Manual
Page 55
... timer, auto on frame, 3 U upgrading 49 power button, i, 3 connecting, 2 specifications, 39 Q quick touch border, 4 R recycling, disposal, 41 regulatory compliance, 43 reset frame, 35 S safety information, 40 screen cleaning, 33, 41 error messages, 37 selecting menus and pictures, 4 multiple pictures, 18 setting auto on/off , 7 transition, setting, 29 troubleshooting error messages, 37 frame, 34 turn on /off , 7 clock after losing power, 36 settings, 29 about this frame, 31 automatic resizing, 30 brightness, 30 clock and timer, 6 display picture order...
... timer, auto on frame, 3 U upgrading 49 power button, i, 3 connecting, 2 specifications, 39 Q quick touch border, 4 R recycling, disposal, 41 regulatory compliance, 43 reset frame, 35 S safety information, 40 screen cleaning, 33, 41 error messages, 37 selecting menus and pictures, 4 multiple pictures, 18 setting auto on/off , 7 transition, setting, 29 troubleshooting error messages, 37 frame, 34 turn on /off , 7 clock after losing power, 36 settings, 29 about this frame, 31 automatic resizing, 30 brightness, 30 clock and timer, 6 display picture order...


