

User's Guide
Page 1
Kodak EasyShare CX6445 zoom digital camera Simulated image User's Guide www.kodak.com For interactive tutorials, www.kodak.com/go/howto
Kodak EasyShare CX6445 zoom digital camera Simulated image User's Guide www.kodak.com For interactive tutorials, www.kodak.com/go/howto

User's Guide
Page 4
Back View Product Overview 7 8 9 10 11 6 12 5 13 14 4 32 1 1 Camera screen (LCD, liquid crystal display) 7 Ready light 8 Viewfinder 2 Share button (page 55) 9 Self Timer/Burst button 3 Mode dial/Off (page 16, page 5) 10 Flash/Status button 4 Joystick (Move OK button (Press in) ) 11 Zoom (Wide Angle/Telephoto) 12 Grip 5 Delete button 13 Menu button 6 Diopter dial 14 Review button ii
Back View Product Overview 7 8 9 10 11 6 12 5 13 14 4 32 1 1 Camera screen (LCD, liquid crystal display) 7 Ready light 8 Viewfinder 2 Share button (page 55) 9 Self Timer/Burst button 3 Mode dial/Off (page 16, page 5) 10 Flash/Status button 4 Joystick (Move OK button (Press in) ) 11 Zoom (Wide Angle/Telephoto) 12 Grip 5 Delete button 13 Menu button 6 Diopter dial 14 Review button ii
User's Guide
Page 7
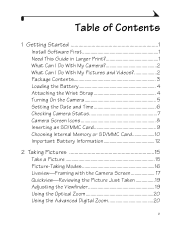
... Internal Memory or SD/MMC Card 10 Important Battery Information 12 2 Taking Pictures 15 Take a Picture 15 Picture-Taking Modes 16 Liveview-Framing with the Camera Screen 17 Quickview-Reviewing the Picture Just Taken 19 Adjusting the Viewfinder 19 Using the Optical Zoom 20 Using the Advanced Digital Zoom 20 v
... Internal Memory or SD/MMC Card 10 Important Battery Information 12 2 Taking Pictures 15 Take a Picture 15 Picture-Taking Modes 16 Liveview-Framing with the Camera Screen 17 Quickview-Reviewing the Picture Just Taken 19 Adjusting the Viewfinder 19 Using the Optical Zoom 20 Using the Advanced Digital Zoom 20 v

User's Guide
Page 8
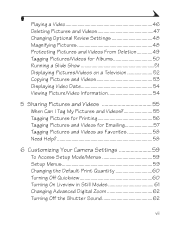
... Date on Pictures 36 Setting the Orientation Sensor 37 3 Taking Videos 39 Taking a Video 39 Quickview-Reviewing the Video Just Taken 40 Using the Optical Zoom 41 Changing Optional Video Settings 41 Pre-tagging for Album Names 42 Putting Yourself in the Video 43 4 Reviewing Pictures and Videos 45 Viewing Single...
... Date on Pictures 36 Setting the Orientation Sensor 37 3 Taking Videos 39 Taking a Video 39 Quickview-Reviewing the Video Just Taken 40 Using the Optical Zoom 41 Changing Optional Video Settings 41 Pre-tagging for Album Names 42 Putting Yourself in the Video 43 4 Reviewing Pictures and Videos 45 Viewing Single...
User's Guide
Page 9
... 55 Tagging Pictures for Printing 56 Tagging Pictures and Videos for Emailing 57 Tagging Pictures and Videos as Favorites 58 Need Help 58 6 Customizing Your Camera Settings 59 To Access Setup Mode/Menus 59 Setup Menus 59 Changing the Default Print Quantity 60 Turning Off Quickview 60 Turning On Liveview in...
... 55 Tagging Pictures for Printing 56 Tagging Pictures and Videos for Emailing 57 Tagging Pictures and Videos as Favorites 58 Need Help 58 6 Customizing Your Camera Settings 59 To Access Setup Mode/Menus 59 Setup Menus 59 Changing the Default Print Quantity 60 Turning Off Quickview 60 Turning On Liveview in...

User's Guide
Page 19
... settings. More settings delete share EasyShare CX6445 menu review ! Press the Shutter button halfway down when Liveview is displayed in the bottom half of the icons. Current aperture, shutter speed, and digital zoom values are displayed in the status... area, press the Flash/Status button to redisplay the status information area at any time. Other icons temporarily disappear. 7 Mode icon delete share EasyShare CX6445 menu review ! To check the current camera settings: Mode dial ! delete share EasyShare CX6445...
... settings. More settings delete share EasyShare CX6445 menu review ! Press the Shutter button halfway down when Liveview is displayed in the bottom half of the icons. Current aperture, shutter speed, and digital zoom values are displayed in the status... area, press the Flash/Status button to redisplay the status information area at any time. Other icons temporarily disappear. 7 Mode icon delete share EasyShare CX6445 menu review ! To check the current camera settings: Mode dial ! delete share EasyShare CX6445...

User's Guide
Page 20
... Flash** Battery power TRIP+ Album name Long time exposure Low Exhausted 072 Pictures remaining Date stamp Digital zoom Custom (When is displayed in the status area, it means there are active. Capture Modes (also on your camera screen when the settings are additional settings. Press the Flash button to display them.) Exposure Compensation...
... Flash** Battery power TRIP+ Album name Long time exposure Low Exhausted 072 Pictures remaining Date stamp Digital zoom Custom (When is displayed in the status area, it means there are active. Capture Modes (also on your camera screen when the settings are additional settings. Press the Flash button to display them.) Exposure Compensation...

User's Guide
Page 28
... the subject. For best results, fill the frame with sound. Auto focus framing marks (see page 18) are in Landscape. Use the camera screen to stay still for a few seconds after the flash fires. Subjects that suits your conditions. Portrait Full-frame portraits of flash if possible.... Use the Telephoto (T) zoom button to be sharp and the background to exaggerate background blur. Flash does not fire unless you turn it on a flat, steady surface or...
... the subject. For best results, fill the frame with sound. Auto focus framing marks (see page 18) are in Landscape. Use the camera screen to stay still for a few seconds after the flash fires. Subjects that suits your conditions. Portrait Full-frame portraits of flash if possible.... Use the Telephoto (T) zoom button to be sharp and the background to exaggerate background blur. Flash does not fire unless you turn it on a flat, steady surface or...

User's Guide
Page 32
... to your subject. Release the button, then press it again. NOTE: You can change the way the digital zoom is no closer than 19.7 in 0.8 increments. You must turn off the camera. See page 62. 20 When you turn Liveview on . NOTE: The lens retracts when you turn on... the camera, the lens extends to the Wide Angle position. Press Wide Angle (W) to frame your subject. IMPORTANT: You may notice a decrease in . Press Telephoto (T) to zoom in printed image quality when using Digital Zoom. 1 Press the OK button to turn on Liveview. ...
... to your subject. Release the button, then press it again. NOTE: You can change the way the digital zoom is no closer than 19.7 in 0.8 increments. You must turn off the camera. See page 62. 20 When you turn Liveview on . NOTE: The lens retracts when you turn on... the camera, the lens extends to the Wide Angle position. Press Wide Angle (W) to frame your subject. IMPORTANT: You may notice a decrease in . Press Telephoto (T) to zoom in printed image quality when using Digital Zoom. 1 Press the OK button to turn on Liveview. ...

User's Guide
Page 51
... Self Timer/Video light stays on the camera screen. 2 Use the viewfinder or camera screen to Video . To stop recording, press the Shutter button again. Taking a Video Ready light delete share EasyShare CX6445 1 Turn the Mode dial to menu frame your picture storage location is set Optical Zoom before, but not during, video recording. NOTE...
... Self Timer/Video light stays on the camera screen. 2 Use the viewfinder or camera screen to Video . To stop recording, press the Shutter button again. Taking a Video Ready light delete share EasyShare CX6445 1 Turn the Mode dial to menu frame your picture storage location is set Optical Zoom before, but not during, video recording. NOTE...

User's Guide
Page 53
...settings. Changing Optional Video Settings In Video mode, press the Menu button to zoom out. NOTE: You can change Optical Zoom before (but not during) video recording. The lens extends or retracts. When you turn on the camera, the lens is set to take the video. Wide Angle 1 Use ... Image Storage (page 10) Album (page 42) Setup Menu (page 59) 41 Chapter 3 Using the Optical Zoom Use Optical Zoom to get up to 4X closer to your subject. 2 Press Telephoto (T) to zoom in. The viewfinder or camera screen displays the zoomed image. 3 Press the Shutter button to the Wide Angle position.
...settings. Changing Optional Video Settings In Video mode, press the Menu button to zoom out. NOTE: You can change Optical Zoom before (but not during) video recording. The lens extends or retracts. When you turn on the camera, the lens is set to take the video. Wide Angle 1 Use ... Image Storage (page 10) Album (page 42) Setup Menu (page 59) 41 Chapter 3 Using the Optical Zoom Use Optical Zoom to get up to 4X closer to your subject. 2 Press Telephoto (T) to zoom in. The viewfinder or camera screen displays the zoomed image. 3 Press the Shutter button to the Wide Angle position.

User's Guide
Page 71
To Access Setup Mode/Menus 1 In any mode (including Review), press the Menu button. 2 Press to your preferences. 6 Customizing Your Camera Settings Use Setup to customize camera settings according to highlight Setup , then press the OK button. Setup Menus Return to previous menu Date & Time Set (page 6) Default Print Quantity (page 60) Quickview (page 60) Video Out (page 63) Language (page 63) Liveview (page 61) Format (page 64) Advanced Digital Zoom (page 62) Shutter Sound (page 62) About (page 64) 59
To Access Setup Mode/Menus 1 In any mode (including Review), press the Menu button. 2 Press to your preferences. 6 Customizing Your Camera Settings Use Setup to customize camera settings according to highlight Setup , then press the OK button. Setup Menus Return to previous menu Date & Time Set (page 6) Default Print Quantity (page 60) Quickview (page 60) Video Out (page 63) Language (page 63) Liveview (page 61) Format (page 64) Advanced Digital Zoom (page 62) Shutter Sound (page 62) About (page 64) 59

User's Guide
Page 74
... to highlight Off, then press the OK button. Chapter 6 Changing Advanced Digital Zoom 1 Press the Menu button. 2 Press to highlight Setup , then press the OK button. 3 Press Zoom to highlight Advanced Digital , then press the OK button. 4 Press to highlight an option: Continuous-digital zoom automatically turns on after the Telephoto button is pressed to the...
... to highlight Off, then press the OK button. Chapter 6 Changing Advanced Digital Zoom 1 Press the Menu button. 2 Press to highlight Setup , then press the OK button. 3 Press Zoom to highlight Advanced Digital , then press the OK button. 4 Press to highlight an option: Continuous-digital zoom automatically turns on after the Telephoto button is pressed to the...

User's Guide
Page 84
... is included with the camera dock connector. 2 Fit the insert into place. Press in and lift. 2 Lift the side edge of the universal insert. It provides a perfect fit for your Kodak EasyShare CX6445 zoom digital camera. Connector NOTE: To order a custom insert for your camera, visit www.kodak.com/go/cx6445accessories. 72 It allows all Kodak EasyShare CX/DX6000/7000 series...
... is included with the camera dock connector. 2 Fit the insert into place. Press in and lift. 2 Lift the side edge of the universal insert. It provides a perfect fit for your Kodak EasyShare CX6445 zoom digital camera. Connector NOTE: To order a custom insert for your camera, visit www.kodak.com/go/cx6445accessories. 72 It allows all Kodak EasyShare CX/DX6000/7000 series...

User's Guide
Page 111
interline transfer CCD, 4:3 aspect ratio, RGB Bayer CFA, 4.23 M pixels (2408 x 1758 pixels) 99 EasyShare camera dock 6000; or printer dock 6000 Dimensions Width Depth 4.3 in. (109 mm) 1.5 in. (38 mm) Height 2.5 in... ft (0.5-5.1 m) f/2.4 Tele: 2.5-8.5 ft (0.75-2.6 m) f/4.8 Charging Time Less than 9.0 seconds with computer USB, via: USB cable; 12 Appendix Camera Specifications Kodak EasyShare CX6445 zoom digital camera Color 24-bit, millions of colors Color modes Color, black & white, sepia Communication with charged battery Focus zone Multi-zone, center zone Image sensor...
interline transfer CCD, 4:3 aspect ratio, RGB Bayer CFA, 4.23 M pixels (2408 x 1758 pixels) 99 EasyShare camera dock 6000; or printer dock 6000 Dimensions Width Depth 4.3 in. (109 mm) 1.5 in. (38 mm) Height 2.5 in... ft (0.5-5.1 m) f/2.4 Tele: 2.5-8.5 ft (0.75-2.6 m) f/4.8 Charging Time Less than 9.0 seconds with computer USB, via: USB cable; 12 Appendix Camera Specifications Kodak EasyShare CX6445 zoom digital camera Color 24-bit, millions of colors Color modes Color, black & white, sepia Communication with charged battery Focus zone Multi-zone, center zone Image sensor...

User's Guide
Page 112
Chapter 12 Kodak EasyShare CX6445 zoom digital camera ISO speed Automatic 100 to 200 Manual 100, 200, or 400 Long time exposure 100 Flash 120 or 180 (Automatic) Video 100 to 85 cm) Landscape: Fixed focus Liquid Crystal Display, LCD (Camera screen) Operating Temperature 1.8 in. (45.7 mm), color, 560 x 240 (134k) pixels. f/13 Focal Length 33 - 132 mm...
Chapter 12 Kodak EasyShare CX6445 zoom digital camera ISO speed Automatic 100 to 200 Manual 100, 200, or 400 Long time exposure 100 Flash 120 or 180 (Automatic) Video 100 to 85 cm) Landscape: Fixed focus Liquid Crystal Display, LCD (Camera screen) Operating Temperature 1.8 in. (45.7 mm), color, 560 x 240 (134k) pixels. f/13 Focal Length 33 - 132 mm...

User's Guide
Page 113
... Close-up Wide: 1/2200-1/60 sec., Tele: 1/2200-1/125 sec. Chapter 12 Kodak EasyShare CX6445 zoom digital camera Power Battery: CRV3 (included), 2-AA lithium, 2-AA Ni-MH, Ni-MH rechargeable battery pack (included with camera dock 6000 and printer dock 6000) AC adapter: 3V DC (purchase separately) Self ... x 240 pixels, 15 fps Viewfinder Optical, with diopter adjustment White balance Auto, Daylight, Tungsten, Fluorescent Zoom (still capture) 4X optical, 3.8X digital Shutter Speeds For shutter speeds slower than 1/30 second, place the camera on a flat, steady surface or use a tripod.
... Close-up Wide: 1/2200-1/60 sec., Tele: 1/2200-1/125 sec. Chapter 12 Kodak EasyShare CX6445 zoom digital camera Power Battery: CRV3 (included), 2-AA lithium, 2-AA Ni-MH, Ni-MH rechargeable battery pack (included with camera dock 6000 and printer dock 6000) AC adapter: 3V DC (purchase separately) Self ... x 240 pixels, 15 fps Viewfinder Optical, with diopter adjustment White balance Auto, Daylight, Tungsten, Fluorescent Zoom (still capture) 4X optical, 3.8X digital Shutter Speeds For shutter speeds slower than 1/30 second, place the camera on a flat, steady surface or use a tripod.

User's Guide
Page 114
Chapter 12 Original Factory Settings Feature Adv. Digital Zoom initiation Color Mode Date/Time Date/Time Stamp Default Print Quantity Exposure Compensation Exposure Metering Mode Flash Focus Zone Image Storage ISO Speed Language Liveview Long Time Exposure Orientation Sensor Picture Quality Quickview Set Album (Still) Shutter Sound Slide Show Interval Slide Show Loop Factory Setting Pause Color 2003/01/01; 12:00 Off 1 0.0 Multi-pattern Auto, Sport, Portrait, Night: Auto Landscape, Close-up, Video, Burst: Off Multi-zone Auto Auto English Off None On Best On Off On 5 seconds Off 102
Chapter 12 Original Factory Settings Feature Adv. Digital Zoom initiation Color Mode Date/Time Date/Time Stamp Default Print Quantity Exposure Compensation Exposure Metering Mode Flash Focus Zone Image Storage ISO Speed Language Liveview Long Time Exposure Orientation Sensor Picture Quality Quickview Set Album (Still) Shutter Sound Slide Show Interval Slide Show Loop Factory Setting Pause Color 2003/01/01; 12:00 Off 1 0.0 Multi-pattern Auto, Sport, Portrait, Night: Auto Landscape, Close-up, Video, Burst: Off Multi-zone Auto Auto English Off None On Best On Off On 5 seconds Off 102

User's Guide
Page 118
For more information, refer to use the card in a camera other than the Kodak EasyShare CX6445 zoom digital camera, and that camera manufacturer adheres to the left of the last picture taken by 1. the highest number allowed is named 100_0001.JPG; The first picture ...highest existing picture number in the file name. When a burst series is initiated or ended, the second digit to this file structure standard, the \DCIM folder contains a folder named by that camera. When a card contains a picture named 100_9999.JPG in the \DCIM\100K6445 folder, subsequent pictures appear in...
For more information, refer to use the card in a camera other than the Kodak EasyShare CX6445 zoom digital camera, and that camera manufacturer adheres to the left of the last picture taken by 1. the highest number allowed is named 100_0001.JPG; The first picture ...highest existing picture number in the file name. When a burst series is initiated or ended, the second digit to this file structure standard, the \DCIM folder contains a folder named by that camera. When a card contains a picture named 100_9999.JPG in the \DCIM\100K6445 folder, subsequent pictures appear in...

User's Guide
Page 120
... radio or television reception, which the receiver is encouraged to try to correct the interference by the party responsible for a Class B digital device, pursuant to comply with Canadian ICES-003. Observation des normes-Class B-Cet appareil numérique de la classe B est... from that interference will not occur in accordance with FCC Standards. Chapter 12 FCC Compliance and Advisory Kodak EasyShare CX6445 zoom digital camera Tested to comply with the instructions, may cause harmful interference to radio communications. Canadian DOC Statement DOC Class B Compliance-This Class...
... radio or television reception, which the receiver is encouraged to try to correct the interference by the party responsible for a Class B digital device, pursuant to comply with Canadian ICES-003. Observation des normes-Class B-Cet appareil numérique de la classe B est... from that interference will not occur in accordance with FCC Standards. Chapter 12 FCC Compliance and Advisory Kodak EasyShare CX6445 zoom digital camera Tested to comply with the instructions, may cause harmful interference to radio communications. Canadian DOC Statement DOC Class B Compliance-This Class...


