User Guide
Page 3
... You Begin ...1-1 Recommended Air Flow Clearances ...1-1 Loading the Paper ...1-2 Loading the Ribbon...1-6 Installing the Print Catcher...1-7 Connecting the Cables ...1-8 Connecting the power cable ...1-8 Connecting the USB cable...1-8 Turning On the Printer...1-9 2 Printer Driver Software Installing the Printer Driver...2-2 Borderless Printing ...2-2 Customizing Printer Properties...2-3 Customizing Printing Preferences...2-3 Color Management using ADOBE PHOTOSHOP 7.0 or Greater 2-4 Custom Image Composition...
... You Begin ...1-1 Recommended Air Flow Clearances ...1-1 Loading the Paper ...1-2 Loading the Ribbon...1-6 Installing the Print Catcher...1-7 Connecting the Cables ...1-8 Connecting the power cable ...1-8 Connecting the USB cable...1-8 Turning On the Printer...1-9 2 Printer Driver Software Installing the Printer Driver...2-2 Borderless Printing ...2-2 Customizing Printer Properties...2-3 Customizing Printing Preferences...2-3 Color Management using ADOBE PHOTOSHOP 7.0 or Greater 2-4 Custom Image Composition...

User Guide
Page 4
Table of Contents Changing the quantity of test prints...4-3 5 Using the Diagnostic Tool Adjusting Print Head and Paper Cutter Registration 5-1 Updating Firmware...5-4 6 Troubleshooting the Printer Appendix A: Important Printer Information Printer Specifications ...A-1 ENERGY STAR Partner...A-1 Appendix B: Safety and Regulatory Information Important Safety Information ...B-1 Safety Labels...B-2 Regulatory and Safety Compliance...B-2 Safety ...B-2 Radio frequency interference ...B-2 Noise emission...B-3 Disposal ...B-3 iv
Table of Contents Changing the quantity of test prints...4-3 5 Using the Diagnostic Tool Adjusting Print Head and Paper Cutter Registration 5-1 Updating Firmware...5-4 6 Troubleshooting the Printer Appendix A: Important Printer Information Printer Specifications ...A-1 ENERGY STAR Partner...A-1 Appendix B: Safety and Regulatory Information Important Safety Information ...B-1 Safety Labels...B-2 Regulatory and Safety Compliance...B-2 Safety ...B-2 Radio frequency interference ...B-2 Noise emission...B-3 Disposal ...B-3 iv

User Guide
Page 5
... air flow clearances for your country. 1 Setting Up the Printer Before You Begin IMPORTANT: Your KODAK PROFESSIONAL 9810 Digital Photo Printer may come with several power cables. IMPORTANT: Install the printer driver software before you begin your printer setup: • A KODAK Photo Print Kit that contains the correct size paper and ribbon for the printer. 102 mm (4.0 in.) 102 mm (4.0 in.) 102 mm...
... air flow clearances for your country. 1 Setting Up the Printer Before You Begin IMPORTANT: Your KODAK PROFESSIONAL 9810 Digital Photo Printer may come with several power cables. IMPORTANT: Install the printer driver software before you begin your printer setup: • A KODAK Photo Print Kit that contains the correct size paper and ribbon for the printer. 102 mm (4.0 in.) 102 mm (4.0 in.) 102 mm...
User Guide
Page 6
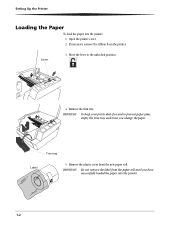
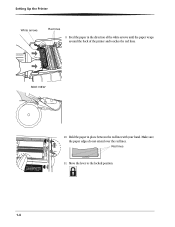
Trim tray Label 5. Open the printer cover. 2. Remove the plastic cover from the paper roll until you change the paper. Setting Up the Printer Loading the Paper To load the paper into the printer. 1-2 Lever 3. IMPORTANT: To keep your prints dust-free and to the unlocked position. 4. IMPORTANT: Do not remove the label from the new paper roll. If necessary, remove the ribbon from the printer. Move the lever to prevent paper jams, empty the trim tray each time you have successfully loaded the paper into the printer: 1. Remove the trim tray.
Trim tray Label 5. Open the printer cover. 2. Remove the plastic cover from the paper roll until you change the paper. Setting Up the Printer Loading the Paper To load the paper into the printer. 1-2 Lever 3. IMPORTANT: To keep your prints dust-free and to the unlocked position. 4. IMPORTANT: Do not remove the label from the new paper roll. If necessary, remove the ribbon from the printer. Move the lever to prevent paper jams, empty the trim tray each time you have successfully loaded the paper into the printer: 1. Remove the trim tray.
User Guide
Page 7
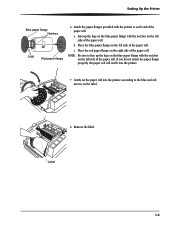
... left side of the paper roll. b. c. Gently set the paper roll into the printer. 7. Setting Up the Printer Blue paper flange Notches Lugs Red paper flange 6. NOTE: Be sure to line up the lugs on the blue paper flange with the notches on the left side of the paper roll. Remove the label... If you do not attach the paper flange properly, the paper roll will not fit into the printer according to each end of the paper roll. Place the blue paper flange on the left side of the paper roll. Attach the paper flanges provided with the printer to the blue and red arrows ...
... left side of the paper roll. b. c. Gently set the paper roll into the printer. 7. Setting Up the Printer Blue paper flange Notches Lugs Red paper flange 6. NOTE: Be sure to line up the lugs on the blue paper flange with the notches on the left side of the paper roll. Remove the label... If you do not attach the paper flange properly, the paper roll will not fit into the printer according to each end of the paper roll. Place the blue paper flange on the left side of the paper roll. Attach the paper flanges provided with the printer to the blue and red arrows ...
User Guide
Page 8
Make sure the paper edges do not extend over the red lines. SIDE VIEW 10. Red lines 11. Setting Up the Printer White arrows Red lines 9. Feed the paper in place between the red lines with your hand. Move the lever to the locked position. 1-4 Hold the paper in the direction of the white arrows until the paper wraps around the back of the printer and touches the red lines.
Make sure the paper edges do not extend over the red lines. SIDE VIEW 10. Red lines 11. Setting Up the Printer White arrows Red lines 9. Feed the paper in place between the red lines with your hand. Move the lever to the locked position. 1-4 Hold the paper in the direction of the white arrows until the paper wraps around the back of the printer and touches the red lines.

User Guide
Page 11
... right side of the take-up spool 6. Rotate the take-up spool until it by turning the take -up spool. Print catcher 1-7 Setting Up the Printer Label/wrapper 5. Take-up spool into the rear spool holder on the left side of the take -up spool into the rear spool holder on... the right. 7. Installing the Print Catcher The print catcher collects finished prints as they exit the printer. • Set the print catcher into place. 9. Place the left . 8. IMPORTANT: Slack in the ribbon, remove it locks into the...
... right side of the take-up spool 6. Rotate the take-up spool until it by turning the take -up spool. Print catcher 1-7 Setting Up the Printer Label/wrapper 5. Take-up spool into the rear spool holder on the left side of the take -up spool into the rear spool holder on... the right. 7. Installing the Print Catcher The print catcher collects finished prints as they exit the printer. • Set the print catcher into place. 9. Place the left . 8. IMPORTANT: Slack in the ribbon, remove it locks into the...
User Guide
Page 21
... Queue and resubmit, requesting Glossy ribbon. Printer Driver Software Resolving Printing Problems Errors or problems encountered while printing are displayed in the Status area of paper - If the problem persists, contact your Kodak representative for the printer to stop the job requested Glossy. Refer... to the following table to view. Wrong ribbon type, load Glossy Possible Cause Action The printer is loaded improperly.
... Queue and resubmit, requesting Glossy ribbon. Printer Driver Software Resolving Printing Problems Errors or problems encountered while printing are displayed in the Status area of paper - If the problem persists, contact your Kodak representative for the printer to stop the job requested Glossy. Refer... to the following table to view. Wrong ribbon type, load Glossy Possible Cause Action The printer is loaded improperly.
User Guide
Page 22
...- Wrong ribbon size, load 8 x 12L Possible Cause Action The printer has 8 x 10S ribbon loaded but the job requires 8 x 12L. • Wait for the printer to stop printing and become Ready. Load 8 x 12L ribbon of the proper type in the printer. • Cancel the job from the Print Queue and resubmit the... job with a smaller page size. These disappear once you are replacing or checking the paper or ribbon, the Print Queue displays an Error-Printing status and an ...
...- Wrong ribbon size, load 8 x 12L Possible Cause Action The printer has 8 x 10S ribbon loaded but the job requires 8 x 12L. • Wait for the printer to stop printing and become Ready. Load 8 x 12L ribbon of the proper type in the printer. • Cancel the job from the Print Queue and resubmit the... job with a smaller page size. These disappear once you are replacing or checking the paper or ribbon, the Print Queue displays an Error-Printing status and an ...
User Guide
Page 33
... the calibration process. The cutter did not move completely to the appropriate patch color. one side. • Check the paper path for service. barcode on page 1-2. If the problem persists, contact your Kodak representative for a jam. • Turn the printer on. The printer is closed securely. Invalid ribbon barcode type has been read the barcode...
... the calibration process. The cutter did not move completely to the appropriate patch color. one side. • Check the paper path for service. barcode on page 1-2. If the problem persists, contact your Kodak representative for a jam. • Turn the printer on. The printer is closed securely. Invalid ribbon barcode type has been read the barcode...
User Guide
Page 39
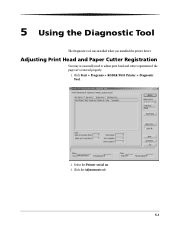
Click the Adjustments tab. 5-1 Click Start > Programs > KODAK 9810 Printer > Diagnostic Tool. 2. Select the Printer serial no. 3. 5 Using the Diagnostic Tool The Diagnostic tool was installed when you installed the printer driver. Adjusting Print Head and Paper Cutter Registration You may occasionally need to adjust print head and cutter registration if the page isn't centered properly. 1.
Click the Adjustments tab. 5-1 Click Start > Programs > KODAK 9810 Printer > Diagnostic Tool. 2. Select the Printer serial no. 3. 5 Using the Diagnostic Tool The Diagnostic tool was installed when you installed the printer driver. Adjusting Print Head and Paper Cutter Registration You may occasionally need to adjust print head and cutter registration if the page isn't centered properly. 1.
User Guide
Page 43
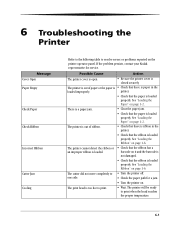
... print head is closed securely. The printer will be ready to • Turn the printer off. See "Loading the Ribbon" on the printer operator panel. If the problem persists, contact your Kodak representative for a jam. • Turn the printer on page 1-2. 6 Troubleshooting the Printer Message Cover Open Paper Empty Check Paper Check Ribbon Incorrect Ribbon Cutter Jam Cooling...
... print head is closed securely. The printer will be ready to • Turn the printer off. See "Loading the Ribbon" on the printer operator panel. If the problem persists, contact your Kodak representative for a jam. • Turn the printer on page 1-2. 6 Troubleshooting the Printer Message Cover Open Paper Empty Check Paper Check Ribbon Incorrect Ribbon Cutter Jam Cooling...
User Guide
Page 45
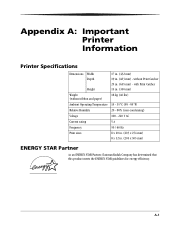
Appendix A: Important Printer Information Printer Specifications Dimensions Width Depth Height 17 in. (432 mm) 19 in . (203 x 305 mm) ENERGY STAR Partner As an ENERGY STAR Partner, Eastman Kodak Company has determined that this product meets the ENERGY STAR guidelines for energy efficiency. A-1 with Print Catcher... 13 in. (330 mm) Weight (without Print Catcher 25 in. (635 mm) - without ribbon and paper) 18 kg (40 lbs) ...
Appendix A: Important Printer Information Printer Specifications Dimensions Width Depth Height 17 in. (432 mm) 19 in . (203 x 305 mm) ENERGY STAR Partner As an ENERGY STAR Partner, Eastman Kodak Company has determined that this product meets the ENERGY STAR guidelines for energy efficiency. A-1 with Print Catcher... 13 in. (330 mm) Weight (without Print Catcher 25 in. (635 mm) - without ribbon and paper) 18 kg (40 lbs) ...
User Guide
Page 51
Index A air flow clearances, 1-1 C cables, connecting, 1-8 calibrating the printer, 3-1 calibration errors, 3-9 calibration software installing, 3-1 uninstalling, 3-8 calibration utility, using, 3-2 connecting cables, 1-8 customizing printer properties, 2-3 D diagnostic tool, 5-1 disposal, B-3 E error messages, calibration, 3-9 F firmware, updating, 5-4 H humidity, printer specifications, A-1 I installing calibration software, 3-1 paper, 1-2 printer driver, 2-2 ribbon, 1-6 L labels, safety, B-2 loading paper, 1-2 ribbon, 1-6 N noise emission spec, B-3 O operator panel error/red light, 4-1 ...
Index A air flow clearances, 1-1 C cables, connecting, 1-8 calibrating the printer, 3-1 calibration errors, 3-9 calibration software installing, 3-1 uninstalling, 3-8 calibration utility, using, 3-2 connecting cables, 1-8 customizing printer properties, 2-3 D diagnostic tool, 5-1 disposal, B-3 E error messages, calibration, 3-9 F firmware, updating, 5-4 H humidity, printer specifications, A-1 I installing calibration software, 3-1 paper, 1-2 printer driver, 2-2 ribbon, 1-6 L labels, safety, B-2 loading paper, 1-2 ribbon, 1-6 N noise emission spec, B-3 O operator panel error/red light, 4-1 ...


